Build an automated testing, continuous integration, and continuous deployment system, using Maven, Hudson, WebLogic Server, JUnit, and NetBeans. Developed with Oracle’s Pre-Built Enterprise Java Development VM. Download the complete source code from Dropbox and on GitHub.
Introduction
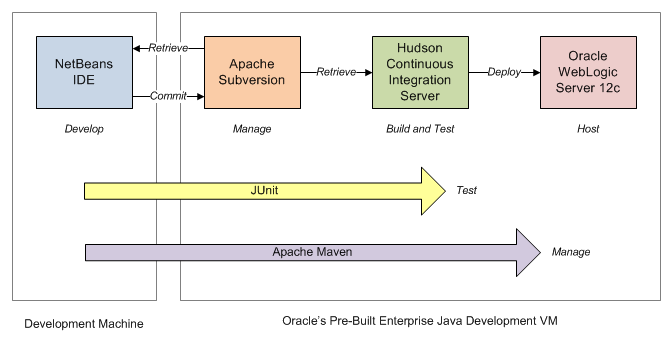
In this post, we will build a basic automated testing, continuous integration, and continuous deployment system, using Oracle’s Pre-Built Enterprise Java Development VM. The primary goal of the system is to automatically compile, test, and deploy a simple Java EE web application to a test environment. As this post will demonstrate, the key to a successful system is not a single application, but the effective integration of all the system’s applications into a well-coordinated and consistent workflow.
Building system such as this can be complex and time-consuming. However, Oracle’s Pre-Built Enterprise Java Development VM already has all the components we need. The Oracle VM includes NetBeans IDE for development, Apache Subversion for version control, Hudson Continuous Integration (CI) Server for build automation, JUnit and Hudson for unit test automation, and WebLogic Server for application hosting.
In addition, we will use Apache Maven, also included on the Oracle VM, to help manage our project’s dependencies, as well as the build and deployment process. Overlapping with some of Apache Ant’s build task functionality, Maven is a powerful cross-cutting tool for managing the modern software development projects. This post will only draw upon a small part of Maven’s functionality.
Demonstration Requirements
To save some time, we will use the same WebLogic Server (WLS) domain we built-in the last post, Deploying Applications to WebLogic Server on Oracle’s Pre-Built Development VM. We will also use code from the sample Hello World Java EE web project from that post. If you haven’t already done so, work through the last post’s example, first.
Here is a quick list of requirements for this demonstration:
- Oracle VM
- Oracle’s Pre-Built Enterprise Java Development VM running on current version of Oracle VM VirtualBox (mine: 4.2.12)
- Oracle VM’s has the latest system updates installed (see earlier post for directions)
- WLS domain from last post created and running in Oracle VM
- Credentials supplied with Oracle VM for Hudson (username and password)
- Window’s Development Machine
- Current version of Apache Maven installed and configured (mine: 3.0.5)
- Current version of NetBeans IDE installed and configured (mine: 7.3)
- Optional: Current version of WebLogic Server installed and configured
- All environmental variables properly configured for Maven, Java, WLS, etc. (MW_HOME, M2, etc.)
The Process
The steps involved in this post’s demonstration are as follows:
- Install the WebLogic Maven Plugin into the Oracle VM’s Maven Repositories, as well as the Development machine
- Create a new Maven Web Application Project in NetBeans
- Copy the classes from the Hello World project in the last post to new project
- Create a properties file to store Maven configuration values for the project
- Add the Maven Properties Plugin to the Project’s POM file
- Add the WebLogic Maven Plugin to project’s POM file
- Add JUnit tests and JUnit dependencies to project
- Add a WebLogic Descriptor to the project
- Enable Tunneling on the new WLS domain from the last post
- Build, test, and deploy the project locally in NetBeans
- Add project to Subversion
- Optional: Upgrade existing Hudson 2.2.0 and plugins on the Oracle VM latest 3.x version
- Create and configure new Hudson CI job for the project
- Build the Hudson job to compile, test, and deploy project to WLS
WebLogic Maven Plugin
First, we need to install the WebLogic Maven Plugin (‘weblogic-maven-plugin’) onto both the Development machine’s local Maven Repository and the Oracle VM’s Maven Repository. Installing the plugin will allow us to deploy our sample application from NetBeans and Hudson, using Maven. The weblogic-maven-plugin, a JAR file, is not part of the Maven repository by default. According to Oracle, ‘WebLogic Server provides support for Maven through the provisioning of plug-ins that enable you to perform various operations on WebLogic Server from within a Maven environment. As of this release, there are two separate plug-ins available.’ In this post, we will use the weblogic-maven-plugin, as opposed to the wls-maven-plugin. Again, according to Oracle, the weblogic-maven-plugin “delivered in WebLogic Server 11g Release 1, provides support for deployment operations.”
The best way to understand the plugin install process is by reading the Using the WebLogic Development Maven Plug-In section of the Oracle Fusion Middleware documentation on Developing Applications for Oracle WebLogic Server. It goes into detail on how to install and configure the plugin.
In a nutshell, below is a list of the commands I executed to install the weblogic-maven-plugin version 12.1.1.0 on both my Windows development machine and on my Oracle VM. If you do not have WebLogic Server installed on your development machine, and therefore no access to the plugin, install it into the Maven Repository on the Oracle VM first, then copy the jar file to the development machine and follow the normal install process from that point forward.
On Windows Development Machine:

Installing weblogic-maven-plugin on a Windows Machine
| cd %MW_HOME%/wlserver/server/lib | |
| java -jar wljarbuilder.jar -profile weblogic-maven-plugin | |
| mkdir c:\tmp | |
| copy weblogic-maven-plugin.jar c:\tmp | |
| cd c:\tmp | |
| jar xvf c:\tmp\weblogic-maven-plugin.jar META-INF/maven/com.oracle.weblogic/weblogic-maven-plugin/pom.xml | |
| mvn install:install-file -DpomFile=META-INF/maven/com.oracle.weblogic/weblogic-maven-plugin/pom.xml -Dfile=c:\tmp\weblogic-maven-plugin.jar |
On the Oracle VM:

Installing WebLogic Maven Plugin into the Oracle VM
| cd $MW_HOME/wlserver_12.1/server/lib | |
| java -jar wljarbuilder.jar -profile weblogic-maven-plugin | |
| mkdir /home/oracle/tmp | |
| cp weblogic-maven-plugin.jar /home/oracle/tmp | |
| cd /home/oracle/tmp | |
| jar xvf weblogic-maven-plugin.jar META-INF/maven/com.oracle.weblogic/weblogic-maven-plugin/pom.xml | |
| mvn install:install-file -DpomFile=META-INF/maven/com.oracle.weblogic/weblogic-maven-plugin/pom.xml -Dfile=weblogic-maven-plugin.jar |
To test the success of your plugin installation, you can run the following maven command on Windows or Linux:
mvn help:describe -Dplugin=com.oracle.weblogic:weblogic-maven-plugin
Sample Maven Web Application
Using NetBeans on your development machine, create a new Maven Web Application. For those of you familiar with Maven, the NetBeans’ Maven Web Application project is based on the ‘webapp-javaee6:1.5’ Archetype. NetBeans creates the project by executing a ‘archetype:generate’ Maven Goal. This is seen in the ‘Output’ tab after the project is created.

1a – Choose the Maven Web Application Project Type

1b – Name and Location of New Project
By default you may have Tomcat and GlassFish as installed options on your system. Unfortunately, NetBeans currently does not have the ability to configure a remote connection to the WLS instance running on the Oracle VM, as I understand. You do not need an instance of WLS installed on your development machine since we are going to use the copy on the Oracle VM. We will use Maven to deploy the project to WLS on the Oracle VM, later in the post.

1c – Default Server and Java Settings

1d – New Maven Project in NetBeans
Next, copy the two java class files from the previous blog post’s Hello World project to the new project’s source package. Alternately, download a zipped copy this post’s complete sample code from Dropbox or on GitHub.

2a – Copy Two Class Files from Previous Project
Because we are copying a RESTful web service to our new project, NetBeans will prompt us for some REST resource configuration options. To keep this new example simple, choose the first option and uncheck the Jersey option.

2b – REST Resource Configuration

2c – New Project with Files Copied from Previous Project
JUnit Tests
Next, create a set of JUnit tests for each class by right-clicking on both classes and selecting ‘Tools’ -> ‘Create Tests’.

3a – Create JUnit Tests for Both Class Files

3b – Choose JUnit Version 4.x

3c – New Project with Test Classes and JUnit Test Dependencies
We will use the test classes and dependencies NetBeans just added to the project. However, we will not use the actual JUnit tests themselves that NetBeans created. To properly set-up the default JUnit tests to work with an embedded version of WLS is well beyond the scope of this post.
Overwrite the contents of the class file with the code provided from Dropbox. I have replaced the default JUnit tests with simpler versions for this demonstration. Build the file to make sure all the JUnit tests all pass.

3d – Project Successfully Built with New JUnit Tests
Project Properties
Next, add a new Properties file to the project, entitled ‘maven.properties’.

4a – Add Properties File to Project

4b – Add Properties File to Project
Add the following key/value pairs to the properties file. These key/value pairs are referenced will be referenced the POM.xml by the weblogic-maven-plugin, added in the next step. Placing the configuration values into a Properties file is not necessary for this post. However, if you wish to deploy to multiple environments, moving environmentally-specific configurations into separate properties files, using Maven Build Profiles, and/or using frameworks such as Spring, are all best practices.
Java Properties File (maven.properties):
| # weblogic-maven-plugin configuration values for Oracle VM environment | |
| wls.adminurl=t3://192.168.1.88:7031 | |
| wls.user=weblogic | |
| wls.password=welcome1 | |
| wls.upload=true | |
| wls.remote=false | |
| wls.verbose=true | |
| wls.middlewareHome=/labs/wls1211 | |
| wls.name=HelloWorldMaven |
Maven Plugins and the POM File
Next, add the WLS Maven Plugin (‘weblogic-maven-plugin’) and the Maven Properties Plugin (‘properties-maven-plugin’) to the end of the project’s Maven POM.xml file. The Maven Properties Plugin, part of the Mojo Project, allows us to substitute configuration values in the Maven POM file from a properties file. According to codehaus,org, who hosts the Mojo Project, ‘It’s main use-case is loading properties from files instead of declaring them in pom.xml, something that comes in handy when dealing with different environments.’
Project Object Model File (pom.xml):
| <project xmlns="http://maven.apache.org/POM/4.0.0" xmlns:xsi="http://www.w3.org/2001/XMLSchema-instance" | |
| xsi:schemaLocation="http://maven.apache.org/POM/4.0.0 http://maven.apache.org/xsd/maven-4.0.0.xsd"> | |
| <modelVersion>4.0.0</modelVersion> | |
| <groupId>com.blogpost</groupId> | |
| <artifactId>HelloWorldMaven</artifactId> | |
| <version>1.0</version> | |
| <packaging>war</packaging> | |
| <name>HelloWorldMaven</name> | |
| <properties> | |
| <endorsed.dir>${project.build.directory}/endorsed</endorsed.dir> | |
| <project.build.sourceEncoding>UTF-8</project.build.sourceEncoding> | |
| </properties> | |
| <dependencies> | |
| <dependency> | |
| <groupId>junit</groupId> | |
| <artifactId>junit</artifactId> | |
| <version>4.10</version> | |
| <scope>test</scope> | |
| </dependency> | |
| <dependency> | |
| <groupId>javax</groupId> | |
| <artifactId>javaee-web-api</artifactId> | |
| <version>6.0</version> | |
| <scope>provided</scope> | |
| </dependency> | |
| </dependencies> | |
| <build> | |
| <plugins> | |
| <plugin> | |
| <groupId>org.apache.maven.plugins</groupId> | |
| <artifactId>maven-compiler-plugin</artifactId> | |
| <version>3.1</version> | |
| <configuration> | |
| <source>1.6</source> | |
| <target>1.6</target> | |
| <compilerArguments> | |
| <endorseddirs>${endorsed.dir}</endorseddirs> | |
| </compilerArguments> | |
| </configuration> | |
| </plugin> | |
| <plugin> | |
| <groupId>org.apache.maven.plugins</groupId> | |
| <artifactId>maven-war-plugin</artifactId> | |
| <version>2.4</version> | |
| <configuration> | |
| <failOnMissingWebXml>false</failOnMissingWebXml> | |
| </configuration> | |
| </plugin> | |
| <plugin> | |
| <groupId>org.apache.maven.plugins</groupId> | |
| <artifactId>maven-dependency-plugin</artifactId> | |
| <version>2.8</version> | |
| <executions> | |
| <execution> | |
| <phase>validate</phase> | |
| <goals> | |
| <goal>copy</goal> | |
| </goals> | |
| <configuration> | |
| <outputDirectory>${endorsed.dir}</outputDirectory> | |
| <silent>true</silent> | |
| <artifactItems> | |
| <artifactItem> | |
| <groupId>javax</groupId> | |
| <artifactId>javaee-endorsed-api</artifactId> | |
| <version>6.0</version> | |
| <type>jar</type> | |
| </artifactItem> | |
| </artifactItems> | |
| </configuration> | |
| </execution> | |
| </executions> | |
| </plugin> | |
| <plugin> | |
| <groupId>org.codehaus.mojo</groupId> | |
| <artifactId>properties-maven-plugin</artifactId> | |
| <version>1.0-alpha-2</version> | |
| <executions> | |
| <execution> | |
| <phase>initialize</phase> | |
| <goals> | |
| <goal>read-project-properties</goal> | |
| </goals> | |
| <configuration> | |
| <files> | |
| <file>maven_wls_local.properties</file> | |
| </files> | |
| </configuration> | |
| </execution> | |
| </executions> | |
| </plugin> | |
| <plugin> | |
| <groupId>com.oracle.weblogic</groupId> | |
| <artifactId>weblogic-maven-plugin</artifactId> | |
| <version>12.1.1.0</version> | |
| <configuration> | |
| <adminurl>${wls.adminurl}</adminurl> | |
| <user>${wls.user}</user> | |
| <password>${wls.password}</password> | |
| <upload>${wls.upload}</upload> | |
| <action>deploy</action> | |
| <remote>${wls.remote}</remote> | |
| <verbose>${wls.verbose}</verbose> | |
| <source>${project.build.directory}/${project.build.finalName}.${project.packaging}</source> | |
| <name>${wls.name}</name> | |
| </configuration> | |
| <executions> | |
| <execution> | |
| <phase>install</phase> | |
| <goals> | |
| <goal>deploy</goal> | |
| </goals> | |
| </execution> | |
| </executions> | |
| </plugin> | |
| </plugins> | |
| </build> | |
| </project> |
WebLogic Deployment Descriptor
A WebLogic Deployment Descriptor file is the last item we need to add to the new Maven Web Application project. NetBeans has descriptors for multiple servers, including Tomcat (context.xml), GlassFish (application.xml), and WebLogic (weblogic.xml). They provide a convenient location to store specific server properties, used during the deployment of the project.

6a – Add New WebLogic Descriptor

6b – Add New WebLogic Descriptor
Add the ‘context-root’ tag. The value will be the name of our project, ‘HelloWorldMaven’, as shown below. According to Oracle, “the context-root element defines the context root of this standalone Web application.” The context-root of the application will form part of the URL we enter to display our application, later.

6c – Add Context Root Element to Descriptor
Make sure to the WebLogic descriptor file (‘weblogic.xml’) is placed in the WEB-INF folder. If not, the descriptor’s properties will not be read. If the descriptor is not read, the context-root of the deployed application will default to the project’s WAR file’s name. Instead of ‘HelloWorldMaven’ as the context-root, you would see ‘HelloWorldMaven-1.0-SNAPSHOT’.

6d – Move WebLogic Descriptor into WEB-INF Folder
Enable Tunneling
Before we compile, test, and deploy our project, we need to make a small change to WLS. In order to deploy our project remotely to the Oracle VM’s WLS, using the WebLogic Maven Plugin, we must enable tunneling on our WLS domain. According to Oracle, the ‘Enable Tunneling’ option “Specifies whether tunneling for the T3, T3S, HTTP, HTTPS, IIOP, and IIOPS protocols should be enabled for this server.” To enable tunneling, from the WLS Administration Console, select the ‘AdminServer’ Server, ‘Protocols’ tab, ‘General’ sub-tab.

Enabling Tunneling on WLS for HTTP Deployments
Build and Test the Project
Right-click and select ‘Build’, ‘Clean and Build’, or ‘Build with Dependencies’. NetBeans executes a ‘mvn install’ command. This command initiates a series of Maven Goals. The goals, visible NetBean’s Output window, include ‘dependency:copy’, ‘properties:read-project-properties’, ‘compiler:compile’, ‘surefire:test’, and so forth. They move the project’s code through the Maven Build Lifecycle. Most goals are self-explanatory by their title.
The last Maven Goal to execute, if the other goals have succeeded, is the ‘weblogic:deploy’ goal. This goal deploys the project to the Oracle VM’s WLS domain we configured in our project. Recall in the POM file, we configured the weblogic-maven-plugin to call the ‘deploy’ goal whenever ‘install’, referred to as Execution Phase by Maven, is executed. If all goals complete without error, you have just compiled, tested, and deployed your first Maven web application to a remote WLS domain. Later, we will have Hudson do it for us, automatically.

6e – Successful Build of Project
Executing Maven Goals in NetBeans
A small aside, if you wish to run alternate Maven goals in NetBeans, right-click on the project and select ‘Custom’ -> ‘Goals…’. Alternately, click on the lighter green arrows (‘Re-run with different parameters’), adjacent to the ‘Output’ tab.
For example, in the ‘Run Maven’ pop-up, replace ‘install’ with ‘surefire:test’ or simply ‘test’. This will compile the project and run the JUnit tests. There are many Maven goals that can be ran this way. Use the Control key and Space Bar key combination in the Maven Goals text box to display a pop-up list of available goals.

7a – Executing Other Maven Goals

7a – JUnit Test Results using Maven ‘test’ Goal
Subversion
Now that our project is complete and tested, we will commit the project to Subversion (SVN). We will commit a copy of our source code to SVN, installed on the Oracle VM, for safe-keeping. Having our source code in SVN also allows Hudson to retrieve a copy. Hudson will then compile, test, and deploy the project to WLS.
The Repository URL, User, and Password are all supplied in the Oracle VM information, along with the other URLs and credentials.

8a – Add Project to Subversion Repository

8b – Subversion Repository Folder for Project
When you import you project for the first time, you will see more files than are displayed below. I had already imported part of the project earlier while creating this post. Therefore most of my files were already managed by Subversion.

8c – List of Files Imported into Subversion (you will see more)

08d – Project Successfully Imported into Subversion
Upgrading Hudson CI Server
The Oracle VM comes with Hudson pre-installed in it’s own WLS domain, ‘hudson-ci_dev’, running on port 5001. Start the domain from within the VM by double-clicking the ‘WLS 12c – Hudson CI 5001’ icon on the desktop, or by executing the domain’s WLS start-up script from a terminal window:
/labs/wls1211/user_projects/domains/hudson-ci_dev/startWebLogic.sh
Once started, the WLS Administration Console 12c is accessible at the following URL. User your VM’s IP address or ‘localhost’ if you are within the VM.
http://[your_vm_ip_address]:5001/console/login/LoginForm.jsp
The Oracle VM comes loaded with Hudson version 2.2.0. I strongly suggest is updating Hudson to the latest version (3.0.1 at the time of this post). To upgrade, download, deploy, and started a new 3.0.1 version in the same domain on the same ‘AdminServer’ Server. I was able to do this remotely, from my development machine, using the browser-based Hudson Dashboard and WLS Administration Console. There is no need to do any of the installation from within the VM, itself.
When the upgrade is complete, stop the 2.2.0 deployment currently running in the WLS domain.

Hudson 3.0.1 Deployed to WLS Domain on VM
The new version of Hudson is accessible from the following URL (adjust the URL your exact version of Hudson):
http://[your_vm_ip_address]:5001/hudson-3.0.1/
It’s also important to update all the Hudson plugins. Hudson makes this easy with the Hudson Plugin Manager, accessible via the Manage Hudson’ option.

View of Hudson 3.0.1 Running on WLS with All Plugins Updated
Note on the top of the Manage Hudson page, there is a warning about the server’s container not using UTF-8 to decode URLs. You can follow this post, if you want to resolve the issue by configuring Hudson differently. I did not worry about it for this post.
Building a Hudson Job
We are ready to configure Hudson to build, test, and deploy our Maven Web Application project. Return to the ‘Hudson Dashboard’, select ‘New Job’, and then ‘Build a new free-style software job’. This will open the ‘Job Configurations’ for the new job.

1 – Creating New Hudson Free-Style Software Job

2 -Default Job Configurations
Start by configuring the ‘Source Code Management’ section. The Subversion Repository URL is the same as the one you used in NetBeans to commit the code. To avoid the access error seen below, you must provide the Subversion credentials to Hudson, just as you did in NetBeans.

3 -Subversion SCM Configuration

4 – Subversion SCM Authentication

5 -Subversion SCM Configuration Authenticated
Next, configure the Maven 3 Goals. I chose the ‘clean’ and ‘install’ goals. Using ‘clean’ insures the project is compiled each time by deleting the output of the build directory.
Optionally, you can configure Hudson to publish the JUnit test results as shown below. Be sure to save your configuration.

6 -Maven 3 and JUnit Configurations
Start a build of the new Hudson Job, by clicking ‘Build Now’. If your Hudson job’s configurations are correct, and the new WLS domain is running, you should have a clean build. This means the project compiled without error, all tests passed, and the web application’s WAR file was deployed successfully to the new WLS domain within the Oracle VM.

7 -Job Built Successfully Using Configurations

8 – Test Results from Build
WebLogic Server
To view the newly deployed Maven Web Application, log into the WebLogic Server Administration Console for the new domain. In my case, the new domain was running on port 7031, so the URL would be:
http://[your_vm_ip_address]:7031/console/login/LoginForm.jsp
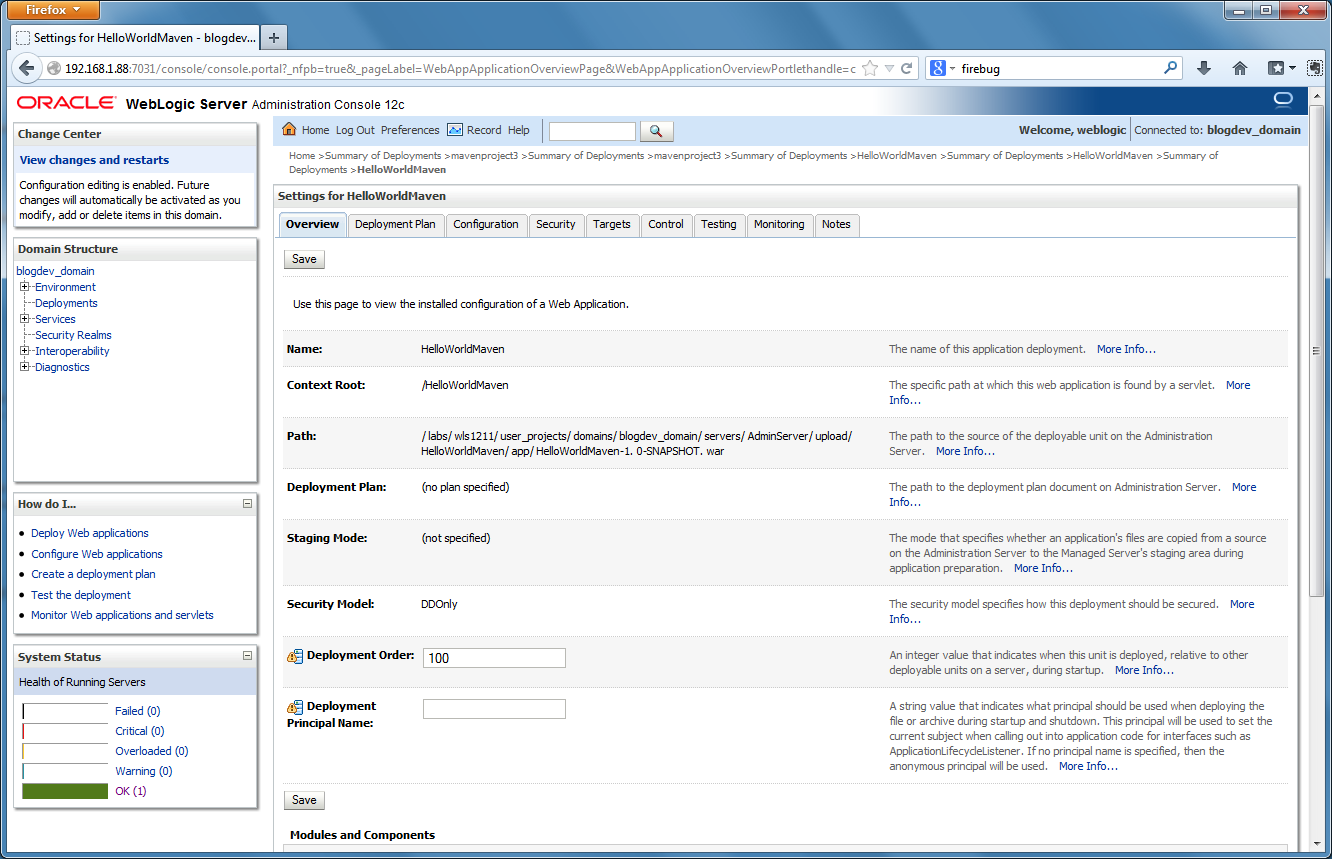
You should see the deployment, in an ‘Active’ state, as shown below.

9a – Project Deployed to WLS from Hudson Build
9b – Project’s Context Root Set by WebLogic Descriptor File

9c – Project’s Servlet Paths
To test the deployment, open a new browser tab and go to the URL of the Servlet. In this case the URL would be:
http://[your_vm_ip_address]:7031/HelloWorldMaven/resources/helloWorld
You should see the original phrase from the previous project displayed, ‘Hello WebLogic Server!’.

10 – Project’s Web Application Running in Browser
To further test the system, make a simple change to the project in NetBeans. I changed the name variable’s default value from ‘WebLogic Server’ to ‘Hudson, Maven, and WLS’. Commit the change to SVN.

11 – Make a Code Change to Project and Commit to Subversion
Return to Hudson and run a new build of the job.

12 – Rebuild Project with Changes in Hudson
After the build completes, refresh the sample Web Application’s browser window. You should see the new text string displayed. Your code change was just re-compiled, re-tested, and re-deployed by Hudson.

13 – Project Showing Code Change
True Continuous Deployment
Although Hudson is now doing a lot of the work for us, the system still is not fully automated. We are still manually building our Hudson Job, in order to deploy our application. If you want true continuous integration and deployment, you need to trust the system to automatically deploy the project, based on certain criteria.
SCM polling with Hudson is one way to demonstrate continuous deployment. In ‘Job Configurations’, turn on ‘Poll SCM’ and enter Unix cron-like value(s) in the ‘Schedule’ text box. In the example below, I have indicated a polling frequency every hour (‘@hourly’). Every hour, Hudson will look for committed changes to the project in Subversion. If changes are found, Hudson w retrieves the source code, compiles, and tests. If the project compiles and passes all tests, it is deployed to WLS.

SCM Polling Interval
There are less resource-intense methods to react to changes than SCM polling. Push-notifications from the repository is alternate, more preferable method.
Additionally, you should configure messaging in Hudson to notify team members of new deployments and the changes they contain. You should also implement a good deployment versioning strategy, for tracking purposes. Knowing the version of deployed artifacts is critical for accurate change management and defect tracking.
Helpful Links
Configuring and Using the WebLogic Maven Plug-In for Deployment
Jenkins: Building a Software Project
Kohsuke Kawaguchi: Polling must die: triggering Jenkins builds from a git hook

#1 by RC on October 23, 2013 - 6:10 pm
You can also use Weblogic-Deployer jenkins plugin instead of weblogic-maven-plugin. Very easy to configure and no save the heavy weblogic-maven-plugin configuration into your pom
#2 by Gary A. Stafford on October 23, 2013 - 8:17 pm
Thanks for the tip. I’ll check that out the plug-in.
#3 by Emmanuel on October 23, 2014 - 4:58 pm
good post Gary.
one question, how to trigger the build to only deploy the changed project?, provided i have three projects : Project1,Project2,Project3 and changes made only in Project2.
Thanks
Emmanuel
#4 by archenroot on January 15, 2015 - 3:25 pm
Reblogged this on Black Hole Of My Memory.