Posts Tagged VirtualBox
Spring Music Revisited: Java-Spring-MongoDB Web App with Docker 1.12
Posted by Gary A. Stafford in Build Automation, Continuous Delivery, DevOps, Enterprise Software Development, Java Development, Software Development on August 7, 2016
Build, test, deploy, and monitor a multi-container, MongoDB-backed, Java Spring web application, using the new Docker 1.12.
Introduction
This post and the post’s example project represent an update to a previous post, Build and Deploy a Java-Spring-MongoDB Application using Docker. This new post incorporates many improvements made in Docker 1.12, including the use of the new Docker Compose v2 YAML format. The post’s project was also updated to use Filebeat with ELK, as opposed to Logspout, which was used previously.
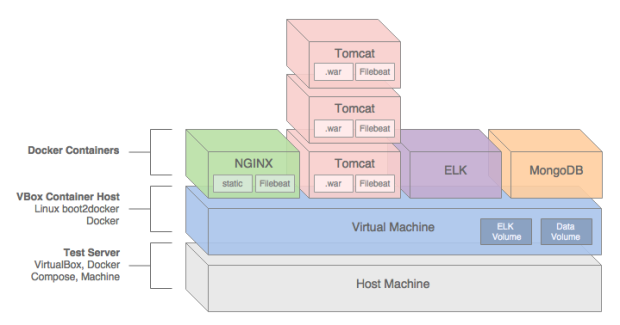
In this post, we will demonstrate how to build, test, deploy, and manage a Java Spring web application, hosted on Apache Tomcat, load-balanced by NGINX, monitored by ELK with Filebeat, and all containerized with Docker.
We will use a sample Java Spring application, Spring Music, available on GitHub from Cloud Foundry. The Spring Music sample record album collection application was originally designed to demonstrate the use of database services on Cloud Foundry, using the Spring Framework. Instead of Cloud Foundry, we will host the Spring Music application locally, using Docker on VirtualBox, and optionally on AWS.
All files necessary to build this project are stored on the docker_v2 branch of the garystafford/spring-music-docker repository on GitHub. The Spring Music source code is stored on the springmusic_v2 branch of the garystafford/spring-music repository, also on GitHub.

Application Architecture
The Java Spring Music application stack contains the following technologies: Java, Spring Framework, AngularJS, Bootstrap, jQuery, NGINX, Apache Tomcat, MongoDB, the ELK Stack, and Filebeat. Testing frameworks include the Spring MVC Test Framework, Mockito, Hamcrest, and JUnit.
A few changes were made to the original Spring Music application to make it work for this demonstration, including:
- Move from Java 1.7 to 1.8 (including newer Tomcat version)
- Add unit tests for Continuous Integration demonstration purposes
- Modify MongoDB configuration class to work with non-local, containerized MongoDB instances
- Add Gradle
warNoStatictask to build WAR without static assets - Add Gradle
zipStatictask to ZIP up the application’s static assets for deployment to NGINX - Add Gradle
zipGetVersiontask with a versioning scheme for build artifacts - Add
context.xmlfile andMANIFEST.MFfile to the WAR file - Add Log4j
RollingFileAppenderappender to send log entries to Filebeat - Update versions of several dependencies, including Gradle, Spring, and Tomcat
We will use the following technologies to build, publish, deploy, and host the Java Spring Music application: Gradle, git, GitHub, Travis CI, Oracle VirtualBox, Docker, Docker Compose, Docker Machine, Docker Hub, and optionally, Amazon Web Services (AWS).
NGINX
To increase performance, the Spring Music web application’s static content will be hosted by NGINX. The application’s WAR file will be hosted by Apache Tomcat 8.5.4. Requests for non-static content will be proxied through NGINX on the front-end, to a set of three load-balanced Tomcat instances on the back-end. To further increase application performance, NGINX will also be configured for browser caching of the static content. In many enterprise environments, the use of a Java EE application server, like Tomcat, is still not uncommon.
Reverse proxying and caching are configured thought NGINX’s default.conf file, in the server configuration section:
| server { | |
| listen 80; | |
| server_name proxy; | |
| location ~* \/assets\/(css|images|js|template)\/* { | |
| root /usr/share/nginx/; | |
| expires max; | |
| add_header Pragma public; | |
| add_header Cache-Control "public, must-revalidate, proxy-revalidate"; | |
| add_header Vary Accept-Encoding; | |
| access_log off; | |
| } |
The three Tomcat instances will be manually configured for load-balancing using NGINX’s default round-robin load-balancing algorithm. This is configured through the default.conf file, in the upstream configuration section:
| upstream backend { | |
| server music_app_1:8080; | |
| server music_app_2:8080; | |
| server music_app_3:8080; | |
| } |
Client requests are received through port 80 on the NGINX server. NGINX redirects requests, which are not for non-static assets, to one of the three Tomcat instances on port 8080.
MongoDB
The Spring Music application was designed to work with a number of data stores, including MySQL, Postgres, Oracle, MongoDB, Redis, and H2, an in-memory Java SQL database. Given the choice of both SQL and NoSQL databases, we will select MongoDB.
The Spring Music application, hosted by Tomcat, will store and modify record album data in a single instance of MongoDB. MongoDB will be populated with a collection of album data from a JSON file, when the Spring Music application first creates the MongoDB database instance.
ELK
Lastly, the ELK Stack with Filebeat, will aggregate NGINX, Tomcat, and Java Log4j log entries, providing debugging and analytics to our demonstration. A similar method for aggregating logs, using Logspout instead of Filebeat, can be found in this previous post.

Continuous Integration
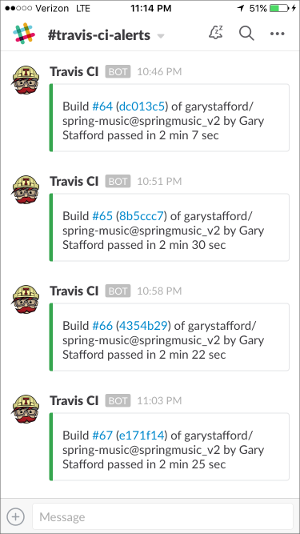
In this post’s example, two build artifacts, a WAR file for the application and ZIP file for the static web content, are built automatically by Travis CI, whenever source code changes are pushed to the springmusic_v2 branch of the garystafford/spring-music repository on GitHub.

Following a successful build and a small number of unit tests, Travis CI pushes the build artifacts to the build-artifacts branch on the same GitHub project. The build-artifacts branch acts as a pseudo binary repository for the project, much like JFrog’s Artifactory. These artifacts are used later by Docker to build the project’s immutable Docker images and containers.

Build Notifications
Travis CI pushes build notifications to a Slack channel, which eliminates the need to actively monitor Travis CI.
Automation Scripting
The .travis.yaml file, custom gradle.build Gradle tasks, and the deploy_travisci.sh script handles the Travis CI automation described, above.
Travis CI .travis.yaml file:
| language: java | |
| jdk: oraclejdk8 | |
| before_install: | |
| - chmod +x gradlew | |
| before_deploy: | |
| - chmod ugo+x deploy_travisci.sh | |
| script: | |
| - "./gradlew clean build" | |
| - "./gradlew warNoStatic warCopy zipGetVersion zipStatic" | |
| - sh ./deploy_travisci.sh | |
| env: | |
| global: | |
| - GH_REF: github.com/garystafford/spring-music.git | |
| - secure: <GH_TOKEN_secure_hash_here> | |
| - secure: <COMMIT_AUTHOR_EMAIL_secure_hash_here> | |
| notifications: | |
| slack: | |
| - secure: <SLACK_secure_hash_here> |
Custom gradle.build tasks:
| // new Gradle build tasks | |
| task warNoStatic(type: War) { | |
| // omit the version from the war file name | |
| version = '' | |
| exclude '**/assets/**' | |
| manifest { | |
| attributes | |
| 'Manifest-Version': '1.0', | |
| 'Created-By': currentJvm, | |
| 'Gradle-Version': GradleVersion.current().getVersion(), | |
| 'Implementation-Title': archivesBaseName + '.war', | |
| 'Implementation-Version': artifact_version, | |
| 'Implementation-Vendor': 'Gary A. Stafford' | |
| } | |
| } | |
| task warCopy(type: Copy) { | |
| from 'build/libs' | |
| into 'build/distributions' | |
| include '**/*.war' | |
| } | |
| task zipGetVersion (type: Task) { | |
| ext.versionfile = | |
| new File("${projectDir}/src/main/webapp/assets/buildinfo.properties") | |
| versionfile.text = 'build.version=' + artifact_version | |
| } | |
| task zipStatic(type: Zip) { | |
| from 'src/main/webapp/assets' | |
| appendix = 'static' | |
| version = '' | |
| } |
The deploy.sh file:
| #!/bin/bash | |
| set -e | |
| cd build/distributions | |
| git init | |
| git config user.name "travis-ci" | |
| git config user.email "${COMMIT_AUTHOR_EMAIL}" | |
| git add . | |
| git commit -m "Deploy Travis CI Build #${TRAVIS_BUILD_NUMBER} artifacts to GitHub" | |
| git push --force --quiet "https://${GH_TOKEN}@${GH_REF}" master:build-artifacts > /dev/null 2>&1 |
You can easily replicate the project’s continuous integration automation using your choice of toolchains. GitHub or BitBucket are good choices for distributed version control. For continuous integration and deployment, I recommend Travis CI, Semaphore, Codeship, or Jenkins. Couple those with a good persistent chat application, such as Glider Labs’ Slack or Atlassian’s HipChat.
Building the Docker Environment
Make sure VirtualBox, Docker, Docker Compose, and Docker Machine, are installed and running. At the time of this post, I have the following versions of software installed on my Mac:
- Mac OS X 10.11.6
- VirtualBox 5.0.26
- Docker 1.12.1
- Docker Compose 1.8.0
- Docker Machine 0.8.1
To build the project’s VirtualBox VM, Docker images, and Docker containers, execute the build script, using the following command: sh ./build_project.sh. A build script is useful when working with CI/CD automation tools, such as Jenkins CI or ThoughtWorks go. However, to understand the build process, I suggest first running the individual commands, locally.
| #!/bin/sh | |
| set -ex | |
| # clone project | |
| git clone -b docker_v2 --single-branch \ | |
| https://github.com/garystafford/spring-music-docker.git music \ | |
| && cd "$_" | |
| # provision VirtualBox VM | |
| docker-machine create --driver virtualbox springmusic | |
| # set new environment | |
| docker-machine env springmusic \ | |
| && eval "$(docker-machine env springmusic)" | |
| # mount a named volume on host to store mongo and elk data | |
| # ** assumes your project folder is 'music' ** | |
| docker volume create --name music_data | |
| docker volume create --name music_elk | |
| # create bridge network for project | |
| # ** assumes your project folder is 'music' ** | |
| docker network create -d bridge music_net | |
| # build images and orchestrate start-up of containers (in this order) | |
| docker-compose -p music up -d elk && sleep 15 \ | |
| && docker-compose -p music up -d mongodb && sleep 15 \ | |
| && docker-compose -p music up -d app \ | |
| && docker-compose scale app=3 && sleep 15 \ | |
| && docker-compose -p music up -d proxy && sleep 15 | |
| # optional: configure local DNS resolution for application URL | |
| #echo "$(docker-machine ip springmusic) springmusic.com" | sudo tee --append /etc/hosts | |
| # run a simple connectivity test of application | |
| for i in {1..9}; do curl -I $(docker-machine ip springmusic); done |
Deploying to AWS
By simply changing the Docker Machine driver to AWS EC2 from VirtualBox, and providing your AWS credentials, the springmusic environment may also be built on AWS.
Build Process
Docker Machine provisions a single VirtualBox springmusic VM on which host the project’s containers. VirtualBox provides a quick and easy solution that can be run locally for initial development and testing of the application.
Next, the script creates a Docker data volume and project-specific Docker bridge network.
Next, using the project’s individual Dockerfiles, Docker Compose pulls base Docker images from Docker Hub for NGINX, Tomcat, ELK, and MongoDB. Project-specific immutable Docker images are then built for NGINX, Tomcat, and MongoDB. While constructing the project-specific Docker images for NGINX and Tomcat, the latest Spring Music build artifacts are pulled and installed into the corresponding Docker images.
Docker Compose builds and deploys (6) containers onto the VirtualBox VM: (1) NGINX, (3) Tomcat, (1) MongoDB, and (1) ELK.
The NGINX Dockerfile:
| # NGINX image with build artifact | |
| FROM nginx:latest | |
| MAINTAINER Gary A. Stafford <garystafford@rochester.rr.com> | |
| ENV REFRESHED_AT 2016-09-17 | |
| ENV GITHUB_REPO https://github.com/garystafford/spring-music/raw/build-artifacts | |
| ENV STATIC_FILE spring-music-static.zip | |
| RUN apt-get update -qq \ | |
| && apt-get install -qqy curl wget unzip nano \ | |
| && apt-get clean \ | |
| \ | |
| && wget -O /tmp/${STATIC_FILE} ${GITHUB_REPO}/${STATIC_FILE} \ | |
| && unzip /tmp/${STATIC_FILE} -d /usr/share/nginx/assets/ | |
| COPY default.conf /etc/nginx/conf.d/default.conf | |
| # tweak nginx image set-up, remove log symlinks | |
| RUN rm /var/log/nginx/access.log /var/log/nginx/error.log | |
| # install Filebeat | |
| ENV FILEBEAT_VERSION=filebeat_1.2.3_amd64.deb | |
| RUN curl -L -O https://download.elastic.co/beats/filebeat/${FILEBEAT_VERSION} \ | |
| && dpkg -i ${FILEBEAT_VERSION} \ | |
| && rm ${FILEBEAT_VERSION} | |
| # configure Filebeat | |
| ADD filebeat.yml /etc/filebeat/filebeat.yml | |
| # CA cert | |
| RUN mkdir -p /etc/pki/tls/certs | |
| ADD logstash-beats.crt /etc/pki/tls/certs/logstash-beats.crt | |
| # start Filebeat | |
| ADD ./start.sh /usr/local/bin/start.sh | |
| RUN chmod +x /usr/local/bin/start.sh | |
| CMD [ "/usr/local/bin/start.sh" ] |
The Tomcat Dockerfile:
| # Apache Tomcat image with build artifact | |
| FROM tomcat:8.5.4-jre8 | |
| MAINTAINER Gary A. Stafford <garystafford@rochester.rr.com> | |
| ENV REFRESHED_AT 2016-09-17 | |
| ENV GITHUB_REPO https://github.com/garystafford/spring-music/raw/build-artifacts | |
| ENV APP_FILE spring-music.war | |
| ENV TERM xterm | |
| ENV JAVA_OPTS -Djava.security.egd=file:/dev/./urandom | |
| RUN apt-get update -qq \ | |
| && apt-get install -qqy curl wget \ | |
| && apt-get clean \ | |
| \ | |
| && touch /var/log/spring-music.log \ | |
| && chmod 666 /var/log/spring-music.log \ | |
| \ | |
| && wget -q -O /usr/local/tomcat/webapps/ROOT.war ${GITHUB_REPO}/${APP_FILE} \ | |
| && mv /usr/local/tomcat/webapps/ROOT /usr/local/tomcat/webapps/_ROOT | |
| COPY tomcat-users.xml /usr/local/tomcat/conf/tomcat-users.xml | |
| # install Filebeat | |
| ENV FILEBEAT_VERSION=filebeat_1.2.3_amd64.deb | |
| RUN curl -L -O https://download.elastic.co/beats/filebeat/${FILEBEAT_VERSION} \ | |
| && dpkg -i ${FILEBEAT_VERSION} \ | |
| && rm ${FILEBEAT_VERSION} | |
| # configure Filebeat | |
| ADD filebeat.yml /etc/filebeat/filebeat.yml | |
| # CA cert | |
| RUN mkdir -p /etc/pki/tls/certs | |
| ADD logstash-beats.crt /etc/pki/tls/certs/logstash-beats.crt | |
| # start Filebeat | |
| ADD ./start.sh /usr/local/bin/start.sh | |
| RUN chmod +x /usr/local/bin/start.sh | |
| CMD [ "/usr/local/bin/start.sh" ] |
Docker Compose v2 YAML
This post was recently updated for Docker 1.12, and to use Docker Compose v2 YAML file format. The post’s docker-compose.yml takes advantage of improvements in Docker 1.12 and Docker Compose v2 YAML. Improvements to the YAML file include eliminating the need to link containers and expose ports, and the addition of named networks and volumes.
| version: '2' | |
| services: | |
| proxy: | |
| build: nginx/ | |
| ports: | |
| - 80:80 | |
| networks: | |
| - net | |
| depends_on: | |
| - app | |
| hostname: proxy | |
| container_name: proxy | |
| app: | |
| build: tomcat/ | |
| ports: | |
| - 8080 | |
| networks: | |
| - net | |
| depends_on: | |
| - mongodb | |
| hostname: app | |
| mongodb: | |
| build: mongodb/ | |
| ports: | |
| - 27017:27017 | |
| networks: | |
| - net | |
| depends_on: | |
| - elk | |
| hostname: mongodb | |
| container_name: mongodb | |
| volumes: | |
| - music_data:/data/db | |
| - music_data:/data/configdb | |
| elk: | |
| image: sebp/elk:latest | |
| ports: | |
| - 5601:5601 | |
| - 9200:9200 | |
| - 5044:5044 | |
| - 5000:5000 | |
| networks: | |
| - net | |
| volumes: | |
| - music_elk:/var/lib/elasticsearch | |
| hostname: elk | |
| container_name: elk | |
| volumes: | |
| music_data: | |
| external: true | |
| music_elk: | |
| external: true | |
| networks: | |
| net: | |
| driver: bridge |
The Results
Below are the results of building the project.
| # Resulting Docker Machine VirtualBox VM: | |
| $ docker-machine ls | |
| NAME ACTIVE DRIVER STATE URL SWARM DOCKER ERRORS | |
| springmusic * virtualbox Running tcp://192.168.99.100:2376 v1.12.1 | |
| # Resulting external volume: | |
| $ docker volume ls | |
| DRIVER VOLUME NAME | |
| local music_data | |
| local music_elk | |
| # Resulting bridge network: | |
| $ docker network ls | |
| NETWORK ID NAME DRIVER SCOPE | |
| f564dfa1b440 music_net bridge local | |
| # Resulting Docker images - (4) base images and (3) project images: | |
| $ docker images | |
| REPOSITORY TAG IMAGE ID CREATED SIZE | |
| music_proxy latest 7a8dd90bcf32 About an hour ago 250.2 MB | |
| music_app latest c93c713d03b8 About an hour ago 393 MB | |
| music_mongodb latest fbcbbe9d4485 25 hours ago 366.4 MB | |
| tomcat 8.5.4-jre8 98cc750770ba 2 days ago 334.5 MB | |
| mongo latest 48b8b08dca4d 2 days ago 366.4 MB | |
| nginx latest 4efb2fcdb1ab 10 days ago 183.4 MB | |
| sebp/elk latest 07a3e78b01f5 13 days ago 884.5 MB | |
| # Resulting (6) Docker containers | |
| $ docker ps | |
| CONTAINER ID IMAGE COMMAND CREATED STATUS PORTS NAMES | |
| b33922767517 music_proxy "/usr/local/bin/start" 3 hours ago Up 13 minutes 0.0.0.0:80->80/tcp, 443/tcp proxy | |
| e16d2372f2df music_app "/usr/local/bin/start" 3 hours ago Up About an hour 0.0.0.0:32770->8080/tcp music_app_3 | |
| 6b7accea7156 music_app "/usr/local/bin/start" 3 hours ago Up About an hour 0.0.0.0:32769->8080/tcp music_app_2 | |
| 2e94f766df1b music_app "/usr/local/bin/start" 3 hours ago Up About an hour 0.0.0.0:32768->8080/tcp music_app_1 | |
| 71f8dc574148 sebp/elk:latest "/usr/local/bin/start" 3 hours ago Up About an hour 0.0.0.0:5000->5000/tcp, 0.0.0.0:5044->5044/tcp, 0.0.0.0:5601->5601/tcp, 0.0.0.0:9200->9200/tcp, 9300/tcp elk | |
| f7e7d1af7cca music_mongodb "/entrypoint.sh mongo" 20 hours ago Up About an hour 0.0.0.0:27017->27017/tcp mongodb |
Testing the Application
Below are partial results of the curl test, hitting the NGINX endpoint. Note the different IP addresses in the Upstream-Address field between requests. This test proves NGINX’s round-robin load-balancing is working across the three Tomcat application instances: music_app_1, music_app_2, and music_app_3.
Also, note the sharp decrease in the Request-Time between the first three requests and subsequent three requests. The Upstream-Response-Time to the Tomcat instances doesn’t change, yet the total Request-Time is much shorter, due to caching of the application’s static assets by NGINX.
| for i in {1..6}; do curl -I $(docker-machine ip springmusic);done | |
| HTTP/1.1 200 | |
| Server: nginx/1.11.4 | |
| Date: Sat, 17 Sep 2016 18:33:50 GMT | |
| Content-Type: text/html;charset=ISO-8859-1 | |
| Content-Length: 2094 | |
| Connection: keep-alive | |
| Accept-Ranges: bytes | |
| ETag: W/"2094-1473924940000" | |
| Last-Modified: Thu, 15 Sep 2016 07:35:40 GMT | |
| Content-Language: en | |
| Request-Time: 0.575 | |
| Upstream-Address: 172.18.0.4:8080 | |
| Upstream-Response-Time: 1474137230.048 | |
| HTTP/1.1 200 | |
| Server: nginx/1.11.4 | |
| Date: Sat, 17 Sep 2016 18:33:51 GMT | |
| Content-Type: text/html;charset=ISO-8859-1 | |
| Content-Length: 2094 | |
| Connection: keep-alive | |
| Accept-Ranges: bytes | |
| ETag: W/"2094-1473924940000" | |
| Last-Modified: Thu, 15 Sep 2016 07:35:40 GMT | |
| Content-Language: en | |
| Request-Time: 0.711 | |
| Upstream-Address: 172.18.0.5:8080 | |
| Upstream-Response-Time: 1474137230.865 | |
| HTTP/1.1 200 | |
| Server: nginx/1.11.4 | |
| Date: Sat, 17 Sep 2016 18:33:52 GMT | |
| Content-Type: text/html;charset=ISO-8859-1 | |
| Content-Length: 2094 | |
| Connection: keep-alive | |
| Accept-Ranges: bytes | |
| ETag: W/"2094-1473924940000" | |
| Last-Modified: Thu, 15 Sep 2016 07:35:40 GMT | |
| Content-Language: en | |
| Request-Time: 0.326 | |
| Upstream-Address: 172.18.0.6:8080 | |
| Upstream-Response-Time: 1474137231.812 | |
| # assets now cached... | |
| HTTP/1.1 200 | |
| Server: nginx/1.11.4 | |
| Date: Sat, 17 Sep 2016 18:33:53 GMT | |
| Content-Type: text/html;charset=ISO-8859-1 | |
| Content-Length: 2094 | |
| Connection: keep-alive | |
| Accept-Ranges: bytes | |
| ETag: W/"2094-1473924940000" | |
| Last-Modified: Thu, 15 Sep 2016 07:35:40 GMT | |
| Content-Language: en | |
| Request-Time: 0.012 | |
| Upstream-Address: 172.18.0.4:8080 | |
| Upstream-Response-Time: 1474137233.111 | |
| HTTP/1.1 200 | |
| Server: nginx/1.11.4 | |
| Date: Sat, 17 Sep 2016 18:33:53 GMT | |
| Content-Type: text/html;charset=ISO-8859-1 | |
| Content-Length: 2094 | |
| Connection: keep-alive | |
| Accept-Ranges: bytes | |
| ETag: W/"2094-1473924940000" | |
| Last-Modified: Thu, 15 Sep 2016 07:35:40 GMT | |
| Content-Language: en | |
| Request-Time: 0.017 | |
| Upstream-Address: 172.18.0.5:8080 | |
| Upstream-Response-Time: 1474137233.350 | |
| HTTP/1.1 200 | |
| Server: nginx/1.11.4 | |
| Date: Sat, 17 Sep 2016 18:33:53 GMT | |
| Content-Type: text/html;charset=ISO-8859-1 | |
| Content-Length: 2094 | |
| Connection: keep-alive | |
| Accept-Ranges: bytes | |
| ETag: W/"2094-1473924940000" | |
| Last-Modified: Thu, 15 Sep 2016 07:35:40 GMT | |
| Content-Language: en | |
| Request-Time: 0.013 | |
| Upstream-Address: 172.18.0.6:8080 | |
| Upstream-Response-Time: 1474137233.594 |
Spring Music Application Links
Assuming the springmusic VM is running at 192.168.99.100, the following links can be used to access various project endpoints. Note the (3) Tomcat instances each map to randomly exposed ports. These ports are not required by NGINX, which maps to port 8080 for each instance. The port is only required if you want access to the Tomcat Web Console. The port, shown below, 32771, is merely used as an example.
- Spring Music Application: 192.168.99.100
- NGINX Status: 192.168.99.100/nginx_status
- Tomcat Web Console – music_app_1*: 192.168.99.100:32771/manager
- Environment Variables – music_app_1: 192.168.99.100:32771/env
- Album List (RESTful endpoint) – music_app_1: 192.168.99.100:32771/albums
- Elasticsearch Info: 192.168.99.100:9200
- Elasticsearch Status: 192.168.99.100:9200/_status?pretty
- Kibana Web Console: 192.168.99.100:5601
* The Tomcat user name is admin and the password is t0mcat53rv3r.
Helpful Links
- Cloud Foundry’s Spring Music Example
- Getting Started with Gradle for Java
- Introduction to Gradle
- Spring Framework
- Understanding Nginx HTTP Proxying, Load Balancing, Buffering, and Caching
- Common conversion patterns for log4j’s PatternLayout
- Spring @PropertySource example
- Java log4j logging
TODOs
- Automate the Docker image build and publish processes
- Automate the Docker container build and deploy processes
- Automate post-deployment verification testing of project infrastructure
- Add Docker Swarm multi-host capabilities with overlay networking
- Update Spring Music with latest CF project revisions
- Include scripting example to stand-up project on AWS
- Add Consul and Consul Template for NGINX configuration
Automate the Provisioning and Configuration of HAProxy and an Apache Web Server Cluster Using Foreman
Posted by Gary A. Stafford in Bash Scripting, Build Automation, Continuous Delivery, DevOps on February 21, 2015
Use Vagrant, Foreman, and Puppet to provision and configure HAProxy as a reverse proxy, load-balancer for a cluster of Apache web servers.

Introduction
In this post, we will use several technologies, including Vagrant, Foreman, and Puppet, to provision and configure a basic load-balanced web server environment. In this environment, a single node with HAProxy will act as a reverse proxy and load-balancer for two identical Apache web server nodes. All three nodes will be provisioned and bootstrapped using Vagrant, from a Linux CentOS 6.5 Vagrant Box. Afterwards, Foreman, with Puppet, will then be used to install and configure the nodes with HAProxy and Apache, using a series of Puppet modules.
For this post, I will assume you already have running instances of Vagrant with the vagrant-hostmanager plugin, VirtualBox, and Foreman. If you are unfamiliar with Vagrant, the vagrant-hostmanager plugin, VirtualBox, Foreman, or Puppet, review my recent post, Installing Foreman and Puppet Agent on Multiple VMs Using Vagrant and VirtualBox. This post demonstrates how to install and configure Foreman. In addition, the post also demonstrates how to provision and bootstrap virtual machines using Vagrant and VirtualBox. Basically, we will be repeating many of this same steps in this post, with the addition of HAProxy, Apache, and some custom configuration Puppet modules.
All code for this post is available on GitHub. However, it been updated as of 8/23/2015. Changes were required to fix compatibility issues with the latest versions of Puppet 4.x and Foreman. Additionally, the version of CentOS on all VMs was updated from 6.6 to 7.1 and the version of Foreman was updated from 1.7 to 1.9.
Steps
Here is a high-level overview of our steps in this post:
- Provision and configure the three CentOS-based virtual machines (‘nodes’) using Vagrant and VirtualBox
- Install the HAProxy and Apache Puppet modules, from Puppet Forge, onto the Foreman server
- Install the custom HAProxy and Apache Puppet configuration modules, from GitHub, onto the Foreman server
- Import the four new module’s classes to Foreman’s Puppet class library
- Add the three new virtual machines (‘hosts’) to Foreman
- Configure the new hosts in Foreman, assigning the appropriate Puppet classes
- Apply the Foreman Puppet configurations to the new hosts
- Test HAProxy is working as a reverse and proxy load-balancer for the two Apache web server nodes
In this post, I will use the terms ‘virtual machine’, ‘machine’, ‘node’, ‘agent node’, and ‘host’, interchangeable, based on each software’s own nomenclature.
Provisioning
First, using the process described in the previous post, provision and bootstrap the three new virtual machines. The new machine’s Vagrant configuration is shown below. This should be added to the JSON configuration file. All code for the earlier post is available on GitHub.
{
  "nodes": {
    "haproxy.example.com": {
      ":ip": "192.168.35.101",
      "ports": [],
      ":memory": 512,
      ":bootstrap": "bootstrap-node.sh"
    },
    "node01.example.com": {
      ":ip": "192.168.35.121",
      "ports": [],
      ":memory": 512,
      ":bootstrap": "bootstrap-node.sh"
    },
    "node02.example.com": {
      ":ip": "192.168.35.122",
      "ports": [],
      ":memory": 512,
      ":bootstrap": "bootstrap-node.sh"
    }
  }
}
After provisioning and bootstrapping, observe the three machines running in Oracle’s VM VirtualBox Manager.

Oracle VM VirtualBox Manager View of New Nodes
Installing Puppet Forge Modules
The next task is to install the HAProxy and Apache Puppet modules on the Foreman server. This allows Foreman to have access to them. I chose the puppetlabs-haproxy HAProxy module and the puppetlabs-apache Apache modules. Both modules were authored by Puppet Labs, and are available on Puppet Forge.
The exact commands to install the modules onto your Foreman server will depend on your Foreman environment configuration. In my case, I used the following two commands to install the two Puppet Forge modules into my ‘Production’ environment’s module directory.
sudo puppet module install -i /etc/puppet/environments/production/modules puppetlabs-haproxy
sudo puppet module install -i /etc/puppet/environments/production/modules puppetlabs-apache

# confirm module installation
puppet module list --modulepath /etc/puppet/environments/production/modules
Installing Configuration Modules
Next, install the HAProxy and Apache configuration Puppet modules on the Foreman server. Both modules are hosted on my GitHub repository. Both modules can be downloaded directly from GitHub and installed on the Foreman server, from the command line. Again, the exact commands to install the modules onto your Foreman server will depend on your Foreman environment configuration. In my case, I used the following two commands to install the two Puppet Forge modules into my ‘Production’ environment’s module directory. Also, notice I am currently downloading version 0.1.0 of both modules at the time of writing this post. Make sure to double-check for the latest versions of both modules before running the commands. Modify the commands if necessary.
# apache config module
wget -N https://github.com/garystafford/garystafford-apache_example_config/archive/v0.1.0.tar.gz && \
sudo puppet module install -i /etc/puppet/environments/production/modules ~/v0.1.0.tar.gz --force

# haproxy config module
wget -N https://github.com/garystafford/garystafford-haproxy_node_config/archive/v0.1.0.tar.gz && \
sudo puppet module install -i /etc/puppet/environments/production/modules ~/v0.1.0.tar.gz --force

# confirm module installation
puppet module list --modulepath /etc/puppet/environments/production/modules

GitHub Repository for Apache Config Example
HAProxy Configuration
The HAProxy configuration module configures HAProxy’s /etc/haproxy/haproxy.cfg file. The single class in the module’s init.pp manifest is as follows:
class haproxy_node_config () inherits haproxy {
  haproxy::listen { 'puppet00':
    collect_exported => false,
    ipaddress        => '*',
    ports            => '80',
    mode             => 'http',
    options          => {
      'option'  => ['httplog'],
      'balance' => 'roundrobin',
    },
  }

  Haproxy::Balancermember <<| listening_service == 'puppet00' |>>

  haproxy::balancermember { 'haproxy':
    listening_service => 'puppet00',
    server_names      => ['node01.example.com', 'node02.example.com'],
    ipaddresses       => ['192.168.35.121', '192.168.35.122'],
    ports             => '80',
    options           => 'check',
  }
}
The resulting /etc/haproxy/haproxy.cfg file will have the following configuration added. It defines the two Apache web server node’s hostname, ip addresses, and http port. The configuration also defines the load-balancing method, ‘round-robin‘ in our example. In this example, we are using layer 7 load-balancing (application layer – http), as opposed to layer 4 load-balancing (transport layer – tcp). Either method will work for this example. The Puppet Labs’ HAProxy module’s documentation on Puppet Forge and HAProxy’s own documentation are both excellent starting points to understand how to configure HAProxy. We are barely scraping the surface of HAProxy’s capabilities in this brief example.
listen puppet00
  bind *:80
  mode  http
  balance  roundrobin
  option  httplog
  server node01.example.com 192.168.35.121:80 check
  server node02.example.com 192.168.35.122:80 check
Apache Configuration
The Apache configuration module creates default web page in Apache’s docroot directory, /var/www/html/index.html. The single class in the module’s init.pp manifest is as follows:

The resulting /var/www/html/index.html file will look like the following. Observe that the facter variables shown in the module manifest above have been replaced by the individual node’s hostname and ip address during application of the configuration by Puppet (ie. ${fqdn} became node01.example.com).

Both of these Puppet modules were created specifically to configure HAProxy and Apache for this post. Unlike published modules on Puppet Forge, these two modules are very simple, and don’t necessarily represent the best practices and patterns for authoring Puppet Forge modules.
Importing into Foreman
After installing the new modules onto the Foreman server, we need to import them into Foreman. This is accomplished from the ‘Puppet classes’ tab, using the ‘Import from theforeman.example.com’ button. Once imported, the module classes are available to assign to host machines.

Importing Puppet Classes into Foreman
Add Host to Foreman
Next, add the three new hosts to Foreman. If you have questions on how to add the nodes to Foreman, start Puppet’s Certificate Signing Request (CSR) process on the hosts, signing the certificates, or other first time tasks, refer to the previous post. That post explains this process in detail.

Foreman Hosts Tab Showing New Nodes
Configure the Hosts
Next, configure the HAProxy and Apache nodes with the necessary Puppet classes. In addition to the base module classes and configuration classes, I recommend adding git and ntp modules to each of the new nodes. These modules were explained in the previous post. Refer to the screen-grabs below for correct module classes to add, specific to HAProxy and Apache.
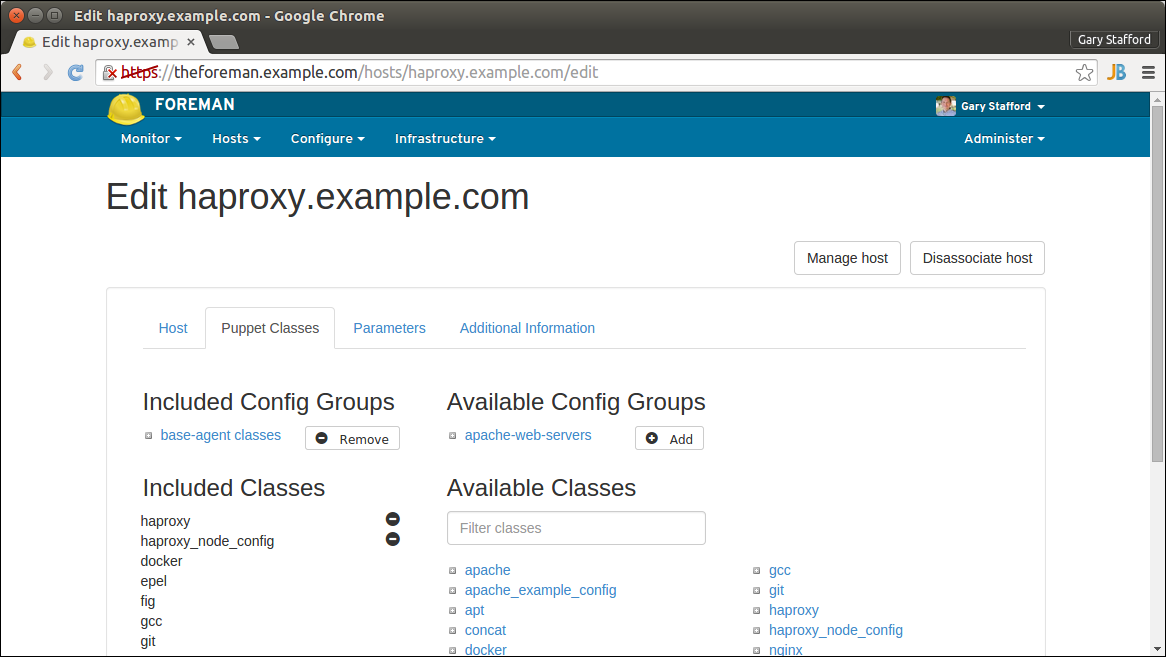
HAProxy Node Puppet Classes Tab

Apache Nodes Puppet Classes Tab
Agent Configuration and Testing the System
Once configurations are retrieved and applied by Puppet Agent on each node, we can test our reverse proxy load-balanced environment. To start, open a browser and load haproxy.paychex.com. You should see one of the two pages below. Refresh the page a few times. You should observe HAProxy re-directing you to one Apache web server node, and then the other, using HAProxy’s round-robin algorithm. You can differentiate the Apache web servers by the hostname and ip address displayed on the web page.

Load Balancer Directing Traffic to Node01

Load Balancer Directing Traffic to Node02
After hitting HAProxy’s URL several times successfully, view HAProxy’s built-in Statistics Report page at http://haproxy.example.com/haproxy?stats. Note below, each of the two Apache node has been hit 44 times each from HAProxy. This demonstrates the effectiveness of the reverse proxy and load-balancing features of HAProxy.

Statistics Report for HAProxy
Accessing Apache Directly
If you are testing HAProxy from the same machine on which you created the virtual machines (VirtualBox host), you will likely be able to directly access either of the Apache web servers (ei. node02.example.com). The VirtualBox host file contains the ip addresses and hostnames of all three hosts. This DNS configuration was done automatically by the vagrant-hostmanager plugin. However, in an actual Production environment, only the HAProxy server’s hostname and ip address would be publicly accessible to a user. The two Apache nodes would sit behind a firewall, accessible only by the HAProxy server. HAProxy acts as a façade to public side of the network.
Testing Apache Host Failure
The main reason you would likely use a load-balancer is high-availability. With HAProxy acting as a load-balancer, we should be able to impair one of the two Apache nodes, without noticeable disruption. HAProxy will continue to serve content from the remaining Apache web server node.
Log into node01.example.com, using the following command, vagrant ssh node01.example.com. To simulate an impairment on ‘node01’, run the following command to stop Apache, sudo service httpd stop. Now, refresh the haproxy.example.com URL in your web browser. You should notice HAProxy is now redirecting all traffic to node02.example.com.
Troubleshooting
While troubleshooting HAProxy configuration issues for this demonstration, I discovered logging is not configured by default on CentOS. No worries, I recommend HAProxy: Give me some logs on CentOS 6.5!, by Stephane Combaudon, to get logging running. Once logging is active, you can more easily troubleshoot HAProxy and Apache configuration issues. Here are some example commands you might find useful:
# haproxy
sudo more -f /var/log/haproxy.log
sudo haproxy -f /etc/haproxy/haproxy.cfg -c # check/validate config file

# apache
sudo ls -1 /etc/httpd/logs/
sudo tail -50 /etc/httpd/logs/error_log
sudo less /etc/httpd/logs/access_log
Redundant Proxies
In this simple example, the system’s weakest point is obviously the single HAProxy instance. It represents a single-point-of-failure (SPOF) in our environment. In an actual production environment, you would likely have more than one instance of HAProxy. They may both be in a load-balanced pool, or one active and on standby as a failover, should one instance become impaired. There are several techniques for building in proxy redundancy, often with the use of Virtual IP and Keepalived. Below is a list of articles that might help you take this post’s example to the next level.
- An Introduction to HAProxy and Load Balancing Concepts
- Install HAProxy and Keepalived (Virtual IP)
- Redundant Load Balancers – HAProxy and Keepalived
- Howto setup a haproxy as fault tolerant / high available load balancer for multiple caching web proxies on RHEL/Centos/SL
- Keepalived Module on Puppet Forge: arioch/keepalived, byTom De Vylder
Installing Foreman and Puppet Agent on Multiple VMs Using Vagrant and VirtualBox
Posted by Gary A. Stafford in DevOps, Enterprise Software Development, Software Development on January 18, 2015
Automatically install and configure Foreman, the open source infrastructure lifecycle management tool, and multiple Puppet Agent VMs using Vagrant and VirtualBox.

Introduction
In the last post, Installing Puppet Master and Agents on Multiple VM Using Vagrant and VirtualBox, we installed Puppet Master/Agent on VirtualBox VMs using Vagrant. Puppet Master is an excellent tool, but lacks the ease-of-use of Puppet Enterprise or Foreman. In this post, we will build an almost identical environment, substituting Foreman for Puppet Master.
According to Foreman’s website, “Foreman is an open source project that helps system administrators manage servers throughout their lifecycle, from provisioning and configuration to orchestration and monitoring. Using Puppet or Chef and Foreman’s smart proxy architecture, you can easily automate repetitive tasks, quickly deploy applications, and proactively manage change, both on-premise with VMs and bare-metal or in the cloud.”
Combined with Puppet Labs’ Open Source Puppet, Foreman is an effective solution to manage infrastructure and system configuration. Again, according to Foreman’s website, the Foreman installer is a collection of Puppet modules that installs everything required for a full working Foreman setup. The installer uses native OS packaging and adds necessary configuration for the complete installation. By default, the Foreman installer will configure:
- Apache HTTP with SSL (using a Puppet-signed certificate)
- Foreman running under mod_passenger
- Smart Proxy configured for Puppet, TFTP and SSL
- Puppet master running under mod_passenger
- Puppet agent configured
- TFTP server (under xinetd on Red Hat platforms)
For the average Systems Engineer or Software Developer, installing and configuring Foreman, Puppet Master, Apache, Puppet Agent, and the other associated software packages listed above, is daunting. If the installation doesn’t work properly, you must troubleshooting, or trying to remove and reinstall some or all the components.
A better solution is to automate the installation of Foreman into a Docker container, or on to a VM using Vagrant. Automating the installation process guarantees accuracy and consistency. The Vagrant VirtualBox VM can be snapshotted, moved to another host, or simply destroyed and recreated, if needed.
All code for this post is available on GitHub. However, it been updated as of 8/23/2015. Changes were required to fix compatibility issues with the latest versions of Puppet 4.x and Foreman. Additionally, the version of CentOS on all VMs was updated from 6.6 to 7.1 and the version of Foreman was updated from 1.7 to 1.9.
The Post’s Example
In this post, we will use Vagrant and VirtualBox to create three VMs. The VMs in this post will be build from a standard CentOS 6.5 x64 base Vagrant Box, located on Atlas. We will use a single JSON-format configuration file to automatically build all three VMs with Vagrant. As part of the provisioning process, using Vagrant’s shell provisioner, we will execute a bootstrap shell script. The script will install Foreman and it’s associated software on the first VM, and Puppet Agent on the two remaining VMs (aka Puppet ‘agent nodes’ or Foreman ‘hosts’).

Foreman does have the ability to provision on bare-metal infrastructure and public or private clouds. However, this example would simulate an environment where you have existing nodes you want to manage with Foreman.
The Foreman bootstrap script will also download several Puppet modules. To test Foreman once the provisioning is complete, import those module’s classes into Foreman and assign the classes to the hosts. The hosts will fetch and apply the configurations. You can then test for the installed instances of those module’s components on the puppet agent hosts.
Vagrant
To begin the process, we will use the JSON-format configuration file to create the three VMs, using Vagrant and VirtualBox.
{
  "nodes": {
    "theforeman.example.com": {
      ":ip": "192.168.35.5",
      "ports": [],
      ":memory": 1024,
      ":bootstrap": "bootstrap-foreman.sh"
    },
    "agent01.example.com": {
      ":ip": "192.168.35.10",
      "ports": [],
      ":memory": 1024,
      ":bootstrap": "bootstrap-node.sh"
    },
    "agent02.example.com": {
      ":ip": "192.168.35.20",
      "ports": [],
      ":memory": 1024,
      ":bootstrap": "bootstrap-node.sh"
    }
  }
}
The Vagrantfile uses the JSON-format configuration file, to provision the three VMs, using a single ‘vagrant up‘ command. That’s it, less than 30 lines of actual code in the Vagrantfile to create as many VMs as you want. For this post’s example, we will not need to add any VirtualBox port mappings. However, that can also done from the JSON configuration file (see the READM.md for more directions).

Vagrant Provisioning the VMs
If you have not used the CentOS Vagrant Box, it will take a few minutes the first time for Vagrant to download the it to the local Vagrant Box repository.
# -*- mode: ruby -*-
# vi: set ft=ruby :

# Builds single Foreman server and
# multiple Puppet Agent Nodes using JSON config file
# Gary A. Stafford - 01/15/2015

# read vm and chef configurations from JSON files
nodes_config = (JSON.parse(File.read("nodes.json")))['nodes']

VAGRANTFILE_API_VERSION = "2"

Vagrant.configure(VAGRANTFILE_API_VERSION) do |config|
  config.vm.box = "chef/centos-6.5"

  nodes_config.each do |node|
    node_name   = node[0] # name of node
    node_values = node[1] # content of node

    config.vm.define node_name do |config|
      # configures all forwarding ports in JSON array
      ports = node_values['ports']
      ports.each do |port|
        config.vm.network :forwarded_port,
          host:  port[':host'],
          guest: port[':guest'],
          id:    port[':id']
      end

      config.vm.hostname = node_name
      config.vm.network :private_network, ip: node_values[':ip']

      config.vm.provider :virtualbox do |vb|
        vb.customize ["modifyvm", :id, "--memory", node_values[':memory']]
        vb.customize ["modifyvm", :id, "--name", node_name]
      end

      config.vm.provision :shell, :path => node_values[':bootstrap']
    end
  end
end
Once provisioned, the three VMs, also called ‘Machines’ by Vagrant, should appear in Oracle VM VirtualBox Manager.

Oracle VM VirtualBox Manager View
The name of the VMs, referenced in Vagrant commands, is the parent node name in the JSON configuration file (node_name), such as, ‘vagrant ssh theforeman.example.com‘.

Bootstrapping Foreman
As part of the Vagrant provisioning process (‘vagrant up‘ command), a bootstrap script is executed on the VMs (shown below). This script will do almost of the installation and configuration work. Below is script for bootstrapping the Foreman VM.
#!/bin/sh

# Run on VM to bootstrap Foreman server
# Gary A. Stafford - 01/15/2015

if ps aux | grep "/usr/share/foreman" | grep -v grep 2> /dev/null
then
    echo "Foreman appears to all already be installed. Exiting..."
else
    # Configure /etc/hosts file
    echo "" | sudo tee --append /etc/hosts 2> /dev/null && \
    echo "192.168.35.5    theforeman.example.com   theforeman" | sudo tee --append /etc/hosts 2> /dev/null

    # Update system first
    sudo yum update -y

    # Install Foreman for CentOS 6
    sudo rpm -ivh http://yum.puppetlabs.com/puppetlabs-release-el-6.noarch.rpm && \
    sudo yum -y install epel-release http://yum.theforeman.org/releases/1.7/el6/x86_64/foreman-release.rpm && \
    sudo yum -y install foreman-installer && \
    sudo foreman-installer

    # First run the Puppet agent on the Foreman host which will send the first Puppet report to Foreman,
    # automatically creating the host in Foreman's database
    sudo puppet agent --test --waitforcert=60

    # Install some optional puppet modules on Foreman server to get started...
    sudo puppet module install -i /etc/puppet/environments/production/modules puppetlabs-ntp
    sudo puppet module install -i /etc/puppet/environments/production/modules puppetlabs-git
    sudo puppet module install -i /etc/puppet/environments/production/modules puppetlabs-docker
fi
Bootstrapping Puppet Agent Nodes
Below is script for bootstrapping the puppet agent nodes. The agent node bootstrap script was executed as part of the Vagrant provisioning process.
#!/bin/sh

# Run on VM to bootstrap Puppet Agent nodes
# Gary A. Stafford - 01/15/2015

if ps aux | grep "puppet agent" | grep -v grep 2> /dev/null
then
    echo "Puppet Agent is already installed. Moving on..."
else
    # Update system first
    sudo yum update -y

    # Install Puppet for CentOS 6
    sudo rpm -ivh http://yum.puppetlabs.com/puppetlabs-release-el-6.noarch.rpm && \
    sudo yum -y install puppet

    # Configure /etc/hosts file
    echo "" | sudo tee --append /etc/hosts 2> /dev/null && \
    echo "192.168.35.5    theforeman.example.com   theforeman" | sudo tee --append /etc/hosts 2> /dev/null

    # Add agent section to /etc/puppet/puppet.conf (sets run interval to 120 seconds)
    echo "" | sudo tee --append /etc/puppet/puppet.conf 2> /dev/null && \
    echo "    server = theforeman.example.com" | sudo tee --append /etc/puppet/puppet.conf 2> /dev/null && \
    echo "    runinterval = 120" | sudo tee --append /etc/puppet/puppet.conf 2> /dev/null

    sudo service puppet stop
    sudo service puppet start

    sudo puppet resource service puppet ensure=running enable=true
    sudo puppet agent --enable
fi
Now that the Foreman is running, use the command, ‘vagrant ssh agent01.example.com‘, to ssh into the first puppet agent node. Run the command below.
sudo puppet agent --test --waitforcert=60
The command above manually starts Puppet’s Certificate Signing Request (CSR) process, to generate the certificates and security credentials (private and public keys) generated by Puppet’s built-in certificate authority (CA). Each puppet agent node must have it certificate signed by the Foreman, first. According to Puppet’s website, “Before puppet agent nodes can retrieve their configuration catalogs, they need a signed certificate from the local Puppet certificate authority (CA). When using Puppet’s built-in CA (that is, not using an external CA), agents will submit a certificate signing request (CSR) to the CA Puppet Master (Foreman) and will retrieve a signed certificate once one is available.”

Waiting for Certificate to be Signed by Foreman
Open the Foreman browser-based interface, running at https://theforeman.example.com. Proceed to the ‘Infrastructure’ -> ‘Smart Proxies’ tab. Sign the certificate(s) from the agent nodes (shown below). The agent node will wait for the Foreman to sign the certificate, before continuing with the initial configuration.
Certificate Waiting to be Signed in Foreman
Once the certificate signing process is complete, the host retrieves the client configuration from the Foreman and applies it to the hosts.
Foreman Puppet Configuration Applied to Agent Node
That’s it, you should now have one host running Foreman and two puppet agent nodes.
Testing Foreman
To test Foreman, import the classes from the Puppet modules installed with the Foreman bootstrap script.

Foreman – Puppet Classes
Next, apply ntp, git, and Docker classes to both agent nodes (aka, Foreman ‘hosts’), as well as the Foreman node, itself.

Foreman – Agents Puppet Classes
Every two minutes, the two agent node hosts should fetch their latest configuration from Foreman and apply it. In a few minutes, check the times reported in the ‘Last report’ column on the ‘All Hosts’ tab. If the times are two minutes or less, Foreman and Puppet Agent are working. Note we changed the runinterval to 120 seconds (‘120s’) in the bootstrap script to speed up the Puppet Agent updates for the sake of the demo. The normal default interval is 30 minutes. I recommend changing the agent node’s runinterval back to 30 minutes (’30m’) on the hosts, once everything is working to save unnecessary use of resources.

Foreman – Hosts Reporting Back
Finally, to verify that the configuration was successfully applied to the hosts, check if ntp, git, and Docker are now running on the hosts.

Agent Node with ntp and git Now Installed
Helpful Links
All the source code this project is on Github.
Foreman:
http://theforeman.org
Atlas – Discover Vagrant Boxes:
https://atlas.hashicorp.com/boxes/search
Learning Puppet – Basic Agent/Master Puppet
https://docs.puppetlabs.com/learning/agent_master_basic.html
Puppet Glossary (of terms):
https://docs.puppetlabs.com/references/glossary.html
Installing Puppet Master and Agents on Multiple VM Using Vagrant and VirtualBox
Posted by Gary A. Stafford in Bash Scripting, Build Automation, DevOps, Enterprise Software Development, Software Development on December 14, 2014
Automatically provision multiple VMs with Vagrant and VirtualBox. Automatically install, configure, and test Puppet Master and Puppet Agents on those VMs.

Introduction
Note this post and accompanying source code was updated on 12/16/2014 to v0.2.1. It contains several improvements to improve and simplify the install process.
Puppet Labs’ Open Source Puppet Agent/Master architecture is an effective solution to manage infrastructure and system configuration. However, for the average System Engineer or Software Developer, installing and configuring Puppet Master and Puppet Agent can be challenging. If the installation doesn’t work properly, the engineer’s stuck troubleshooting, or trying to remove and re-install Puppet.
A better solution, automate the installation of Puppet Master and Puppet Agent on Virtual Machines (VMs). Automating the installation process guarantees accuracy and consistency. Installing Puppet on VMs means the VMs can be snapshotted, cloned, or simply destroyed and recreated, if needed.
In this post, we will use Vagrant and VirtualBox to create three VMs. The VMs will be build from a Ubuntu 14.04.1 LTS (Trusty Tahr) Vagrant Box, previously on Vagrant Cloud, now on Atlas. We will use a single JSON-format configuration file to build all three VMs, automatically. As part of the Vagrant provisioning process, we will run a bootstrap shell script to install Puppet Master on the first VM (Puppet Master server) and Puppet Agent on the two remaining VMs (agent nodes).
Lastly, to test our Puppet installations, we will use Puppet to install some basic Puppet modules, including ntp and git on the server, and ntp, git, Docker and Fig, on the agent nodes.
All the source code this project is on Github.
Vagrant
To begin the process, we will use the JSON-format configuration file to create the three VMs, using Vagrant and VirtualBox.
{
  "nodes": {
    "puppet.example.com": {
      ":ip": "192.168.32.5",
      "ports": [],
      ":memory": 1024,
      ":bootstrap": "bootstrap-master.sh"
    },
    "node01.example.com": {
      ":ip": "192.168.32.10",
      "ports": [],
      ":memory": 1024,
      ":bootstrap": "bootstrap-node.sh"
    },
    "node02.example.com": {
      ":ip": "192.168.32.20",
      "ports": [],
      ":memory": 1024,
      ":bootstrap": "bootstrap-node.sh"
    }
  }
}
The Vagrantfile uses the JSON-format configuration file, to provision the three VMs, using a single ‘vagrant up‘ command. That’s it, less than 30 lines of actual code in the Vagrantfile to create as many VMs as we need. For this post’s example, we will not need to add any port mappings, which can be done from the JSON configuration file (see the READM.md for more directions). The Vagrant Box we are using already has the correct ports opened.
If you have not previously used the Ubuntu Vagrant Box, it will take a few minutes the first time for Vagrant to download the it to the local Vagrant Box repository.
# vi: set ft=ruby :

# Builds Puppet Master and multiple Puppet Agent Nodes using JSON config file
# Author: Gary A. Stafford

# read vm and chef configurations from JSON files
nodes_config = (JSON.parse(File.read("nodes.json")))['nodes']

VAGRANTFILE_API_VERSION = "2"

Vagrant.configure(VAGRANTFILE_API_VERSION) do |config|
  config.vm.box = "ubuntu/trusty64"

  nodes_config.each do |node|
    node_name   = node[0] # name of node
    node_values = node[1] # content of node

    config.vm.define node_name do |config|
      # configures all forwarding ports in JSON array
      ports = node_values['ports']
      ports.each do |port|
        config.vm.network :forwarded_port,
          host:  port[':host'],
          guest: port[':guest'],
          id:    port[':id']
      end

      config.vm.hostname = node_name
      config.vm.network :private_network, ip: node_values[':ip']

      config.vm.provider :virtualbox do |vb|
        vb.customize ["modifyvm", :id, "--memory", node_values[':memory']]
        vb.customize ["modifyvm", :id, "--name", node_name]
      end

      config.vm.provision :shell, :path => node_values[':bootstrap']
    end
  end
end
Once provisioned, the three VMs, also referred to as ‘Machines’ by Vagrant, should appear, as shown below, in Oracle VM VirtualBox Manager.

Vagrant Machines in VM VirtualBox Manager
The name of the VMs, referenced in Vagrant commands, is the parent node name in the JSON configuration file (node_name), such as, ‘vagrant ssh puppet.example.com‘.

Vagrant Machine Names
Bootstrapping Puppet Master Server
As part of the Vagrant provisioning process, a bootstrap script is executed on each of the VMs (script shown below). This script will do 98% of the required work for us. There is one for the Puppet Master server VM, and one for each agent node.
#!/bin/sh

# Run on VM to bootstrap Puppet Master server

if ps aux | grep "puppet master" | grep -v grep 2> /dev/null
then
    echo "Puppet Master is already installed. Exiting..."
else
    # Install Puppet Master
    wget https://apt.puppetlabs.com/puppetlabs-release-trusty.deb && \
    sudo dpkg -i puppetlabs-release-trusty.deb && \
    sudo apt-get update -yq && sudo apt-get upgrade -yq && \
    sudo apt-get install -yq puppetmaster

    # Configure /etc/hosts file
    echo "" | sudo tee --append /etc/hosts 2> /dev/null && \
    echo "# Host config for Puppet Master and Agent Nodes" | sudo tee --append /etc/hosts 2> /dev/null && \
    echo "192.168.32.5    puppet.example.com  puppet" | sudo tee --append /etc/hosts 2> /dev/null && \
    echo "192.168.32.10   node01.example.com  node01" | sudo tee --append /etc/hosts 2> /dev/null && \
    echo "192.168.32.20   node02.example.com  node02" | sudo tee --append /etc/hosts 2> /dev/null

    # Add optional alternate DNS names to /etc/puppet/puppet.conf
    sudo sed -i 's/.*\[main\].*/&\ndns_alt_names = puppet,puppet.example.com/' /etc/puppet/puppet.conf

    # Install some initial puppet modules on Puppet Master server
    sudo puppet module install puppetlabs-ntp
    sudo puppet module install garethr-docker
    sudo puppet module install puppetlabs-git
    sudo puppet module install puppetlabs-vcsrepo
    sudo puppet module install garystafford-fig

    # symlink manifest from Vagrant synced folder location
    ln -s /vagrant/site.pp /etc/puppet/manifests/site.pp
fi
There are a few last commands we need to run ourselves, from within the VMs. Once the provisioning process is complete, ‘vagrant ssh puppet.example.com‘ into the newly provisioned Puppet Master server. Below are the commands we need to run within the ‘puppet.example.com‘ VM.
sudo service puppetmaster status # test that puppet master was installed
sudo service puppetmaster stop
sudo puppet master --verbose --no-daemonize
# Ctrl+C to kill puppet master
sudo service puppetmaster start
sudo puppet cert list --all # check for 'puppet' cert
According to Puppet’s website, ‘these steps will create the CA certificate and the puppet master certificate, with the appropriate DNS names included.‘
Bootstrapping Puppet Agent Nodes
Now that the Puppet Master server is running, open a second terminal tab (‘Shift+Ctrl+T‘). Use the command, ‘vagrant ssh node01.example.com‘, to ssh into the new Puppet Agent node. The agent node bootstrap script should have already executed as part of the Vagrant provisioning process.
#!/bin/sh

# Run on VM to bootstrap Puppet Agent nodes
# http://blog.kloudless.com/2013/07/01/automating-development-environments-with-vagrant-and-puppet/

if ps aux | grep "puppet agent" | grep -v grep 2> /dev/null
then
    echo "Puppet Agent is already installed. Moving on..."
else
    sudo apt-get install -yq puppet
fi

if cat /etc/crontab | grep puppet 2> /dev/null
then
    echo "Puppet Agent is already configured. Exiting..."
else
    sudo apt-get update -yq && sudo apt-get upgrade -yq

    sudo puppet resource cron puppet-agent ensure=present user=root minute=30 \
        command='/usr/bin/puppet agent --onetime --no-daemonize --splay'

    sudo puppet resource service puppet ensure=running enable=true

    # Configure /etc/hosts file
    echo "" | sudo tee --append /etc/hosts 2> /dev/null && \
    echo "# Host config for Puppet Master and Agent Nodes" | sudo tee --append /etc/hosts 2> /dev/null && \
    echo "192.168.32.5    puppet.example.com  puppet" | sudo tee --append /etc/hosts 2> /dev/null && \
    echo "192.168.32.10   node01.example.com  node01" | sudo tee --append /etc/hosts 2> /dev/null && \
    echo "192.168.32.20   node02.example.com  node02" | sudo tee --append /etc/hosts 2> /dev/null

    # Add agent section to /etc/puppet/puppet.conf
    echo "" && echo "[agent]\nserver=puppet" | sudo tee --append /etc/puppet/puppet.conf 2> /dev/null

    sudo puppet agent --enable
fi
Run the two commands below within both the ‘node01.example.com‘ and ‘node02.example.com‘ agent nodes.
sudo service puppet status # test that agent was installed
sudo puppet agent --test --waitforcert=60 # initiate certificate signing request (CSR)
The second command above will manually start Puppet’s Certificate Signing Request (CSR) process, to generate the certificates and security credentials (private and public keys) generated by Puppet’s built-in certificate authority (CA). Each Puppet Agent node must have it certificate signed by the Puppet Master, first. According to Puppet’s website, “Before puppet agent nodes can retrieve their configuration catalogs, they need a signed certificate from the local Puppet certificate authority (CA). When using Puppet’s built-in CA (that is, not using an external CA), agents will submit a certificate signing request (CSR) to the CA Puppet Master and will retrieve a signed certificate once one is available.”

Agent Node Starting Puppet’s Certificate Signing Request (CSR) Process
Back on the Puppet Master Server, run the following commands to sign the certificate(s) from the agent node(s). You may sign each node’s certificate individually, or wait and sign them all at once. Note the agent node(s) will wait for the Puppet Master to sign the certificate, before continuing with the Puppet Agent configuration run.
sudo puppet cert list # should see 'node01.example.com' cert waiting for signature
sudo puppet cert sign --all # sign the agent node certs
sudo puppet cert list --all # check for signed certs

Puppet Master Completing Puppet’s Certificate Signing Request (CSR) Process
Once the certificate signing process is complete, the Puppet Agent retrieves the client configuration from the Puppet Master and applies it to the local agent node. The Puppet Agent will execute all applicable steps in the site.pp manifest on the Puppet Master server, designated for that specific Puppet Agent node (ie.’node node02.example.com {...}‘).

Configuration Run Completed on Puppet Agent Node
Below is the main site.pp manifest on the Puppet Master server, applied by Puppet Agent on the agent nodes.
node default {
# Test message
  notify { "Debug output on ${hostname} node.": }

  include ntp, git
}

node 'node01.example.com', 'node02.example.com' {
# Test message
  notify { "Debug output on ${hostname} node.": }

  include ntp, git, docker, fig
}
That’s it! You should now have one server VM running Puppet Master, and two agent node VMs running Puppet Agent. Both agent nodes should have successfully been registered with Puppet Master, and configured themselves based on the Puppet Master’s main manifest. Agent node configuration includes installing ntp, git, Fig, and Docker.
Helpful Links
All the source code this project is on Github.
Puppet Glossary (of terms):
https://docs.puppetlabs.com/references/glossary.html
Puppet Labs Open Source Automation Tools:
http://puppetlabs.com/misc/download-options
Puppet Master Overview:
http://ci.openstack.org/puppet.html
Install Puppet on Ubuntu:
https://docs.puppetlabs.com/guides/install_puppet/install_debian_ubuntu.html
Installing Puppet Master:
http://andyhan.linuxdict.com/index.php/sys-adm/item/273-puppet-371-on-centos-65-quick-start-i
Regenerating Node Certificates:
https://docs.puppetlabs.com/puppet/latest/reference/ssl_regenerate_certificates.html
Automating Development Environments with Vagrant and Puppet:
http://blog.kloudless.com/2013/07/01/automating-development-environments-with-vagrant-and-puppet
Create Multi-VM Environments Using Vagrant, Chef, and JSON
Posted by Gary A. Stafford in Build Automation, DevOps, Enterprise Software Development, Software Development on February 27, 2014
Create and manage ‘multi-machine’ environments with Vagrant, using JSON configuration files. Allow increased portability across hosts, environments, and organizations.

Introduction
As their website says, Vagrant has made it very easy to ‘create and configure lightweight, reproducible, and portable development environments.’ Based on Ruby, the elegantly simple open-source programming language, Vagrant requires a minimal learning curve to get up and running.
In this post, we will create what Vagrant refers to as a ‘multi-machine’ environment. We will provision three virtual machines (VMs). The VMs will mirror a typical three-tier architected environment, with separate web, application, and database servers.
We will move all the VM-specific information from the Vagrantfile to a separate JSON format configuration file. There are a few advantages to moving the configuration information to separate file. First, we can configure any number VMs, while keeping the Vagrantfile exactly the same. Secondly and more importantly, we can re-use the same Vagrantfile to build different VMs on another host machine.
Although certainly not required, I am also using Chef in this example. More specifically, I am using Hosted Chef to further configure the VMs. Like the VM-specific information above, I have also moved the Chef-specific information to a separate JSON configuration file. We can now use the same Vagrantfile within another Chef Environment, or even within another Chef Organization, using an alternate configuration files. If you are not a Chef user, you can disregard that part of the configuration code. Alternately, you can substitute the Chef configuration code for Puppet, if that is your configuration automation tool of choice.
The only items we will not remove from the Vagrantfile are the Vagrant Box and synced folder configurations. These items could also be moved to a separate configuration file, making the Vagrantfile even more generic and portable.
The Code
Below is the VM-specific JSON configuration file, containing all the individual configuration information necessary for Vagrant to build the three VMs: ‘apps’, dbs’, and ‘web’. Each child ‘node’ in the parent ‘nodes’ object contains key/value pairs for VM names, IP addresses, forwarding ports, host names, and memory settings. To add another VM, you would simply add another ‘node’ object.
| { | |
| "nodes": { | |
| "apps": { | |
| ":node": "ApplicationServer-201", | |
| ":ip": "192.168.33.21", | |
| ":host": "apps.server-201", | |
| "ports": [ | |
| { | |
| ":host": 2201, | |
| ":guest": 22, | |
| ":id": "ssh" | |
| }, | |
| { | |
| ":host": 7709, | |
| ":guest": 7709, | |
| ":id": "wls-listen" | |
| } | |
| ], | |
| ":memory": 2048 | |
| }, | |
| "dbs": { | |
| ":node": "DatabaseServer-301", | |
| ":ip": "192.168.33.31", | |
| ":host": "dbs.server-301", | |
| "ports": [ | |
| { | |
| ":host": 2202, | |
| ":guest": 22, | |
| ":id": "ssh" | |
| }, | |
| { | |
| ":host": 1529, | |
| ":guest": 1529, | |
| ":id": "xe-db" | |
| }, | |
| { | |
| ":host": 8380, | |
| ":guest": 8380, | |
| ":id": "xe-listen" | |
| } | |
| ], | |
| ":memory": 2048 | |
| }, | |
| "web": { | |
| ":node": "WebServer-401", | |
| ":ip": "192.168.33.41", | |
| ":host": "web.server-401", | |
| "ports": [ | |
| { | |
| ":host": 2203, | |
| ":guest": 22, | |
| ":id": "ssh" | |
| }, | |
| { | |
| ":host": 4756, | |
| ":guest": 4756, | |
| ":id": "apache" | |
| } | |
| ], | |
| ":memory": 1024 | |
| } | |
| } | |
| } |
Next, is the Chef-specific JSON configuration file, containing Chef configuration information common to all the VMs.
| { | |
| "chef": { | |
| ":chef_server_url": "https://api.opscode.com/organizations/my-organization", | |
| ":client_key_path": "/etc/chef/my-client.pem", | |
| ":environment": "my-environment", | |
| ":provisioning_path": "/etc/chef", | |
| ":validation_client_name": "my-client", | |
| ":validation_key_path": "~/.chef/my-client.pem" | |
| } | |
| } |
Lastly, the Vagrantfile, which loads both configuration files. The Vagrantfile instructs Vagrant to loop through all nodes in the nodes.json file, provisioning VMs for each node. Vagrant then uses the chef.json file to further configure the VMs.
The environment and node configuration items in the chef.json reference an actual Chef Environment and Chef Nodes. They are both part of a Chef Organization, which is configured within a Hosted Chef account.
| # -*- mode: ruby -*- | |
| # vi: set ft=ruby : | |
| # Multi-VM Configuration: Builds Web, Application, and Database Servers using JSON config file | |
| # Configures VMs based on Hosted Chef Server defined Environment and Node (vs. Roles) | |
| # Author: Gary A. Stafford | |
| # read vm and chef configurations from JSON files | |
| nodes_config = (JSON.parse(File.read("nodes.json")))['nodes'] | |
| chef_config = (JSON.parse(File.read("chef.json")))['chef'] | |
| VAGRANTFILE_API_VERSION = "2" | |
| Vagrant.require_plugin "vagrant-omnibus" | |
| Vagrant.configure(VAGRANTFILE_API_VERSION) do |config| | |
| config.vm.box = "vagrant-oracle-vm-saucy64" | |
| config.vm.box_url = "http://cloud-images.ubuntu.com/vagrant/saucy/current/saucy-server-cloudimg-amd64-vagrant-disk1.box" | |
| config.omnibus.chef_version = :latest | |
| nodes_config.each do |node| | |
| node_name = node[0] # name of node | |
| node_values = node[1] # content of node | |
| config.vm.define node_name do |config| | |
| # configures all forwarding ports in JSON array | |
| ports = node_values['ports'] | |
| ports.each do |port| | |
| config.vm.network :forwarded_port, | |
| host: port[':host'], | |
| guest: port[':guest'], | |
| id: port[':id'] | |
| end | |
| config.vm.hostname = node_values[':node'] | |
| config.vm.network :private_network, ip: node_values[':ip'] | |
| # syncs local repository of large third-party installer files (quicker than downloading each time) | |
| config.vm.synced_folder "#{ENV['HOME']}/Documents/git_repos/chef-artifacts", "/vagrant" | |
| config.vm.provider :virtualbox do |vb| | |
| vb.customize ["modifyvm", :id, "--memory", node_values[':memory']] | |
| vb.customize ["modifyvm", :id, "--name", node_values[':node']] | |
| end | |
| # chef configuration section | |
| config.vm.provision :chef_client do |chef| | |
| chef.environment = chef_config[':environment'] | |
| chef.provisioning_path = chef_config[':provisioning_path'] | |
| chef.chef_server_url = chef_config[':chef_server_url'] | |
| chef.validation_key_path = chef_config[':validation_key_path'] | |
| chef.node_name = node_values[':node'] | |
| chef.validation_client_name = chef_config[':validation_client_name'] | |
| chef.client_key_path = chef_config[':client_key_path'] | |
| end | |
| end | |
| end | |
| end |
Each VM has a varying number of ports it needs to configue and forward. To accomplish this, the Vagrantfile not only loops through the each node, it also loops through each port configuration object it finds within the node object. Shown below is the Database Server VM within VirtualBox, containing three forwarding ports.

VirtualBox Port Forwarding Rules
In addition to the gists above, this repository on GitHub contains a complete copy of all the code used in the post.
The Results
Running the ‘vagrant up’ command will provision all three individually configured VMs. Once created and running in VirtualBox, Chef further configures the VMs with the necessary settings and applications specific to each server’s purposes. You can just as easily create 10, 100, or 1,000 VMs using this same process.

VirtualBox View of Multiple Virtual Machines
.

Virtual Media Manager View of VMs
Helpful Links
Dynamically Allocated Storage Issues with Ubuntu’s Cloud Images
Posted by Gary A. Stafford in Build Automation, Enterprise Software Development on December 22, 2013

Background
According to Canonical, ‘Ubuntu Cloud Images are pre-installed disk images that have been customized by Ubuntu engineering to run on cloud-platforms such as Amazon EC2, Openstack, Windows and LXC’. Ubuntu also disk images, or ‘boxes’, built specifically for Vagrant and VirtualBox. Boxes, according to Vagrant, ‘are the skeleton from which Vagrant machines are constructed. They are portable files which can be used by others on any platform that runs Vagrant to bring up a working environment‘. Ubuntu’s images are very popular with Vagrant users to build their VMs.
Assuming you have VirtualBox and Vagrant installed on your Windows, Mac OS X, or Linux system, with a few simple commands, ‘vagrant add box…’, ‘vagrant init…’, and ‘vagrant up’, you can provision a VM from one of these boxes.
Dynamically Allocated Storage
The Ubuntu Cloud Images (boxes), are Virtual Machine Disk (VMDK) format files. These VMDK files are configured for dynamically allocated storage, with a virtual size of 40 GB. That means the VMDK format file should grow to an actual size of 40 GB, as files are added. According to VirtualBox, the VM ‘will initially be very small and not occupy any space for unused virtual disk sectors, but will grow every time a disk sector is written to for the first time, until the drive reaches the maximum capacity chosen when the drive was created’.
To illustrate dynamically allocated storage, below are three freshly provisioned VirtualBox virtual machines (VM), on three different hosts, all with different operating systems. One VM is hosted on Windows 7 Enterprise, another on Ubuntu 13.10 Desktop Edition, and the last on Mac OS X 10.6.8. The VMs were all created with Vagrant from the official Ubuntu Server 13.10 (Saucy Salamander) cloud images. The Windows and Ubuntu hosts used the 64-bit version. The Mac OS X host used the 32-bit version. According to VirtualBox Manager, on all three host platforms, the virtual size of the VMs is 40 GB and the actual size is about 1 GB.

VirtualBox Storage Settings on Windows Host

VirtualBox Storage Settings on Ubuntu Host

VirtualBox Storage Settings on Mac OS X Host
So What’s the Problem?
After a significant amount of troubleshooting Chef recipe problems on two different Ubuntu-hosted VMs, the issue with the cloud images became painfully clear. Other than a single (seemingly charmed) Windows host, none of the VMs I tested on Windows-, Ubuntu-, and Mac OS X-hosts would expand beyond 4 GB. Below is the file system disk space usage report from four host’s VMs. All four were created with the most current version of Vagrant (1.4.1), and managed with the most current version of VirtualBox (4.3.6.x).
Windows-hosted 64-bit Cloud Image VM #1:
vagrant@vagrant-ubuntu-saucy-64:/tmp$ df -hT
Filesystem     Type      Size  Used Avail Use% Mounted on
/dev/sda1      ext4       40G  1.1G   37G   3% /
none           tmpfs     4.0K     0  4.0K   0% /sys/fs/cgroup
udev           devtmpfs  241M   12K  241M   1% /dev
tmpfs          tmpfs      50M  336K   49M   1% /run
none           tmpfs     5.0M     0  5.0M   0% /run/lock
none           tmpfs     246M     0  246M   0% /run/shm
none           tmpfs     100M     0  100M   0% /run/user
/vagrant       vboxsf    233G  196G   38G  85% /vagrant
Windows-hosted 32-bit Cloud Image VM #2:
vagrant@vagrant-ubuntu-saucy-32:~$ df -hT
Filesystem     Type      Size  Used Avail Use% Mounted on
/dev/sda1      ext4      4.0G 1012M  2.8G  27% /
none           tmpfs     4.0K     0  4.0K   0% /sys/fs/cgroup
udev           devtmpfs  245M  8.0K  245M   1% /dev
tmpfs          tmpfs      50M  336K   50M   1% /run
none           tmpfs     5.0M  4.0K  5.0M   1% /run/lock
none           tmpfs     248M     0  248M   0% /run/shm
none           tmpfs     100M     0  100M   0% /run/user
/vagrant       vboxsf    932G  209G  724G  23% /vagrant
Ubuntu-hosted 64-bit Cloud Image VM:
vagrant@vagrant-ubuntu-saucy-64:~$ df -hT
Filesystem     Type      Size  Used Avail Use% Mounted on
/dev/sda1      ext4      4.0G  1.1G  2.7G  28% /
none           tmpfs     4.0K     0  4.0K   0% /sys/fs/cgroup
udev           devtmpfs  241M  8.0K  241M   1% /dev
tmpfs          tmpfs      50M  336K   49M   1% /run
none           tmpfs     5.0M     0  5.0M   0% /run/lock
none           tmpfs     246M     0  246M   0% /run/shm
none           tmpfs     100M     0  100M   0% /run/user
/vagrant       vboxsf     74G   65G  9.1G  88% /vagrant
Mac OS X-hosted 32-bit Cloud Image VM:
vagrant@vagrant-ubuntu-saucy-32:~$ df -hT
Filesystem     Type      Size  Used Avail Use% Mounted on
/dev/sda1      ext4      4.0G 1012M  2.8G  27% /
none           tmpfs     4.0K     0  4.0K   0% /sys/fs/cgroup
udev           devtmpfs  245M   12K  245M   1% /dev
tmpfs          tmpfs      50M  336K   50M   1% /run
none           tmpfs     5.0M     0  5.0M   0% /run/lock
none           tmpfs     248M     0  248M   0% /run/shm
none           tmpfs     100M     0  100M   0% /run/user
/vagrant       vboxsf    149G   71G   79G  48% /vagrant
On the first Windows-hosted VM (the only host that actually worked), the virtual SCSI disk device (sda1), formatted ‘ext4‘, had a capacity of 40 GB. But, on the other three hosts, the same virtual device only had a capacity of 4 GB. I tested the various 32- and 64-bit Ubuntu Server 12.10 (Quantal Quetzal), 13.04 (Raring Ringtail), and 13.10 (Saucy Salamander) cloud images. They all exhibited the same issue. However, the Ubuntu 12.04.3 LTS (Precise Pangolin) worked fine on all three host OS systems.
To prove the issue was specifically with Ubuntu’s cloud images, I also tested boxes from Vagrant’s own repository, as well as other third-party providers. They all worked as expected, with no storage discrepancies. This was suggested in the only post I found on this issue, from StackExchange.
To confirm the Ubuntu-hosted VM will not expand beyond 4 GB, I also created a few multi-gigabyte files on each VM, totally 4 GB. The VMs virtual drive would not expand beyond 4 GB limit to accommodate the new files, as demonstrated below on a Ubuntu-hosted VM:
vagrant@vagrant-ubuntu-saucy-64:~$ dd if=/dev/zero of=/tmp/big_file2.bin bs=1M count=2000
dd: writing '/tmp/big_file2.bin': No space left on device
742+0 records in
741+0 records out
777560064 bytes (778 MB) copied, 1.81098 s, 429 MB/s

vagrant@vagrant-ubuntu-saucy-64:~$ df -hT
Filesystem     Type      Size  Used Avail Use% Mounted on
/dev/sda1      ext4      4.0G  3.7G  196K 100% /
The exact cause eludes me, but I tend to think the cloud images are the issue. I know they are capable of working, since the Ubuntu 12.04.3 cloud images expand to 40 GB, but the three most recent releases are limited to 4 GB. Whatever the cause, it’s a significant problem. Imagine you’ve provisioned a 100 or a 1,000 server nodes on your network from any of these cloud images, expecting them to grow to 40 GB, but really only having 10% of that potential. Worse, they have live production data on them, and suddenly run out of space.
Test Results
Below is the complete shell sessions from three hosts.
Windows-hosted 64-bit Cloud Image VM #1:
| gstafford@windows-host: ~/Documents/GitHub | |
| $ vagrant --version | |
| Vagrant 1.4.1 | |
| gstafford@windows-host: /c/Program Files/Oracle/VirtualBox | |
| $ VBoxManage.exe --version | |
| 4.3.6r91406 | |
| gstafford@windows-host: ~/Documents/GitHub | |
| $ mkdir cloudimage-test-win | |
| gstafford@windows-host: ~/Documents/GitHub | |
| $ cd cloudimage-test-win | |
| gstafford@windows-host: ~/Documents/GitHub/cloudimage-test-win | |
| $ vagrant init | |
| A `Vagrantfile` has been placed in this directory. You are now | |
| ready to `vagrant up` your first virtual environment! Please read | |
| the comments in the Vagrantfile as well as documentation on | |
| `vagrantup.com` for more information on using Vagrant. | |
| gstafford@windows-host: ~/Documents/GitHub/cloudimage-test-win | |
| $ vagrant up | |
| Bringing machine 'default' up with 'virtualbox' provider... | |
| [default] Importing base box 'vagrant-vm-saucy-server'... | |
| [default] Matching MAC address for NAT networking... | |
| [default] Setting the name of the VM... | |
| [default] Clearing any previously set forwarded ports... | |
| [default] Fixed port collision for 22 => 2222. Now on port 2200. | |
| [default] Clearing any previously set network interfaces... | |
| [default] Preparing network interfaces based on configuration... | |
| [default] Forwarding ports... | |
| [default] -- 22 => 2200 (adapter 1) | |
| [default] Booting VM... | |
| [default] Waiting for machine to boot. This may take a few minutes... | |
| DL is deprecated, please use Fiddle | |
| [default] Machine booted and ready! | |
| [default] The guest additions on this VM do not match the installed version of | |
| VirtualBox! In most cases this is fine, but in rare cases it can | |
| cause things such as shared folders to not work properly. If you see | |
| shared folder errors, please make sure the guest additions within the | |
| virtual machine match the version of VirtualBox you have installed on | |
| your host and reload your VM. | |
| Guest Additions Version: 4.2.16 | |
| VirtualBox Version: 4.3 | |
| [default] Mounting shared folders... | |
| [default] -- /vagrant | |
| gstafford@windows-host: ~/Documents/GitHub/cloudimage-test-win | |
| $ vagrant ssh | |
| Welcome to Ubuntu 13.10 (GNU/Linux 3.11.0-14-generic x86_64) | |
| * Documentation: https://help.ubuntu.com/ | |
| System information disabled due to load higher than 1.0 | |
| Get cloud support with Ubuntu Advantage Cloud Guest: | |
| http://www.ubuntu.com/business/services/cloud | |
| vagrant@vagrant-ubuntu-saucy-64:/tmp$ df -hT | |
| Filesystem Type Size Used Avail Use% Mounted on | |
| /dev/sda1 ext4 40G 1.1G 37G 3% / | |
| none tmpfs 4.0K 0 4.0K 0% /sys/fs/cgroup | |
| udev devtmpfs 241M 12K 241M 1% /dev | |
| tmpfs tmpfs 50M 336K 49M 1% /run | |
| none tmpfs 5.0M 0 5.0M 0% /run/lock | |
| none tmpfs 246M 0 246M 0% /run/shm | |
| none tmpfs 100M 0 100M 0% /run/user | |
| /vagrant vboxsf 233G 196G 38G 85% /vagrant | |
| vagrant@vagrant-ubuntu-saucy-64:/tmp$ dd if=/dev/zero of=/tmp/big_file1.bin bs=1M count=2000 | |
| 2000+0 records in | |
| 2000+0 records out | |
| 2097152000 bytes (2.1 GB) copied, 5.11716 s, 410 MB/s | |
| vagrant@vagrant-ubuntu-saucy-64:/tmp$ dd if=/dev/zero of=/tmp/big_file2.bin bs=1M count=2000 | |
| 2000+0 records in | |
| 2000+0 records out | |
| 2097152000 bytes (2.1 GB) copied, 7.78449 s, 269 MB/s | |
| vagrant@vagrant-ubuntu-saucy-64:/tmp$ df -hT | |
| Filesystem Type Size Used Avail Use% Mounted on | |
| /dev/sda1 ext4 40G 5.0G 33G 14% / | |
| none tmpfs 4.0K 0 4.0K 0% /sys/fs/cgroup | |
| udev devtmpfs 241M 12K 241M 1% /dev | |
| tmpfs tmpfs 50M 336K 49M 1% /run | |
| none tmpfs 5.0M 0 5.0M 0% /run/lock | |
| none tmpfs 246M 0 246M 0% /run/shm | |
| none tmpfs 100M 0 100M 0% /run/user | |
| /vagrant vboxsf 233G 196G 38G 85% /vagrant | |
| vagrant@vagrant-ubuntu-saucy-64:/tmp$ |
Ubuntu-hosted 64-bit Cloud Image VM:
| gstafford@ubuntu-host:~/GitHub/cloudimage-test-ubt$ vagrant --version | |
| Vagrant 1.4.1 | |
| gstafford@ubuntu-host:/usr/bin$ vboxmanage --version | |
| 4.3.6r91406 | |
| gstafford@ubuntu-host:~/GitHub$ mkdir cloudimage-test-ubt | |
| gstafford@ubuntu-host:~/GitHub$ cd cloudimage-test-ubt/ | |
| gstafford@ubuntu-host:~/GitHub/cloudimage-test-ubt$ vagrant init | |
| A `Vagrantfile` has been placed in this directory. You are now | |
| ready to `vagrant up` your first virtual environment! Please read | |
| the comments in the Vagrantfile as well as documentation on | |
| `vagrantup.com` for more information on using Vagrant. | |
| gstafford@ubuntu-host:~/GitHub/cloudimage-test-ubt$ vagrant up | |
| Bringing machine 'default' up with 'virtualbox' provider... | |
| [default] Box 'vagrant-vm-saucy-server' was not found. Fetching box from specified URL for | |
| the provider 'virtualbox'. Note that if the URL does not have | |
| a box for this provider, you should interrupt Vagrant now and add | |
| the box yourself. Otherwise Vagrant will attempt to download the | |
| full box prior to discovering this error. | |
| Downloading box from URL: file:/home/gstafford/GitHub/cloudimage-test-ubt/saucy-server-cloudimg-amd64-vagrant-disk1.box | |
| Extracting box...te: 23.8M/s, Estimated time remaining: 0:00:01)) | |
| Successfully added box 'vagrant-vm-saucy-server' with provider 'virtualbox'! | |
| [default] Importing base box 'vagrant-vm-saucy-server'... | |
| [default] Matching MAC address for NAT networking... | |
| [default] Setting the name of the VM... | |
| [default] Clearing any previously set forwarded ports... | |
| [default] Fixed port collision for 22 => 2222. Now on port 2200. | |
| [default] Clearing any previously set network interfaces... | |
| [default] Preparing network interfaces based on configuration... | |
| [default] Forwarding ports... | |
| [default] -- 22 => 2200 (adapter 1) | |
| [default] Booting VM... | |
| [default] Waiting for machine to boot. This may take a few minutes... | |
| [default] Machine booted and ready! | |
| [default] The guest additions on this VM do not match the installed version of | |
| VirtualBox! In most cases this is fine, but in rare cases it can | |
| cause things such as shared folders to not work properly. If you see | |
| shared folder errors, please make sure the guest additions within the | |
| virtual machine match the version of VirtualBox you have installed on | |
| your host and reload your VM. | |
| Guest Additions Version: 4.2.16 | |
| VirtualBox Version: 4.3 | |
| [default] Mounting shared folders... | |
| [default] -- /vagrant | |
| gstafford@ubuntu-host:~/GitHub/cloudimage-test-ubt$ vagrant ssh | |
| Welcome to Ubuntu 13.10 (GNU/Linux 3.11.0-15-generic x86_64) | |
| * Documentation: https://help.ubuntu.com/ | |
| System information disabled due to load higher than 1.0 | |
| Get cloud support with Ubuntu Advantage Cloud Guest: | |
| http://www.ubuntu.com/business/services/cloud | |
| _____________________________________________________________________ | |
| WARNING! Your environment specifies an invalid locale. | |
| This can affect your user experience significantly, including the | |
| ability to manage packages. You may install the locales by running: | |
| sudo apt-get install language-pack-en | |
| or | |
| sudo locale-gen en_US.UTF-8 | |
| To see all available language packs, run: | |
| apt-cache search "^language-pack-[a-z][a-z]$" | |
| To disable this message for all users, run: | |
| sudo touch /var/lib/cloud/instance/locale-check.skip | |
| _____________________________________________________________________ | |
| vagrant@vagrant-ubuntu-saucy-64:~$ df -hT | |
| Filesystem Type Size Used Avail Use% Mounted on | |
| /dev/sda1 ext4 4.0G 1.1G 2.7G 28% / | |
| none tmpfs 4.0K 0 4.0K 0% /sys/fs/cgroup | |
| udev devtmpfs 241M 8.0K 241M 1% /dev | |
| tmpfs tmpfs 50M 336K 49M 1% /run | |
| none tmpfs 5.0M 0 5.0M 0% /run/lock | |
| none tmpfs 246M 0 246M 0% /run/shm | |
| none tmpfs 100M 0 100M 0% /run/user | |
| /vagrant vboxsf 74G 65G 9.1G 88% /vagrant | |
| vagrant@vagrant-ubuntu-saucy-64:~$ dd if=/dev/zero of=/tmp/big_file1.bin bs=1M count=2000 | |
| 2000+0 records in | |
| 2000+0 records out | |
| 2097152000 bytes (2.1 GB) copied, 4.72951 s, 443 MB/s | |
| vagrant@vagrant-ubuntu-saucy-64:~$ dd if=/dev/zero of=/tmp/big_file2.bin bs=1M count=2000 | |
| dd: writing '/tmp/big_file2.bin': No space left on device | |
| 742+0 records in | |
| 741+0 records out | |
| 777560064 bytes (778 MB) copied, 1.81098 s, 429 MB/s | |
| vagrant@vagrant-ubuntu-saucy-64:~$ df -hT | |
| Filesystem Type Size Used Avail Use% Mounted on | |
| /dev/sda1 ext4 4.0G 3.7G 196K 100% / | |
| none tmpfs 4.0K 0 4.0K 0% /sys/fs/cgroup | |
| udev devtmpfs 241M 8.0K 241M 1% /dev | |
| tmpfs tmpfs 50M 336K 49M 1% /run | |
| none tmpfs 5.0M 0 5.0M 0% /run/lock | |
| none tmpfs 246M 0 246M 0% /run/shm | |
| none tmpfs 100M 0 100M 0% /run/user | |
| /vagrant vboxsf 74G 65G 9.1G 88% /vagrant | |
| vagrant@vagrant-ubuntu-saucy-64:~$ |
Mac OS X-hosted 32-bit Cloud Image VM:
| gstafford@mac-development:cloudimage-test-osx $ vagrant box add saucycloud32 http://cloud-images.ubuntu.com/vagrant/saucy/current/saucy-server-cloudimg-i386-vagrant-disk1.box | |
| Downloading box from URL: http://cloud-images.ubuntu.com/vagrant/saucy/current/saucy-server-cloudimg-i386-vagrant-disk1.box | |
| Extracting box...te: 1383k/s, Estimated time remaining: 0:00:01) | |
| Successfully added box 'saucycloud32' with provider 'virtualbox'! | |
| gstafford@mac-development:cloudimage-test-osx $ vagrant init saucycloud32 | |
| A `Vagrantfile` has been placed in this directory. You are now | |
| ready to `vagrant up` your first virtual environment! Please read | |
| the comments in the Vagrantfile as well as documentation on | |
| `vagrantup.com` for more information on using Vagrant. | |
| gstafford@mac-development:cloudimage-test-osx $ vagrant up | |
| Bringing machine 'default' up with 'virtualbox' provider... | |
| [default] Importing base box 'saucycloud32'... | |
| [default] Matching MAC address for NAT networking... | |
| [default] Setting the name of the VM... | |
| [default] Clearing any previously set forwarded ports... | |
| [default] Clearing any previously set network interfaces... | |
| [default] Preparing network interfaces based on configuration... | |
| [default] Forwarding ports... | |
| [default] -- 22 => 2222 (adapter 1) | |
| [default] Booting VM... | |
| [default] Waiting for machine to boot. This may take a few minutes... | |
| [default] Machine booted and ready! | |
| [default] The guest additions on this VM do not match the installed version of | |
| VirtualBox! In most cases this is fine, but in rare cases it can | |
| prevent things such as shared folders from working properly. If you see | |
| shared folder errors, please make sure the guest additions within the | |
| virtual machine match the version of VirtualBox you have installed on | |
| your host and reload your VM. | |
| Guest Additions Version: 4.2.16 | |
| VirtualBox Version: 4.3 | |
| [default] Mounting shared folders... | |
| [default] -- /vagrant | |
| gstafford@mac-development:cloudimage-test-osx $ vagrant ssh | |
| Welcome to Ubuntu 13.10 (GNU/Linux 3.11.0-15-generic i686) | |
| * Documentation: https://help.ubuntu.com/ | |
| System information disabled due to load higher than 1.0 | |
| Get cloud support with Ubuntu Advantage Cloud Guest: | |
| http://www.ubuntu.com/business/services/cloud | |
| vagrant@vagrant-ubuntu-saucy-32:~$ df -hT | |
| Filesystem Type Size Used Avail Use% Mounted on | |
| /dev/sda1 ext4 4.0G 1012M 2.8G 27% / | |
| none tmpfs 4.0K 0 4.0K 0% /sys/fs/cgroup | |
| udev devtmpfs 245M 12K 245M 1% /dev | |
| tmpfs tmpfs 50M 336K 50M 1% /run | |
| none tmpfs 5.0M 0 5.0M 0% /run/lock | |
| none tmpfs 248M 0 248M 0% /run/shm | |
| none tmpfs 100M 0 100M 0% /run/user | |
| /vagrant vboxsf 149G 71G 79G 48% /vagrant | |
| vagrant@vagrant-ubuntu-saucy-32:~$ exit | |
| gstafford@mac-development:MacOS$ VBoxManage list vms --long hdds | |
| UUID: ee72161f-25c5-4714-ab28-6ee9929500e8 | |
| Parent UUID: base | |
| State: locked write | |
| Type: normal (base) | |
| Location: /Users/gstafford/VirtualBox VMs/cloudimage-test-osx_default_1389280075070_65829/box-disk1.vmdk | |
| Storage format: VMDK | |
| Format variant: dynamic default | |
| Capacity: 40960 MBytes | |
| Size on disk: 1031 MBytes | |
| In use by VMs: cloudimage-test-osx_default_1389280075070_65829 (UUID: 51df4527-99af-48be-92cd-ad73110be88c) |
Resources
Ubuntu Cloud Images for Vagrant
Fourth Extended Filesystem (ext4)
Similar Issue on StackOverflow
Updating Ubuntu Linux to the Latest JDK
Posted by Gary A. Stafford in DevOps, Enterprise Software Development, Java Development, Software Development on December 16, 2013
Introduction
If you are Java Developer, new to the Linux environment, installing and configuring Java updates can be a bit daunting. In the following post, we will update a VirtualBox VM running Canonical’s popular Ubuntu Linux operating system. The VM currently contains an earlier version of Java. We will update the VM to the latest release of the Java.
All code for this post is available as Gists on GitHub.com, including a complete install script, explained at the end of this post.
Current Version of Java?
First, we will use the ‘update-alternatives –display java’ command to review all the versions of Java currently installed on the VM. We can have multiple copies installed, but only one will be configured and active. We can verify the active version using the ‘java -version’ command.
| # preview java alternatives | |
| update-alternatives --display java | |
| # check current version of java | |
| java -version |
Check Current Version of Java
In the above example, the 1.7.0_17 JDK version of Java is configured and active. That version is located in the ‘/usr/lib/jvm/jdk1.7.0_17’ subdirectory. There are two other Java versions also installed but not active, an Oracle 1.7.0_17 JRE version and an older 1.7.0_04 JDK version. These three versions are referred to as ‘alternatives’, thus the ‘alternatives’ command. By selecting an alternative version of Java, we control which java.exe binary executable file the system calls when the ‘java’ command is executed. In a many software development environments, you may need different versions of Java, depending on different client project’s level of technology.
Alternatives
According to About.com, alternatives ‘make it possible for several programs fulfilling the same or similar functions to be installed on a single system at the same time. A generic name in the filesystem is shared by all files providing interchangeable functionality. The alternatives system and the system administrator together determine which actual file is referenced by this generic name. The generic name is not a direct symbolic link to the selected alternative. Instead, it is a symbolic link to a name in the alternatives directory, which in turn is a symbolic link to the actual file referenced.’
We can see this system at work by changing to our ‘/usr/bin’ directory. This directory contains the majority of binary executables on the system. Executing an ‘ls -Al /usr/bin/* | grep -e java -e jar -e appletviewer -e mozilla-javaplugin.so’ command, we see that each Java executable is actually a symbolic link to the alternatives directory, not a binary executable file.
| # view java-related executables | |
| ls -Al /usr/bin/* | \ | |
| grep -e java -e jar -e jexec -e appletviewer -e mozilla-javaplugin.so | |
| # view all the commands which support alternatives | |
| update-alternatives --get-selections | |
| # view all java-related executables which support alternatives | |
| update-alternatives --get-selections | \ | |
| grep -e java -e jar -e jexec -e appletviewer -e mozilla-javaplugin.so |

Java Symbolic Links to Alternatives Directory
To find out all the commands which support alternatives, you can use the ‘update-alternatives –get-selections’ command. We can use a similar command to get just the Java commands, ‘update-alternatives –get-selections | grep -e java -e jar -e appletview -e mozilla-javaplugin.so’.

Java-Related Executable Alternatives (view after update)
Computer Architecture?
Next, we need to determine the computer processor architecture of the VM. The architecture determines which version of Java to download. The machine that hosts our VM may have a 64-bit architecture (also known as x86-64, x64, and amd64), while the VM might have a 32-bit architecture (also known as IA-32 or x86). Trying to install 64-bit versions of software onto 32-bit VMs is a common mistake.
The VM’s architecture was originally displayed with the ‘java -version’ command, above. To confirm the 64-bit architecture we can use either the ‘uname -a’ or ‘arch’ command.
| # determine the processor architecture | |
| uname -a | |
| arch |

Find Your Processor’s Architecture
JRE or JDK?
One last decision. The Java Runtime Environment (JRE) purpose is to run Java applications. The JRE covers most end-user’s needs. The Java Development Kit (JDK) purpose is to develop Java applications. The JDK includes a complete JRE, plus tools for developing, debugging, and monitoring Java applications. As developers, we will choose to install the JDK.
Download Latest Version
In the above screen grab, you see our VM is running a 64-bit version of Ubuntu 12.04.3 LTS (Precise Pangolin). Therefore, we will download the most recent version of the 64-bit Linux JDK. We could choose either Oracle’s commercial version of Java or the OpenJDK version. According to Oracle, the ‘OpenJDK is an open-source implementation of the Java Platform, Standard Edition (Java SE) specifications’. We will choose the latest commercial version of Oracle’s JDK. At the time of this post, that is JDK 7u45 (aka 1.7.0_45-b18).
The Linux file formats available for download, are a .rpm (Red Hat Package Manager) file and a .tar.gz file (aka tarball). For this post, we will download the tarball, the ‘jdk-7u45-linux-x64.tar.gz’ file.

Current JDK Downloads
Extract Tarball
We will use the command ‘sudo tar -zxvf jdk-7u45-linux-x64.tar.gz -C /usr/lib/jvm’, to extract the files directly to the ‘/usr/lib/jvm’ folder. This folder contains all previously installed versions of Java. Once the tarball’s files are extracted, we should see a new directory containing the new version of Java, ‘jdk1.7.0_45’, in the ‘/usr/lib/jvm’ directory.
| # extract new version of java from the downloaded tarball | |
| cd ~/Downloads/Java | |
| ls | |
| sudo tar -zxvf jdk-7u45-linux-x64.tar.gz -C /usr/lib/jvm/ | |
| # change directories to the location of the extracted version of java | |
| cd /usr/lib/jvm/ | |
| ls |

Versions of Java on the VM
Installation
There are two configuration modes available in the alternatives system, manual and automatic mode. According to die.net, ‘when a link group is in manual mode, the alternatives system will not (automatically) make any changes to the system administrator’s settings’. When a link group is in automatic mode, the alternatives system ensures that the links in the group point to the highest priority alternatives appropriate for the group’.
We will first install and configure the new version of Java in manual mode. To install the new version of Java, we run ‘update-alternatives –install /usr/bin/java java /usr/lib/jvm/jdk1.7.0_45/jre/bin/java 4’. Note the last parameter, ‘4’, the priority. Why ‘4’? If we chose to use automatic mode, as we will a little later, we want our new Java version to have the highest numeric priority. In automatic mode, the system looks at the priority to determine which version of Java it will run. In the post’s first screen grab, note each of the three installed Java versions had different priorities: 1, 2, and 3. If we want to use automatic mode later, we must set a higher priority on our new version of Java, ‘4’ or greater. We will set it now as part of the install, so we can use it later in automatic mode.
Configuration
First, to configure (activate) the new Java version in alternatives manual mode, we will run ‘update-alternatives –config java’. We are prompted to choose from the list of alternatives for Java executables (java.exe), which has now grown from three to four choices. Choose the new JDK version of Java, which we just installed.
That’s it. The system has been instructed to use the version we selected as the Java alternative. Now, when we run the ‘java’ command, the system will access the newly configured JDK version. To verify, we rerun the ‘java -version’ command. The version of Java has changed since the first time we ran the command (see first screen grab).
| # find a higher priority number | |
| update-alternatives --display java | |
| # install new version of java | |
| sudo update-alternatives --install /usr/bin/java java \ | |
| /usr/lib/jvm/jdk1.7.0_45/jre/bin/java 4 | |
| # configure new version of java | |
| update-alternatives --config java | |
| # select the new version when prompted |

Install and Configure New Version of Java
Now let’s switch to automatic mode. To switch to automatic mode, we use ‘update-alternatives –auto java’. Notice how the mode has changed in the screen grab below and our version with the highest priority is selected.

Switching to Auto
Other Java Command Alternatives
We will repeat this process for the other Java-related executables. Many are part of the JDK Tools and Utilities. Java-related executables include the Javadoc Tool (javadoc), Java Web Start (javaws), Java Compiler (javac), and Java Archive Tool (jar), javap, javah, appletviewer, and the Java Plugin for Linux. Note if you are updating a headless VM, you would not have a web browser installed. Therefore it would not be necessary to configuring the mozilla-javaplugin.
| # install and configure other java executable alternatives in manual mode | |
| # install and update Java Web Start (javaws) | |
| update-alternatives --display javaws | |
| sudo update-alternatives --install /usr/bin/javaws javaws \ | |
| /usr/lib/jvm/jdk1.7.0_45/jre/bin/javaws 20000 | |
| update-alternatives --config javaws | |
| # install and update Java Compiler (javac) | |
| update-alternatives --display javac | |
| sudo update-alternatives --install /usr/bin/javac javac \ | |
| /usr/lib/jvm/jdk1.7.0_45/bin/javac 20000 | |
| update-alternatives --config javac | |
| # install and update Java Archive Tool (jar) | |
| update-alternatives --display jar | |
| sudo update-alternatives --install /usr/bin/jar jar \ | |
| /usr/lib/jvm/jdk1.7.0_45/bin/jar 20000 | |
| update-alternatives --config jar | |
| # jar signing and verification tool (jarsigner) | |
| update-alternatives --display jarsigner | |
| sudo sudo update-alternatives --install /usr/bin/jarsigner jarsigner \ | |
| /usr/lib/jvm/jdk1.7.0_45/bin/jarsigner 20000 | |
| update-alternatives --config jarsigner | |
| # install and update Java Archive Tool (javadoc) | |
| update-alternatives --display javadoc | |
| sudo update-alternatives --install /usr/bin/javadoc javadoc \ | |
| /usr/lib/jvm/jdk1.7.0_45/bin/javadoc 20000 | |
| update-alternatives --config javadoc | |
| # install and update Java Plugin for Linux (mozilla-javaplugin.so) | |
| update-alternatives --display mozilla-javaplugin.so | |
| sudo update-alternatives --install \ | |
| /usr/lib/mozilla/plugins/libjavaplugin.so mozilla-javaplugin.so \ | |
| /usr/lib/jvm/jdk1.7.0_45/jre/lib/amd64/libnpjp2.so 20000 | |
| update-alternatives --config mozilla-javaplugin.so | |
| # install and update Java disassembler (javap) | |
| update-alternatives --display javap | |
| sudo update-alternatives --install /usr/bin/javap javap \ | |
| /usr/lib/jvm/jdk1.7.0_45/bin/javap 20000 | |
| update-alternatives --config javap | |
| # install and update file that creates C header files and C stub (javah) | |
| update-alternatives --display javah | |
| sudo update-alternatives --install /usr/bin/javah javah \ | |
| /usr/lib/jvm/jdk1.7.0_45/bin/javah 20000 | |
| update-alternatives --config javah | |
| # jexec utility executes command inside the jail (jexec) | |
| update-alternatives --display jexec | |
| sudo update-alternatives --install /usr/bin/jexec jexec \ | |
| /usr/lib/jvm/jdk1.7.0_45/lib/jexec 20000 | |
| update-alternatives --config jexec | |
| # install and update file to run applets without a web browser (appletviewer) | |
| update-alternatives --display appletviewer | |
| sudo update-alternatives --install /usr/bin/appletviewer appletviewer \ | |
| /usr/lib/jvm/jdk1.7.0_45/bin/appletviewer 20000 | |
| update-alternatives --config appletviewer |

Configure Java Plug-in for Linux

Verify Java Version is Latest
JAVA_HOME
Many applications which need the JDK/JRE to run, look up the JAVA_HOME environment variable for the location of the Java compiler/interpreter. The most common approach is to hard-wire the JAVA_HOME variable to the current JDK directory. User the ‘sudo nano ~/.bashrc’ command to open the bashrc file. Add or modify the following line, ‘export JAVA_HOME=/usr/lib/jvm/jdk1.7.0_45’. Remember to also add the java executable path to the PATH variable, ‘export PATH=$PATH:$JAVA_HOME/bin’. Lastly, execute a ‘bash –login’ command for the changes to be visible in the current session.
Alternately, we could use a symbolic link to ‘default-java’. There are several good posts on the Internet on using the ‘default-java’ link.
| # open bashrc | |
| sudo nano ~/.bashrc | |
| #add these lines to bashrc file | |
| export JAVA_HOME=/usr/lib/jvm/jdk1.7.0_45 | |
| export PATH=$PATH:$JAVA_HOME/bin | |
| # for the changes to be visible in the current session | |
| bash --login |
Complete Scripted Example
Below is a complete script to install or update the latest JDK on Ubuntu. Simply download the tarball to your home directory, along with the below script, available on GitHub. Execute the script with a ‘sh install_java_complete.sh’. All java executables will be installed and configured as alternatives in automatic mode. The JAVA_HOME and PATH environment variables will also be set.
| #!/bin/bash | |
| ################################################################# | |
| # author: Gary A. Stafford | |
| # date: 2013-12-17 | |
| # source: http://www.programmaticponderings.com | |
| # description: complete code for install and config on Ubuntu | |
| # of jdk 1.7.0_45 in alteratives automatic mode | |
| ################################################################# | |
| ########## variables start ########## | |
| # priority value | |
| priority=20000 | |
| # path to binaries directory | |
| binaries=/usr/bin | |
| # path to libraries directory | |
| libraries=/usr/lib | |
| # path to new java version | |
| javapath=$libraries/jvm/jdk1.7.0_45 | |
| # path to downloaded java version | |
| java_download=~/jdk-7u45-linux-x64.tar.gz | |
| ########## variables end ########## | |
| cd $libraries | |
| [ -d jvm ] || sudo mkdir jvm | |
| cd ~/ | |
| # change permissions on jvm subdirectory | |
| sudo chmod +x $libraries/jvm/ | |
| # extract new version of java from the downloaded tarball | |
| if [ -f $java_download ]; then | |
| sudo tar -zxf $java_download -C $libraries/jvm | |
| else | |
| echo "Cannot locate Java download. Check 'java_download' variable." | |
| echo 'Exiting script.' | |
| exit 1 | |
| fi | |
| # install and config java web start (java) | |
| sudo update-alternatives --install $binaries/java java \ | |
| $javapath/jre/bin/java $priority | |
| sudo update-alternatives --auto java | |
| # install and config java web start (javaws) | |
| sudo update-alternatives --install $binaries/javaws javaws \ | |
| $javapath/jre/bin/javaws $priority | |
| sudo update-alternatives --auto javaws | |
| # install and config java compiler (javac) | |
| sudo update-alternatives --install $binaries/javac javac \ | |
| $javapath/bin/javac $priority | |
| sudo update-alternatives --auto javac | |
| # install and config java archive tool (jar) | |
| sudo update-alternatives --install $binaries/jar jar \ | |
| $javapath/bin/jar $priority | |
| sudo update-alternatives --auto jar | |
| # jar signing and verification tool (jarsigner) | |
| sudo update-alternatives --install $binaries/jarsigner jarsigner \ | |
| $javapath/bin/jarsigner $priority | |
| sudo update-alternatives --auto jarsigner | |
| # install and config java tool for generating api documentation in html (javadoc) | |
| sudo update-alternatives --install $binaries/javadoc javadoc \ | |
| $javapath/bin/javadoc $priority | |
| sudo update-alternatives --auto javadoc | |
| # install and config java disassembler (javap) | |
| sudo update-alternatives --install $binaries/javap javap \ | |
| $javapath/bin/javap $priority | |
| sudo update-alternatives --auto javap | |
| # install and config file that creates c header files and c stub (javah) | |
| sudo update-alternatives --install $binaries/javah javah \ | |
| $javapath/bin/javah $priority | |
| sudo update-alternatives --auto javah | |
| # jexec utility executes command inside the jail (jexec) | |
| sudo update-alternatives --install $binaries/jexec jexec \ | |
| $javapath/lib/jexec $priority | |
| sudo update-alternatives --auto jexec | |
| # install and config file to run applets without a web browser (appletviewer) | |
| sudo update-alternatives --install $binaries/appletviewer appletviewer \ | |
| $javapath/bin/appletviewer $priority | |
| sudo update-alternatives --auto appletviewer | |
| # install and config java plugin for linux (mozilla-javaplugin.so) | |
| if [ -f '$libraries/mozilla/plugins/libjavaplugin.so mozilla-javaplugin.so' ]; then | |
| sudo update-alternatives --install \ | |
| $libraries/mozilla/plugins/libjavaplugin.so mozilla-javaplugin.so \ | |
| $javapath/jre/lib/amd64/libnpjp2.so $priority | |
| sudo update-alternatives --auto mozilla-javaplugin.so | |
| else | |
| echo 'Mozilla Firefox not found. Java Plugin for Linux will not be installed.' | |
| fi | |
| echo | |
| ########## add JAVA_HOME start ########## | |
| grep -q 'JAVA_HOME' ~/.bashrc | |
| if [ $? -ne 0 ]; then | |
| echo 'JAVA_HOME not found. Adding JAVA_HOME to ~/.bashrc' | |
| echo >> ~/.bashrc | |
| echo 'export JAVA_HOME=/usr/lib/jvm/jdk1.7.0_45' >> ~/.bashrc | |
| echo 'export PATH=$JAVA_HOME/bin:$PATH' >> ~/.bashrc | |
| else | |
| echo 'JAVA_HOME found. No changes required to ~/.bashrc.' | |
| fi | |
| ########## add JAVA_HOME start ########## | |
| echo | |
| echo '*** Java update script completed successfully ***' | |
| echo | |
| # confirm alternative for java-related executables | |
| update-alternatives --get-selections | \ | |
| grep -e java -e jar -e jexec -e appletviewer -e mozilla-javaplugin.so | |
| # confirm JAVA_HOME environment variable is set | |
| echo "To confirm JAVA_HOME, execute 'bash --login' and then 'echo \$JAVA_HOME'" |
Below is a test of the script on a fresh Vagrant VM of an Ubuntu Cloud Image of Ubuntu Server 13.10 (Saucy Salamander). Ubuntu Cloud Images are pre-installed disk images that have been customized by Ubuntu engineering to run on cloud-platforms such as Amazon EC2, Openstack, Windows, LXC, and Vagrant. The script was able to successfully install and configure the JDK, as well as the JAVA_HOME and PATH environment variables.

Test New Install on Vagrant Ubuntu VM
Deleting Old Versions?
Before deciding to completely delete previously installed versions of Java from the ‘/usr/lib/jvm’ directory, ensure there are no links to those versions from OS and application configuration files. Many applications, such as NetBeans, eclipse, soapUI, and WebLogic Server, may contain their own Java configurations. If they don’t use the JAVA_HOME variable, they should be updated to reflect the current active Java version when possible.
Resources
Ubuntu Linux: Install Latest Oracle Java 7
update-alternatives(8) – Linux man page
Build a Continuous Deployment System with Maven, Hudson, WebLogic Server, and JUnit
Posted by Gary A. Stafford in Build Automation, DevOps, Enterprise Software Development, Java Development, Software Development on May 31, 2013
Build an automated testing, continuous integration, and continuous deployment system, using Maven, Hudson, WebLogic Server, JUnit, and NetBeans. Developed with Oracle’s Pre-Built Enterprise Java Development VM. Download the complete source code from Dropbox and on GitHub.
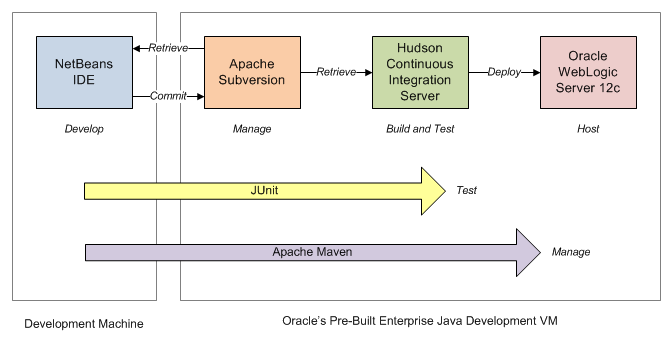
Introduction
In this post, we will build a basic automated testing, continuous integration, and continuous deployment system, using Oracle’s Pre-Built Enterprise Java Development VM. The primary goal of the system is to automatically compile, test, and deploy a simple Java EE web application to a test environment. As this post will demonstrate, the key to a successful system is not a single application, but the effective integration of all the system’s applications into a well-coordinated and consistent workflow.
Building system such as this can be complex and time-consuming. However, Oracle’s Pre-Built Enterprise Java Development VM already has all the components we need. The Oracle VM includes NetBeans IDE for development, Apache Subversion for version control, Hudson Continuous Integration (CI) Server for build automation, JUnit and Hudson for unit test automation, and WebLogic Server for application hosting.
In addition, we will use Apache Maven, also included on the Oracle VM, to help manage our project’s dependencies, as well as the build and deployment process. Overlapping with some of Apache Ant’s build task functionality, Maven is a powerful cross-cutting tool for managing the modern software development projects. This post will only draw upon a small part of Maven’s functionality.
Demonstration Requirements
To save some time, we will use the same WebLogic Server (WLS) domain we built-in the last post, Deploying Applications to WebLogic Server on Oracle’s Pre-Built Development VM. We will also use code from the sample Hello World Java EE web project from that post. If you haven’t already done so, work through the last post’s example, first.
Here is a quick list of requirements for this demonstration:
- Oracle VM
- Oracle’s Pre-Built Enterprise Java Development VM running on current version of Oracle VM VirtualBox (mine: 4.2.12)
- Oracle VM’s has the latest system updates installed (see earlier post for directions)
- WLS domain from last post created and running in Oracle VM
- Credentials supplied with Oracle VM for Hudson (username and password)
- Window’s Development Machine
- Current version of Apache Maven installed and configured (mine: 3.0.5)
- Current version of NetBeans IDE installed and configured (mine: 7.3)
- Optional: Current version of WebLogic Server installed and configured
- All environmental variables properly configured for Maven, Java, WLS, etc. (MW_HOME, M2, etc.)
The Process
The steps involved in this post’s demonstration are as follows:
- Install the WebLogic Maven Plugin into the Oracle VM’s Maven Repositories, as well as the Development machine
- Create a new Maven Web Application Project in NetBeans
- Copy the classes from the Hello World project in the last post to new project
- Create a properties file to store Maven configuration values for the project
- Add the Maven Properties Plugin to the Project’s POM file
- Add the WebLogic Maven Plugin to project’s POM file
- Add JUnit tests and JUnit dependencies to project
- Add a WebLogic Descriptor to the project
- Enable Tunneling on the new WLS domain from the last post
- Build, test, and deploy the project locally in NetBeans
- Add project to Subversion
- Optional: Upgrade existing Hudson 2.2.0 and plugins on the Oracle VM latest 3.x version
- Create and configure new Hudson CI job for the project
- Build the Hudson job to compile, test, and deploy project to WLS
WebLogic Maven Plugin
First, we need to install the WebLogic Maven Plugin (‘weblogic-maven-plugin’) onto both the Development machine’s local Maven Repository and the Oracle VM’s Maven Repository. Installing the plugin will allow us to deploy our sample application from NetBeans and Hudson, using Maven. The weblogic-maven-plugin, a JAR file, is not part of the Maven repository by default. According to Oracle, ‘WebLogic Server provides support for Maven through the provisioning of plug-ins that enable you to perform various operations on WebLogic Server from within a Maven environment. As of this release, there are two separate plug-ins available.’ In this post, we will use the weblogic-maven-plugin, as opposed to the wls-maven-plugin. Again, according to Oracle, the weblogic-maven-plugin “delivered in WebLogic Server 11g Release 1, provides support for deployment operations.”
The best way to understand the plugin install process is by reading the Using the WebLogic Development Maven Plug-In section of the Oracle Fusion Middleware documentation on Developing Applications for Oracle WebLogic Server. It goes into detail on how to install and configure the plugin.
In a nutshell, below is a list of the commands I executed to install the weblogic-maven-plugin version 12.1.1.0 on both my Windows development machine and on my Oracle VM. If you do not have WebLogic Server installed on your development machine, and therefore no access to the plugin, install it into the Maven Repository on the Oracle VM first, then copy the jar file to the development machine and follow the normal install process from that point forward.
On Windows Development Machine:

Installing weblogic-maven-plugin on a Windows Machine
| cd %MW_HOME%/wlserver/server/lib | |
| java -jar wljarbuilder.jar -profile weblogic-maven-plugin | |
| mkdir c:\tmp | |
| copy weblogic-maven-plugin.jar c:\tmp | |
| cd c:\tmp | |
| jar xvf c:\tmp\weblogic-maven-plugin.jar META-INF/maven/com.oracle.weblogic/weblogic-maven-plugin/pom.xml | |
| mvn install:install-file -DpomFile=META-INF/maven/com.oracle.weblogic/weblogic-maven-plugin/pom.xml -Dfile=c:\tmp\weblogic-maven-plugin.jar |
On the Oracle VM:

Installing WebLogic Maven Plugin into the Oracle VM
| cd $MW_HOME/wlserver_12.1/server/lib | |
| java -jar wljarbuilder.jar -profile weblogic-maven-plugin | |
| mkdir /home/oracle/tmp | |
| cp weblogic-maven-plugin.jar /home/oracle/tmp | |
| cd /home/oracle/tmp | |
| jar xvf weblogic-maven-plugin.jar META-INF/maven/com.oracle.weblogic/weblogic-maven-plugin/pom.xml | |
| mvn install:install-file -DpomFile=META-INF/maven/com.oracle.weblogic/weblogic-maven-plugin/pom.xml -Dfile=weblogic-maven-plugin.jar |
To test the success of your plugin installation, you can run the following maven command on Windows or Linux:
mvn help:describe -Dplugin=com.oracle.weblogic:weblogic-maven-plugin
Sample Maven Web Application
Using NetBeans on your development machine, create a new Maven Web Application. For those of you familiar with Maven, the NetBeans’ Maven Web Application project is based on the ‘webapp-javaee6:1.5’ Archetype. NetBeans creates the project by executing a ‘archetype:generate’ Maven Goal. This is seen in the ‘Output’ tab after the project is created.

1a – Choose the Maven Web Application Project Type

1b – Name and Location of New Project
By default you may have Tomcat and GlassFish as installed options on your system. Unfortunately, NetBeans currently does not have the ability to configure a remote connection to the WLS instance running on the Oracle VM, as I understand. You do not need an instance of WLS installed on your development machine since we are going to use the copy on the Oracle VM. We will use Maven to deploy the project to WLS on the Oracle VM, later in the post.

1c – Default Server and Java Settings

1d – New Maven Project in NetBeans
Next, copy the two java class files from the previous blog post’s Hello World project to the new project’s source package. Alternately, download a zipped copy this post’s complete sample code from Dropbox or on GitHub.

2a – Copy Two Class Files from Previous Project
Because we are copying a RESTful web service to our new project, NetBeans will prompt us for some REST resource configuration options. To keep this new example simple, choose the first option and uncheck the Jersey option.

2b – REST Resource Configuration

2c – New Project with Files Copied from Previous Project
JUnit Tests
Next, create a set of JUnit tests for each class by right-clicking on both classes and selecting ‘Tools’ -> ‘Create Tests’.

3a – Create JUnit Tests for Both Class Files

3b – Choose JUnit Version 4.x

3c – New Project with Test Classes and JUnit Test Dependencies
We will use the test classes and dependencies NetBeans just added to the project. However, we will not use the actual JUnit tests themselves that NetBeans created. To properly set-up the default JUnit tests to work with an embedded version of WLS is well beyond the scope of this post.
Overwrite the contents of the class file with the code provided from Dropbox. I have replaced the default JUnit tests with simpler versions for this demonstration. Build the file to make sure all the JUnit tests all pass.

3d – Project Successfully Built with New JUnit Tests
Project Properties
Next, add a new Properties file to the project, entitled ‘maven.properties’.

4a – Add Properties File to Project

4b – Add Properties File to Project
Add the following key/value pairs to the properties file. These key/value pairs are referenced will be referenced the POM.xml by the weblogic-maven-plugin, added in the next step. Placing the configuration values into a Properties file is not necessary for this post. However, if you wish to deploy to multiple environments, moving environmentally-specific configurations into separate properties files, using Maven Build Profiles, and/or using frameworks such as Spring, are all best practices.
Java Properties File (maven.properties):
| # weblogic-maven-plugin configuration values for Oracle VM environment | |
| wls.adminurl=t3://192.168.1.88:7031 | |
| wls.user=weblogic | |
| wls.password=welcome1 | |
| wls.upload=true | |
| wls.remote=false | |
| wls.verbose=true | |
| wls.middlewareHome=/labs/wls1211 | |
| wls.name=HelloWorldMaven |
Maven Plugins and the POM File
Next, add the WLS Maven Plugin (‘weblogic-maven-plugin’) and the Maven Properties Plugin (‘properties-maven-plugin’) to the end of the project’s Maven POM.xml file. The Maven Properties Plugin, part of the Mojo Project, allows us to substitute configuration values in the Maven POM file from a properties file. According to codehaus,org, who hosts the Mojo Project, ‘It’s main use-case is loading properties from files instead of declaring them in pom.xml, something that comes in handy when dealing with different environments.’
Project Object Model File (pom.xml):
| <project xmlns="http://maven.apache.org/POM/4.0.0" xmlns:xsi="http://www.w3.org/2001/XMLSchema-instance" | |
| xsi:schemaLocation="http://maven.apache.org/POM/4.0.0 http://maven.apache.org/xsd/maven-4.0.0.xsd"> | |
| <modelVersion>4.0.0</modelVersion> | |
| <groupId>com.blogpost</groupId> | |
| <artifactId>HelloWorldMaven</artifactId> | |
| <version>1.0</version> | |
| <packaging>war</packaging> | |
| <name>HelloWorldMaven</name> | |
| <properties> | |
| <endorsed.dir>${project.build.directory}/endorsed</endorsed.dir> | |
| <project.build.sourceEncoding>UTF-8</project.build.sourceEncoding> | |
| </properties> | |
| <dependencies> | |
| <dependency> | |
| <groupId>junit</groupId> | |
| <artifactId>junit</artifactId> | |
| <version>4.10</version> | |
| <scope>test</scope> | |
| </dependency> | |
| <dependency> | |
| <groupId>javax</groupId> | |
| <artifactId>javaee-web-api</artifactId> | |
| <version>6.0</version> | |
| <scope>provided</scope> | |
| </dependency> | |
| </dependencies> | |
| <build> | |
| <plugins> | |
| <plugin> | |
| <groupId>org.apache.maven.plugins</groupId> | |
| <artifactId>maven-compiler-plugin</artifactId> | |
| <version>3.1</version> | |
| <configuration> | |
| <source>1.6</source> | |
| <target>1.6</target> | |
| <compilerArguments> | |
| <endorseddirs>${endorsed.dir}</endorseddirs> | |
| </compilerArguments> | |
| </configuration> | |
| </plugin> | |
| <plugin> | |
| <groupId>org.apache.maven.plugins</groupId> | |
| <artifactId>maven-war-plugin</artifactId> | |
| <version>2.4</version> | |
| <configuration> | |
| <failOnMissingWebXml>false</failOnMissingWebXml> | |
| </configuration> | |
| </plugin> | |
| <plugin> | |
| <groupId>org.apache.maven.plugins</groupId> | |
| <artifactId>maven-dependency-plugin</artifactId> | |
| <version>2.8</version> | |
| <executions> | |
| <execution> | |
| <phase>validate</phase> | |
| <goals> | |
| <goal>copy</goal> | |
| </goals> | |
| <configuration> | |
| <outputDirectory>${endorsed.dir}</outputDirectory> | |
| <silent>true</silent> | |
| <artifactItems> | |
| <artifactItem> | |
| <groupId>javax</groupId> | |
| <artifactId>javaee-endorsed-api</artifactId> | |
| <version>6.0</version> | |
| <type>jar</type> | |
| </artifactItem> | |
| </artifactItems> | |
| </configuration> | |
| </execution> | |
| </executions> | |
| </plugin> | |
| <plugin> | |
| <groupId>org.codehaus.mojo</groupId> | |
| <artifactId>properties-maven-plugin</artifactId> | |
| <version>1.0-alpha-2</version> | |
| <executions> | |
| <execution> | |
| <phase>initialize</phase> | |
| <goals> | |
| <goal>read-project-properties</goal> | |
| </goals> | |
| <configuration> | |
| <files> | |
| <file>maven_wls_local.properties</file> | |
| </files> | |
| </configuration> | |
| </execution> | |
| </executions> | |
| </plugin> | |
| <plugin> | |
| <groupId>com.oracle.weblogic</groupId> | |
| <artifactId>weblogic-maven-plugin</artifactId> | |
| <version>12.1.1.0</version> | |
| <configuration> | |
| <adminurl>${wls.adminurl}</adminurl> | |
| <user>${wls.user}</user> | |
| <password>${wls.password}</password> | |
| <upload>${wls.upload}</upload> | |
| <action>deploy</action> | |
| <remote>${wls.remote}</remote> | |
| <verbose>${wls.verbose}</verbose> | |
| <source>${project.build.directory}/${project.build.finalName}.${project.packaging}</source> | |
| <name>${wls.name}</name> | |
| </configuration> | |
| <executions> | |
| <execution> | |
| <phase>install</phase> | |
| <goals> | |
| <goal>deploy</goal> | |
| </goals> | |
| </execution> | |
| </executions> | |
| </plugin> | |
| </plugins> | |
| </build> | |
| </project> |
WebLogic Deployment Descriptor
A WebLogic Deployment Descriptor file is the last item we need to add to the new Maven Web Application project. NetBeans has descriptors for multiple servers, including Tomcat (context.xml), GlassFish (application.xml), and WebLogic (weblogic.xml). They provide a convenient location to store specific server properties, used during the deployment of the project.

6a – Add New WebLogic Descriptor

6b – Add New WebLogic Descriptor
Add the ‘context-root’ tag. The value will be the name of our project, ‘HelloWorldMaven’, as shown below. According to Oracle, “the context-root element defines the context root of this standalone Web application.” The context-root of the application will form part of the URL we enter to display our application, later.

6c – Add Context Root Element to Descriptor
Make sure to the WebLogic descriptor file (‘weblogic.xml’) is placed in the WEB-INF folder. If not, the descriptor’s properties will not be read. If the descriptor is not read, the context-root of the deployed application will default to the project’s WAR file’s name. Instead of ‘HelloWorldMaven’ as the context-root, you would see ‘HelloWorldMaven-1.0-SNAPSHOT’.

6d – Move WebLogic Descriptor into WEB-INF Folder
Enable Tunneling
Before we compile, test, and deploy our project, we need to make a small change to WLS. In order to deploy our project remotely to the Oracle VM’s WLS, using the WebLogic Maven Plugin, we must enable tunneling on our WLS domain. According to Oracle, the ‘Enable Tunneling’ option “Specifies whether tunneling for the T3, T3S, HTTP, HTTPS, IIOP, and IIOPS protocols should be enabled for this server.” To enable tunneling, from the WLS Administration Console, select the ‘AdminServer’ Server, ‘Protocols’ tab, ‘General’ sub-tab.

Enabling Tunneling on WLS for HTTP Deployments
Build and Test the Project
Right-click and select ‘Build’, ‘Clean and Build’, or ‘Build with Dependencies’. NetBeans executes a ‘mvn install’ command. This command initiates a series of Maven Goals. The goals, visible NetBean’s Output window, include ‘dependency:copy’, ‘properties:read-project-properties’, ‘compiler:compile’, ‘surefire:test’, and so forth. They move the project’s code through the Maven Build Lifecycle. Most goals are self-explanatory by their title.
The last Maven Goal to execute, if the other goals have succeeded, is the ‘weblogic:deploy’ goal. This goal deploys the project to the Oracle VM’s WLS domain we configured in our project. Recall in the POM file, we configured the weblogic-maven-plugin to call the ‘deploy’ goal whenever ‘install’, referred to as Execution Phase by Maven, is executed. If all goals complete without error, you have just compiled, tested, and deployed your first Maven web application to a remote WLS domain. Later, we will have Hudson do it for us, automatically.

6e – Successful Build of Project
Executing Maven Goals in NetBeans
A small aside, if you wish to run alternate Maven goals in NetBeans, right-click on the project and select ‘Custom’ -> ‘Goals…’. Alternately, click on the lighter green arrows (‘Re-run with different parameters’), adjacent to the ‘Output’ tab.
For example, in the ‘Run Maven’ pop-up, replace ‘install’ with ‘surefire:test’ or simply ‘test’. This will compile the project and run the JUnit tests. There are many Maven goals that can be ran this way. Use the Control key and Space Bar key combination in the Maven Goals text box to display a pop-up list of available goals.

7a – Executing Other Maven Goals

7a – JUnit Test Results using Maven ‘test’ Goal
Subversion
Now that our project is complete and tested, we will commit the project to Subversion (SVN). We will commit a copy of our source code to SVN, installed on the Oracle VM, for safe-keeping. Having our source code in SVN also allows Hudson to retrieve a copy. Hudson will then compile, test, and deploy the project to WLS.
The Repository URL, User, and Password are all supplied in the Oracle VM information, along with the other URLs and credentials.

8a – Add Project to Subversion Repository

8b – Subversion Repository Folder for Project
When you import you project for the first time, you will see more files than are displayed below. I had already imported part of the project earlier while creating this post. Therefore most of my files were already managed by Subversion.

8c – List of Files Imported into Subversion (you will see more)

08d – Project Successfully Imported into Subversion
Upgrading Hudson CI Server
The Oracle VM comes with Hudson pre-installed in it’s own WLS domain, ‘hudson-ci_dev’, running on port 5001. Start the domain from within the VM by double-clicking the ‘WLS 12c – Hudson CI 5001’ icon on the desktop, or by executing the domain’s WLS start-up script from a terminal window:
/labs/wls1211/user_projects/domains/hudson-ci_dev/startWebLogic.sh
Once started, the WLS Administration Console 12c is accessible at the following URL. User your VM’s IP address or ‘localhost’ if you are within the VM.
http://[your_vm_ip_address]:5001/console/login/LoginForm.jsp
The Oracle VM comes loaded with Hudson version 2.2.0. I strongly suggest is updating Hudson to the latest version (3.0.1 at the time of this post). To upgrade, download, deploy, and started a new 3.0.1 version in the same domain on the same ‘AdminServer’ Server. I was able to do this remotely, from my development machine, using the browser-based Hudson Dashboard and WLS Administration Console. There is no need to do any of the installation from within the VM, itself.
When the upgrade is complete, stop the 2.2.0 deployment currently running in the WLS domain.

Hudson 3.0.1 Deployed to WLS Domain on VM
The new version of Hudson is accessible from the following URL (adjust the URL your exact version of Hudson):
http://[your_vm_ip_address]:5001/hudson-3.0.1/
It’s also important to update all the Hudson plugins. Hudson makes this easy with the Hudson Plugin Manager, accessible via the Manage Hudson’ option.

View of Hudson 3.0.1 Running on WLS with All Plugins Updated
Note on the top of the Manage Hudson page, there is a warning about the server’s container not using UTF-8 to decode URLs. You can follow this post, if you want to resolve the issue by configuring Hudson differently. I did not worry about it for this post.
Building a Hudson Job
We are ready to configure Hudson to build, test, and deploy our Maven Web Application project. Return to the ‘Hudson Dashboard’, select ‘New Job’, and then ‘Build a new free-style software job’. This will open the ‘Job Configurations’ for the new job.

1 – Creating New Hudson Free-Style Software Job

2 -Default Job Configurations
Start by configuring the ‘Source Code Management’ section. The Subversion Repository URL is the same as the one you used in NetBeans to commit the code. To avoid the access error seen below, you must provide the Subversion credentials to Hudson, just as you did in NetBeans.

3 -Subversion SCM Configuration

4 – Subversion SCM Authentication

5 -Subversion SCM Configuration Authenticated
Next, configure the Maven 3 Goals. I chose the ‘clean’ and ‘install’ goals. Using ‘clean’ insures the project is compiled each time by deleting the output of the build directory.
Optionally, you can configure Hudson to publish the JUnit test results as shown below. Be sure to save your configuration.

6 -Maven 3 and JUnit Configurations
Start a build of the new Hudson Job, by clicking ‘Build Now’. If your Hudson job’s configurations are correct, and the new WLS domain is running, you should have a clean build. This means the project compiled without error, all tests passed, and the web application’s WAR file was deployed successfully to the new WLS domain within the Oracle VM.

7 -Job Built Successfully Using Configurations

8 – Test Results from Build
WebLogic Server
To view the newly deployed Maven Web Application, log into the WebLogic Server Administration Console for the new domain. In my case, the new domain was running on port 7031, so the URL would be:
http://[your_vm_ip_address]:7031/console/login/LoginForm.jsp
You should see the deployment, in an ‘Active’ state, as shown below.

9a – Project Deployed to WLS from Hudson Build
9b – Project’s Context Root Set by WebLogic Descriptor File

9c – Project’s Servlet Paths
To test the deployment, open a new browser tab and go to the URL of the Servlet. In this case the URL would be:
http://[your_vm_ip_address]:7031/HelloWorldMaven/resources/helloWorld
You should see the original phrase from the previous project displayed, ‘Hello WebLogic Server!’.

10 – Project’s Web Application Running in Browser
To further test the system, make a simple change to the project in NetBeans. I changed the name variable’s default value from ‘WebLogic Server’ to ‘Hudson, Maven, and WLS’. Commit the change to SVN.

11 – Make a Code Change to Project and Commit to Subversion
Return to Hudson and run a new build of the job.

12 – Rebuild Project with Changes in Hudson
After the build completes, refresh the sample Web Application’s browser window. You should see the new text string displayed. Your code change was just re-compiled, re-tested, and re-deployed by Hudson.

13 – Project Showing Code Change
True Continuous Deployment
Although Hudson is now doing a lot of the work for us, the system still is not fully automated. We are still manually building our Hudson Job, in order to deploy our application. If you want true continuous integration and deployment, you need to trust the system to automatically deploy the project, based on certain criteria.
SCM polling with Hudson is one way to demonstrate continuous deployment. In ‘Job Configurations’, turn on ‘Poll SCM’ and enter Unix cron-like value(s) in the ‘Schedule’ text box. In the example below, I have indicated a polling frequency every hour (‘@hourly’). Every hour, Hudson will look for committed changes to the project in Subversion. If changes are found, Hudson w retrieves the source code, compiles, and tests. If the project compiles and passes all tests, it is deployed to WLS.

SCM Polling Interval
There are less resource-intense methods to react to changes than SCM polling. Push-notifications from the repository is alternate, more preferable method.
Additionally, you should configure messaging in Hudson to notify team members of new deployments and the changes they contain. You should also implement a good deployment versioning strategy, for tracking purposes. Knowing the version of deployed artifacts is critical for accurate change management and defect tracking.
Helpful Links
Configuring and Using the WebLogic Maven Plug-In for Deployment
Jenkins: Building a Software Project
Kohsuke Kawaguchi: Polling must die: triggering Jenkins builds from a git hook
Deploying Applications to WebLogic Server on Oracle’s Pre-Built Development VM
Posted by Gary A. Stafford in DevOps, Enterprise Software Development, Java Development, Software Development on May 24, 2013
Create a new WebLogic Server domain on Oracle’s Pre-built Development VM. Remotely deploy a sample web application to the domain from a remote machine.
Introduction
In my last two posts, Using Oracle’s Pre-Built Enterprise Java VM for Development Testing and Resizing Oracle’s Pre-Built Development Virtual Machines, I introduced Oracle’s Pre-Built Enterprise Java Development VM, aka a ‘virtual appliance’. Oracle has provided ready-made VMs that would take a team of IT professionals days to assemble. The Oracle Linux 5 OS-based VM has almost everything that comprises basic enterprise test and production environment based on the Oracle/Java technology stack. The VM includes Java JDK 1.6+, WebLogic Server, Coherence, TopLink, Subversion, Hudson, Maven, NetBeans, Enterprise Pack for Eclipse, and so forth.
One of the first things you will probably want to do, once your Oracle’s Pre-Built Enterprise Java Development VM is up and running, is deploy an application to WebLogic Server. According to Oracle, WebLogic Server is ‘a scalable, enterprise-ready Java Platform, Enterprise Edition (Java EE) application server.’ Even if you haven’t used WebLogic Server before, don’t worry, Oracle has designed it to be easy to get started.
In this post I will cover creating a new WebLogic Server (WLS) domain, and the deployment a simple application to WLS from a remote development machine. The major steps in the process presented in this post are as follows:
- Create a new WLS domain
- Create and build a sample application
- Deploy the sample application to the new WLS domain
- Access deployed application via a web browser
Networking
First, let me review how I have my VM configured for networking, so you will understand my deployment methodology, discussed later. The way you configure your Oracle VM VirtualBox appliance will depend on your network topology. Again, keeping it simple for this post, I have given the Oracle VM a static IP address (192.168.1.88). The machine on which I am hosting VirtualBox uses DHCP to obtain an IP address on the same local wireless network.
For the VM’s VirtualBox networking mode, I have chosen the ‘Bridged Adapter‘ mode. Using this mode, any machine on the network can access the VM through the host machine, via the VM’s IP address. One of the best posts I have read on VM networking is on Oracle’s The Fat Bloke Sings blog, here.

Setting Static IP Address for VM

Using VirtualBox’s Bridged Adapter Networking Mode
Creating New WLS Domain
A domain, according Oracle, is ‘the basic administrative unit of WebLogic Server. It consists of one or more WebLogic Server instances, and logically related resources and services that are managed, collectively, as one unit.’ Although the Oracle Development VM comes with pre-existing domains, we will create our own for this post.
To create the new domain, we will use the Oracle’s Fusion Middleware Configuration Wizard. The Wizard will take you through a step-by-step process to configure your new domain. To start the wizard, from within the Oracle VM, open a terminal window, and use the following command to switch to the Wizard’s home directory and start the application.
/labs/wls1211/wlserver_12.1/common/bin/config.sh
There are a lot of configuration options available, using the Wizard. I have selected some basic settings, shown below, to configure the new domain. Feel free to change the settings as you step through the Wizard, to meet your own needs. Make sure to use the ‘Development Mode’ Start Mode Option for this post. Also, make sure to note the admin port of the domain, the domain’s location, and the username and password you choose.
-

- 01 – New WebLogic Domain
-

- 02 – Selecting the Domain Source
-

- 03 – Naming the Domain
-

- 04 – Domain User Name and Password
-

- 05 – Startup and JDK
-

- 06 – Optional Configuration
-

- 07 – Administrative Configuration
-

- 08 – JMS Configuration
-

- 09 – Managed Servers
-

- 10 – Clusters
-

- 11 – Machines
-

- 12 – Target Services
-

- 13 – JMS File Stores
-

- 14 – RDBMS
-

- 15 – Configuration Summary

Creating the New Domain
Starting the Domain
To start the new domain, open a terminal window in the VM and run the following command to change to the root directory of the new domain and start the WLS domain instance. Your domain path and domain name may be different. The start script command will bring up a new terminal window, showing you the domain starting.
/labs/wls1211/user_projects/domains/blogdev_domain/startWebLogic.sh

New WLS Domain Starting
WLS Administration Console
Once the domain starts, test it by opening a web browser from the host machine and entering the URL of the WLS Administration Console. If your networking is set-up correctly, the host machine will able to connect to the VM and open the domain, running on the port you indicated when creating the domain, on the static IP address of the VM. If your IP address and port are different, make sure to change the URL. To log into WLS Administration Console, use the username and password you chose when you created the domain.
http://192.168.1.88:7031/console/login/LoginForm.jsp

Logging into the New WLS Domain
Before we start looking around the new domain however, let’s install an application into it.
Sample Java Application
If you have an existing application you want to install, you can skip this part. If you don’t, we will quickly create a simple Java EE Hello World web application, using a pre-existing sample project in NetBeans – no coding required. From your development machine, create a new Samples -> Web Services -> REST: Hello World (Java EE 6) Project. You now have a web project containing a simple RESTful web service, Servlet, and Java Server Page (.jsp). Build the project in NetBeans. We will upload the resulting .war file manually, in the next step.
In a previous post, Automated Deployment to GlassFish Using Jenkins CI Server and Apache Ant, we used the same sample web application to demonstrate automated deployments to Oracle’s GlassFish application server.

Creating the Sample Java EE 6 Web Application in NetBeans

Naming the New Project

New Project in NetBeans

Hello World WAR File After Building Project
Deploying the Application
There are several methods to deploy applications to WLS, depending on your development workflow. For this post, we will keep it simple. We will manually deploy our web application’s .war file to WLS using the browser-based WLS Administration Console. In a future post, we will use Hudson, also included on the VM, to build and deploy an application, but for now we will do it ourselves.
To deploy the application, switch back to the WLS Administration Console. Following the screen grabs below, you will select the .war file, built from the above web application, and upload it to the Oracle VM’s new WLS domain. The .war file has all the necessary files, including the RESTful web service, Servlet, and the .jsp page. Make sure to deploy it as an ‘application’ as opposed to a ‘library’ (see ‘target style’ configuration screen, below).

Select the Deployment Tab Lists All Deployed Applications

Select Install to Start the Installation Process

Select Next then Browse for .war File

Select Next Again to Install the Application

Install the Deployment as an Application

The Default Settings Are Fine for Application

Select Finish to Complete the Installation

The Overview Tab Reviews the Installed Application’s Configuration

Switch Back to the Deployments Tab to See the Installed Application

Click on the Application and Select the Testing Tab
Accessing the Application
Now that we have deployed the Hello World application, we will access it from our browser. From any machine on the same network, point a browser to the following URL. Adjust your URL if your VM’s IP address and domain’s port is different.
http://192.168.1.88:7031/HelloWebLogicServer/resources/helloWorld

Hello World Application Running from WLS Domain
The Hello World RESTful web service’s Web Application Description Language (WADL) description can be viewed at:
http://192.168.1.88:7031/HelloWebLogicServer/resources/application.wadl

RESTful Web Service’s WADL
Since the Oracle VM is accessible from anywhere on the network, the deployed application is also accessible from any device on the network, as demonstrated below.

Hello World Application Running from WLS Domain on iPhone
Conclusion
This was a simple demonstration of deploying an application to WebLogic Server on Oracle’s Pre-Built Enterprise Java Development VM. WebLogic Server is a powerful, feature-rich Java application server. Once you understand how to configure and administer WLS, you can deploy more complex applications. In future posts we will show a more common, slightly more complex example of automated deployment from Hudson. In addition, we will show how to create a datasource in WLS and access it from the deployed application, to talk to a relational database.
Helpful Links
Resizing Oracle’s Pre-Built Development Virtual Machines
Posted by Gary A. Stafford in DevOps, Enterprise Software Development, Java Development, Software Development on April 25, 2013
Expand the size of Oracle’s Pre-Built Development VM’s (virtual appliances) to accommodate software package updates and additional software installations.
Introduction
In my last post, Using Oracle’s Pre-Built Enterprise Java VM for Development Testing, I discussed issues with the small footprint of the VM. Oracle’s Pre-Built Enterprise Java Development VM, aka virtual appliance, is comprised of (2) 8 GB Virtual Machine Disks (VMDK). The small size of the VM made it impossible to update the system software, or install new applications. After much trial and error, and a few late nights reading posts by others who had run into this problem, I found a fairly easy series of steps to increase the size of the VM. In the following example, I’ll demonstrate how to resize the VM’s virtual disks to 15 GB each; you can resize the disks to whatever size you need.
Terminology
Before we start, a few quick terms. It’s not critical to have a complete understanding of Linux’s Logical Volume Manager (LVM). However, without some basic knowledge of how Linux manages virtual disks and physical storage, the following process might seem a bit confusing. I pulled the definitions directly from Wikipedia and LVM How-To.
- Logical Volume Manager (LVM) – LVM is a logical volume manager for the Linux kernel; it manages disk drivers and similar mass-storage devices.
- Volume Group (VG) – Highest level abstraction within the LVM. Gathers Logical Volumes (LV) and Physical Volumes (PV) into one administrative unit.
- Physical Volume (PV) – Typically a hard disk, or any device that ‘looks’ like a hard disk (eg. a software raid device).
- Logical Volume (LV) – Equivalent of disk partition in a non-LVM system. Visible as a standard block device; as such the LV can contain a file system (eg. /home).
- Logical Extents (LE) – Each LV is split into chunks of data, known as logical extents. The extent size is the same for all logical volumes in the volume group. The system pools LEs into a VG. The pooled LEs can then be concatenated together into virtual disk partitions (LV).
- Virtual Machine Disk (VMDK) – Container for virtual hard disk drives used in virtual machines. Developed by VMware for its virtual appliance products, but is now an open format.
- Virtual Disk Image (VDI) – VirtualBox-specific container format for storing files on the host operating system.
Ten Simple Steps
After having downloaded, assembled, and imported the original virtual appliance into VirtualBox Manager on my Windows computer, I followed the these simple steps to enlarge the size of the VM’s (2) 8 GB VMDK files:
- Locate the VM’s virtual disk images;
- Clone VMDK files to VDI files;
- Resize VDI files;
- Replace VM’s original VMDK files;
- Boot VM using GParted Live;
- Resize VDI partitions;
- Resize Logical Volume (LV);
- Resize file system;
- Restart the VM;
- Delete the original VMDK files.

Original VM in VirtualBox Manager Before Resizing

Original View of VM Before Resizing and Software Updates
1. Locate the VM’s virtual disk images
- From the Windows command line, run the following command to find information about virtual disk images currently in use by VirtualBox.
- Locate the (2) VMDK images associated with the VM you are going to resize.
cd C:\Program Files\Oracle\VirtualBox
VBoxManage list hdds

Two Virtual Disk Images in use by VM
2. Clone the (2) VMDK files to VDI files (substitute your own file paths and VMDK file names)
VBoxManage clonehd "C:\Users\your_username\VirtualBox VMs\VDD_WLS_labs_2012\VDD_WLS_labs_2012-disk1.vmdk" "C:\Users\your_username\VirtualBox VMs\VDD_WLS_labs_2012\VDD_WLS_labs_2012-disk1_ext.vdi" --format vdi
VBoxManage clonehd "C:\Users\your_username\VirtualBox VMs\VDD_WLS_labs_2012\VDD_WLS_labs_2012-disk2.vmdk" "C:\Users\your_username\VirtualBox VMs\VDD_WLS_labs_2012\VDD_WLS_labs_2012-disk2_ext.vdi" --format vdi

3. Resize the (2) VDI files
To calculate the new size, multiple the number of gigabytes you want to end up with by 1,024 (ie. 15 x 1,024 = 15,360)
VBoxManage modifyhd "C:\Users\your_username\VirtualBox VMs\VDD_WLS_labs_2012\VDD_WLS_labs_2012-disk1_ext.vdi" --resize 15360
VBoxManage modifyhd "C:\Users\your_username\VirtualBox VMs\VDD_WLS_labs_2012\VDD_WLS_labs_2012-disk2_ext.vdi" --resize 15360
4. Replace the VM’s original VMDK files with the VDI files
- Using VirtualBox Manger -> Settings -> Storage, replace the (2) original VMDK files with the new VDI files.
- Keep the Attributes -> Hard Disk set to the same SATA Port 0 and SATA Port 1 of the original VMDK files.

VirtualBox Manager Showing VM with Larger Disks and GParted Live ISO
5. Boot VM using the GParted Live ISO image
- Download GParted Live ISO image to the host system (Windows).
- Mount the GParted ISO (Devices -> CD/DVD Devices -> Chose a virtual CD/DVD disk file…).
- Start the VM, hit f12 as VM boots up, and select CD/DVD (option c).
- Answer a few questions for GParted to boot up properly.


6. Using GParted, resize the (2) VDI partitions
- Expand the ‘/dev/sda2’ and ‘/dev/sdb1’ partitions to use all unallocated space (in gray below).


7. Resize Logical Volume (LV)
- Using the Terminal, resize the Logical Volume to the new size of the VDI (‘/dev/sda’).
lvresize -L +7GB /dev/VolGroup00/LogVol00

8. Resize file system
- Using the Terminal, resize the file system to match Logical Volume size.
resize2fs -p /dev/mapper/VolGroup00-LogVol00
9. Restart the VM
- Restart the VM, hit f12 as it’s booting up, and select ‘1) Hard disk’ as the boot device.
- Open the Terminal and enter ‘df -hT’ to confirm your results.
- You can now safely install YUM Server configuration to update software packages, and install new applications.

Final View of VM After Resizing and Software Updates
10. Delete the original VMDK files
- Once you sure everything worked, don’t forget to delete the original VMDK files. They are taking up 16 GB of disk space.
Links
Here are links to the two posts where I found most of the above information:
Gary Stafford
AWS Area Principal Solutions Architect | 10x AWS Certified Pro | DevOps | Data/ML | Serverless | Polyglot Developer | Former ThoughtWorks and Accenture
