Posts Tagged JavaScript
Scaffold a RESTful API with Yeoman, Node, Restify, and MongoDB
Posted by Gary A. Stafford in Continuous Delivery, Enterprise Software Development, Software Development on June 22, 2016
Using Yeoman, scaffold a basic RESTful CRUD API service, based on Node, Restify, and MongoDB.
Introduction
NOTE: Generator updated on 11-13-2016 to v0.2.1.
Yeoman generators reduce the repetitive coding of boilerplate functionality and ensure consistency between full-stack JavaScript projects. For several recent Node.js projects, I created the generator-node-restify-mongodb Yeoman generator. This Yeoman generator scaffolds a basic RESTful CRUD API service, a Node application, based on Node.js, Restify, and MongoDB.
According to their website, Restify, used most notably by Netflix, borrows heavily from Express. However, while Express is targeted at browser applications, with templating and rendering, Restify is keenly focused on building API services that are maintainable and observable.
Along with Node, Restify, and MongoDB, theNode application’s scaffolded by the Node-Restify-MongoDB Generator, also implements Bunyan, which includes DTrace, Jasmine, using jasmine-node, Mongoose, and Grunt.
Portions of the scaffolded Node application’s file structure and code are derived from what I consider the best parts of several different projects, including generator-express, generator-restify-mongo, and generator-restify.
Installation
To begin, install Yeoman and the generator-node-restify-mongodb using npm. The generator assumes you have pre-installed Node and MongoDB.
npm install -g yo
npm install -g generator-node-restify-mongodb
Then, generate the new project.
mkdir node-restify-mongodb
cd $_
yo node-restify-mongodb
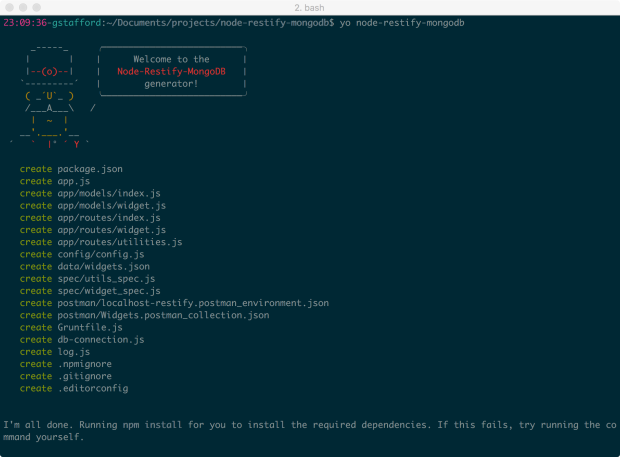
Yeoman scaffolds the application, creating the directory structure, copying required files, and running ‘npm install’ to load the npm package dependencies.
Using the Generated Application
Next, import the supplied set of sample widget documents into the local development instance of MongoDB from the supplied ‘data/widgets.json’ file.
NODE_ENV=development grunt mongoimport --verbose
Similar to Yeoman’s Express Generator, this application contains configuration for three typical environments: ‘Development’ (default), ‘Test’, and ‘Production’. If you want to import the sample widget documents into your Test or Production instances of MongoDB, first change the ‘NODE_ENV’ environment variable value.
NODE_ENV=production grunt mongoimport --verbose
To start the application in a new terminal window, use the following command.
npm start
The output should be similar to the example, below.

To test the application, using jshint and the jasmine-node module, the sample documents must be imported into MongoDB and the application must be running (see above). To test the application, open a separate terminal window, and use the following command.
npm test
The project contains a set of jasmine-node tests, split between the ‘/widgets’ and the ‘/utils’ endpoints. If the application is running correctly, you should see the following output from the tests.

Similarly, the following command displays a code coverage report, using the grunt, mocha, istanbul, and grunt-mocha-istanbul node modules.
grunt coverage
Grunt uses the grunt-mocha-istanbul module to execute the same set of jasmine-node tests as shown above. Based on those tests, the application’s code coverage (statement, line, function, and branch coverage) is displayed.

You may test the running application, directly, by cURLing the ‘/widgets’ endpoints.
curl -X GET -H "Accept: application/json" "http://localhost:3000/widgets"
For more legible output, try prettyjson.
npm install -g prettyjson
curl -X GET -H "Accept: application/json" "http://localhost:3000/widgets" --silent | prettyjson
curl -X GET -H "Accept: application/json" "http://localhost:3000/widgets/SVHXPAWEOD" --silent | prettyjson
The JSON-formatted response body from the HTTP GET requests should look similar to the output, below.

A much better RESTful API testing solution is Postman. Postman provides the ability to individually configure each environment and abstract that environment-specific configuration, such as host and port, from the actual HTTP requests.

Continuous Integration
As part of being published to both the npmjs and Yeoman registries, the generator-node-restify-mongodb generator is continuously integrated on Travis CI. This should provide an addition level of confidence to the generator’s end-users. Currently, Travis CI tests the generator against Node.js v4, v5, and v6, as well as IO.js. Older versions of Node.js may have compatibility issues with the application.

Additionally, Travis CI feeds test results to Coveralls, which displays the generator’s code coverage. Note the code coverage, shown below, is reported for the yeoman generator, not the generator’s scaffolded application. The scaffolded application’s coverage is shown above.

Application Details
API Endpoints
The scaffolded application includes the following endpoints.
# widget resources
var PATH = '/widgets';
server.get({path: PATH, version: VERSION}, findDocuments);
server.get({path: PATH + '/:product_id', version: VERSION}, findOneDocument);
server.post({path: PATH, version: VERSION}, createDocument);
server.put({path: PATH, version: VERSION}, updateDocument);
server.del({path: PATH + '/:product_id', version: VERSION}, deleteDocument);

# utility resources
var PATH = '/utils';
server.get({path: PATH + '/ping', version: VERSION}, ping);
server.get({path: PATH + '/health', version: VERSION}, health);
server.get({path: PATH + '/info', version: VERSION}, information);
server.get({path: PATH + '/config', version: VERSION}, configuraton);
server.get({path: PATH + '/env', version: VERSION}, environment);
The Widget
The Widget is the basic document object used throughout the application. It is used, primarily, to demonstrate Mongoose’s Model and Schema. The Widget object contains the following fields, as shown in the sample widget, below.
{
  "product_id": "4OZNPBMIDR",
  "name": "Fapster",
  "color": "Orange",
  "size": "Medium",
  "price": "29.99",
  "inventory": 5
}
MongoDB
Use the mongo shell to access the application’s MongoDB instance and display the imported sample documents.
mongo
 > show dbs
 > use node-restify-mongodb-development
 > show tables
 > db.widgets.find()
The imported sample documents should be displayed, as shown below.

Environmental Variables
The scaffolded application relies on several environment variables to determine its environment-specific runtime configuration. If these environment variables are present, the application defaults to using the Development environment values, as shown below, in the application’s ‘config/config.js’ file.
var NODE_ENV   = process.env.NODE_ENV   || 'development';
var NODE_HOST  = process.env.NODE_HOST  || '127.0.0.1';
var NODE_PORT  = process.env.NODE_PORT  || 3000;
var MONGO_HOST = process.env.MONGO_HOST || '127.0.0.1';
var MONGO_PORT = process.env.MONGO_PORT || 27017;
var LOG_LEVEL  = process.env.LOG_LEVEL  || 'info';
var APP_NAME   = 'node-restify-mongodb-';
Future Project TODOs
Future project enhancements include the following:
- Add filtering, sorting, field selection and paging
- Add basic HATEOAS-based response features
- Add authentication and authorization to production MongoDB instance
- Convert from out-dated jasmine-node to Jasmine?
Scaffolding Modern Web Applications
Posted by Gary A. Stafford in Client-Side Development, Java Development, Mobile HTML Development, Software Development on November 29, 2015
Scaffold Three Full-Stack Modern Web Application Examples using Yeoman with npm, Bower, and Grunt
Introduction
The capabilities of modern web applications have quickly matched and surpassed those of most traditional desktop applications. However, with the increase in capabilities, comes an increase in architectural complexity of web applications. To help deal with the increase in complexity, developers have benefitted from a plethora of popular support libraries, frameworks, API’s, and similar tooling. Examples of these include AngularJS, React.js, Play!, Node.js, Express, npm, Yeoman, Bower, Grunt, and Gulp.
With so many choices, selecting an optimal toolset to construct a modern web application can be overwhelming. In this post, we will examine three distinct modern web application architectures, predominantly JavaScript-based. The post will discuss how to select and install the required tools, and how to use those tools to scaffold the applications. By the end of the post, we will have three working web applications, ready for further development.
Generators
The post’s examples use Yeoman generators. What is a generator? According to Wikipedia, Yeoman’s generator concept was inspired by Ruby on Rails. Using a generator’s blueprint, Yeoman scaffolds an application’s project directory and file structure, and installs required vendor libraries and dependencies. Yeoman generators usually run interactively, guiding the developer through a series of configuration questions. The configuration choices determine the project’s physical structure and components installed by Yeoman.
Generators are inherently opinionated. They dictate a particular application architecture they feel represents current best practices. However, good generators also allow developers to select from a range of architectural choices to meet the requirements of a developer’s environment. For example, a generator might allow Grunt or Gulp for task automation, or allow either Less or Sass for styling the UI. Similar to npm, RubyGems, Bower, Docker Hub, and Puppet Forge, Yeoman provides a searchable public repository. This allows developers to choose from a variety of generators to meet their specific needs.
Preparing the Development Environment
The examples in this post were built on Mac OS X. However, all the tools discussed in the post are available on the three major platforms, Linux, Mac, and Windows. Installation and configuration will vary.
An IDE is not required to scaffold the post’s application examples. However, for further development of the applications, I strongly recommend JetBrain’s WebStorm. According to Slant, WebStorm is a popular, highly rated IDE for building modern web applications. WebStorm is available on all three major platforms. A paid license is required, but well worth the reasonable investment based on the IDE’s rich feature set. WebStorm is integrated with many popular JavaScript frameworks. Additionally, there are hundreds of plug-ins available to extend WebStorm’s functionality.
Each of the post’s examples varies, architecturally. However, each also shares several common components, which we will install. They include:
npm
We will use npm (aka Node Package Manager), a leading server-side package manager, to manage the application’s server-side JavaScript dependencies.
Node.js
We will use Node.js, a JavaScript runtime, to power the JavaScript-based web application examples.
Bower
Similar to npm, Bower, is a popular client-side package manager. We will use Bower to manage the application’s client-side JavaScript dependencies.
Yeoman
We will use Yeoman, a leading web application scaffolding tool, to quickly build the frameworks for the example applications based on best practices and tooling.
Grunt
We will use Grunt, a leading JavaScript task runner, to automate common tasks such as minification, compilation, unit-testing, linting, and packaging of applications for deployment. At least two of the three examples also offer Gulp as an alternative.
Express
We will use Express, a Node.js web application framework that provides a robust set of features for web applications development, to support our example applications.
MongoDB
We will use MongoDB, a leading open-source NoSQL document database, for all three examples. For two of the examples, you can easily substitute alternate databases, such as MySQL, when configuring the application with Yeoman. The choice of database is of secondary importance in this post.
First install Node.js, which comes packaged with npm. Then, use npm to install Bower, Yeoman, and Grunt. Make sure you run the command to fix the permissions for npm. If permissions are set correctly, you should not have to use sudo with your npm commands.
The global mode option (-g) installs packages globally. Packages are usually installed globally, only if they are used as a command line tool, such as with Bower, Yeoman, and Grunt.
The easiest way to install Node.js and npm on OS X, is with Homebrew:
| # install homebrew and confirm | |
| ruby -e "$(curl -fsSL https://raw.githubusercontent.com/Homebrew/install/master/install)" | |
| brew update | |
| brew doctor | |
| export PATH="/usr/local/bin:$PATH" | |
| brew --version | |
| # install node and npm with brew and confirm | |
| brew install node | |
| node --version; npm --version |
Alternatively, install Node and npm by downloading the package installer for Mac OS X (x64) from nodejs.org. If you are not a currently a Homebrew user, I suggest this route. At the time of this post, you have the choice of Node.js version v4.2.3 LTS or v5.1.1 Stable.
Fix the potential permission problem with npm, so sudo is not required:
| sudo chown -R `whoami` $(npm config get prefix) |
Then, install Yeoman, Bower, and Grunt, globally:
| npm install -g bower yo grunt-cli | |
| bower --version; yo --version; grunt --version |
Lastly, install MongoDB. Similar to Node, we can use Homebrew, or download and install MongoDB from the MongoDB website. Review this page for detailed installation and configuration instructions. To install MongoDB with Homebrew, we would issue the following commands:
| brew update | |
| brew install mongod | |
| mongod --version | |
| sudo mkdir -p /data/db | |
| sudo chown -R `whoami` /data/db/ | |
| mongod |
Example #1: Server-Centric Express Application
For our first example, we will scaffold a server-centric JavaScript web application using Pete Cooper’s Express Generator (v2.9.2). According to the project’s GitHub site, the Express Generator is ‘An Expressjs generator for Yeoman, based on the express command line tool.’ I suggest reading the project’s documentation before continuing; it describes the generator’s functionality in greater detail.
To install, download the Express Generator with npm, and install with Yeoman, as follows:
| npm install -g generator-express | |
| yo express |
As part of the Express Generator’s configuration process, Yeoman will ask a series of configuration questions. The Express generator offers several choices for scaffolding the application. For this example, we will choose the following options: MVC, Marko, Sass, MongoDB, and Grunt.

Using Express-Generator with Yeoman
For those not as familiar with developing full-stack JavaScript applications, some of the generator’s choices may be unfamiliar, such as view engines, css preprocessors, and build tools. For this example, we will select Marko, a highly regarded JavaScript templating engine (aka view engine), for the first application. You can compare different engines on Slant. For CSS preprocessors, you can also refer to Slant for a comparison of leading candidates. We will choose Sass.
Lastly, for a build tool (aka task runner) we will choose Grunt. Grunt and Gulp are the two most popular choices. Either is a proven tool for automation tasks such as minification, compilation, unit-testing, linting, and packaging applications for deployment.
As shown below, Yeoman creates a series of files and directories and installs JavaScript libraries with npm and Bower. Choices are based on best practices, as prescribed by the generator.

Default Express-Generator File Structure
npm
Yeoman uses npm and bower to install the generator’s required packages. Based on our five configuration choices for the Express Generator, npm installed over 225 packages in the project’s local node_module directory. This includes primary and secondary npm package dependencies. For example, Marko, one of the choices, which npm installed, has 24 dependencies it requires. In turn, each of those packages may have more dependencies. You quickly see why npm, and other similar package managers, are invaluable to building and managing a modern web application. The npm dependencies are declared in the package.json file, in the project’s root directory.

Partial List of npm Packages Installed
We will still need to install a few more items. We chose Sass as an Express generator option. Sass requires Ruby, which comes preinstalled on Mac OS X. If you wish, you can upgrade your pre-installed version of Ruby with Homebrew, but it is not required. Sass is installed with RubyGems, a package manager for Ruby. To automate the Sass-related tasks with Grunt, we also need to install the Grunt plug-in for Sass, grunt-contrib-sass, using npm:
| # optional install updated version of Ruby and confirm | |
| brew install ruby | |
| ruby --version | |
| # install grunt-contrib-sass | |
| npm install grunt-contrib-sass --save-dev | |
| # install sass and confirm | |
| gem install sass | |
| gem list sass |
The Express Generator’s test are written in Mocha. Mocha is an asynchronous JavaScript test framework running on Node.js. The website suggests installing Mocha globally with npm. Mocha can be run from the command line:
| npm install -g mocha | |
| mocha --version |
Up and Running
Simply running the grunt command will start the default Generator-Express MVC application. While in development, I prefer to run Grunt with the debug option (grunt -d) and/or with the verbose option (grunt -v or grunt -dv). These options offer enhanced feedback, especially on which tasks are run by Grunt. Review the terminal output to make sure the application started properly.

Starting the Application with Grunt
To confirm the Express application started correctly, in a second terminal window, curl the application using curl -I localhost:3000. Easier yet, point your web browser to localhost:3000. You should see the following default web page.

Default Express-Generator Application
Example #2: Full-Stack MEAN Application
In our second example, we will scaffold a true full-stack JavaScript web application using Tyler Henkel’s popular AngularJS Full-Stack Generator for Yeoman (v3.0.2). According to the project’s GitHub site, the generator is a ‘Yeoman generator for creating MEAN stack applications, using MongoDB, Express, AngularJS, and Node – lets you quickly set up a project following best practices.’ As with the earlier example, I suggest you read the project’s documentation before continuing.
To install theAngularJS Full-Stack Generator, download the with npm and install with Yeoman:
| npm install -g generator-angular-fullstack | |
| mkdir demo-web-app-2; cd $_ | |
| yo angular-fullstack meanapp |
Similar to the Express example, Yeoman will ask a series of configuration questions. We will choose the following options: Jade, Less, ngRoute, Bootstrap, UI Bootstrap, and MongoDB with Mongoose. AngularJS, Express, and Grunt are installed by the generator, automatically. For the sake of brevity, we will not include other available options, including Babel for ES6, OAuth authentication, or socket.io.

AngularJS Full-Stack Generator Config Options
PhantomJS
After generating the AngularJS Full-Stack project, I received errors regarding PhantomJS. According to several sources, this is not uncommon. The AngularJS Full-Stack project uses PhantomJS as the default browser for Karma, the popular test runner, designed by the AngularJS team. Although npm installed PhantomJS locally, as part of the project, Karma complained about missing the path to the PhantomJS binary. To eliminate the issue, I installed PhantomJS globally with npm. I then manually added the PhantomJS binary path to the $PATH environment variable:
| npm install -g phantomjs | |
| sudo vi ~/.bash_profile | |
| # add PHANTOMJS_BIN environment variable (next two lines) | |
| export PHANTOMJS_BIN=/usr/local/lib/node_modules/phantomjs/bin | |
| # your file/line may vary | |
| resetexport PATH=${PHANTOMJS_BIN}:$PATH | |
| phantomjs --version |
To test Karma, with PhantomJS, run the grunt test command. This should result in error-free output, similar to the following.

Running “karma:unit” (karma) task
Client/Server Architecture
Similar to the previous example, Yeoman creates a series of files and directories, and installs JavaScript packages on the server and client sides with npm and Bower.

AngularJS Full-Stack Generator File Structure
Both the Express and AngularJS examples share several common files and directories. However, one major difference between the two is the client/server oriented directory structure of the AngularJS generator. Unlike the Express example, the AngularJS example has both a client and a server directory. The server-side of the application (aka back-end) is driven primarily by Express and Node. Mongoose serves as an interface between our application’s domain model and MongoDB, on the server-side. Also, on the server-side, Jade is used for HTML templating. The client-side of the application (aka front-end) is driven primarily by AngularJS. Twitter’s Bootstrap and Bootstrap UI offer a responsive web interface for our example application.

Full-Stack Server/Client File Structure
Up and Running
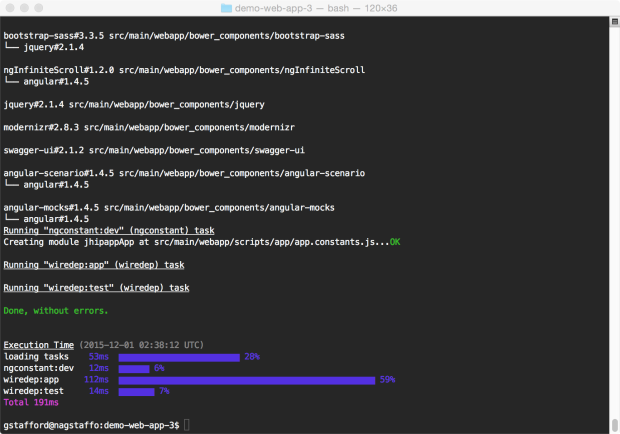
Running the grunt serve command will eventually start the default AngularJS Full-Stack application, after running a series of pre-defined Grunt tasks.

AngularJS Full-Stack App Starting with Grunt
Review the terminal output to make sure the application started properly. You may see some warnings, suggesting the installation of several dependencies globally. You may also see warnings about dependency versions being outdated. Outdated versions are one of the challenges with generators that are not constantly kept refreshed and tested with the latest package dependencies. Warnings shouldn’t prevent the application from starting, only Errors.

AngularJS Full-Stack App Started with Grunt
To confirm the application started, in a second terminal window, curl the application using curl -I localhost:9000. Easier yet, point your web browser at localhost:9000. The default web page for the AngularJS Full-Stack web application is much more elaborate than the previous Express example. This is thanks to the Bootstrap and AngularJS client-side components.

AngularJS Full-Stack App Running in Browser
Additional Generator Features
The AngularJS Full-Stack generator is capable of generating more than just the default application project. The AngularJS Full-Stack generator contains a set of generators. Beyond generating the basic application framework, you may use the generator to create boilerplate code for AngularJS and Node.js components for endpoints, services, routes, models, controllers, directives, and filters. The generators also provide the ability to prepare your application for deployment to OpenStack and Heroku.
The best place to review available options for the generators is on the GitHub sites. You can display a high-level list of the generator’s features using the yo --help command. Below are the three generators used in this post.
Below, is an example of generating additional application components using the AngularJS Full-Stack generator. First scaffold a server-side Express RESTful API endpoint, called ‘user’. The single command generates a server-side directory structure and several boilerplate files, including an Express model, controller, and router, and Mocha tests.

List of Installed Yeoman Generators
Next, generate a client-side AngularJS service, which connects to the server-side, Express RESTful ‘user’ endpoint above. The command creates a boilerplate AngularJS service and Mocha test. Lastly, create an AngularJS route. This generator command creates a boilerplate AngularJS route and controller, Mocha test, Jade view template, and less file.

AngularJS Full-Stack Component Generators
Example #3: Java Hipster Application
In the third and last example, we will scaffold another full-stack web application. However, this time, we will use a generator that relies on Java EE as the primary development platform on the server-side, as opposed to JavaScript. JavaScript will be relegated largely to the client-side.
Again, we will use a Yeoman generator, JHipster, built by Julien Dubois and team, to scaffold the application (v2.25.0). According to the project’s GitHub site, JHipster uses a robust server-side Java EE stack with Spring Boot and Maven. JHipster’s mobile-first front-end is enabled with AngularJS and Bootstrap. Being the most complex of the three examples, it’s important to review the project documentation.
JHipster offers three ways to install the application, which are 1) locally, 2) a Docker container, or 3) a Vagrant VM. We will install the application framework locally as not to introduce additional complexity. To install the generator, download the JHipster generator with npm, and install with Yeoman:
| npm install -g generator-jhipster | |
| mkdir demo-web-app-3; cd $_ | |
| yo jhipster |
Again, Yeoman will ask a series of configuration questions on behalf of JHipster. For this example, we will choose the following options: token-based authentication, MongoDB, Maven, Grunt, LibSass (Sass), and Gatling for testing. AngularJS and Bootstrap are installed automatically. We have chosen not to include other configuration options in this example, such as Angular Translate, WebSockets, and clustered HTTP sessions.

Default JHipster Generator Options
Once Yeoman finishes scaffolding the application, you should see the following output.
JHipster Generator Install Complete
Maven Project Structure
The file and directory structure of JHipster is very different from the previous two examples. The first two example’s project structure is typical of a JavaScript project. In contrast, the JHipster example’s structure is more typical of a Maven-based Java project. In the JHipster project, the client-side JavaScript files are in the /src/main/webapp/ directory. The presence of the webapp directory is based on part of the project’s reliance on the Spring MVC web framework. Additionally, npm has loaded required server-side JavaScript packages into the node_modules directory, in the project’s root directory.

Default JHipster File Structure
Up and Running
Running the mvn command will start the default JHipster application. The URL for the JHipster application is included in the terminal output.

JHipster Application Running with Maven
To confirm the application has started, curl the application in a second terminal window, using curl -I localhost:8080. Easier yet, point your web browser to localhost:8080. Again, thanks to Bootstrap and AngularJS, the application presents a rich client UI.

Default JHipster Application Running
Conclusion
The post’s examples represent a narrow sampling of available modern web application stacks, which can be easily scaffolded with generators. The JavaScript space continues to evolve rapidly. Even within the realm of JavaScript-based solutions, we didn’t examine several other popular frameworks, such as Meteor, FaceBook’s ReactJS, Ember, Backbone, and Polymer. They are all worth exploring, along with the hundreds of popular supporting frameworks, libraries, and API’s.
Useful Links
- Post: JavaScript Frameworks: The Best 10 for Modern Web Apps (link)
- Post: Best Web Frameworks (link)
- Post: State Of Web Development 2014 (link)
- YouTube: Modern Front-end Engineering (link)
- YouTube: WebStorm – Things You Probably Didn’t Know (link)
- Website: MEAN Stack (link)
- Website: Full Stack Python (link)
- Post: Best Full Stack Web Framework (link)
Calling Third-Party HTTP-based RESTful APIs from the MEAN Stack
Posted by Gary A. Stafford in Client-Side Development, Software Development on January 6, 2015
Example of calling Google’s Custom Search http-based RESTful API, using Node.js with Express and Request, from a MEAN.io-generated MEAN stack application. 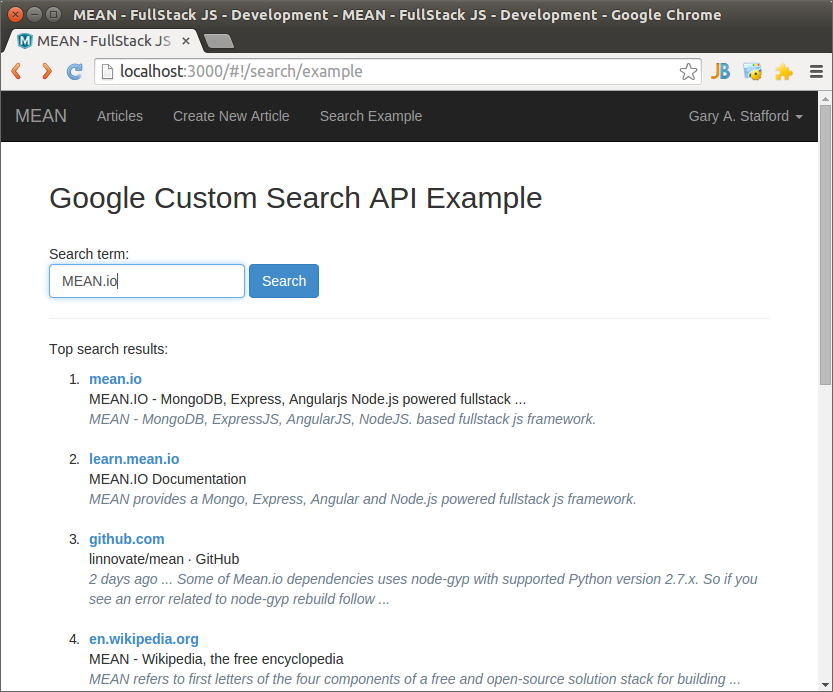
Introduction
Most MEAN stack articles and tutorials demonstrate how AngularJS, on the client-side, calls Node.js with Express on the server-side, via a http-based RESTful API. In turn, on the server-side, Node.js with Express, and often a ODM like Mongoose, calls MongoDB. Below is a simple, high-level sequence diagram of a typical MEAN stack request/response data flow from the client to the server to the database, and back.
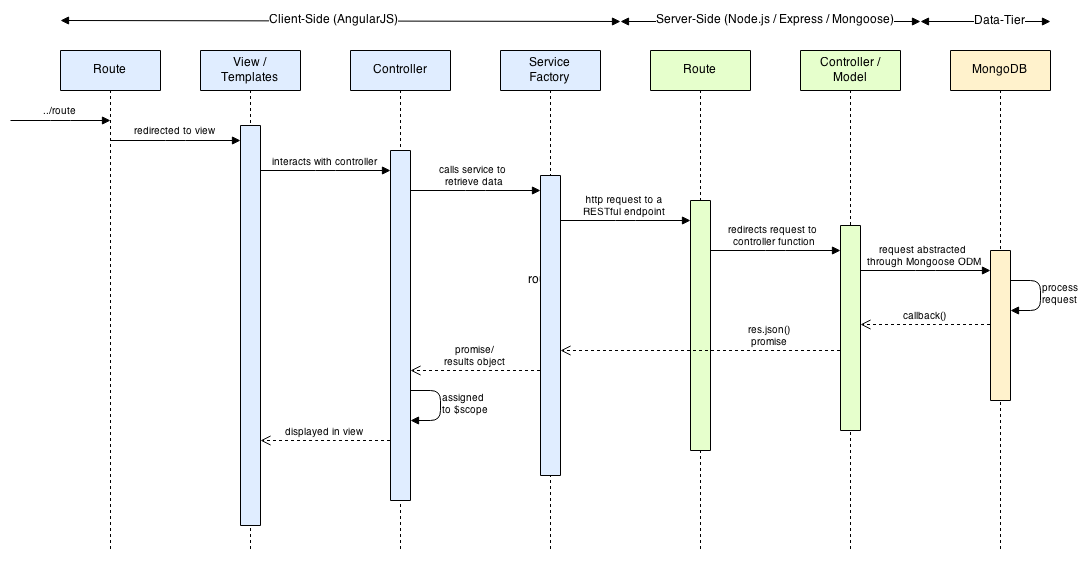
Typical MEAN Stack Request/Response Data Flow
However in many situations, applications don’t only call into their own application stack. Applications often call third-party http-based RESTful APIs, including social networks, cloud providers, e-commerce, and news aggregators. Twitter’s REST API and Facebook Graph API are two popular social network examples. Within larger enterprise environments, applications call multiple internal applications. For example, an online retailer’s storefront application accesses their own inventory control system via RESTful URIs. This is the same RESTful API the retailer’s authorized resellers use to interact with the retailer’s own inventory control system.
Calling APIs from the MEAN Stack
From the Client-Side
There are two ways to call third-party http-based APIs from a MEAN stack application. The first approach is calling directly from the client-side. AngularJS calls the third-party API, directly. All logic is on the client-side, instead of on the server-side. Node.js and Express are not involved in the process. The approach requires less moving parts than the next approach, but is less secure and places more demand on the client to handle the application’s business logic. Below is a simple, high-level sequence diagram demonstrating a request/response data flow from AngularJS on the client-side to a third-party API, and back.
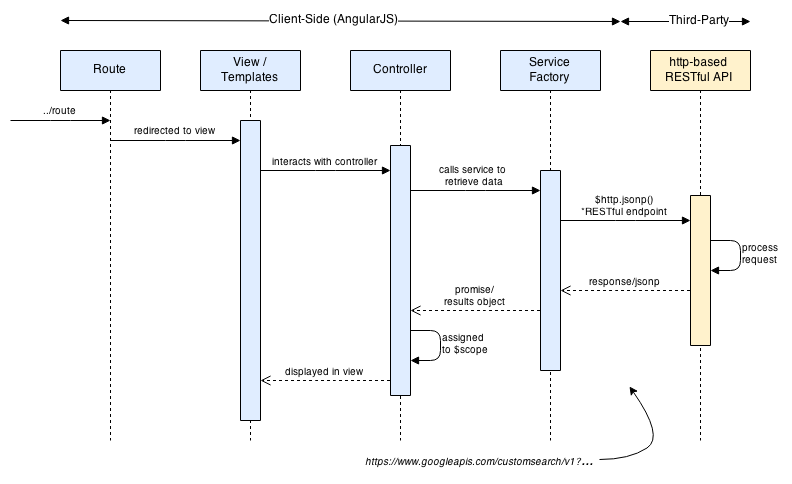
Example AngularJS/Third-Party API Request/Response Data Flow
From the Server-Side
The second approach, using Node.js and Express, on the servers-side, is slightly more complex. However, this approach is also more architecturally sound, scalable, secure, and performant. AngularJS, on the client side, calls Node.js with Express, on the server-side. Node.js with Express then calls the service and pass the response back to the client-side, to AngularJS. Below is a simple, high-level sequence diagram demonstrating a request/response data flow from the client-side to the server-side, to a third-party API, and back.
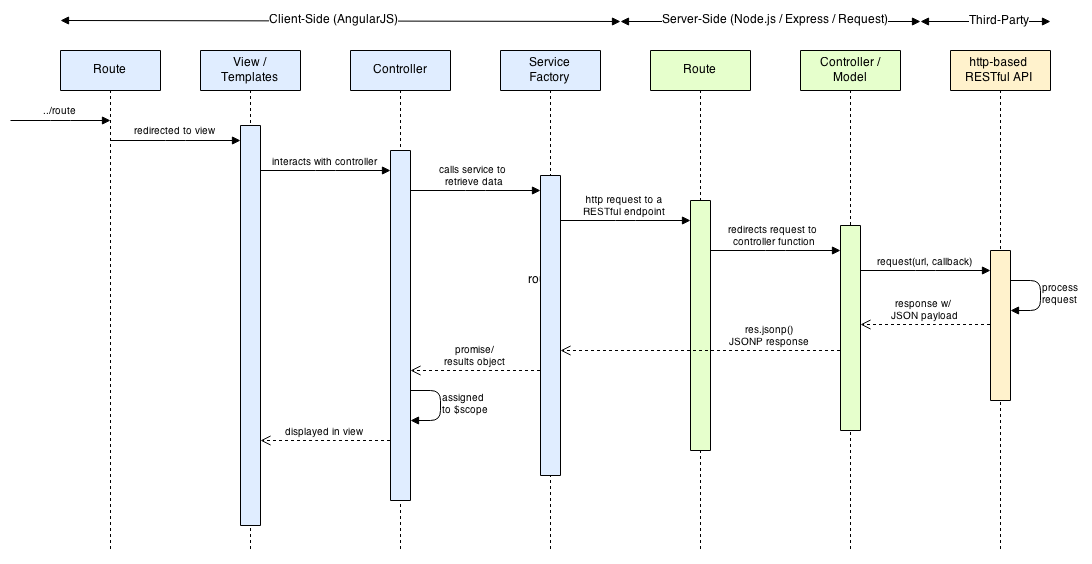
Example Node.js/Third-Party API Request/Response Data Flow
Example
MEAN.io
Using the MEAN.io ‘FullStack JS Development’ framework, I have created a basic example of calling Google’s Custom Search http-based RESTful API, from Node.js with Express and Request. MEAN.io provides an ready-made MEAN stack boilerplate framework/generator, saving a lot of coding time. Irregardless of the generator or framework you choose, you would architect this example the same.
Google Custom Search API
Google provides the Custom Search API as part of their Custom Search, one of many API’s, available through the Google Developers portal. According to Google, “the JSON/Atom Custom Search API lets you develop websites and applications to retrieve and display search results from Google Custom Search programmatically. With this API, you can use RESTful requests to get either web search or image search results in JSON or Atom format.”
Google APIs Explorer – Exploring Custom Search API
In order to use the Custom Search API, you will need to first create a Google account, API project, API key, Custom Search Engine (CSE), and CSE ID, through Google’s Developers Console. If you have previously worked with Google, FaceBook, or Twitter APIs, creating an API project, CSE, API key, and CSE ID, if very similar.
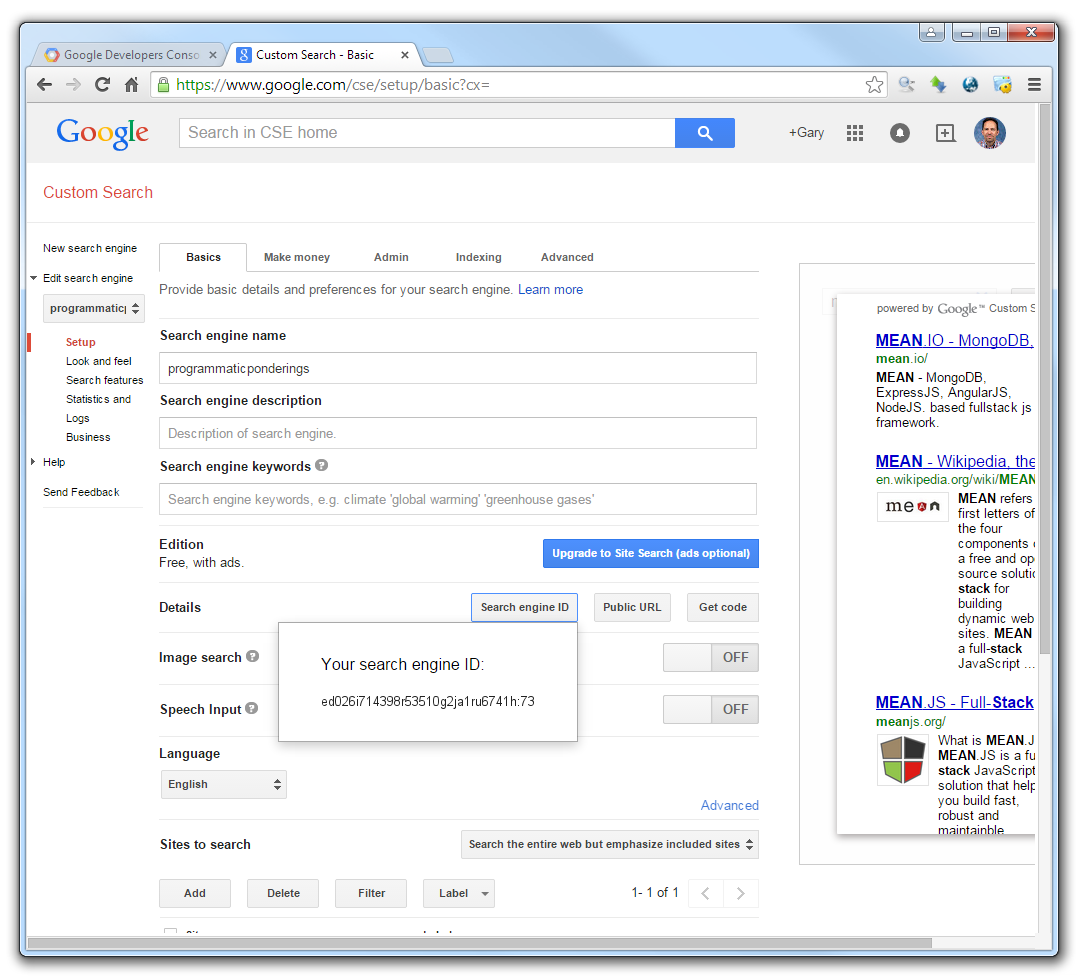
Google Custom Search – Your Search Engine ID
Like most of Google’s APIs, the Custom Search API pricing and quotas depend on the engine’s edition. You have a choice of two engines. According to Google, the free Custom Search Engine provides 100 search queries per day for free. If you need more, you may sign up for billing in the Developers Console. Additional requests cost $5 per 1000 queries, up to 10k queries per day. The limit of 100 is more than enough for this demonstration.
Installing and Configuring the Project
All the code for this project is available on GitHub at /meanio-custom-search. Before continuing, make sure you have the prerequisite software installed – Git, Node.js with npm, and MongoDB. To install the GitHub project, follow these commands:
git clone https://github.com/garystafford/meanio-custom-search.git
cd meanio-custom-search
npm install
Alternatively, if you want to code the project yourself, these are the commands I used to set up the base MEAN.io framework, and create ‘search‘ package:
sudo npm install -g mean-cli
mean init meanio-custom-search
cd meanio-custom-search
npm install
mean package search
After creating your own CSE ID and API key, create two environmental variables, GOOGLE_CSE_ID and GOOGLE_API_KEY, to hold the values.
echo "export GOOGLE_API_KEY=<YOUR_API_KEY_HERE>" >> ~/.bashrc
echo "export GOOGLE_CSE_ID=<YOUR_CSE_ID_HERE>"   >> ~/.bashrc
The code is run from a terminal prompt with the grunt command. Then, in the browser, go to http://localhost:3000. Once on the main home page, you can navigate to the ‘Search Example’ page, and input a search term, such as ‘MEAN Stack’. All the instructions on the MEAN.io Github site, apply to this project.
The Project’s Architecture
According to MEAN.io, everything in mean.io is a ‘package’. When extending mean with custom functionality, you create a new ‘package’. In this case, I have created a ‘search’ package, with the command above, ‘mean package search‘. Below is the basic file structure of the ‘search‘ package, within the overall MEAN.io project framework. The ‘public‘ folder contains all the client-side, AngularJS code. The ‘server‘ folder contains all the server-side, Node.js/Express/Request code. Note that each ‘package’ also has its own ‘package.json‘ npm file and ‘bower.json‘ Bower file.

The simple, high-level sequence diagram below shows the flow of the custom search request from the ‘Search Example’ view to the Google Custom Search API. The diagram also shows the response from the Google Custom Search API all the way back up the MEAN stack to the client-side view.
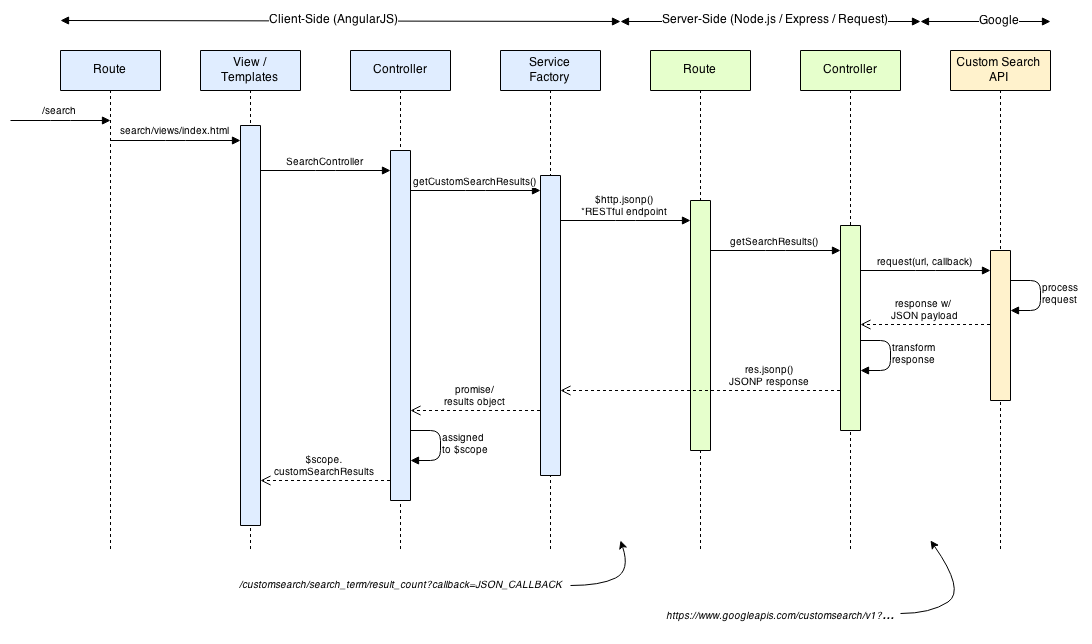
High-Level Custom Search API Request/Response Data Flow
Client-Side Request/Response
If you view the network traffic in your web browser, you will see a RESTful URI call is made between AngularJS’ service factory, on the client-side, and Node.js with Express, on the server-side. The RESTful endpoint, called with $http.jsonp(), will be similar to: http://localhost:3000/customsearch/MEAN.io/10?callback=angular.callbacks._0. In actuality, the callback parameter name, the AngularJS service factory, is ‘JSON_CALLBACK‘. This is replaced by AngularJS with an incremented ‘angular.callbacks._X‘ parameter name, making the response callback name incremental and unique.
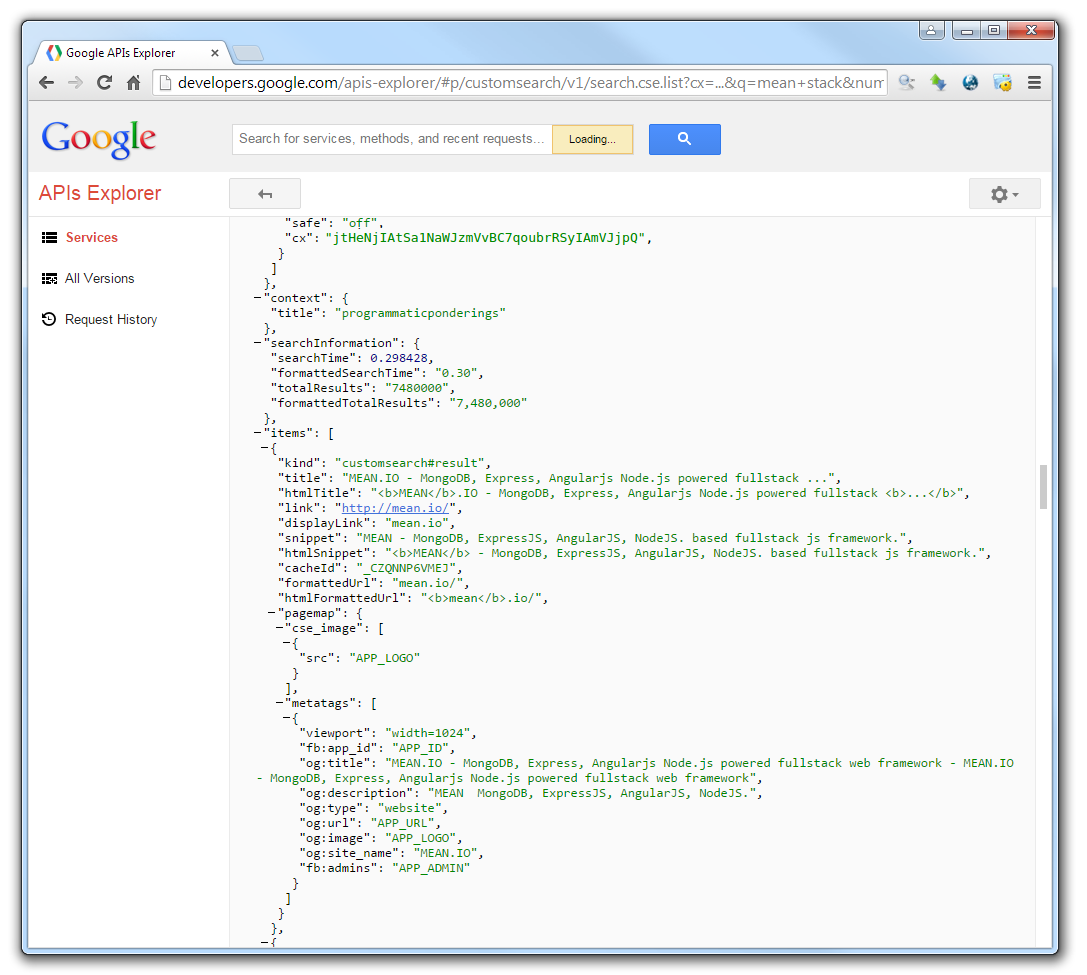
The response returned to AngularJS from Node.js is a sub-set of full response from Google’s Custom Search API. Only the search results items and a ‘200’ status code are returned to AngularJS as JavaScript, JSONP wrapped in a callback. Below is a sample response, truncated to just a single search result. I have highlighted the four fields that are displayed in the ‘Search Example’ view, using AngularJS’ ng-repeat directive.
/**/
typeof angular.callbacks._0 === 'function' && angular.callbacks._0({
    "statusCode": 200,
    "items"     : [{
        "kind"            : "customsearch#result",
        "title"           : "MEAN.IO - MongoDB, Express, Angularjs Node.js powered fullstack ...",
        "htmlTitle"       : "<b>MEAN</b>.<b>IO</b> - MongoDB, Express, Angularjs Node.js powered fullstack <b>...</b>",
        "link"            : "http://mean.io/",
        "displayLink"     : "mean.io",
        "snippet"         : "MEAN - MongoDB, ExpressJS, AngularJS, NodeJS. based fullstack js framework.",
        "htmlSnippet"     : "<b>MEAN</b> - MongoDB, ExpressJS, AngularJS, NodeJS. based fullstack js framework.",
        "cacheId"         : "_CZQNNP6VMEJ",
        "formattedUrl"    : "mean.io/",
        "htmlFormattedUrl": "<b>mean</b>.<b>io</b>/",
        "pagemap"         : {
            "cse_image"    : [{"src": "http://i.ytimg.com/vi/oUtWtSF_VNY/hqdefault.jpg"}],
            "cse_thumbnail": [{
                "width" : "259",
                "height": "194",
                "src"   : "https://encrypted-tbn2.gstatic.com/images?q=tbn:ANd9GcSIVwPo7OcW9u_b3P3DGxv8M7rKifGZITi1Bhmpy10_I2tlUqjRUVVUBKNG"
            }],
            "metatags"     : [{
                "viewport"      : "width=1024",
                "fb:app_id"     : "APP_ID",
                "og:title"      : "MEAN.IO - MongoDB, Express, Angularjs Node.js powered fullstack web framework - MEAN.IO - MongoDB, Express, Angularjs Node.js powered fullstack web framework",
                "og:description": "MEAN  MongoDB, ExpressJS, AngularJS, NodeJS.",
                "og:type"       : "website",
                "og:url"        : "APP_URL",
                "og:image"      : "APP_LOGO",
                "og:site_name"  : "MEAN.IO",
                "fb:admins"     : "APP_ADMIN"
            }]
        }
    }]
});
Server-Side Request/Response
On the server-side, Node.js with Express and Request, calls the Google Custom Search API via a RESTful URI. The RESTful URI, called with request.get(), will be similar to: https://www.googleapis.com/customsearch/v1?cx=ed026i714398r53510g2ja1ru6741h:73&q=MEAN.io&num=10&key=jtHeNjIAtSa1NaWJzmVvBC7qoubrRSyIAmVJjpQu. Note the URI contains both the your CSE ID and API key (not my real ones, of course). The JSON response from Google’s Custom Search API has other data, which is not necessary to display the results.
Shown below is a sample response with a single search result. Like the URI above, the response from Google has your Custom Search Engine ID. Your CSE ID and API key should both be considered confidential and not visible to the client. The CSE ID could be easily intercepted in both the URI and the response object, and used without your authorization. Google has a page that suggests methods to keep your keys secure.
{
  kind: "customsearch#search",
  url: {
    type: "application/json",
    template: "https://www.googleapis.com/customsearch/v1?q={searchTerms}&num={count?}&start={startIndex?}&lr={language?}&safe={safe?}&cx={cx?}&cref={cref?}&sort={sort?}&filter={filter?}&gl={gl?}&cr={cr?}&googlehost={googleHost?}&c2coff={disableCnTwTranslation?}&hq={hq?}&hl={hl?}&siteSearch={siteSearch?}&siteSearchFilter={siteSearchFilter?}&exactTerms={exactTerms?}&excludeTerms={excludeTerms?}&linkSite={linkSite?}&orTerms={orTerms?}&relatedSite={relatedSite?}&dateRestrict={dateRestrict?}&lowRange={lowRange?}&highRange={highRange?}&searchType={searchType}&fileType={fileType?}&rights={rights?}&imgSize={imgSize?}&imgType={imgType?}&imgColorType={imgColorType?}&imgDominantColor={imgDominantColor?}&alt=json"
  },
  queries: {
    nextPage: [
      {
        title: "Google Custom Search - MEAN.io",
        totalResults: "12100000",
        searchTerms: "MEAN.io",
        count: 10,
        startIndex: 11,
        inputEncoding: "utf8",
        outputEncoding: "utf8",
        safe: "off",
        cx: "ed026i714398r53510g2ja1ru6741h:73"
      }
    ],
    request: [
      {
        title: "Google Custom Search - MEAN.io",
        totalResults: "12100000",
        searchTerms: "MEAN.io",
        count: 10,
        startIndex: 1,
        inputEncoding: "utf8",
        outputEncoding: "utf8",
        safe: "off",
        cx: "ed026i714398r53510g2ja1ru6741h:73"
      }
    ]
  },
  context: {
    title: "my_search_engine"
  },
  searchInformation: {
    searchTime: 0.237431,
    formattedSearchTime: "0.24",
    totalResults: "12100000",
    formattedTotalResults: "12,100,000"
  },
  items: [
    {
      kind: "customsearch#result",
      title: "MEAN.IO - MongoDB, Express, Angularjs Node.js powered fullstack ...",
      htmlTitle: "<b>MEAN</b>.<b>IO</b> - MongoDB, Express, Angularjs Node.js powered fullstack <b>...</b>",
      link: "http://mean.io/",
      displayLink: "mean.io",
      snippet: "MEAN - MongoDB, ExpressJS, AngularJS, NodeJS. based fullstack js framework.",
      htmlSnippet: "<b>MEAN</b> - MongoDB, ExpressJS, AngularJS, NodeJS. based fullstack js framework.",
      cacheId: "_CZQNNP6VMEJ",
      formattedUrl: "mean.io/",
      htmlFormattedUrl: "<b>mean</b>.<b>io</b>/",
      pagemap: {
        cse_image: [
          {
            src: "http://i.ytimg.com/vi/oUtWtSF_VNY/mqdefault.jpg"
          }
        ],
        cse_thumbnail: [
          {
            width: "256",
            height: "144",
            src: "https://encrypted-tbn1.gstatic.com/images?q=tbn:ANd9GcTXm3rYwGdWs9Cx3s5VvooATKlgtrVZoP83hxfAOjGvsRMqLpMKuycVl_sF"
          }
        ],
        metatags: [
          {
            viewport: "width=1024",
            fb:app_id: "APP_ID",
            og:title: "MEAN.IO - MongoDB, Express, Angularjs Node.js powered fullstack web framework - MEAN.IO - MongoDB, Express, Angularjs Node.js powered fullstack web framework",
            og:description: "MEAN  MongoDB, ExpressJS, AngularJS, NodeJS.",
            og:type: "website",
            og:url: "APP_URL",
            og:image: "APP_LOGO",
            og:site_name: "MEAN.IO",
            fb:admins: "APP_ADMIN"
          }
        ]
      }
    }
  ]
}
The best way to understand the project’s sample code is to clone the GitHub repo, and explore the files directly associated with the search, starting in the ‘packages/custom/search‘ subdirectory.
Helpful Links
Learn REST: A RESTful Tutorial
Using an AngularJS Factory to Interact with a RESTful Service
Google APIs Client Library for JavaScript (Beta)
REST-ful URI design
Creating a CRUD App in Minutes with Angular’s $resource
Install Latest Node.js and npm in a Docker Container
Posted by Gary A. Stafford in Bash Scripting, Build Automation, Client-Side Development, DevOps, Enterprise Software Development on November 17, 2014
Install the latest versions of Node.js and npm, into a Docker container, with or without the need for root access. Easily update both applications to the latest versions.
Ubuntu and Node
Recently, I was setting up a new development laptop with Ubuntu 14.10 (Utopic Unicorn). As part of the setup, I needed to install all the several development tools, including Node.js and npm. Researching the current recommendations for installing Node.js and npm on Ubuntu, I found using the traditional ‘apt-get‘ command does not always install the latest versions of either application. Additionally, ‘apt-get’ makes updating those versions difficult.
After a lot of investigation, I created three different snippets of code to install the latest copies of Node.js and npm. Some of my code came from Isaac Z. Schlueter‘s series of installations Gists, and a post on StackOverflow by Pascal Hartig. Joyant and others recommended Isaac’s Gists for installing earlier versions of Node.js and npm. Other code was found in posts by DigitalOcean. Versions are as follows:
- Version 1: using ‘apt-get install’
- Version 2: using curl, make, and npmjs.org’s install script
- Version 3: version 2 without requiring ‘sudo’ to use npm*
*There is some debate on the use of ‘sudo’ with some earlier versions of npm. It appears not to be recommended with the latest versions of npm.
Docker
Docker containers and virtual machines (VM) are ideal platforms for developing and testing applications, locally. I often create a Docker container or VirtualBox VM, to install and test new scripts, before running them within our software environments. To test this code, I created three separate Docker containers, based on the official 14.04 Ubuntu base image, located on Docker Hub. I then executed each version of code within a container. After installation testing, I chose version 2 for my laptop.
Docker Ubuntu Image and Containers
GitHub Gists
The three versions of install scripts on gist.github.com, perform the following tasks:
- Creates Docker container
- Updates Ubuntu system packages within container
- Creates new ‘testuser’ account within container (‘testuser’)
- Installs required software to install Node.js, if necessary (curl, make, etc.)
- Installs Node.js and npm
- Installs some common full-stack JavaScript npm packages
- Verifies installation locations and contents correct
| ############################################################################### | |
| # Version 1: using ‘apt-get install’ | |
| # Installs using apt-get | |
| # Requires update to npm afterwards | |
| # Harder to get latest copy of node | |
| # Requires sudo to use npm | |
| ############################################################################### | |
| # create new docker ubuntu container | |
| sudo docker run -i -t ubuntu /bin/bash # drops you into container as root | |
| # update and install all required packages (no sudo required as root) | |
| # https://gist.github.com/isaacs/579814#file-only-git-all-the-way-sh | |
| apt-get update -yq && apt-get upgrade -yq && \ | |
| apt-get install -yq curl git nano | |
| # install from nodesource using apt-get | |
| # https://www.digitalocean.com/community/tutorials/how-to-install-node-js-on-an-ubuntu-14-04-server | |
| curl -sL https://deb.nodesource.com/setup | sudo bash - && \ | |
| apt-get install -yq nodejs build-essential | |
| # fix npm - not the latest version installed by apt-get | |
| npm install -g npm | |
| # add user with sudo privileges within Docker container | |
| # without adduser input questions | |
| # http://askubuntu.com/questions/94060/run-adduser-non-interactively/94067#94067 | |
| USER="testuser" && \ | |
| adduser --disabled-password --gecos "" $USER && \ | |
| sudo usermod -a -G sudo $USER && \ | |
| echo "$USER:abc123" | chpasswd && \ | |
| su - $USER # switch to testuser | |
| # install common full-stack JavaScript packages globally | |
| # http://blog.nodejs.org/2011/03/23/npm-1-0-global-vs-local-installation | |
| sudo npm install -g yo grunt-cli bower express | |
| # optional, check locations and packages are correct | |
| which node; node -v; which npm; npm -v; \ | |
| npm ls -g --depth=0 |
| ############################################################################### | |
| # Version 2: using curl, make, and npmjs.org’s install script | |
| # Installs using make and shell script | |
| # Easier to update node and npm versions in future | |
| # Requires sudo to use npm | |
| ############################################################################### | |
| # create new docker ubuntu container | |
| sudo docker run -i -t ubuntu /bin/bash # drops you into container as root | |
| # update and install all required packages (no sudo required as root) | |
| # https://gist.github.com/isaacs/579814#file-only-git-all-the-way-sh | |
| apt-get update -yq && apt-get upgrade -yq && \ | |
| apt-get install -yq g++ libssl-dev apache2-utils curl git python make nano | |
| # install latest Node.js and npm | |
| # https://gist.github.com/isaacs/579814#file-node-and-npm-in-30-seconds-sh | |
| mkdir ~/node-latest-install && cd $_ && \ | |
| curl http://nodejs.org/dist/node-latest.tar.gz | tar xz --strip-components=1 && \ | |
| make install && \ # takes a few minutes to build... | |
| curl https://www.npmjs.org/install.sh | sh | |
| # add user with sudo privileges within Docker container | |
| # without adduser input questions | |
| # http://askubuntu.com/questions/94060/run-adduser-non-interactively/94067#94067 | |
| USER="testuser" && \ | |
| adduser --disabled-password --gecos "" $USER && \ | |
| sudo usermod -a -G sudo $USER && \ | |
| echo "$USER:abc123" | chpasswd && \ | |
| su - $USER # switch to testuser | |
| # install common full-stack JavaScript packages globally | |
| # http://blog.nodejs.org/2011/03/23/npm-1-0-global-vs-local-installation | |
| sudo npm install -g yo grunt-cli bower express | |
| # optional, check locations and packages are correct | |
| which node; node -v; which npm; npm -v; \ | |
| npm ls -g --depth=0 |
| ############################################################################### | |
| # Version 3: version 2 without requiring ‘sudo’ to use npm | |
| # Does NOT require sudo to use npm | |
| ############################################################################### | |
| # create new docker ubuntu container | |
| sudo docker run -i -t ubuntu /bin/bash # drops you into container as root | |
| # update and install all required packages (no sudo required as root) | |
| # https://gist.github.com/isaacs/579814#file-only-git-all-the-way-sh | |
| apt-get update -yq && apt-get upgrade -yq && \ | |
| apt-get install -yq g++ libssl-dev apache2-utils curl git python make nano | |
| # add user with sudo privileges within Docker container | |
| # without adduser input questions | |
| # http://askubuntu.com/questions/94060/run-adduser-non-interactively/94067#94067 | |
| USER="testuser" && \ | |
| adduser --disabled-password --gecos "" $USER && \ | |
| sudo usermod -a -G sudo $USER && \ | |
| echo "$USER:abc123" | chpasswd && \ | |
| su - $USER # switch to testuser | |
| # setting up npm for global installation without sudo | |
| # http://stackoverflow.com/a/19379795/580268 | |
| MODULES="local" && \ | |
| echo prefix = ~/$MODULES >> ~/.npmrc && \ | |
| echo "export PATH=\$HOME/$MODULES/bin:\$PATH" >> ~/.bashrc && \ | |
| . ~/.bashrc && \ | |
| mkdir ~/$MODULES | |
| # install Node.js and npm | |
| # https://gist.github.com/isaacs/579814#file-node-and-npm-in-30-seconds-sh | |
| mkdir ~/node-latest-install && cd $_ && \ | |
| curl http://nodejs.org/dist/node-latest.tar.gz | tar xz --strip-components=1 && \ | |
| ./configure --prefix=~/$MODULES && \ | |
| make install && \ # takes a few minutes to build... | |
| curl https://www.npmjs.org/install.sh | sh | |
| # install common fullstack JavaScript packages globally | |
| npm install -g yo grunt-cli bower express | |
| # optional, check locations and packages are correct | |
| which node; node -v; which npm; npm -v; \ | |
| npm ls -g --depth=0 |
Running Code

Installing Node, npm, and New User Account

Installing and Verifying npm Packages
Data-Driven Forms with AngularJS’s Two-Way Data Binding and Custom Directives
Posted by Gary A. Stafford in Client-Side Development, Mobile HTML Development, Software Development on July 23, 2014
Use the two-way data binding and custom directives features of AngularJS to develop data-driven, interactive forms.

Introduction
AngularJS has exploded on to the web-application development scene. Since being introduced in 2009, AngularJS’s use has grown exponentially. Its wide range of features and ease of use make it an ideal tool for rapidly developing modern web-applications. Combined with other modern JavaScript tools, such as Node, Express, Twitter Bootstrap, Yeoman, and NoSQL databases such as MongoDB, AngularJS developers can create robust, full-stack JavaScript applications.
A primary feature of AngularJS is two-way data binding. According to AngularJS’s website, ‘data-binding is the automatic synchronization of data between the model and view. The way that Angular implements data-binding lets you treat the model as the single-source-of-truth in your application. The view is a projection of the model at all times. When the model changes, the view reflects the change, and vice versa.‘ In the past, developers spent much of their coding time wiring up UI components to the application’s data model. AngularJS has greatly simplified this process.
Another key feature of AngularJS are directives. At a high level, according to AngularJS’ site, ‘directives are markers on a DOM element (such as an attribute, element name, comment or CSS class) that tell AngularJS’s HTML compiler to attach a specified behavior to that DOM element or even transform the DOM element and its children.‘ AngularJS provides many built-in directives, including ngModel, ngBind, ngInclude, ngRepeat, and ngChange. These directives are the building blocks of an AngularJS application. We will use many of these built-in directives in this post.
In addition to built-in directives, AngularJS allows us to create custom directives. Custom directives are a powerful feature, allowing us to encapsulate our own reusable DOM manipulation functionality.
The Sample Project
There is an infinite variety of web-based forms (‘electronic forms’). We interact with web-based forms at work, at home, and at school. Forms serve the primary purpose of collecting data user. Web-based forms allow us to order products and services over the internet, file our taxes, manage our benefits at work, track our time, and take online classes.
Tests or quizzes are a perfect example of web-based forms to demonstrate AngularJS’s many strengths, including data-binding and custom directives. In this post, we will create a series of interactive quizzes on the theme of AngularJS – sort of a learning opportunity inside a learning opportunity. Quizzes often contain several common types of question/answer formats, including true-false, multiple-choice, and multiple-correct, ordering, matching, short-answer, essay, and so forth. These question/answer formats take advantage of all the HTML form elements, including radio buttons, check-boxes, text fields, drop-down lists, list boxes, and text areas. We will build the quizzes from static JSON data files, and using AngularJS’s services, controllers, routes, views, templates, directives, and custom directives.
In the first example, we will use AngularJS’s factory service, controller, partial templates, view, routing, and built-in directive features to read JSON data from a file, and display and validate a basic true-false quiz. In the second example, we will expand our true-false quiz to contain additional types of questions, including multiple-choice and multiple-correct. For the advanced quiz, we will make use of use custom directives and partial view templates. These two new features will allow us to increase the quizzes complexity without substantially increasing the complexity of code we need to write.
Installing and Configuring the Project
This post’s project is available on GitHub. The easiest way to obtain all the source code, is to clone the project with Git. Once you have cloned the project, don’t forget to install the npm and bower packages. All commands are shown below. The minimum requirements for the project, are to have Bower, Grunt, npm, and Git installed.
git clone https://github.com/garystafford/angular-quiz.git
cd angular-quiz
npm install
bower install
Alternately, if you are experienced building JavaScript applications with the scaffolding tool, yo, you can create a new project and recreate the code yourself. To use generator-angular’s code generators, you will need yo installed, in addition to Bower, Grunt, npm, and Git. Since this post’s project is based on the Yeoman’s generator-angular, you can use npm to install Yeoman’s generator-angular. Afterwards, using generator-angular’s available code generators, you can easily reproduce the post’s basic project structure.
npm install -g generator-angular

# Use generator-angular code generators to create project components
# Instructions here: https://github.com/yeoman/generator-angular
mkdir quiz-app && cd $_
yo angular quiz
yo angular:route quizAdvanced
yo angular:factory quizAdvancedFactory
yo angular:directive quizTrueFalseDirective

Using yo with generator-angular to Set-up a New Application

Using yo with generator-angular to Create New Components
If you used the generator-angular code generator to create the project yourself, using the above instructions, your module will be called ‘quizApp’. The application name, found in the ‘package.json’ and ‘bower.json’ files, will be ‘quiz’. I changed my project’s module and app names to be more descriptive, along with the names of the routes, factories, directives, and other components. They will also vary slightly using the code generators.
Also, if you used the generator-angular code generator to create the project yourself, you may need to install a few additional npm and bower packages, not part of generator-angular project, to reproduce this post’s project, exactly.
Project Structure
The project structure follows the generator-angular format. Most core application files are kept in the ‘app’ folder. This post’s project has added the ‘app/data’ folder, which holds the quiz data, and the ‘app/scripts/partials’, which holds the partial view templates for the custom directives (explained later).

Project View from WebStorm 8
Starting the Project
The project is started using the ‘grunt serve‘ command. Using the grunt server, the project be hosted on ‘localhost’, port 9000, by default. This can be changed to a specific hostname or IP address by editing the ‘Gruntfile.js’ file’s ‘connect‘ task.
Testing the Project
There are some basic tests created using the Karma, Test Runner for JavaScript. These tests are run using the ‘grunt test‘ command. Test are set to run on port 8092, using the PhantomJS web browser. PhantomJS, if you’re not familiar, is a headless WebKit scriptable with a JavaScript API. PhantomJS is ideal for use with Continuous Integration Servers, such as TravisCI. If you do not have PhantomJS installed, and plan to run the tests, change the ‘browser‘ property in the ‘karma.conf.js’ file, located in the project’s root directory. Chrome is a good alternative for local testing. Test results for this GitHub project can be reviewed on TravisCI.
Creating a complete set of unit tests for the advanced quiz proved challenging based on its nested, partial view templates, described in the Advanced Quiz section. I may add a more complete set of unit test in the future.
Basic Quiz
The first quiz is a six-question, basic true-false format form. The user answers all six questions, and then pushes a button to display the results.
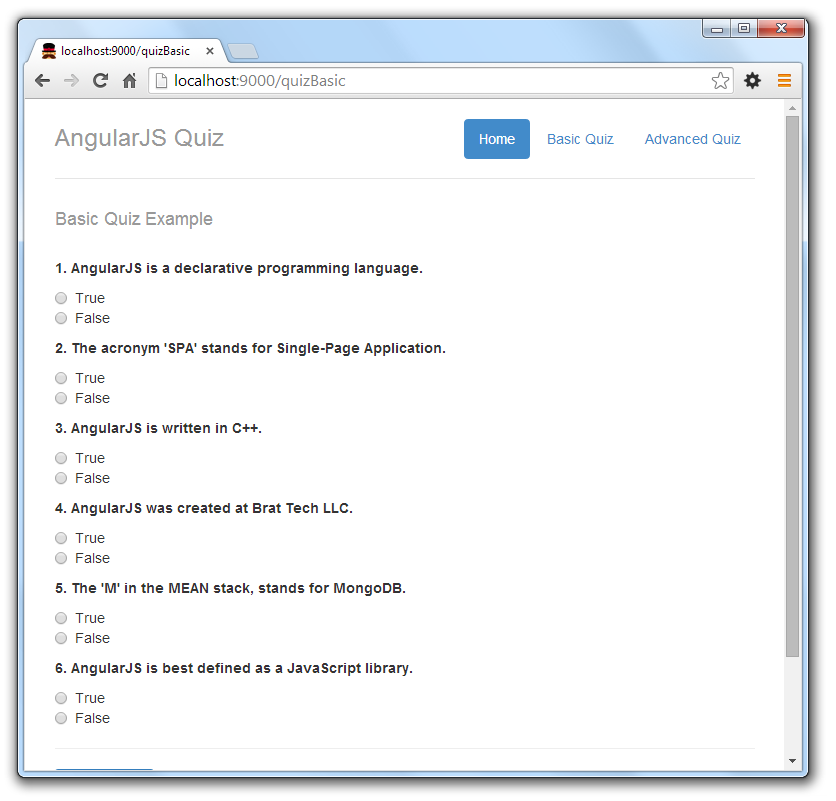
Basic Quiz Before User Input

Basic Quiz With User Input
The basic quiz uses a single controller (quizBasicController.js), single factory service (quizBasicFactory.js), single route (apps.js – ‘/quizBasic’), and a single partial view template (quiz-basic.html), in addition to the main layout (index.html). All these components are part the ‘quizModule’ AngularJS module. I’ve attempted to illustrate these relationships in the diagram, below.
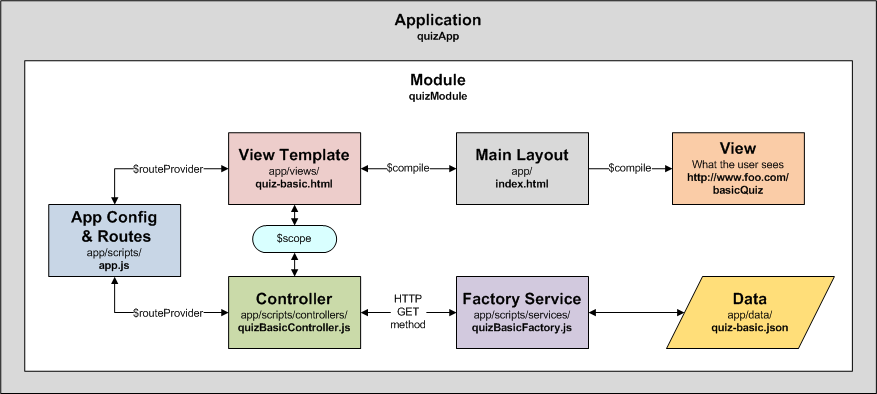
The factory service (quizBasicFactory.js) uses $resource, a service in AngularJS’s ngResource module, to load the contents of a local JSON-format file (quiz-basic.json).
angular.module('quizModule')
 .factory('quizBasicFactory', function ($resource) {
 return $resource('./data/quiz-basic.json');
 });
{
  "name":      "Basic Quiz Example",
  "questions": [
    {
      "_id":      1,
      "question": "AngularJS is a declarative programming language.",
      "answer":   true
    },
    {
      "_id":      2,
      "question": "The acronym 'SPA' stands for Single-Page Application.",
      "answer":   true
    },
    {
      "_id":      3,
      "question": "AngularJS is written in C++.",
      "answer":   false
    }
    ...
  ]
}
The controller (quizBasicController.js), calls the factory service (quizBasicFactory.js), which returns the ‘data’ object.
angular.module('quizModule')
  .controller('QuizBasicController',
  function ($scope, quizBasicFactory) {
    var createResults;
    $scope.title = null; // quiz title
    $scope.quiz = {}; // quiz questions
    $scope.results = []; // user results

    quizBasicFactory.get(function (data) {
      $scope.title = data.name;
      $scope.quiz = data.questions;
      createResults();
    });

    // prepare array of result objects
    createResults = function () {
      var len = $scope.quiz.length;
      for (var i = 0; i < len; i++) {
        $scope.results.push({
          _id:        $scope.quiz[i]._id,
          answer:     $scope.quiz[i].answer,
          userChoice: null,
          correct:    null
        });
      }
    };

    // assign and check user's choice
    $scope.checkUserChoice = function (question, userChoice) {
      // assign the user's choice to userChoice
      $scope.results.userChoice = userChoice;

      // check the user's choice against the answer
      if ($scope.results.answer === userChoice) {
        $scope.results.correct = 'Correct';
      } else {
        $scope.results.correct = 'Incorrect';
      }
    };

    // only show results if all questions are answered
    $scope.checkQuizCompleted = function () {
      var len = $scope.results.length;
      for (var i = 0; i < len; i++) {
        if ($scope.results[i].userChoice === null) {
          return true;
        }
      }
      return false;
    };
  });

The ‘data’ Object Returned from Factory Service containing JSON Data
Contents of the ‘data’ object are used to populate ‘$scope.quiz[]’, ‘$scope.title’, and ‘$scope.results[]’ properties. The $scope holds the quiz data ($scope.quiz[]), the quiz title ($scope.title), and the results ($scope.results[]). The ‘$scope.checkUserChoice()’ method stores the user’s answer in ‘$scope.results[].answer’ property, and evaluates if the answer is correct ($scope.results[].correct). The ‘$scope.checkQuizCompleted()’ method checks to make sure all questions have been answered before showing the results, when the user clicks the ‘Show Results’ button.

The $scope Containing Quiz, Title, and Results Properties
AngularJS bootstraps the application. Through AngularJS’s compiling and linking process, the partial view template (quiz-basic.html), shown below, the controller (quizBasicController.js), and the main layout (index.html), form the ‘\quizBasic’ View, which is presented to the user. Blogger, Dag-Inge Aas does a nice job of explaining this process in his post, Understanding template compiling in AngularJS.
<h4 class="title">{{title}}
<br/>

<!--quiz section-->
<form name="quiz">
  <div ng-repeat="question in quiz">
    <strong>{{question._id}}. {{question.question}}</strong>

    <div class="radio">
      <input required
             name="_id{{question._id}}"
             type="radio"
             value="true"
             ng-model="question.userChoice"
             ng-change="$parent.checkUserChoice(question._id, true)"/>
      <label for="_id{{question._id}}">True</label>
      <br/>
      <input required
             name="_id{{question._id}}"
             type="radio"
             ng-value="false"
             ng-model="question.userChoice"
             ng-change="$parent.checkUserChoice(question._id, false)"/>
      <label for="_id{{question._id}}">False</label>
    </div>
  </div>
</form>

<hr/>

<!--results section-->
<div ng-init="showAnswers=true">
  btn-sm"
          ng-click="showAnswers=checkQuizCompleted()">
    Show Results
  </button>
  <br/>
  <br/>

  <div ng-hide="showAnswers">
    <strong>Results</strong>

    <div ng-repeat="result in results">
      {{result._id}}. <span
        ng-class="result.correct == 'Correct' ? 'correct' : 'incorrect'">
        {{result.correct}}
      </span>
    </div>
  </div>
We load all the contents of the JSON data file into $scope and use the ‘ng-repeat‘ directive to iterate over the questions ($scope.quiz[]) and the results ($scope.results[]). Because of this, modifying existing questions and adding new ones is easy. This requires no additional coding, just a change to the JSON data file.
Advanced Quiz
Using all the same basic building blocks as the basic quiz, with the addition of custom-directives, we can add complexity to our quiz, without a lot of additional coding. This advanced quiz has nine questions, including three true-false format, three multiple-choice format, and three multiple-correct format. As the user answers each questions, they are presented with the results, either ‘Correct’ or ‘Incorrect’.

Advanced Quiz Before User Input

Advanced Quiz With User Input
Similar to the basic quiz, the advanced quiz uses a single controller (quizAdvancedController.js), factory service (quizAdvancedFactory.js), route (apps.js – ‘/quizAdvanced’), partial view template (quiz-advanced.html), and the main layout (index.html). Additionally, the advanced quiz uses a filter, three custom directives, and four partial view templates. The fourth partial view template, ‘quiz-choice-response.html’, is called by the first three partial view templates. It contains common DOM elements. Like the basic quiz, all these components are part the ‘quizModule’ module. I’ve attempted to illustrate these relationships in the diagram, below.
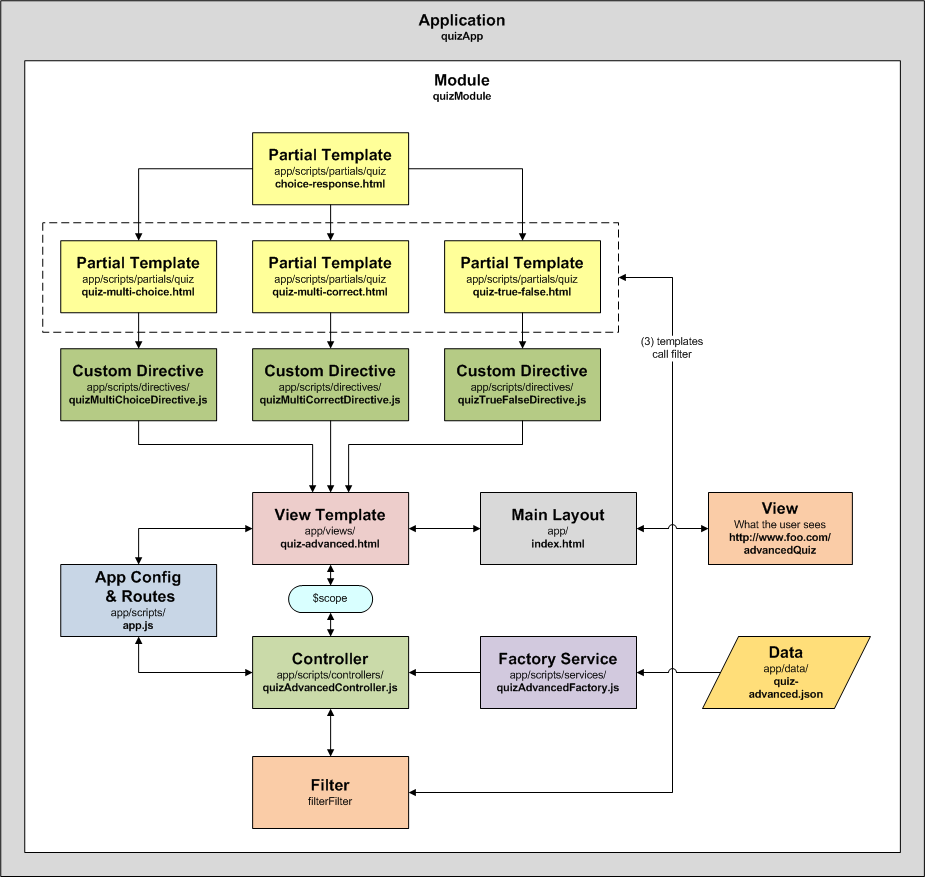
Just like with the basic quiz, the factory service (quizAdvancedFactory.js) uses $resource to load the contents of a local JSON-format file (quiz-advanced.json). This time however, the JSON file contains three types of questions, each with a slightly different schema. The three different question types are shown in the code snippet below. The true-false questions have a boolean value as the answer, the multiple choice questions, an integer as an answer, and the multiple correct questions, an array of integers as an answer.
angular.module('quizModule')
  .factory('quizAdvancedFactory', function ($resource) {
    return $resource('./data/quiz-advanced.json');
  });
{
  "name":      "Advanced Quiz Example",
  "questions": [
    {
      "_id":      1,
      "question": "AngularJS is written completely in JavaScript.",
      "type":     "True-false",
      "answer":   true
    },
    {
      "_id":      4,
      "question": "What does the acronym 'MVC' stand for?",
      "type":     "Multiple choice",
      "choices":  [
        {
          "_id":    1,
          "choice": "Method, Variable, Constant"
        },
        {
          "_id":    2,
          "choice": "Module, View, Constraint"
        },
        {
          "_id":    3,
          "choice": "Model, View, Controller"
        },
        {
          "_id":    4,
          "choice": "None of the above"
        }
      ],
      "answer":   3
    },
    {
      "_id":      7,
      "question": "Which of the following are associated with AngularJS?",
      "type":     "Multiple correct",
      "choices":  [
        {
          "_id":    1,
          "choice": "Controller"
        },
        {
          "_id":    2,
          "choice": "Interface"
        },
        {
          "_id":    3,
          "choice": "Route"
        },
        {
          "_id":    4,
          "choice": "View"
        },
        {
          "_id":    5,
          "choice": "Model"
        },
        {
          "_id":    6,
          "choice": "Generator"
        },
        {
          "_id":    7,
          "choice": "Service"
        },
        {
          "_id":    8,
          "choice": "Node"
        }
      ],
      "answer":   [1, 3, 4, 5, 7]
    }
    ...
  ]
}
The controller (quizAdvancedController.js), calls the factory service (quizAdvancedFactory.js), which returns the ‘data’ object, just like in the basic quiz example.
angular.module('quizModule')
  .controller('QuizAdvancedController',
  function ($scope, quizAdvancedFactory, filterFilter) {
    var createResults;
    $scope.title = null; // quiz title
    $scope.quiz = {}; // quiz questions
    $scope.results = []; // user results

    quizAdvancedFactory.get(function (data) {
      $scope.title = data.name;
      $scope.quiz = data.questions;
      createResults();
    });

    // prepare array of result objects
    createResults = function () {
      var len = $scope.quiz.length;
      for (var i = 0; i < len; i++) {
        $scope.results.push({
          _id:        $scope.quiz[i]._id,
          answer:     $scope.quiz[i].answer,
          userChoice: null,
          correct:    null
        });
      }
    };

    // used for multiple correct type questions
    $scope.checkUserMultiCorrectChoice = function (question, userChoice) {
      // create blank array
      if ($scope.results.userChoice === null) {
        $scope.results.userChoice = [];
      }

      // find choice, if not there the add or if there remove
      var pos = $scope.results.userChoice.indexOf(userChoice);
      if (pos < 0) {
        $scope.results.userChoice.push(userChoice);
      } else {
        $scope.results.userChoice.slice(pos, 1);
      }

      // check the user's choice against the answer
      var answer = JSON.stringify($scope.quiz.answer.sort());
      var choice = JSON.stringify($scope.results.userChoice.sort());

      if (answer === choice) {
        $scope.results.correct = true;
      } else {
        $scope.results.correct = false;
      }
    };

    // used for multiple choice and true-false type questions
    $scope.checkUserChoice = function (question, userChoice) {
      // assign the user's choice to userChoice
      $scope.results.userChoice = userChoice;

      // check the user's choice against the answer
      if ($scope.results.answer === userChoice) {
        $scope.results.correct = true;
      } else {
        $scope.results.correct = false;
      }
    };

    // find a specific question
    $scope.filteredQuestion = function (questionId) {
      return filterFilter($scope.quiz, {_id: questionId});
    };
  });
For true-false and multiple-choice questions, the ‘$scope.checkUserChoice()’ method stores the user’s answer in the ‘$scope.results[].answer’ property. The method also evaluates if the answer is correct, and stores that value in the ‘$scope.results[].correct’ property. The method takes two input parameters, question id and user’s choice.
For multiple correct questions, the ‘$scope.checkUserMultiCorrectChoice()’ method does the same. The difference, for multiple-correct questions, the method stores both the multiple answers and multiple user choices in a pair of arrays, ‘$scope.results[].answer[]’ and ‘$scope.results[].userChoice[]’ object arrays. In addition to storing the user’s choices, the method removes user choices if they are deselected by the user, in the view.
Lastly, the ‘$scope.checkUserMultiCorrectChoice()’ method evaluates the user’s choices array against the correct answers array. In the example below, note the ‘$scope.results[6].answer[]’ array and the ‘$scope.results[6].userChoice[]’ array. They were determined to be equal by the ‘$scope.checkUserMultiCorrectChoice()’, and reflected in the ‘true’ value of the ‘$scope.results[6].correct’ property.

Advanced Quiz Results for Multiple-Correct Question
Filter
In the ‘quizAdvancedController.js’ controller, note the ‘filterFilter’ object injected into the controller’s main function. At the end of the controller, also note the ‘$scope.filterQuestion(questionId)’ method.
angular.module('quizModule')
  .controller('QuizAdvancedController',
  function ($scope, quizAdvancedFactory, filterFilter) {
    ...
    // find a specific question
    $scope.filteredQuestion = function (questionId) {
      return filterFilter($scope.quiz, {_id: questionId});
    };
  });
The ‘$scope.filterQuestion(questionId)’ method takes a question id as an input parameter, and returns that single question. The ‘$scope.filterQuestion(questionId)’ method actually returns a call to the angular.filter‘s filterFilter. It takes two parameters, an array containing the entire set of questions (‘$scope.quiz’ array), and a ‘pattern object’ containing the specific ‘id’ to filter on (‘{_id: questionId}’).
The filter method is called by the three question-type partial view templates, for example ‘quiz-multi-choice.html’. For example, the partial view template, ‘quiz-advanced.html’, uses the ‘quiz-multichoice’ element to call the custom directive, ‘quizMultiChoiceDirective.js’, passing it a request for question id 4.
<h4 class="title">{{title}}</h4>
<br/>
<form name="quiz">
  <!--true-false-->
  <quiz-truefalse filter-by="1"></quiz-truefalse>
  <quiz-truefalse filter-by="2"></quiz-truefalse>
  <quiz-truefalse filter-by="3"></quiz-truefalse>

  <!--multi-choice-->
  <quiz-multichoice filter-by="4"></quiz-multichoice>
  <quiz-multichoice filter-by="5"></quiz-multichoice>
  <quiz-multichoice filter-by="6"></quiz-multichoice>

  <!--multi-correct-->
  <quiz-multicorrect filter-by="7"></quiz-multicorrect>
  <quiz-multicorrect filter-by="8"></quiz-multicorrect>
  <quiz-multicorrect filter-by="9"></quiz-multicorrect>
</form>
The custom directive, ‘quizMultiChoiceDirective.js’, loads the partial view template, ‘quiz-multi-choice.html’, using the ‘templateUrl’ argument. The ‘templateUrl’ argument uses ajax to load the template. The template, ‘quiz-multi-choice.html’, uses the ‘ng-repeat‘ directive to populate its section of the advanced quiz with question id 4 (div ng-repeat="question in $parent.filteredQuestion(filterBy)). It does so by calling filteredQuestion(4), in the ‘quizAdvancedController.js’ controller.
<div ng-repeat="question in $parent.filteredQuestion(filterBy)">
  <strong>{{question._id}}. {{question.question}}</strong>
  <div class="radio" ng-repeat="choice in question.choices">
    <input
        name="_id{{question._id}}"
        type="radio"
        value="{{choice._id}}"
        ng-model="question.userChoice"
        ng-change="$parent.$parent.$parent.checkUserChoice(question._id, choice._id)"/>
    <label for="_id{{question._id}}">{{choice.choice}}</label>
  </div>
  <div ng-include src="'/scripts/partials/quiz-choice-response.html'"></div>
</div>
<br/>
The ‘quiz-multi-choice.html’ template also loads the contents of the ‘choice-response.html’ template. This template contains DOM elements, common to all three question-type templates.
<div ng-if="$parent.$parent.$parent.results.correct"
     class="result correct">
  <span class="glyphicon glyphicon-thumbs-up"></span>
  Correct!
</div>
<!--specify 'false' because not true (!) would include null (blank)-->
<div ng-if="$parent.$parent.$parent.results.correct === false"
     class="result incorrect">
  <span class="glyphicon glyphicon-thumbs-down"></span>
  Incorrect
</div>
I have attempted to illustrate the filter in the diagram, below. I intentionally left out a few non-essential components to simplify the diagram, such as the main layout, config, route, service, other custom directives, and the JSON data file.

Using these techniques, we can easily extend the quiz, adding new answer types, such as ordering, matching, short-answer, and so forth.
Managing Scope
Being familiar with AngularJS, you should understand how scope works. You should know there is more than one scope, and that scope is normally inherited from the parent scope. Directives such as ng-repeat, ng-switch, ng-view, and ng-include, all create their own child scopes. Said better by AngularJS’s team, ‘in AngularJS, a child scope normally prototypically inherits from its parent scope. One exception to this rule is a directive that uses scope: { … } — this creates an isolate scope that does not prototypically inherit.‘ We use a number of directives. We also use ‘scope:’ within our custom directives for the advanced quiz example, which breaks the chain of inheritance.
In some of the code examples in this post, you will notice the use of ‘$parent‘, ‘$parent.$parent‘, or even ‘$parent.$parent.$parent‘, instead of simply ‘$scope‘. Sometimes, it necessary to reach outside the current scope, to a parent’s scope (‘$parent‘), or that parent’s parent’s scope (‘$parent.$parent‘). A simple example of this, in the partial view template, ‘quiz-multi-choice.htm’, we call ‘$parent.filteredQuestion(filterBy)‘. The ‘filteredQuestion(filterBy)’ method we need to use is in the parent scope of the template’s scope, so we call ‘$parent’ instead of ‘$scope’.
So how can you determine which scope contains the method or properties you are seeking? Batarang, the AngularJS WebInspector Extension for Chrome. Batarang adds an additional ‘AngularJS’ tab to Developer tools for Chrome. Previously, we were using the example of question id 4 with the AngularJS’s filter. Using the Batarang, below, we can see the question id 4 in the final View. Each question returned using the filter is contained within its own separate scope.

Question #4 in Batarang Models Tab
This example also shows how complex working with AngularJS’s scope(s) can be. Starting with a particular scope, using Batarang, you can visually move up (parent scope) or down (child scope) within the scope hierarchy. The contents of each scope, the Model, is displayed on the right. Batarang also offers several other feature, seen below, including AngularJS application performance and dependency visualization.
Links
Quiz Question Types (presentation)
Understanding Service Types (article)
Understanding Scopes (article)
Build custom directives with AngularJS (article)
Google I/O 2012 – Better Web App Development Through Tooling (YouTube video)
Single Page Web Applications, Book Review
Posted by Gary A. Stafford in Client-Side Development, Enterprise Software Development, Mobile HTML Development, Software Development on May 24, 2014
A brief review of ‘Single Page Web Applications’, by authors Michael S. Mikowski and Josh C. Powell. Learn to build modern browser-based apps, using the latest full-stack JavaScript technologies.

Recently, I had the opportunity to review the eBook edition of ‘Single Page Web Applications‘, by authors Michael S. Mikowski and Josh C. Powell, published by Manning Publications. Most of us involved in software development are acutely aware of recent explosion of the interest in full-stack JavaScript applications, NoSQL databases, HTML5/CCS3, web-sockets, and single-page web applications (SPAs). Mikowski and Powell’s book, Single Page Web Applications, hit the market at a perfect time (release last September), and with just the right mix of timely learning opportunities for the reader.
An interesting twist on many current books in this category, the lack of the author’s heavy reliance on one or more popular JavaScript libraries, such as AngularJS, Ember.js, and Backbone.js. Mikowski and Powell purposefully build a JavaScript-based SPA from the ground up, without simply plugging into a ready-made library or API. Although many readers may be heavily tied to a certain library or API, understanding how to build a SPA from the ground up is invaluable.
The first thing that struck me, the thoroughness of the book’s examples. A question many publishers ask, does the book have enough ‘real-word examples’. Sadly, the answer is often no. Many books only offer incomplete, academic examples. They are often difficult to scale to match the complexity of modern software development. However in this case, I felt Mikowski and Powell’s book hit a home run with their ‘real-world’ code samples. It is obvious both authors are working professionals, doing development in the ‘real world’. The book’s samples build upon one another throughout the book, effectively expanding the application’s scope and the user’s knowledge.
The second attribute that stood out to me, the book’s documentation. In fact, that might have been one of the very few minor negatives I found with the book — to many comments. The authors go to great lengths to thoroughly comment and document the code samples. In some examples, almost obscuring the code itself. I found the comments both detailed and helpful.
The third attribute that stood out to me, the author’s focus on testing. Testing the sample applications is highlighted throughout the book. Additionally, Appendix B, ‘Testing a SPA’, had more information on testing complex JavaScript applications than many other books I have read. Testing software is often ignored in books and training materials. However, software testing is an integral part of the ‘real-world’ software development life-cycle. Testing is critical to software’s success.
Lastly, I found a lot of value in Appendix A, ‘JavaScript coding standard‘. Read this part, first! Anyone can follow along with the book, mimicking code samples, without really understanding JavaScript’s core concepts. Without a real understanding, it is hard to apply the book’s lessons to your own application. I felt the JavaScript overview in Appendix A of Mikowski and Powell’s book was one of the best I have read. I will be referring back to appendix’s coding style guide, in the future.
Retrieving and Displaying Data with AngularJS and the MEAN Stack: Part II
Posted by Gary A. Stafford in Client-Side Development, DevOps, Enterprise Software Development, Mobile HTML Development, Software Development on March 24, 2014
Explore various methods of retrieving and displaying data using AngularJS and the MEAN Stack.

Mobile View on Android Smartphone
Introduction
In this two-part post, we are exploring methods of retrieving and displaying data using AngularJS and the MEAN Stack. The post’s corresponding GitHub project, ‘meanstack-data-samples‘, is based on William Lepinski’s ‘generator-meanstack‘, which is in turn is based on Yeoman’s ‘generator-angular‘. As a bonus, since both projects are based on ‘generator-angular’, all the code generators work. Generators can save a lot of time and aggravation when building AngularJS components.
In part one of this post, we installed and configured the ‘meanstack-data-samples’ project from GitHub. In part two, we will we will look at five examples of retrieving and displaying data using AngularJS:
- Function within AngularJS Controller returns array of strings.
- AngularJS Service returns an array of simple object literals to the controller.
- AngularJS Factory returns the contents of JSON file to the controller.
- AngularJS Factory returns the contents of JSON file to the controller using a resource object
(In GitHub project, but not discussed in this post). - AngularJS Factory returns a collection of documents from MongoDB Database to the controller.
- AngularJS Factory returns results from Google’s RESTful Web Search API to the controller.
Project Structure
For brevity, I have tried to limit the number of files in the project. There are two main views, both driven by a single controller. The primary files, specific to data retrieval and display, are as follows:
- Default site file (./)
- index.html – loads all CSS and JavaScript files, and views
- App and Routes (./app/scripts/)
- app.js – instantiates app and defines routes (route/view/controller relationship)
- Views (./app/views/)
- data-bootstrap.html – uses Twitter Bootstrap
- data-no-bootstrap.html – basically the same page, without Twitter Bootstrap
- Controllers (./app/scripts/controllers/)
- DataController.js (DataController) – single controller used by both views
- Services and Factories (./app/scripts/services/)
- meanService.js (meanService) – service returns array of object literals to DataController
- jsonFactory.js (jsonFactory) – factory returns contents of JSON file
- jsonFactoryResource.js (jsonFactoryResource) – factory returns contents of JSON file using resource object (new)
- mongoFactory.js (mongoFactory) – factory returns MongoDB collection of documents
- googleFactory.js (googleFactory) – factory call Google Web Search API
- Models (./app/models/)
- Components.js – mongoose constructor for the Component schema definition
- Routes (./app/)
- routes.js – mongoose RESTful routes
- Data (./app/data/)
- otherStuff.json – static JSON file loaded by jsonFactory
- Environment Configuration (./config/environments/)
- index.js – defines all environment configurations
- test.js – Configuration specific to the current ‘test’ environment
- Unit Tests (./test/spec/…)
- Various files – all controller and services/factories unit test files are in here…

Project in JetBrains WebStorm 8.0
There are many more files, critical to the project’s functionality, include app.js, Gruntfile.js, bower.json, package.json, server.js, karma.conf.js, and so forth. You should understand each of these file’s purposes.
Function Returns Array
In the first example, we have the yeomanStuff() method, a member of the $scope object, within the DataController. The yeomanStuff() method return an array object containing three strings. In JavaScript, a method is a function associated with an object.
$scope.yeomanStuff = function () {
  return [
    'yo',
    'Grunt',
    'Bower'
  ];
};
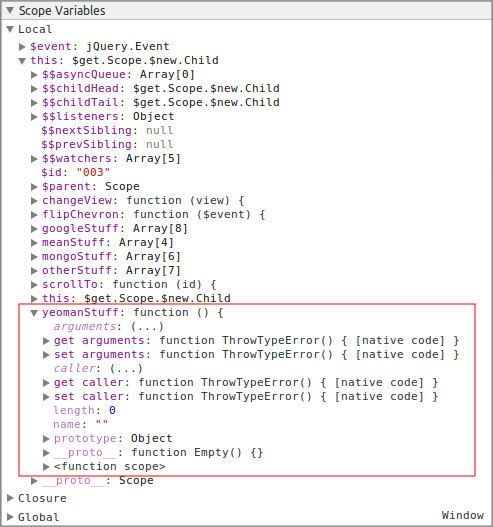
‘yeomanStuff’ Method of the ‘$scope’ Object
The yeomanStuff() method is called from within the view by Angular’s ng-repeat directive. The directive, ng-repeat, allows us to loop through the array of strings and add them to an unordered list. We will use ng-repeat for all the examples in this post.
<ul class="list-group">
  <li class="list-group-item"
	  ng-repeat="stuff in yeomanStuff()">
	{{stuff}}
  </li>
<ul>

Although this first example is easy to implement, it is somewhat impractical. Generally, you would not embed static data into your code. This limits your ability to change the data, independent of a application’s code. In addition, the function is tightly coupled to the controller, limiting its reuse.
Service Returns Array
In the second example, we also use data embedded in our code. However, this time we have improved the architecture slightly by moving the data to an Angular Service. The meanService contains the getMeanStuff() function, which returns an array containing four object literals. Using a service, we can call the getMeanStuff() function from anywhere in our project.
angular.module('generatorMeanstackApp')
  .service('meanService', function () {
    this.getMeanStuff = function () {
      return ([
        {
          component: 'MongoDB',
          url: 'http://www.mongodb.org'
        },
        {
          component: 'Express',
          url: 'http://expressjs.com'
        },
        {
          component: 'AngularJS',
          url: 'http://angularjs.org'
        },
        {
          component: 'Node.js',
          url: 'http://nodejs.org'
        }
      ])
    };
  });
Within the DataController, we assign the array object, returned from the meanService.getMeanStuff() function, to the meanStuff object property of the $scope object.
$scope.meanStuff = {};
try {
  $scope.meanStuff = meanService.getMeanStuff();
} catch (error) {
  console.error(error);
}

‘meanStuff’ Property of the ‘$scope’ Object
The meanStuff object property is accessed from within the view, using ng-repeat. Each object in the array contains two properties, component and url. We display the property values on the page using Angular’s double curly brace expression notation (i.e. ‘{{stuff.component}}‘).
<ul class="nav nav-pills nav-stacked">
  <li ng-repeat="stuff in meanStuff">
    url}}"
       target="_blank">{{stuff.component}}
  </li>
<ul>

Promises, Promises…
The remaining methods implement an asynchronous (non-blocking) programming model, using the $http and $q services of Angular’s ng module. The services implements the asynchronous Promise and Deferred APIs. According to Chris Webb, in his excellent two-part post, Promise & Deferred objects in JavaScript: Theory and Semantics, a promise represents a value that is not yet known and a deferred represents work that is not yet finished. I strongly recommend reading Chris’ post, before continuing. I also highly recommend watching RED Ape EDU’s YouTube video, Deferred and Promise objects in Angular js. This video really clarified the promise and deferred concepts for me.
Factory Loads JSON File
In the third example, we will read data from a JSON file (‘./app/data/otherStuff.json‘) using an AngularJS Factory. The differences between a service and a factory can be confusing, and are beyond the scope of this post. Here is two great links on the differences, one on Angular’s site and one on StackOverflow.
{
  "components": [
    {
      "component": "jQuery",
      "url": "http://jquery.com"
    },
    {
      "component": "Jade",
      "url": "http://jade-lang.com"
    },
    {
      "component": "JSHint",
      "url": "http://www.jshint.com"
    },
    {
      "component": "Karma",
      "url": "http://karma-runner.github.io"
    },
    ...
  ]
}
The jsonFactory contains the getOtherStuff() function. This function uses $http.get() to read the JSON file and returns a promise of the response object. According to Angular’s site, “since the returned value of calling the $http function is a promise, you can also use the then method to register callbacks, and these callbacks will receive a single argument – an object representing the response. A response status code between 200 and 299 is considered a success status and will result in the success callback being called. ” As I mentioned, a complete explanation of the deferreds and promises, is too complex for this short post.
angular.module('generatorMeanstackApp')
  .factory('jsonFactory', function ($q, $http) {
    return {
      getOtherStuff: function () {
        var deferred = $q.defer(),
          httpPromise = $http.get('data/otherStuff.json');

        httpPromise.then(function (response) {
          deferred.resolve(response);
        }, function (error) {
          console.error(error);
        });

        return deferred.promise;
      }
    };
  });
The response object contains the data property. Angular defines the response object’s data property as a string or object, containing the response body transformed with the transform functions. One of the properties of the data property is the components array containing the seven objects. Within the DataController, if the promise is resolved successfully, the callback function assigns the contents of the components array to the otherStuff property of the $scope object.
$scope.otherStuff = {};
jsonFactory.getOtherStuff()
  .then(function (response) {
    $scope.otherStuff = response.data.components;
  }, function (error) {
    console.error(error);
  });

‘otherStuff’ Property of the ‘$scope’ Object
The otherStuff property is accessed from the view, using ng-repeat, which displays individual values, exactly like the previous methods.
<ul class="nav nav-pills nav-stacked">
  <li ng-repeat="stuff in otherStuff">
    <a href="{{stuff.url}}"
       target="_blank">{{stuff.component}}</a>
  </li>
</ul>

This method of reading a JSON file is often used for configuration files. Static configuration data is stored in a JSON file, external to the actual code. This way, the configuration can be modified without requiring the main code to be recompiled and deployed. It is a technique used by the components within this very project. Take for example the bower.json files and the package.json files. Both contain configuration data, stored as JSON, used by Bower and npm to perform package management.
Factory Retrieves Data from MongoDB
In the fourth example, we will read data from a MongoDB database. There are a few more moving parts in this example than in the previous examples. Below are the documents in the components collection of the meanstack-test MongoDB database, which we will retrieve and display with this method. The meanstack-test database is defined in the test.js environments file (discussed in part one).

‘meanstack-test’ Database’s ‘components’ Collection Documents
To connect to the MongoDB, we will use Mongoose. According to their website, “Mongoose provides a straight-forward, schema-based solution to modeling your application data and includes built-in type casting, validation, query building, business logic hooks and more, out of the box.” But wait, MongoDB is schemaless? It is. However, Mongoose provides a schema-based API for us to work within. Again, according to Mongoose’s website, “Everything in Mongoose starts with a Schema. Each schema maps to a MongoDB collection and defines the shape of the documents within that collection.”
In our example, we create the componentSchema schema, and pass it to the Component model (the ‘M’ in MVC). The componentSchema maps to the database’s components collection.
var mongoose = require('mongoose');
var Schema = mongoose.Schema;

var componentSchema = new Schema({
  component: String,
  url: String
});

module.exports = mongoose.model('Component', componentSchema);
The routes.js file associates routes (Request URIs) and HTTP methods to Mongoose actions. These actions are usually CRUD operations. In our simple example, we have a single route, ‘/api/components‘, associated with an HTTP GET method. When an HTTP GET request is made to the ‘/api/components‘ request URI, Mongoose calls the Model.find() function, ‘Component.find()‘, with a callback function parameter. The Component.find() function returns all documents in the components collection.
var Component = require('./models/component');

module.exports = function (app) {
  app.get('/api/components', function (req, res) {
    Component.find(function (err, components) {
      if (err)
        res.send(err);

      res.json(components);
    });
  });
};
You can test these routes, directly. Below, is the results of calling the ‘/api/components‘ route in Chrome.

Response from MongoDB Using Mongoose
The mongoFactory contains the getMongoStuff() function. This function uses $http.get() to call the ‘/api/components‘ route. The route is resolved by the routes.js file, which in turn executes the Component.find() command. The promise of an array of objects is returned by the getMongoStuff() function. Each object represents a document in the components collection.
angular.module('generatorMeanstackApp')
  .factory('mongoFactory', function ($q, $http) {
    return {
      getMongoStuff: function () {
        var deferred = $q.defer(),
          httpPromise = $http.get('/api/components');

        httpPromise.success(function (components) {
          deferred.resolve(components);
        })
          .error(function (error) {
            console.error('Error: ' + error);
          });

        return deferred.promise;
      }
    };
  });
Within the DataController, if the promise is resolved successfully, the callback function assigns the array of objects, representing the documents in the collection, to the mongoStuff property of the $scope object.
$scope.mongoStuff = {};
mongoFactory.getMongoStuff()
  .then(function (components) {
    $scope.mongoStuff = components;
  }, function (error) {
    console.error(error);
  });

‘mongoStuff’ Property of the ‘$scope’ Object
The mongoStuff property is accessed from the view, using ng-repeat, which displays individual values using Angular expressions, exactly like the previous methods.
<ul class="list-group">
  <li class="list-group-item" ng-repeat="stuff in mongoStuff">
    <b>{{stuff.component}}</b>
    <div class="text-muted">{{stuff.description}}</div>
  </li>
</ul>

Factory Calls Google Search
Post Update: the Google Web Search API is no longer available as of September 29, 2014. The post’s example post will no longer return a resultset. Please migrate to the Google Custom Search API (https://developers.google.com/custom-search/). Please read ‘Calling Third-Party HTTP-based RESTful APIs from the MEAN Stack‘ post for more information on using Google’s Custom Search API.
In the last example, we will call the Google Web Search API from an AngularJS Factory. The Google Web Search API exposes a simple RESTful interface. According to Google, “in all cases, the method supported is GET and the response format is a JSON encoded result set with embedded status codes.” Google describes this method of using RESTful access to the API, as “for Flash developers, and those developers that have a need to access the Web Search API from other Non-JavaScript environment.” However, we will access it in our JavaScript-based MEAN stack application, due to the API’s ease of implementation.
Note according to Google’s site, “the Google Web Search API has been officially deprecated…it will continue to work…but the number of requests…will be limited. Therefore, we encourage you to move to Custom Search, which provides an alternative solution.” Google Search, or more specifically, the Custom Search JSON/Atom API, is a newer API, but the Web Search API is easier to demonstrate in this brief post than Custom Search JSON/Atom API, which requires the use of an API key.
The googleFactory contains the getSearchResults() function. This function uses $http.jsonp() to call the Google Web Search API RESTful interface and return the promise of the JSONP-formatted (‘JSON with padding’) response. JSONP provides cross-domain access to a JSON payload, by wrapping the payload in a JavaScript function call (callback).
angular.module('generatorMeanstackApp')
  .factory('googleFactory', function ($q, $http) {
    return {
      getSearchResults: function () {
        var deferred = $q.defer(),
          host = 'https://ajax.googleapis.com/ajax/services/search/web',
          args = {
            'version': '1.0',
            'searchTerm': 'mean%20stack',
            'results': '8',
            'callback': 'JSON_CALLBACK'
          },
          params = ('?v=' + args.version + '&q=' + args.searchTerm + '&rsz=' +
            args.results + '&callback=' + args.callback),
          httpPromise = $http.jsonp(host + params);

        httpPromise.then(function (response) {
          deferred.resolve(response);
        }, function (error) {
          console.error(error);
        });

        return deferred.promise;
      }
    };
  });
The getSearchResults() function uses the HTTP GET method to make an HTTP request the following RESTful URI:
https://ajax.googleapis.com/ajax/services/search/web?v=1.0&q=mean%20stack&rsz=8&callback=angular.callbacks._0
Using Google Chrome’s Developer tools, we can preview the Google Web Search JSONP-format HTTP response (abridged). Note the callback function that wraps the JSON payload.

Google Web Search Results in Chrome Browser
Within the DataController, if the promise is resolved successfully, our callback function returns the response object. The response object contains a lot of information. We are able to limit that amount of information sent to the view by only assigning the actual search results, an array of eight objects contained in the response object, to the googleStuff property of the $scope object.
$scope.googleStuff = {};
googleFactory.getSearchResults()
  .then(function (response) {
    $scope.googleStuff = response.data.responseData.results;
  }, function (error) {
    console.error(error);
  });
Below is the full response returned by the The googleFactory. Note the path to the data we are interested in: ‘response.data.responseData.results‘.

Google Search Response Object
Below is the filtered results assigned to the googleStuff property:

‘googleStuff’ Property of the ‘$scope’ Object
The googleStuff property is accessed from the view, using ng-repeat, which displays individual values using Angular expressions, exactly like the previous methods.
<ul class="list-group">
  <li class="list-group-item"
      ng-repeat="stuff in googleStuff">
    <a href="{{unescapedUrl.url}}"
       target="_blank"><b>{{stuff.visibleUrl}}</b></a>

    <div class="text-muted">{{stuff.titleNoFormatting}}</div>
  </li>
</ul>

Links
- Promise & Deferred objects in JavaScript Pt.1: Theory and Semantics
- Promise & Deferred objects in JavaScript Pt.2: Theory and Semantics
- Deferred and Promise objects in Angular js (YouTube video – excellent!)
- Deferred Promise Workshop (goes with above video)
- Angular.js Promise and Deferred Api – Implementation Explained
- Creating a Single Page Todo App with Node and Angular
- Build an Angular Todo App with a Node Backend
- Consuming REST APIs
Retrieving and Displaying Data with AngularJS and the MEAN Stack: Part I
Posted by Gary A. Stafford in Client-Side Development, DevOps, Mobile HTML Development, Software Development on March 22, 2014
Explore various methods of retrieving and displaying data using AngularJS and the MEAN Stack.
Mobile View of Application on Android Smartphone
Introduction
In the following two-part post, we will explore several methods of retrieving and displaying data using AngularJS and the MEAN Stack. The post’s corresponding GitHub project, ‘meanstack-data-samples‘, is based on William Lepinski’s ‘generator-meanstack‘, which is in turn is based on Yeoman’s ‘generator-angular‘. As a bonus, since both projects are based on ‘generator-angular’, all the code generators work. Generators can save a lot of time and aggravation when building AngularJS components.
In part one of this post, we will install and configure the ‘meanstack-data-samples’ project from GitHub, which corresponds to this post. In part two, we will we will look at several methods for retrieving and displaying data using AngularJS:
- Function within AngularJS Controller returns array of strings.
- AngularJS Service returns an array of simple object literals to the controller.
- AngularJS Factory returns the contents of JSON file to the controller.
- AngularJS Factory returns the contents of JSON file to the controller using a resource object
(In GitHub project, but not discussed in this post). - AngularJS Factory returns a collection of documents from MongoDB Database to the controller.
- AngularJS Factory returns results from Google’s RESTful Web Search API to the controller.
Preparation
If you need help setting up your development machine to work with the MEAN stack, refer to my last post, Installing and Configuring the MEAN Stack, Yeoman, and Associated Tooling on Windows. You will need to install all the MEAN and Yeoman components.
For this post, I am using JetBrains’ new WebStorm 8RC to build and demonstrate the project. There are several good IDE’s for building modern web applications; WebStorm is one of the current favorites of developers.
Complexity of Modern Web Applications
Building modern web applications using the MEAN stack or comparable technologies is complex. The ‘meanstack-data-samples’ project, and the projects it is based on, ‘generator-meanstack’ and ‘generator-angular’, have dozens of moving parts. In this simple project, we have MongoDB, ExpressJS, AngularJS, Node.js, yo, Grunt, Bower, Git, jQuery, Twitter Bootstrap, Karma, JSHint, jQuery, Mongoose, and hundreds of other components, all working together. There are almost fifty Node packages and hundreds of their dependencies loaded by npm, in addition to another dozen loaded by Bower.
Installing, configuring, and managing all the parts of a modern web application requires a basic working knowledge of these technologies. Understanding how Bower and npm install and manage packages, how Grunt builds, tests, and serves the application with ExpressJS, how Yo scaffolds applications, how Karma and Jasmine run unit tests, or how Mongoose and MongoDB work together, are all essential. This brief post will primarily focus on retrieving and displaying data, not necessarily how the components all work, or work together.
Installing and Configuring the Project
Environment Variables
To start, we need to create (3) environment variables. The NODE_ENV environment variable is used to determine the environment our application is operating within. The NODE_ENV variable determines which configuration file in the project is read by the application when it starts. The configuration files contain variables, specific to that environment. There are (4) configuration files included in the project. They are ‘development’, ‘test’, ‘production’, and ‘travis’ (travis-ci.org). The NODE_ENV variable is referenced extensively throughout the project. If the NODE_ENV variable is not set, the application will default to ‘development‘.
For this post, set the NODE_ENV variable to ‘test‘. The value, ‘test‘, corresponds to the ‘test‘ configuration file (‘meanstack-data-samples\config\environments\test.js‘), shown below.
// set up =====================================
var express          = require('express');
var bodyParser       = require('body-parser');
var errorHandler     = require('errorhandler');
var favicon          = require('serve-favicon');
var logger           = require('morgan');
var cookieParser     = require('cookie-parser');
var methodOverride   = require('method-override');
var session          = require('express-session');
var path             = require('path');
var env              = process.env.NODE_ENV || 'development';

module.exports = function (app) {
    if ('test' == env) {
        console.log('environment = test');
        app.use(function staticsPlaceholder(req, res, next) {
            return next();
        });
        app.set('db', 'mongodb://localhost/meanstack-test');
        app.set('port', process.env.PORT || 3000);
        app.set('views', path.join(app.directory, '/app'));
        app.engine('html', require('ejs').renderFile);
        app.set('view engine', 'html');
        app.use(favicon('./app/favicon.ico'));
        app.use(logger('dev'));
        app.use(bodyParser());
        app.use(methodOverride());
        app.use(cookieParser('your secret here'));
        app.use(session());

        app.use(function middlewarePlaceholder(req, res, next) {
            return next();
        });

        app.use(errorHandler());
    }
};
The second environment variable is PORT. The application starts on the port indicated by the PORT variable, for example, ‘localhost:3000’. If the the PORT variable is not set, the application will default to port ‘3000‘, as specified in the each of the environment configuration files and the ‘Gruntfile.js’ Grunt configuration file.
Lastly, the CHROME_BIN environment variable is used Karma, the test runner for JavaScript, to determine the correct path to browser’s binary file. Details of this variable are discussed in detail on Karma’s site. In my case, the value for the CHROME_BIN is ‘C:\Program Files (x86)\Google\Chrome\Application\chrome.exe'. This variable is only necessary if you will be configuring Karma to use Chrome to run the tests. The browser can be changes to any browser, including PhantomJS. See the discussion at the end of this post regarding browser choice for Karma.
You can easily set all the environment variables on Windows from a command prompt, with the following commands. Remember to exit and re-open your interactive shell or command prompt window after adding the variables so they can be used.
| REM cofirm the path to Chrome, change value if necessary | |
| setx /m NODE_ENV "test" | |
| setx /m PORT "3000" | |
| setx /m CHROME_BIN "C:\Program Files (x86)\Google\Chrome\Application\chrome.exe" |
Install and Configure the Project
To install and configure the project, we start by cloning the ‘meanstack-data-samples‘ project from GitHub. We then use npm and bower to install the project’s dependencies. Once installed, we create and populate the Mongo database. We then use Grunt and Karma to unit test the project. Finally, we will use Grunt to start the Express Server and run the application. This is all accomplished with only a few individual commands. Please note, the ‘npm install’ command could take several minutes to complete, depending on your network speed; the project has many direct and indirect Node.js dependencies.
| # install meanstack-data-samples project | |
| git clone https://github.com/garystafford/meanstack-data-samples.git | |
| cd meanstack-data-samples | |
| npm install | |
| bower install | |
| mongoimport --db meanstack-$NODE_ENV --collection components components.json --drop # Unix | |
| # mongoimport --db meanstack-%NODE_ENV% --collection components components.json --drop # Windows | |
| grunt test | |
| grunt server |
If everything was installed correctly, running the ‘grunt test’ command should result in output similar to below:

Results of Running ‘grunt test’ with Chrome
If everything was installed correctly, running the ‘grunt server’ command should result in output similar to below:

Results of Running ‘grunt server’ to Start Application
Running the ‘grunt server’ command should start the application and open your browser to the default view, as shown below:

Displaying the Application’s Google Search Results on Desktop Browser
Karma’s Browser Choice for Unit Tests
The GitHub project is currently configured to use Chrome for running Karma’s unit tests in the ‘development’ and ‘test’ environments. For the ‘travis’ environment, it uses PhantomJS. If you do not have Chrome installed on your machine, the ‘grunt test’ task will fail during the ‘karma:unit’ task portion. To change Karma’s browser preference, simply change the ‘testBrowser’ variable in the ‘./karma.conf.js’ file, as shown below.
| // Karma configuration | |
| module.exports = function (config) { | |
| // Determines Karma's browser choice based on environment | |
| var testBrowser = 'Chrome'; // Default browser | |
| if (process.env.NODE_ENV === 'travis') { | |
| testBrowser = 'PhantomJS'; // Must use for headless CI (Travis-CI) | |
| } | |
| console.log("Karma browser: " + testBrowser); | |
| ... | |
| // Start these browsers, currently available: | |
| // Chrome, ChromeCanary, Firefox, Opera, | |
| // Safari (only Mac), PhantomJS, IE (only Windows) | |
| browsers: [testBrowser], |
I recommend installing and using PhantomJS headless WebKit, locally. Since PhantomJS is headless, Karma runs the unit tests without having to open and close browser windows. To run this project on continuous integration servers, like Jenkins or Travis-CI, you must PhantomJS. If you decide to use PhantomJS on Windows, don’t forget add the PhantomJS executable directory path to your ‘PATH’ environment variable to, after downloading and installing the application.
Code Generator
As I mentioned at the start of this post, this project was based on William Lepinski’s ‘generator-meanstack‘, which is in turn is based on Yeoman’s ‘generator-angular‘. Optionally, to install the ‘generator-meanstack’ npm package, globally, on our system use the following command The ‘generator-meanstack’ code generator will allow us to generate additional AngularJS components automatically, within the project, if we choose. The ‘generator-meanstack’ is not required for this post.
npm install -g generator-meanstack
Part II
In part two of this post, we will explore each methods of retrieving and displaying data using AngularJS, in detail.
Links
Installing and Configuring the MEAN Stack, Yeoman, and Associated Tooling on Windows
Posted by Gary A. Stafford in Bash Scripting, Build Automation, Client-Side Development, DevOps, Software Development on March 8, 2014
Configure your Windows environment for developing modern web applications using the popular MEAN Stack and Yeoman suite of utilities.

MEAN Stack Using the MEAN.io Project Running on Windows
Introduction
It’s an exciting time to be involved in web development. There are dozens of popular open-source JavaScript frameworks, libraries, code-generators, and associated tools, exploding on to the development scene. It is now possible to use a variety of popular technology mashups to provide a complete, full-stack JavaScript application platform.
MEAN Stack
One of the JavaScript mashups gaining a lot of traction recently is the MEAN Stack. If you’re reading this post, you probably already know MEAN is an acronym for four leading technologies: MongoDB, ExpressJS, AngularJS, and Node.js. The MEAN stack provides an end-to-end JavaScript application solution. MEAN provides a NoSQL document database (Mongo), a server-side solution for JavaScript (Node/Express), and a magic client-side MV* framework (Angular).
Depending in which MEAN stack generator or pre-build project you start with, in addition to the main four technologies, you will pull down several other smaller libraries and frameworks. These most commonly include jQuery, Twitter Bootstrap, Karma (test runner), Jade (template engine), JSHint, Underscore.js (utility-belt library), Mongoose (MongoDB object modeling tool), Passport (authentication), RequireJS (file and module loader), BreezeJS (data entity management), and so forth.
Common Tooling
If you are involved in these modern web development trends, then you are aware there is also a fairly common set of tools used by a majority of these developers, including source control, IDE, OS, and other helper-utilities. For SCM/VCS, Git is the clear winner. For an IDE, WebStorm, Sublime Text, and Kompozer, are heavy favorites. The platform of choice for most developers most often appears to be either Mac or Linux. It’s far less common to see a demonstration of these technologies, or tutorials built on the Microsoft Windows platform.
Yeoman
Another area of commonality is help-utilities, used to make the development, building, dependency management, and deployment of modern JavaScript applications, easier. Two popular ones are Brunch and Yeoman. Yeoman is also an acronym for a set of popular tools: yo, Grunt, and Bower. The first, yo, is best described as a scaffolding tool. Grunt is the build tool. Bower is a tool for client-side package and dependency management. We will install Yeoman, along with the MEAN Stack, in this post.
Windows
There is no reason Windows cannot serve as your development and hosting platform for modern web development, without specifically using Microsoft’s .NET stack. In fact, with minimal set-up, you would barely know you were using Windows as opposed to Linux or Mac. In this post, I will demonstrate how to configure your Windows machine for developing these modern web applications using the MEAN Stack and Yeoman.
Here is a list of the components we will discuss:
Installations
Git
The use of Git for source control is obvious. Git is the overwhelming choice of modern developers. Git has been integrated into most major IDEs and hosting platforms. There are hooks into Git available for most leading development tools. However, there are more benefits to using Git than just SCM. Being a Linux/Mac user, I prefer to use a Unix-like shell on Windows, versus the native Windows Command Prompt. For this reason, I use Git for Windows, available from msysGit. This package includes Git SCM, Git Bash, and Git GUI. I use the Git Bash interactive shell almost exclusively for my daily interactions requiring a command prompt. I will be using the Git Bash interactive shell for this post. OpenHatch has great post and training materials available on using Git Bash with Windows.

Using Git Bash on Windows for a Unix-like Experience
Git for Windows provides a downloadable Windows executable file for installation. Follow the installation file’s instructions.

To test your installation of Git for Windows, call the Git binary with the ‘–version’ flag. This flag can be used to test all the components we are installing in this post. If the command returns a value, then it’s a good indication that the component is installed properly and can be called from the command prompt:
gstafford: ~/Documents/git_repos $ git --version
git version 1.9.0.msysgit.0
You can also verify Git using the ‘where’ and ‘which’ commands. The ‘where’ command will display the location of files that match the search pattern and are in the paths specified by the PATH environment variable. The ‘which’ command tells you which file gets executed when you run a command. These commands will work for most components we will install:
gstafford: ~/Documents/git_repos $ where git
C:\Program Files (x86)\Git\bin\git.exe
C:\Program Files (x86)\Git\cmd\git.cmd
C:\Program Files (x86)\Git\cmd\git.exe

gstafford: ~/Documents/git_repos $ which git
/bin/git
Ruby
The reasons for Git are obvious, but why Ruby? Yeoman, specifically yo, requires Ruby. Installing Ruby on Windows is easy. Ruby recommends using RubyInstaller for Windows. RubyInstaller downloads an executable file, making install easy. I am using Ruby 1.9.3. I had previously installed the latest 2.0.0, but had to roll-back after some 64-bit compatibility issues with other applications.

To test the Ruby installation, use the ‘–version’ flag again:
gstafford: ~/Documents/git_repos $ ruby --version
ruby 1.9.3p484 (2013-11-22) [i386-mingw32]
RubyGems
Optionally, you might also to install RubyGems. RubyGems allow you to add functionality to the Ruby platform, in the form of ‘Gems’. A common Gem used with the MEAN stack is Compass, the Sass-based stylesheet framework creation and maintenance of CSS. According to their website, Ruby 1.9 and newer ships with RubyGems built-in but you may need to upgrade for bug fixes or new features.
On Windows, installation of RubyGems is as simple as downloading the .zip file from the RubyGems download site. To install, RubyGems, unzip the downloaded file. From the root of the unzipped directory, run the following Ruby command:
ruby setup.rb
To confirm your installation:
gstafford: ~/Documents/git_repos $ gem --version
2.2.2
If you already have RubyGems installed, it’s recommended you update RubyGems before continuing. Use the first command, with the ‘–system’ flag, will update to the latest RubyGems. Use the second command, without the tag, if you want to update each of your individually installed Ruby Gems:
gem update --system
gem update
MongoDB
MongoDB provides a great set of installation and configuration instructions for Windows users. To install MongoDB, download the MongoDB package. Create a ‘mongodb’ folder. Mongo recommends at the root of your system drive. Unzip the MongoDB package to ‘c:\mongodb’ folder. That’s really it, there is no installer file.
Next, make a default Data Directory location, use the following two commands:
mkdir c://data && mkdir c://data/db
Unlike most other components, to call Mongo from the command prompt, I had to manually add the path to the Mongo binaries to my PATH environment variable. You can get access to your Windows environment variables using the Windows and Pause keys. Add the path ‘c:\mongodb\bin’ to end of the PATH environment variable value.

Adding Mongo to the PATH Environment Variable
To test the MongoDB installation, and that the PATH variable is set correctly, close any current interactive shells or command prompt windows. Open a new shell and use the same ‘–version’ flag for Mongo’s three core components:
gstafford: ~/Documents/git_repos
$ mongo --version; mongod --version; mongos --version
MongoDB shell version: 2.4.9

db version v2.4.9
Sun Mar 09 16:26:48.730 git version: 52fe0d21959e32a5bdbecdc62057db386e4e029c

MongoS version 2.4.9 starting: pid=15436 port=27017 64-bit
host=localhost (--help for usage)
git version: 52fe0d21959e32a5bdbecdc62057db386e4e029c
build sys info: windows sys.getwindowsversion(major=6, minor=1, build=7601,
platform=2, service_pack='Service Pack 1')
BOOST_LIB_VERSION=1_49
To start MongoDB, use the ‘mongod’ or ‘start mongod’ commands. Adding ‘start’ opens a new command prompt window, versus tying up your current shell. If you are not using the default MongoDB Data Directory (‘c://data/db’) you created in the previous step, use the ‘–dbpath’ flag, for example ‘start mongod –dbpath ‘c://alternate/path’.

MongoDB Running on Windows
.

MongoDB Default Data Directory Containing New MEAN Database
Node.js
To install Node.js, download and run the Node’s .msi installer for Windows. Along with Node.js, you will get npm (Node Package Manager). You will use npm to install all your server-side components, such as Express, yo, Grunt, and Bower.

gstafford: ~/Documents/git_repos
$ node --version && npm --version
v0.10.26
1.4.3
Express
To install Express, the web application framework for node, use npm:
npm install -g express
The ‘-g’ flag (or, ‘–global’ flag) should be used. According to Stack Overflow, ‘if you’re installing something that you want to use in your shell, on the command line or something, install it globally, so that its binaries end up in your PATH environment variable:
gstafford: ~/Documents/git_repos $ express --version
3.5.0
Yeoman – yo, Grunt, and Bower
You will also use npm to install yo, Grunt, and Bower. Actually, we will use npm to install the Grunt Command Line Interface (CLI). The Grunt task runner will be installed in your MEAN stack project, locally, later. Read these instructions on the Grunt website for a better explanation. Use the same basic command as with Express:
npm install -g yo grunt-cli bower
To test the installs, run the same command as before:
gstafford: ~/Documents/git_repos
$ yo --version; grunt --version; bower --version
1.1.2
grunt-cli v0.1.13
1.2.8
If you already had Yeoman installed, confirm you have the latest versions with the ‘npm update’ command:
gstafford: ~/Documents/git_repos/gen-angular-sample
$ npm update -g yo grunt-cli bower
npm http GET https://registry.npmjs.org/grunt-cli
npm http GET https://registry.npmjs.org/bower
npm http GET https://registry.npmjs.org/yo
npm http 304 https://registry.npmjs.org/bower
npm http 304 https://registry.npmjs.org/yo
npm http 200 https://registry.npmjs.org/grunt-cli
All of the npm installs, including Express, are installed and called from a common location on Windows:
gstafford: ~/Documents/git_repos/gen-angular-sample
$ where express yo grunt bower
c:\Users\gstaffor\AppData\Roaming\npm\yo
c:\Users\gstaffor\AppData\Roaming\npm\yo.cmd
c:\Users\gstaffor\AppData\Roaming\npm\grunt
c:\Users\gstaffor\AppData\Roaming\npm\grunt.cmd
c:\Users\gstaffor\AppData\Roaming\npm\bower
c:\Users\gstaffor\AppData\Roaming\npm\bower.cmd

gstafford: ~/Documents/git_repos
$ which express; which yo; which grunt; which bower
~/AppData/Roaming/npm/express
~/AppData/Roaming/npm/yo
~/AppData/Roaming/npm/grunt
~/AppData/Roaming/npm/bower
Use the command, ‘npm list –global | less’ (or, ‘npm ls -g | less’) to view all npm packages installed globally, in a tree-view. After you have generated your project (see below), check the project-specific server-side packages with the ‘npm ls’ command from within the project’s root directory. For the client-side packages, use the ‘bower ls’ command from within the project’s root directory.
If your in a hurry, or have more Windows boxes to configure you can use one npm command for all four components, above:
npm install -g express yo grunt-cli bower
MEAN Boilerplate Generators and Projects
That’s it, you’ve installed most of the core components you need to get started with the MEAN stack on Windows. Next, you will want to download one of the many MEAN boilerplate projects, or use a MEAN code generator with npm and yo. I recommend trying one or all of the following projects. They are each slightly different architecturally, but fairly stable:
- Linnovate’s MEAN.io project on GitHub (boilerplate MEAN project)
- James Cryer’s npm generator-mean, a Yeoman generator for MEAN stack, inspired by mean.io
- William Lepinski’s MEAN stack generator for Yeoman, generator-meanstack, based on the generator-angular.

Yeoman Running MEAN Generator
.

MEAN Stack Using James Cryer’s ‘generator-mean’
Links
- Jim Lavin’s Introduction to the MEAN Stack on YouTube
- Google Developer’s Getting MEAN on YouTube
- Introduction to the MEAN Stack, Part One: Setting Up Your Tools
- Full-Stack JavaScript With MEAN And Yeoman
- The MEAN Stack: MongoDB, ExpressJS, AngularJS and Node.js
RESTful Mobile: Consuming Java EE RESTful Web Services Using jQuery Mobile
Posted by Gary A. Stafford in Java Development, Mobile HTML Development, Software Development on October 18, 2012
Use jQuery Mobile to build a mobile HTML website, capable of calling Jersey-specific Java EE RESTful web services and displaying JSONP in a mobile web browser.

Both NetBeans projects used in this post are available on DropBox. If you like DropBox, please use this link to sign up for a free 2 GB account. It will help me post more files to DropBox for future posts.
Background
In the previous two-part series, Returning JSONP from Java EE RESTful Web Services Using jQuery, Jersey, and GlassFish, we created a Jersey-specific RESTful web service from a database using EclipseLink (JPA 2.0 Reference Implementation), Jersey (JAX-RS Reference Implementation), JAXB, and Jackson Java JSON-processor. The service and associated entity class mapped to a copy of Microsoft SQL Server’s Adventure Works database. An HTML and jQuery-based client called the service, which returned a JSONP response payload. The JSON data it contained was formatted and displayed in a simple HTML table, in a web-browser.
Objectives
In this post, we will extend the previous example to the mobile platform. Using jQuery and jQuery Mobile JavaScript libraries, we will call two RESTful web services and display the resulting JSONP data using the common list/detail UX design pattern. We will display a list of Adventure Works employees. When the end-user clicks on an employee in the web-browser, a new page will display detailed demographic information about that employee.
Similar to the previous post, when the client website is accessed by the end-user in a mobile web browser, the client site’s HTML, CSS, and JavaScript files are downloaded and cached on the end-users machine. The JavaScript file, using jQuery and Ajax, makes a call to the RESTful web service, which returns JSON (or, JSONP in this case). This simulates a typical cross-domain situation where a client needs to consume RESTful web services from a remote source. This is not allowed by the same origin policy, but overcome by returning JSONP to the client, which wraps the JSON payload in a function call.
We will extend both the ‘JerseyRESTfulServices’ and ‘JerseyRESTfulClient’ projects we built in the last series of posts. Here are the high-level steps we will walk-through in this post:
- Create a second view (virtual table) in the Adventure Works database;
- Create a second entity class that maps to the new database view;
- Modify the existing entity class, adding JAXB and Jackson JSON annotations;
- Create a second Jersey-specific RESTful web service from the new entity using Jersey and Jackson;
- Modify the existing Jersey-specific RESTful web service, adding one new methods;
- Modify the web.xml file to allow us to use natural JSON notation;
- Implement a JAXBContext resolver to serialize the JSON using natural JSON notation;
- Create a simple list/detail two-page mobile HTML5 website using jQuery Mobile;
- Use jQuery, Ajax, and CSS to call, parse, and display the JSONP returned by the service.
RESTful Web Services Project
When we are done, the final RESTful web services projects will look like the screen-grab, below. It will contain (2) entity classes, (2) RESTful web service classes, (1) JAXBContext resolver class, and the web.xml configuration file:

JerseyRESTfulServices Project View in NetBeans
1: Create the Second Database View
Create a new database view, vEmployeeNames, in the Adventure Works database:
USE [AdventureWorks]
GO

SET ANSI_NULLS ON
GO

SET QUOTED_IDENTIFIER ON
GO

CREATE VIEW [HumanResources].[vEmployeeNames]
AS
SELECT TOP (100) PERCENT BusinessEntityID, REPLACE(RTRIM(LastName
     + COALESCE (' ' + Suffix + '', N'') + COALESCE (', ' + FirstName + ' ', N'')
     + COALESCE (MiddleName + ' ', N'')), '  ', ' ') AS FullName
FROM Person.Person
WHERE (PersonType = 'EM')
ORDER BY FullName
GO
2: Create the Second Entity
Add the new VEmployeeNames.java entity class, mapped to the vEmployeeNames database view, using NetBeans’ ‘Entity Classes from Database…’ wizard. Then, modify the class to match the code below.
package entities;

import java.io.Serializable;
import javax.persistence.Basic;
import javax.persistence.Column;
import javax.persistence.Entity;
import javax.persistence.Id;
import javax.persistence.NamedQueries;
import javax.persistence.NamedQuery;
import javax.persistence.Table;
import javax.validation.constraints.NotNull;
import javax.validation.constraints.Size;
import javax.xml.bind.annotation.XmlRootElement;
import javax.xml.bind.annotation.XmlType;

@Entity
@Table(name = "vEmployeeNames", catalog = "AdventureWorks", schema = "HumanResources")
@XmlRootElement(name = "vEmployeeNames")
@NamedQueries({
    @NamedQuery(name = "VEmployeeNames.findAll", query = "SELECT v FROM VEmployeeNames v"),
    @NamedQuery(name = "VEmployeeNames.findByBusinessEntityID", query = "SELECT v FROM VEmployeeNames v WHERE v.businessEntityID = :businessEntityID"),
    @NamedQuery(name = "VEmployeeNames.findByFullName", query = "SELECT v FROM VEmployeeNames v WHERE v.fullName = :fullName")})
public class VEmployeeNames implements Serializable {

    private static final long serialVersionUID = 1L;
    @Basic(optional = false)
    @NotNull
    @Id
    @Column(name = "BusinessEntityID")
    private int businessEntityID;
    @Basic(optional = false)
    @NotNull
    @Size(min = 1, max = 102)
    @Column(name = "FullName")
    private String fullName;

    public VEmployeeNames() {
    }

    public int getBusinessEntityID() {
        return businessEntityID;
    }

    public void setBusinessEntityID(int businessEntityID) {
        this.businessEntityID = businessEntityID;
    }

    public String getFullName() {
        return fullName;
    }

    public void setFullName(String fullName) {
        this.fullName = fullName;
    }
}
3: Modify the Existing Entity
Modify the existing VEmployee.java entity class to use JAXB and Jackson JSON Annotations as shown below (class code abridged). Note the addition of the @XmlType(propOrder = { "businessEntityID"... }) to the class, the @JsonProperty(value = ...) tags to each member variable, and the @Id tag to the businessEntityID, which serves as the entity’s primary key. We will see the advantages of the first two annotations later in the post when we return the JSON to the client.
package entities;

import java.io.Serializable;
import javax.persistence.Basic;
import javax.persistence.Entity;
import javax.persistence.Id;
import javax.persistence.NamedQueries;
import javax.persistence.NamedQuery;
import javax.persistence.Table;
import javax.validation.constraints.NotNull;
import javax.validation.constraints.Size;
import javax.xml.bind.annotation.XmlRootElement;
import javax.xml.bind.annotation.XmlType;
import org.codehaus.jackson.annotate.JsonProperty;

@Entity
@Table(name = "vEmployee", catalog = "AdventureWorks", schema = "HumanResources")
@XmlRootElement
@NamedQueries({
    @NamedQuery(name = "VEmployee.findAll", query = "SELECT v FROM VEmployee v"),
    ...})
    @XmlType(propOrder = {
    "businessEntityID",
    "title",
    "firstName",
    "middleName",
    "lastName",
    "suffix",
    "jobTitle",
    "phoneNumberType",
    "phoneNumber",
    "emailAddress",
    "emailPromotion",
    "addressLine1",
    "addressLine2",
    "city",
    "stateProvinceName",
    "postalCode",
    "countryRegionName",
    "additionalContactInfo"
})
public class VEmployee implements Serializable {

    private static final long serialVersionUID = 1L;
    @Basic(optional = false)
    @NotNull
    @Id
    @JsonProperty(value = "Employee ID")
    private int businessEntityID;
    @Size(max = 8)
    @JsonProperty(value = "Title")
    private String title;
    @Basic(optional = false)
    @NotNull
    @Size(min = 1, max = 50)
    @JsonProperty(value = "First Name")
    private String firstName;
    @Size(max = 50)
    @JsonProperty(value = "Middle Name")
    private String middleName;
    @Basic(optional = false)
    @NotNull
    @Size(min = 1, max = 50)
    @JsonProperty(value = "Last Name")
    private String lastName;
    @Size(max = 10)
    @JsonProperty(value = "Suffix")
    private String suffix;
    @Basic(optional = false)
    @NotNull
    @Size(min = 1, max = 50)
    @JsonProperty(value = "Job Title")
    private String jobTitle;
    @Size(max = 25)
    @JsonProperty(value = "Phone Number")
    private String phoneNumber;
    @Size(max = 50)
    @JsonProperty(value = "Phone Number Type")
    private String phoneNumberType;
    @Size(max = 50)
    @JsonProperty(value = "Email Address")
    private String emailAddress;
    @Basic(optional = false)
    @NotNull
    @JsonProperty(value = "Email Promotion")
    private int emailPromotion;
    @Basic(optional = false)
    @NotNull
    @Size(min = 1, max = 60)
    @JsonProperty(value = "Address Line 1")
    private String addressLine1;
    @Size(max = 60)
    @JsonProperty(value = "Address Line 2")
    private String addressLine2;
    @Basic(optional = false)
    @NotNull
    @Size(min = 1, max = 30)
    @JsonProperty(value = "City")
    private String city;
    @Basic(optional = false)
    @NotNull
    @Size(min = 1, max = 50)
    @JsonProperty(value = "State or Province Name")
    private String stateProvinceName;
    @Basic(optional = false)
    @NotNull
    @Size(min = 1, max = 15)
    @JsonProperty(value = "Postal Code")
    private String postalCode;
    @Basic(optional = false)
    @NotNull
    @Size(min = 1, max = 50)
    @JsonProperty(value = "Country or Region Name")
    private String countryRegionName;
    @Size(max = 2147483647)
    @JsonProperty(value = "Additional Contact Info")
    private String additionalContactInfo;

    public VEmployee() {
    }
    ...
}
4: Create the New RESTful Web Service
Add the new VEmployeeNamesFacadeREST.java RESTful web service class using NetBean’s ‘RESTful Web Services from Entity Classes…’ wizard. Then, modify the new class, adding the new findAllJSONP() method shown below (class code abridged). This method call the same super.findAll() method from the parent AbstractFacade.java class as the default findAll({id}) method. However, the findAllJSONP() method returns JSONP instead of XML or JSON, as findAll({id}) does. This is done by passing the results of super.findAll() to a new instance of Jersey’s JSONWithPadding() class (com.sun.jersey.api.json.JSONWithPadding).
package service;

import com.sun.jersey.api.json.JSONWithPadding;
import entities.VEmployeeNames;
import java.util.ArrayList;
import java.util.Collection;
import java.util.List;
import javax.ejb.Stateless;
import javax.persistence.EntityManager;
import javax.persistence.PersistenceContext;
import javax.persistence.criteria.CriteriaBuilder;
import javax.persistence.criteria.CriteriaQuery;
import javax.persistence.criteria.Root;
import javax.ws.rs.Consumes;
import javax.ws.rs.DELETE;
import javax.ws.rs.GET;
import javax.ws.rs.POST;
import javax.ws.rs.PUT;
import javax.ws.rs.Path;
import javax.ws.rs.PathParam;
import javax.ws.rs.Produces;
import javax.ws.rs.QueryParam;
import javax.ws.rs.core.GenericEntity;

@Stateless
@Path("entities.vemployeenames")
public class VEmployeeNamesFacadeREST extends AbstractFacade<VEmployeeNames> {
    ...
    @GET
    @Path("jsonp")
    @Produces({"application/javascript"})
    public JSONWithPadding findAllJSONP(@QueryParam("callback") String callback) {
        CriteriaBuilder cb = getEntityManager().getCriteriaBuilder();
        CriteriaQuery cq = cb.createQuery();
        Root empRoot = cq.from(VEmployeeNames.class);
        cq.select(empRoot);
        cq.orderBy(cb.asc(empRoot.get("fullName")));
        javax.persistence.Query q = getEntityManager().createQuery(cq);

        List<VEmployeeNames> employees = q.getResultList();
        return new JSONWithPadding(
                new GenericEntity<Collection<VEmployeeNames>>(employees) {
                }, callback);
    }
    ...
}
5: Modify the Existing Service
Modify the existing VEmployeeFacadeREST.java RESTful web service class, adding the findJSONP() method shown below (class code abridged). This method calls the same super.find({id}) in the AbstractFacade.java parent class as the default find({id}) method, but returns JSONP instead of XML or JSON. As with the previous service class above, this is done by passing the results to a new instance of Jersey’s JSONWithPadding() class (com.sun.jersey.api.json.JSONWithPadding). There are no changes required to the default AbstractFacade.java class.
package service;

import com.sun.jersey.api.json.JSONWithPadding;
import entities.VEmployee;
import java.util.ArrayList;
import java.util.Collection;
import java.util.List;
import javax.ejb.Stateless;
import javax.persistence.EntityManager;
import javax.persistence.PersistenceContext;
import javax.persistence.criteria.CriteriaBuilder;
import javax.persistence.criteria.CriteriaQuery;
import javax.persistence.criteria.Root;
import javax.ws.rs.Consumes;
import javax.ws.rs.DELETE;
import javax.ws.rs.GET;
import javax.ws.rs.POST;
import javax.ws.rs.PUT;
import javax.ws.rs.Path;
import javax.ws.rs.PathParam;
import javax.ws.rs.Produces;
import javax.ws.rs.QueryParam;
import javax.ws.rs.core.GenericEntity;

@Stateless
@Path("entities.vemployee")
public class VEmployeeFacadeREST extends AbstractFacade<VEmployee> {
    ...
    @GET
    @Path("{id}/jsonp")
    @Produces({"application/javascript"})
    public JSONWithPadding findJSONP(@PathParam("id") Integer id,
            @QueryParam("callback") String callback) {
        List<VEmployee> employees = new ArrayList<VEmployee>();
        employees.add(super.find(id));
        return new JSONWithPadding(
                new GenericEntity<Collection<VEmployee>>(employees) {
                }, callback);
    }
    ...
}
6: Allow POJO JSON Support
Add the JSONConfiguration.FEATURE_POJO_MAPPING servlet init parameter to web.xml, as shown below (xml abridged). According to the Jersey website, this will allow us to use POJO support, the easiest way to convert our Java Objects to JSON. It is based on the Jackson library.
<?xml version="1.0" encoding="UTF-8"?>
<web-app version="3.0" xmlns="http://java.sun.com/xml/ns/javaee" xmlns:xsi="http://www.w3.org/2001/XMLSchema-instance" xsi:schemaLocation="http://java.sun.com/xml/ns/javaee http://java.sun.com/xml/ns/javaee/web-app_3_0.xsd">
    <servlet>
        <servlet-name>ServletAdaptor</servlet-name>
        <servlet-class>com.sun.jersey.spi.container.servlet.ServletContainer</servlet-class>
        <init-param>
            <description>Multiple packages, separated by semicolon(;), can be specified in param-value</description>
            <param-name>com.sun.jersey.config.property.packages</param-name>
            <param-value>service</param-value>
        </init-param>
        <init-param>
            <param-name>com.sun.jersey.api.json.POJOMappingFeature</param-name>
            <param-value>true</param-value>
        </init-param>
        ...
7: Implement a JAXBContext Resolver
Create the VEmployeeFacadeREST.java JAXBContext resolver class, shown below. This allows us to serialize the JSON using natural JSON notation. A good explanation of the use of a JAXBContext resolver can be found on the Jersey website.
package config;

import com.sun.jersey.api.json.JSONConfiguration;
import com.sun.jersey.api.json.JSONJAXBContext;
import javax.ws.rs.ext.ContextResolver;
import javax.ws.rs.ext.Provider;
import javax.xml.bind.JAXBContext;

@Provider
public class JAXBContextResolver implements ContextResolver<JAXBContext> {

    JAXBContext jaxbContext;
    private Class[] types = {entities.VEmployee.class, entities.VEmployeeNames.class};

    public JAXBContextResolver() throws Exception {
        this.jaxbContext =
                new JSONJAXBContext(JSONConfiguration.natural().build(), types);
    }

    @Override
    public JAXBContext getContext(Class<?> objectType) {
        for (Class type : types) {
            if (type == objectType) {
                return jaxbContext;
            }
        }
        return null;
    }
}
What is Natural JSON Notation?
According to the Jersey website, “with natural notation, Jersey will automatically figure out how individual items need to be processed, so that you do not need to do any kind of manual configuration. Java arrays and lists are mapped into JSON arrays, even for single-element cases. Java numbers and booleans are correctly mapped into JSON numbers and booleans, and you do not need to bother with XML attributes, as in JSON, they keep the original names.”
What does that mean? Better yet, what does that look like? Here is an example of an employee record, first as plain old JAXB JSON in a JSONP wrapper:
callback({"vEmployee":{"businessEntityID":"211","firstName":"Hazem","middleName":"E","lastName":"Abolrous","jobTitle":"Quality Assurance Manager","phoneNumberType":"Work","phoneNumber":"869-555-0125","emailAddress":"hazem0@adventure-works.com","emailPromotion":"0","addressLine1":"5050 Mt. Wilson Way","city":"Kenmore","stateProvinceName":"Washington","postalCode":"98028","countryRegionName":"United States"}})
And second, JSON wrapped in JSONP, using Jersey’s natural notation. Note the differences in the way the parent vEmployee node, numbers, and nulls are handled in natural JSON notation.
callback([{"Employee ID":211,"Title":null,"First Name":"Hazem","Middle Name":"E","Last Name":"Abolrous","Suffix":null,"Job Title":"Quality Assurance Manager","Phone Number Type":"Work","Phone Number":"869-555-0125","Email Address":"hazem0@adventure-works.com","Email Promotion":0,"Address Line 1":"5050 Mt. Wilson Way","Address Line 2":null,"City":"Kenmore","State or Province Name":"Washington","Postal Code":"98028","Country or Region Name":"United States","Additional Contact Info":null}])
Mobile Client Project
When we are done with the mobile client, the final RESTful web services mobile client NetBeans projects should look like the screen-grab, below. Note the inclusion of jQuery Mobile 1.2.0. You will need to download the library and associated components, and install them in the project. I chose to keep them in a separate folder since there were several files included with the library. This example requires a few new features introduced in jQuery Mobile 1.2.0. Make sure to get this version or later.

JerseyRESTfulClient Project View in NetBeans
8: Create a List/Detail Mobile HTML Site
The process to display the data from the Adventure Works database in the mobile web browser is identical to the process used in the last series of posts. We are still using jQuery with Ajax, calling the same services, but with a few new methods. The biggest change is the use of jQuery Mobile to display the employee data. The jQuery Mobile library, especially with the release of 1.2.0, makes displaying data, quick and elegant. The library does all the hard work under the covers, with the features such as the listview control. We simply need to use jQuery and Ajax to retrieve the data and pass it to the control.
We will create three new files. They include the HTML, CSS, and JavaScript files. We add a ‘.m’ to the file names to differentiate them from the normal web browser files from the last post. As with the previous post, the HTML page and CSS file are minimal. The HTML page uses the jQuery Mobile multi-page template available on the jQuery Mobile website. Although it appears as two different web pages to the end-user, it is actually a single-page site.
Source code for employee.m.html:
<!DOCTYPE html>
<html>
    <head>
        <title>Employee List</title>
        <meta name="viewport" content="width=device-width, initial-scale=1">
        <meta http-equiv="Content-Type" content="text/html; charset=UTF-8">

        <link rel="stylesheet" href="jquery.mobile-1.2.0/jquery.mobile-1.2.0.min.css" />
        <link type="text/css" rel="stylesheet" href="employees.m.css" />

        <script src="jquery-1.8.2.min.js" type="text/javascript"></script>
        <script src="jquery.mobile-1.2.0/jquery.mobile-1.2.0.min.js" type="text/javascript"></script>
        <script src="employees.m.js" type="text/javascript"></script>
    </head>
    <body>
        <!-- Start of first page: #one -->
        <div data-role="page" id="one" data-theme="b">
            <div data-role="header" data-theme="b">
                <h1>Employee List</h1>
            </div><!-- /header -->
            <div data-role="content">
                <div id="errorMessage"></div>
                <div class="ui-grid-solo">
                    <form>
                        <ul data-role="listview" data-filter="true"
                            id="employeeList" data-theme="c" data-autodividers="true">
                        </ul>
                    </form>
                </div>
            </div><!-- /content -->
            <div data-role="footer" data-theme="b">
                <h4>Programmatic Ponderings, 2012</h4>
            </div><!-- /footer -->
        </div><!-- /page -->

        <!-- Start of second page: #two -->
        <div data-role="page" id="two" data-theme="c">
            <div data-role="header" data-theme="b">
                <a href="#one" data-icon="back">Return</a>
                <h1>Employee Detail</h1>
            </div><!-- /header -->
            <div data-role="content" data-theme="c">
                <div id="employeeDetail"></div>
            </div><!-- /content -->
            <div data-role="footer" data-theme="b">
                <h4>Programmatic Ponderings, 2012</h4>
            </div><!-- /footer -->
        </div><!-- /page two -->
    </body>
</html>
Source code for employee.m.css:
#employeeList {
    clear:both;
}

#employeeDetail div {
    padding-top: 2px;
    white-space: nowrap;
}

.field {
    margin-bottom: 0px;
    font-size: smaller;
    color: #707070;
}

.value {
    font-weight: bolder;
    padding-bottom: 12px;
    border-bottom: 1px #d0d0d0 solid;
}

.ui-block-a{
    padding-left: 6px;
    padding-right: 6px;
}

.ui-grid-a{
    padding-bottom: 12px;
    padding-top: -6px;
}
8: Retrieve, Parse, and Display the Data
The mobile JavaScript file below is identical in many ways to the JavaScript file used in the last series of posts for a non-mobile browser. One useful change we have made is the addition of two arguments to the function that calls jQuery.Ajax(). The address of the service (URI) that the jQuery.Ajax() method requests, and the function that Ajax calls after successful completion, are both passed into the callService(Uri, successFunction) function as arguments. This allows us to reuse the Ajax method for different purposes. In this case, we call the function once to populate the Employee List with the full names of the employees. We call it again to populate the Employee Detail page with demographic information of a single employee chosen from the Employee List. Both calls are to different URIs representing the two different RESTful web services, which in turn are associated with the two different entities, which in turn are mapped to the two different database views.
callService = function (uri, successFunction) {
        $.ajax({
            cache: true,
            url: uri,
            data: "{}",
            type: "GET",
            contentType: "application/javascript",
            dataType: "jsonp",
            error: ajaxCallFailed,
            failure: ajaxCallFailed,
            success: successFunction
        });
    };
The rest of the functions are self-explanatory. There are two calls to the jQuery Ajax method to return data from the service, two functions to parse and format the JSONP for display in the browser, and one jQuery method that adds click events to the Employee List. We perform a bit of string manipulation to imbed the employee id into the id property of each list item (li element. Later, when the end-user clicks on the employee name in the list, the employee id is extracted from the id property of the selected list item and passed back to the service to retrieve the employee detail. The HTML snippet below shows how a single employee row in the jQuery listview. Note the id property of the li element, id="empId_121", for employee id 121.
<li id="empId_121" class="ui-btn ui-btn-icon-right ui-li-has-arrow ui-li ui-btn-up-c"
    data-corners="false" data-shadow="false" data-iconshadow="true"
    data-wrapperels="div" data-icon="arrow-r" data-iconpos="right" data-theme="c">
    <div class="ui-btn-inner ui-li">
        <div class="ui-btn-text">
            <a class="ui-link-inherit" href="#">Ackerman, Pilar G</a>
        </div>
        <span class="ui-icon ui-icon-arrow-r ui-icon-shadow"> </span>
    </div>
</li>
To make this example work, you need to change the restfulWebServiceBaseUri variable to the server and port of the GlassFish domain running your RESTful web services. If you are testing the client locally on your mobile device, I suggest using the IP address for the GlassFish server versus a domain name, which your phone will be able to connect to in your local wireless environment. At least on the iPhone, there is no easy way to change the hosts file to provide local domain name resolution.
Source code for employee.m.js:
// ===========================================================================
//
// Author: Gary A. Stafford
// Website: http://www.programmaticponderings.com
// Description: Call RESTful Web Services from mobile HTML pages
// using jQuery mobile, Jersey, Jackson, and EclipseLink
//
// ===========================================================================
// Immediate function
(function () {
"use strict";
var restfulWebServiceBaseUri, employeeListFindAllUri, employeeByIdUri,
callService, ajaxCallFailed,
getEmployeeById, displayEmployeeList, displayEmployeeDetail;
// Base URI of RESTful web service
restfulWebServiceBaseUri = "http://your_server_name_or_ip:8080/JerseyRESTfulServices/webresources/";
// URI maps to service.VEmployeeNamesFacadeREST.findAllJSONP
employeeListFindAllUri = restfulWebServiceBaseUri + "entities.vemployeenames/jsonp";
// URI maps to service.VEmployeeFacadeREST.findJSONP
employeeByIdUri = restfulWebServiceBaseUri + "entities.vemployee/{id}/jsonp";
// Execute after the page one dom is fully loaded
$(".one").ready(function () {
// Retrieve employee list
callService(employeeListFindAllUri, displayEmployeeList);
// Attach onclick event to each row of employee list on page one
$("#employeeList").on("click", "li", function(event){
getEmployeeById($(this).attr("id").split("empId_").pop());
});
});
// Call a service URI and return JSONP to a function
callService = function (Uri, successFunction) {
$.ajax({
cache: true,
url: Uri,
data: "{}",
type: "GET",
contentType: "application/javascript",
dataType: "jsonp",
error: ajaxCallFailed,
failure: ajaxCallFailed,
success: successFunction
});
};
// Called if ajax call fails
ajaxCallFailed = function (jqXHR, textStatus) {
console.log("Error: " + textStatus);
console.log(jqXHR);
$("form").css("visibility", "hidden");
$("#errorMessage").empty().
append("Sorry, there was an error.").
css("color", "red");
};
// Display employee list on page one
displayEmployeeList = function (employee) {
var employeeList = "";
$.each(employee, function(index, employee) {
employeeList = employeeList.concat(
"<li id=empId_" + employee.businessEntityID.toString() + ">" +
"<a href='#'>" +
employee.fullName.toString() + "</a></li>");
});
$('#employeeList').empty();
$('#employeeList').append(employeeList).listview("refresh", true);
};
// Display employee detail on page two
displayEmployeeDetail = function(employee) {
$.mobile.loading( 'show', {
text: '',
textVisible: false,
theme: 'a',
html: ""
});
window.location = "#two";
var employeeDetail = "";
$.each(employee, function(key, value) {
$.each(value, function(key, value) {
if(!value) {
value = " ";
}
employeeDetail = employeeDetail.concat(
"<div class='detail'>" +
"<div class='field'>" + key + "</div>" +
"<div class='value'>" + value + "</div>" +
"</div>");
});
});
$("#employeeDetail").empty().append(employeeDetail);
};
// Retrieve employee detail based on employee id
getEmployeeById = function (employeeID) {
callService(employeeByIdUri.replace("{id}", employeeID), displayEmployeeDetail);
};
} ());
The Final Result
Viewed in Google’s Chrome for Mobile web browser on iOS 6, the previous project’s Employee List looks pretty bland and un-mobile like:

Previous Project as Viewed in Google Chrome for Mobile Web Browser
However, with a little jQuery Mobile magic you get a simple yet effective and highly functional mobile web presentation. Seen below on page one, the Employee List is displayed in Safari on an iPhone 4 with iOS 6. It features some of the new capabilities of jQuery Mobile 1.2.0’s improved listview, including autodividers.
Employee List
Here again is the Employee List using the jQuery Mobile 1.2.0’s improved listview search filter bar:

Employee List – Filtered
Here is the Employee Detail on page 2. Note the order and names of the fields. Remember previously when we annotated the VEmployeeNames.java entity with the @XmlType(propOrder = {"businessEntityID", ...}) to the class and the @JsonProperty(value = ...) tags to each member variable. This is the results of those efforts; our JSON is delivered pre-sorted and titled the way we want. No need to handle those functions on the client-side. This allows the client to be loosely-coupled to the data. The client simply displays whichever key/value pairs are delivered in the JSONP response payload.

Employee Detail

Employee Detail – Bottom
Gary Stafford
AWS Area Principal Solutions Architect | 10x AWS Certified Pro | DevOps | Data/ML | Serverless | Polyglot Developer | Former ThoughtWorks and Accenture
