Posts Tagged Virtual Machine
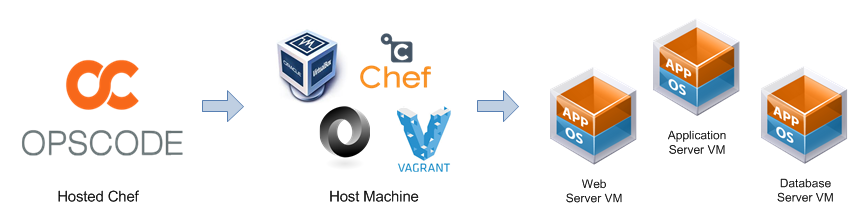
Create Multi-VM Environments Using Vagrant, Chef, and JSON
Posted by Gary A. Stafford in Build Automation, DevOps, Enterprise Software Development, Software Development on February 27, 2014
Create and manage ‘multi-machine’ environments with Vagrant, using JSON configuration files. Allow increased portability across hosts, environments, and organizations.
Introduction
As their website says, Vagrant has made it very easy to ‘create and configure lightweight, reproducible, and portable development environments.’ Based on Ruby, the elegantly simple open-source programming language, Vagrant requires a minimal learning curve to get up and running.
In this post, we will create what Vagrant refers to as a ‘multi-machine’ environment. We will provision three virtual machines (VMs). The VMs will mirror a typical three-tier architected environment, with separate web, application, and database servers.
We will move all the VM-specific information from the Vagrantfile to a separate JSON format configuration file. There are a few advantages to moving the configuration information to separate file. First, we can configure any number VMs, while keeping the Vagrantfile exactly the same. Secondly and more importantly, we can re-use the same Vagrantfile to build different VMs on another host machine.
Although certainly not required, I am also using Chef in this example. More specifically, I am using Hosted Chef to further configure the VMs. Like the VM-specific information above, I have also moved the Chef-specific information to a separate JSON configuration file. We can now use the same Vagrantfile within another Chef Environment, or even within another Chef Organization, using an alternate configuration files. If you are not a Chef user, you can disregard that part of the configuration code. Alternately, you can substitute the Chef configuration code for Puppet, if that is your configuration automation tool of choice.
The only items we will not remove from the Vagrantfile are the Vagrant Box and synced folder configurations. These items could also be moved to a separate configuration file, making the Vagrantfile even more generic and portable.
The Code
Below is the VM-specific JSON configuration file, containing all the individual configuration information necessary for Vagrant to build the three VMs: ‘apps’, dbs’, and ‘web’. Each child ‘node’ in the parent ‘nodes’ object contains key/value pairs for VM names, IP addresses, forwarding ports, host names, and memory settings. To add another VM, you would simply add another ‘node’ object.
| { | |
| "nodes": { | |
| "apps": { | |
| ":node": "ApplicationServer-201", | |
| ":ip": "192.168.33.21", | |
| ":host": "apps.server-201", | |
| "ports": [ | |
| { | |
| ":host": 2201, | |
| ":guest": 22, | |
| ":id": "ssh" | |
| }, | |
| { | |
| ":host": 7709, | |
| ":guest": 7709, | |
| ":id": "wls-listen" | |
| } | |
| ], | |
| ":memory": 2048 | |
| }, | |
| "dbs": { | |
| ":node": "DatabaseServer-301", | |
| ":ip": "192.168.33.31", | |
| ":host": "dbs.server-301", | |
| "ports": [ | |
| { | |
| ":host": 2202, | |
| ":guest": 22, | |
| ":id": "ssh" | |
| }, | |
| { | |
| ":host": 1529, | |
| ":guest": 1529, | |
| ":id": "xe-db" | |
| }, | |
| { | |
| ":host": 8380, | |
| ":guest": 8380, | |
| ":id": "xe-listen" | |
| } | |
| ], | |
| ":memory": 2048 | |
| }, | |
| "web": { | |
| ":node": "WebServer-401", | |
| ":ip": "192.168.33.41", | |
| ":host": "web.server-401", | |
| "ports": [ | |
| { | |
| ":host": 2203, | |
| ":guest": 22, | |
| ":id": "ssh" | |
| }, | |
| { | |
| ":host": 4756, | |
| ":guest": 4756, | |
| ":id": "apache" | |
| } | |
| ], | |
| ":memory": 1024 | |
| } | |
| } | |
| } |
Next, is the Chef-specific JSON configuration file, containing Chef configuration information common to all the VMs.
| { | |
| "chef": { | |
| ":chef_server_url": "https://api.opscode.com/organizations/my-organization", | |
| ":client_key_path": "/etc/chef/my-client.pem", | |
| ":environment": "my-environment", | |
| ":provisioning_path": "/etc/chef", | |
| ":validation_client_name": "my-client", | |
| ":validation_key_path": "~/.chef/my-client.pem" | |
| } | |
| } |
Lastly, the Vagrantfile, which loads both configuration files. The Vagrantfile instructs Vagrant to loop through all nodes in the nodes.json file, provisioning VMs for each node. Vagrant then uses the chef.json file to further configure the VMs.
The environment and node configuration items in the chef.json reference an actual Chef Environment and Chef Nodes. They are both part of a Chef Organization, which is configured within a Hosted Chef account.
| # -*- mode: ruby -*- | |
| # vi: set ft=ruby : | |
| # Multi-VM Configuration: Builds Web, Application, and Database Servers using JSON config file | |
| # Configures VMs based on Hosted Chef Server defined Environment and Node (vs. Roles) | |
| # Author: Gary A. Stafford | |
| # read vm and chef configurations from JSON files | |
| nodes_config = (JSON.parse(File.read("nodes.json")))['nodes'] | |
| chef_config = (JSON.parse(File.read("chef.json")))['chef'] | |
| VAGRANTFILE_API_VERSION = "2" | |
| Vagrant.require_plugin "vagrant-omnibus" | |
| Vagrant.configure(VAGRANTFILE_API_VERSION) do |config| | |
| config.vm.box = "vagrant-oracle-vm-saucy64" | |
| config.vm.box_url = "http://cloud-images.ubuntu.com/vagrant/saucy/current/saucy-server-cloudimg-amd64-vagrant-disk1.box" | |
| config.omnibus.chef_version = :latest | |
| nodes_config.each do |node| | |
| node_name = node[0] # name of node | |
| node_values = node[1] # content of node | |
| config.vm.define node_name do |config| | |
| # configures all forwarding ports in JSON array | |
| ports = node_values['ports'] | |
| ports.each do |port| | |
| config.vm.network :forwarded_port, | |
| host: port[':host'], | |
| guest: port[':guest'], | |
| id: port[':id'] | |
| end | |
| config.vm.hostname = node_values[':node'] | |
| config.vm.network :private_network, ip: node_values[':ip'] | |
| # syncs local repository of large third-party installer files (quicker than downloading each time) | |
| config.vm.synced_folder "#{ENV['HOME']}/Documents/git_repos/chef-artifacts", "/vagrant" | |
| config.vm.provider :virtualbox do |vb| | |
| vb.customize ["modifyvm", :id, "--memory", node_values[':memory']] | |
| vb.customize ["modifyvm", :id, "--name", node_values[':node']] | |
| end | |
| # chef configuration section | |
| config.vm.provision :chef_client do |chef| | |
| chef.environment = chef_config[':environment'] | |
| chef.provisioning_path = chef_config[':provisioning_path'] | |
| chef.chef_server_url = chef_config[':chef_server_url'] | |
| chef.validation_key_path = chef_config[':validation_key_path'] | |
| chef.node_name = node_values[':node'] | |
| chef.validation_client_name = chef_config[':validation_client_name'] | |
| chef.client_key_path = chef_config[':client_key_path'] | |
| end | |
| end | |
| end | |
| end |
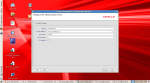
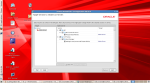
Each VM has a varying number of ports it needs to configue and forward. To accomplish this, the Vagrantfile not only loops through the each node, it also loops through each port configuration object it finds within the node object. Shown below is the Database Server VM within VirtualBox, containing three forwarding ports.
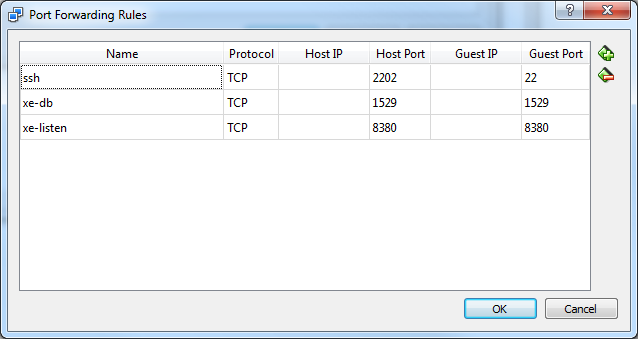
VirtualBox Port Forwarding Rules
In addition to the gists above, this repository on GitHub contains a complete copy of all the code used in the post.
The Results
Running the ‘vagrant up’ command will provision all three individually configured VMs. Once created and running in VirtualBox, Chef further configures the VMs with the necessary settings and applications specific to each server’s purposes. You can just as easily create 10, 100, or 1,000 VMs using this same process.
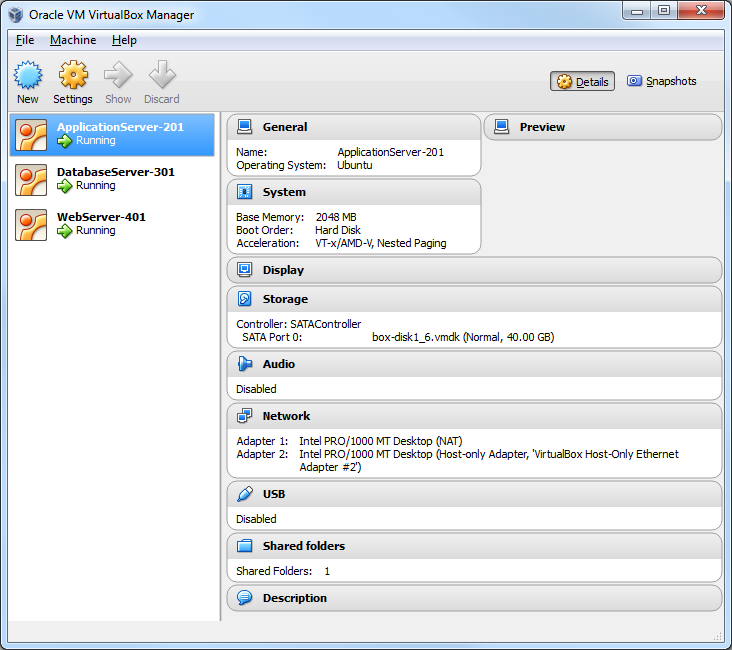
VirtualBox View of Multiple Virtual Machines
.
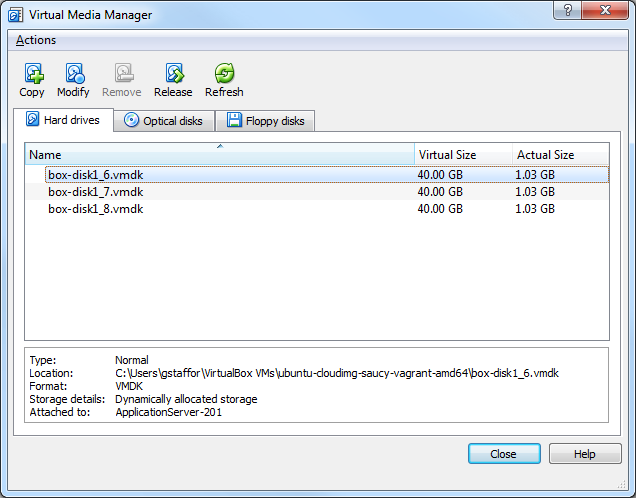
Virtual Media Manager View of VMs
Helpful Links
Dynamically Allocated Storage Issues with Ubuntu’s Cloud Images
Posted by Gary A. Stafford in Build Automation, Enterprise Software Development on December 22, 2013

Background
According to Canonical, ‘Ubuntu Cloud Images are pre-installed disk images that have been customized by Ubuntu engineering to run on cloud-platforms such as Amazon EC2, Openstack, Windows and LXC’. Ubuntu also disk images, or ‘boxes’, built specifically for Vagrant and VirtualBox. Boxes, according to Vagrant, ‘are the skeleton from which Vagrant machines are constructed. They are portable files which can be used by others on any platform that runs Vagrant to bring up a working environment‘. Ubuntu’s images are very popular with Vagrant users to build their VMs.
Assuming you have VirtualBox and Vagrant installed on your Windows, Mac OS X, or Linux system, with a few simple commands, ‘vagrant add box…’, ‘vagrant init…’, and ‘vagrant up’, you can provision a VM from one of these boxes.
Dynamically Allocated Storage
The Ubuntu Cloud Images (boxes), are Virtual Machine Disk (VMDK) format files. These VMDK files are configured for dynamically allocated storage, with a virtual size of 40 GB. That means the VMDK format file should grow to an actual size of 40 GB, as files are added. According to VirtualBox, the VM ‘will initially be very small and not occupy any space for unused virtual disk sectors, but will grow every time a disk sector is written to for the first time, until the drive reaches the maximum capacity chosen when the drive was created’.
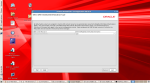
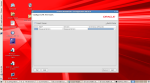
To illustrate dynamically allocated storage, below are three freshly provisioned VirtualBox virtual machines (VM), on three different hosts, all with different operating systems. One VM is hosted on Windows 7 Enterprise, another on Ubuntu 13.10 Desktop Edition, and the last on Mac OS X 10.6.8. The VMs were all created with Vagrant from the official Ubuntu Server 13.10 (Saucy Salamander) cloud images. The Windows and Ubuntu hosts used the 64-bit version. The Mac OS X host used the 32-bit version. According to VirtualBox Manager, on all three host platforms, the virtual size of the VMs is 40 GB and the actual size is about 1 GB.
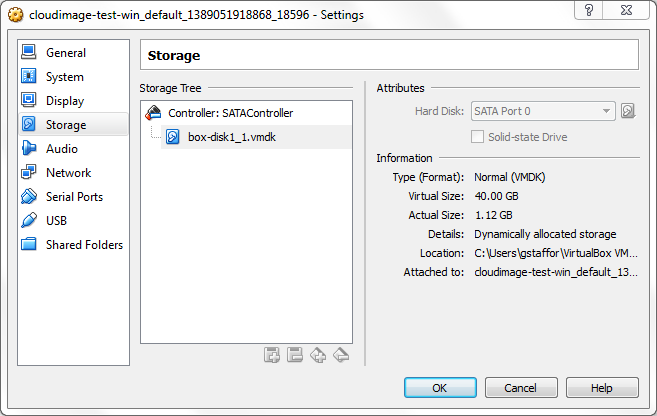
VirtualBox Storage Settings on Windows Host
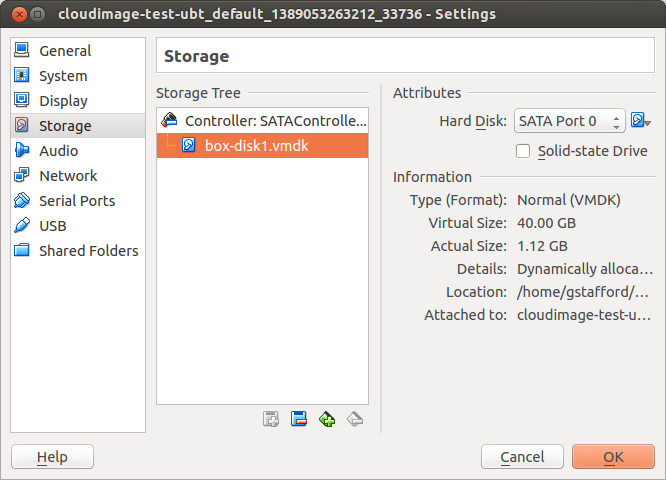
VirtualBox Storage Settings on Ubuntu Host
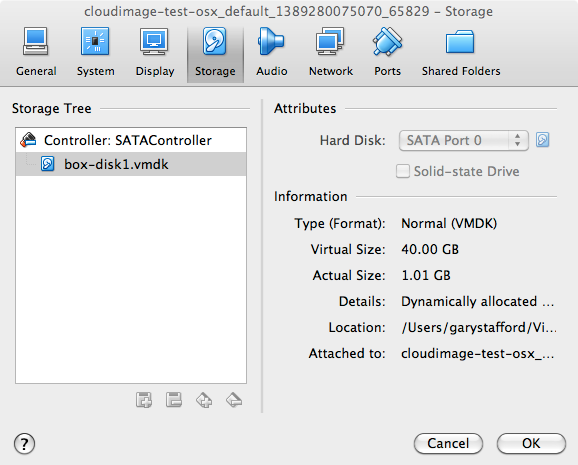
VirtualBox Storage Settings on Mac OS X Host
So What’s the Problem?
After a significant amount of troubleshooting Chef recipe problems on two different Ubuntu-hosted VMs, the issue with the cloud images became painfully clear. Other than a single (seemingly charmed) Windows host, none of the VMs I tested on Windows-, Ubuntu-, and Mac OS X-hosts would expand beyond 4 GB. Below is the file system disk space usage report from four host’s VMs. All four were created with the most current version of Vagrant (1.4.1), and managed with the most current version of VirtualBox (4.3.6.x).
Windows-hosted 64-bit Cloud Image VM #1:
vagrant@vagrant-ubuntu-saucy-64:/tmp$ df -hT
Filesystem     Type      Size  Used Avail Use% Mounted on
/dev/sda1      ext4       40G  1.1G   37G   3% /
none           tmpfs     4.0K     0  4.0K   0% /sys/fs/cgroup
udev           devtmpfs  241M   12K  241M   1% /dev
tmpfs          tmpfs      50M  336K   49M   1% /run
none           tmpfs     5.0M     0  5.0M   0% /run/lock
none           tmpfs     246M     0  246M   0% /run/shm
none           tmpfs     100M     0  100M   0% /run/user
/vagrant       vboxsf    233G  196G   38G  85% /vagrant
Windows-hosted 32-bit Cloud Image VM #2:
vagrant@vagrant-ubuntu-saucy-32:~$ df -hT
Filesystem     Type      Size  Used Avail Use% Mounted on
/dev/sda1      ext4      4.0G 1012M  2.8G  27% /
none           tmpfs     4.0K     0  4.0K   0% /sys/fs/cgroup
udev           devtmpfs  245M  8.0K  245M   1% /dev
tmpfs          tmpfs      50M  336K   50M   1% /run
none           tmpfs     5.0M  4.0K  5.0M   1% /run/lock
none           tmpfs     248M     0  248M   0% /run/shm
none           tmpfs     100M     0  100M   0% /run/user
/vagrant       vboxsf    932G  209G  724G  23% /vagrant
Ubuntu-hosted 64-bit Cloud Image VM:
vagrant@vagrant-ubuntu-saucy-64:~$ df -hT
Filesystem     Type      Size  Used Avail Use% Mounted on
/dev/sda1      ext4      4.0G  1.1G  2.7G  28% /
none           tmpfs     4.0K     0  4.0K   0% /sys/fs/cgroup
udev           devtmpfs  241M  8.0K  241M   1% /dev
tmpfs          tmpfs      50M  336K   49M   1% /run
none           tmpfs     5.0M     0  5.0M   0% /run/lock
none           tmpfs     246M     0  246M   0% /run/shm
none           tmpfs     100M     0  100M   0% /run/user
/vagrant       vboxsf     74G   65G  9.1G  88% /vagrant
Mac OS X-hosted 32-bit Cloud Image VM:
vagrant@vagrant-ubuntu-saucy-32:~$ df -hT
Filesystem     Type      Size  Used Avail Use% Mounted on
/dev/sda1      ext4      4.0G 1012M  2.8G  27% /
none           tmpfs     4.0K     0  4.0K   0% /sys/fs/cgroup
udev           devtmpfs  245M   12K  245M   1% /dev
tmpfs          tmpfs      50M  336K   50M   1% /run
none           tmpfs     5.0M     0  5.0M   0% /run/lock
none           tmpfs     248M     0  248M   0% /run/shm
none           tmpfs     100M     0  100M   0% /run/user
/vagrant       vboxsf    149G   71G   79G  48% /vagrant
On the first Windows-hosted VM (the only host that actually worked), the virtual SCSI disk device (sda1), formatted ‘ext4‘, had a capacity of 40 GB. But, on the other three hosts, the same virtual device only had a capacity of 4 GB. I tested the various 32- and 64-bit Ubuntu Server 12.10 (Quantal Quetzal), 13.04 (Raring Ringtail), and 13.10 (Saucy Salamander) cloud images. They all exhibited the same issue. However, the Ubuntu 12.04.3 LTS (Precise Pangolin) worked fine on all three host OS systems.
To prove the issue was specifically with Ubuntu’s cloud images, I also tested boxes from Vagrant’s own repository, as well as other third-party providers. They all worked as expected, with no storage discrepancies. This was suggested in the only post I found on this issue, from StackExchange.
To confirm the Ubuntu-hosted VM will not expand beyond 4 GB, I also created a few multi-gigabyte files on each VM, totally 4 GB. The VMs virtual drive would not expand beyond 4 GB limit to accommodate the new files, as demonstrated below on a Ubuntu-hosted VM:
vagrant@vagrant-ubuntu-saucy-64:~$ dd if=/dev/zero of=/tmp/big_file2.bin bs=1M count=2000
dd: writing '/tmp/big_file2.bin': No space left on device
742+0 records in
741+0 records out
777560064 bytes (778 MB) copied, 1.81098 s, 429 MB/s

vagrant@vagrant-ubuntu-saucy-64:~$ df -hT
Filesystem     Type      Size  Used Avail Use% Mounted on
/dev/sda1      ext4      4.0G  3.7G  196K 100% /
The exact cause eludes me, but I tend to think the cloud images are the issue. I know they are capable of working, since the Ubuntu 12.04.3 cloud images expand to 40 GB, but the three most recent releases are limited to 4 GB. Whatever the cause, it’s a significant problem. Imagine you’ve provisioned a 100 or a 1,000 server nodes on your network from any of these cloud images, expecting them to grow to 40 GB, but really only having 10% of that potential. Worse, they have live production data on them, and suddenly run out of space.
Test Results
Below is the complete shell sessions from three hosts.
Windows-hosted 64-bit Cloud Image VM #1:
| gstafford@windows-host: ~/Documents/GitHub | |
| $ vagrant --version | |
| Vagrant 1.4.1 | |
| gstafford@windows-host: /c/Program Files/Oracle/VirtualBox | |
| $ VBoxManage.exe --version | |
| 4.3.6r91406 | |
| gstafford@windows-host: ~/Documents/GitHub | |
| $ mkdir cloudimage-test-win | |
| gstafford@windows-host: ~/Documents/GitHub | |
| $ cd cloudimage-test-win | |
| gstafford@windows-host: ~/Documents/GitHub/cloudimage-test-win | |
| $ vagrant init | |
| A `Vagrantfile` has been placed in this directory. You are now | |
| ready to `vagrant up` your first virtual environment! Please read | |
| the comments in the Vagrantfile as well as documentation on | |
| `vagrantup.com` for more information on using Vagrant. | |
| gstafford@windows-host: ~/Documents/GitHub/cloudimage-test-win | |
| $ vagrant up | |
| Bringing machine 'default' up with 'virtualbox' provider... | |
| [default] Importing base box 'vagrant-vm-saucy-server'... | |
| [default] Matching MAC address for NAT networking... | |
| [default] Setting the name of the VM... | |
| [default] Clearing any previously set forwarded ports... | |
| [default] Fixed port collision for 22 => 2222. Now on port 2200. | |
| [default] Clearing any previously set network interfaces... | |
| [default] Preparing network interfaces based on configuration... | |
| [default] Forwarding ports... | |
| [default] -- 22 => 2200 (adapter 1) | |
| [default] Booting VM... | |
| [default] Waiting for machine to boot. This may take a few minutes... | |
| DL is deprecated, please use Fiddle | |
| [default] Machine booted and ready! | |
| [default] The guest additions on this VM do not match the installed version of | |
| VirtualBox! In most cases this is fine, but in rare cases it can | |
| cause things such as shared folders to not work properly. If you see | |
| shared folder errors, please make sure the guest additions within the | |
| virtual machine match the version of VirtualBox you have installed on | |
| your host and reload your VM. | |
| Guest Additions Version: 4.2.16 | |
| VirtualBox Version: 4.3 | |
| [default] Mounting shared folders... | |
| [default] -- /vagrant | |
| gstafford@windows-host: ~/Documents/GitHub/cloudimage-test-win | |
| $ vagrant ssh | |
| Welcome to Ubuntu 13.10 (GNU/Linux 3.11.0-14-generic x86_64) | |
| * Documentation: https://help.ubuntu.com/ | |
| System information disabled due to load higher than 1.0 | |
| Get cloud support with Ubuntu Advantage Cloud Guest: | |
| http://www.ubuntu.com/business/services/cloud | |
| vagrant@vagrant-ubuntu-saucy-64:/tmp$ df -hT | |
| Filesystem Type Size Used Avail Use% Mounted on | |
| /dev/sda1 ext4 40G 1.1G 37G 3% / | |
| none tmpfs 4.0K 0 4.0K 0% /sys/fs/cgroup | |
| udev devtmpfs 241M 12K 241M 1% /dev | |
| tmpfs tmpfs 50M 336K 49M 1% /run | |
| none tmpfs 5.0M 0 5.0M 0% /run/lock | |
| none tmpfs 246M 0 246M 0% /run/shm | |
| none tmpfs 100M 0 100M 0% /run/user | |
| /vagrant vboxsf 233G 196G 38G 85% /vagrant | |
| vagrant@vagrant-ubuntu-saucy-64:/tmp$ dd if=/dev/zero of=/tmp/big_file1.bin bs=1M count=2000 | |
| 2000+0 records in | |
| 2000+0 records out | |
| 2097152000 bytes (2.1 GB) copied, 5.11716 s, 410 MB/s | |
| vagrant@vagrant-ubuntu-saucy-64:/tmp$ dd if=/dev/zero of=/tmp/big_file2.bin bs=1M count=2000 | |
| 2000+0 records in | |
| 2000+0 records out | |
| 2097152000 bytes (2.1 GB) copied, 7.78449 s, 269 MB/s | |
| vagrant@vagrant-ubuntu-saucy-64:/tmp$ df -hT | |
| Filesystem Type Size Used Avail Use% Mounted on | |
| /dev/sda1 ext4 40G 5.0G 33G 14% / | |
| none tmpfs 4.0K 0 4.0K 0% /sys/fs/cgroup | |
| udev devtmpfs 241M 12K 241M 1% /dev | |
| tmpfs tmpfs 50M 336K 49M 1% /run | |
| none tmpfs 5.0M 0 5.0M 0% /run/lock | |
| none tmpfs 246M 0 246M 0% /run/shm | |
| none tmpfs 100M 0 100M 0% /run/user | |
| /vagrant vboxsf 233G 196G 38G 85% /vagrant | |
| vagrant@vagrant-ubuntu-saucy-64:/tmp$ |
Ubuntu-hosted 64-bit Cloud Image VM:
| gstafford@ubuntu-host:~/GitHub/cloudimage-test-ubt$ vagrant --version | |
| Vagrant 1.4.1 | |
| gstafford@ubuntu-host:/usr/bin$ vboxmanage --version | |
| 4.3.6r91406 | |
| gstafford@ubuntu-host:~/GitHub$ mkdir cloudimage-test-ubt | |
| gstafford@ubuntu-host:~/GitHub$ cd cloudimage-test-ubt/ | |
| gstafford@ubuntu-host:~/GitHub/cloudimage-test-ubt$ vagrant init | |
| A `Vagrantfile` has been placed in this directory. You are now | |
| ready to `vagrant up` your first virtual environment! Please read | |
| the comments in the Vagrantfile as well as documentation on | |
| `vagrantup.com` for more information on using Vagrant. | |
| gstafford@ubuntu-host:~/GitHub/cloudimage-test-ubt$ vagrant up | |
| Bringing machine 'default' up with 'virtualbox' provider... | |
| [default] Box 'vagrant-vm-saucy-server' was not found. Fetching box from specified URL for | |
| the provider 'virtualbox'. Note that if the URL does not have | |
| a box for this provider, you should interrupt Vagrant now and add | |
| the box yourself. Otherwise Vagrant will attempt to download the | |
| full box prior to discovering this error. | |
| Downloading box from URL: file:/home/gstafford/GitHub/cloudimage-test-ubt/saucy-server-cloudimg-amd64-vagrant-disk1.box | |
| Extracting box...te: 23.8M/s, Estimated time remaining: 0:00:01)) | |
| Successfully added box 'vagrant-vm-saucy-server' with provider 'virtualbox'! | |
| [default] Importing base box 'vagrant-vm-saucy-server'... | |
| [default] Matching MAC address for NAT networking... | |
| [default] Setting the name of the VM... | |
| [default] Clearing any previously set forwarded ports... | |
| [default] Fixed port collision for 22 => 2222. Now on port 2200. | |
| [default] Clearing any previously set network interfaces... | |
| [default] Preparing network interfaces based on configuration... | |
| [default] Forwarding ports... | |
| [default] -- 22 => 2200 (adapter 1) | |
| [default] Booting VM... | |
| [default] Waiting for machine to boot. This may take a few minutes... | |
| [default] Machine booted and ready! | |
| [default] The guest additions on this VM do not match the installed version of | |
| VirtualBox! In most cases this is fine, but in rare cases it can | |
| cause things such as shared folders to not work properly. If you see | |
| shared folder errors, please make sure the guest additions within the | |
| virtual machine match the version of VirtualBox you have installed on | |
| your host and reload your VM. | |
| Guest Additions Version: 4.2.16 | |
| VirtualBox Version: 4.3 | |
| [default] Mounting shared folders... | |
| [default] -- /vagrant | |
| gstafford@ubuntu-host:~/GitHub/cloudimage-test-ubt$ vagrant ssh | |
| Welcome to Ubuntu 13.10 (GNU/Linux 3.11.0-15-generic x86_64) | |
| * Documentation: https://help.ubuntu.com/ | |
| System information disabled due to load higher than 1.0 | |
| Get cloud support with Ubuntu Advantage Cloud Guest: | |
| http://www.ubuntu.com/business/services/cloud | |
| _____________________________________________________________________ | |
| WARNING! Your environment specifies an invalid locale. | |
| This can affect your user experience significantly, including the | |
| ability to manage packages. You may install the locales by running: | |
| sudo apt-get install language-pack-en | |
| or | |
| sudo locale-gen en_US.UTF-8 | |
| To see all available language packs, run: | |
| apt-cache search "^language-pack-[a-z][a-z]$" | |
| To disable this message for all users, run: | |
| sudo touch /var/lib/cloud/instance/locale-check.skip | |
| _____________________________________________________________________ | |
| vagrant@vagrant-ubuntu-saucy-64:~$ df -hT | |
| Filesystem Type Size Used Avail Use% Mounted on | |
| /dev/sda1 ext4 4.0G 1.1G 2.7G 28% / | |
| none tmpfs 4.0K 0 4.0K 0% /sys/fs/cgroup | |
| udev devtmpfs 241M 8.0K 241M 1% /dev | |
| tmpfs tmpfs 50M 336K 49M 1% /run | |
| none tmpfs 5.0M 0 5.0M 0% /run/lock | |
| none tmpfs 246M 0 246M 0% /run/shm | |
| none tmpfs 100M 0 100M 0% /run/user | |
| /vagrant vboxsf 74G 65G 9.1G 88% /vagrant | |
| vagrant@vagrant-ubuntu-saucy-64:~$ dd if=/dev/zero of=/tmp/big_file1.bin bs=1M count=2000 | |
| 2000+0 records in | |
| 2000+0 records out | |
| 2097152000 bytes (2.1 GB) copied, 4.72951 s, 443 MB/s | |
| vagrant@vagrant-ubuntu-saucy-64:~$ dd if=/dev/zero of=/tmp/big_file2.bin bs=1M count=2000 | |
| dd: writing '/tmp/big_file2.bin': No space left on device | |
| 742+0 records in | |
| 741+0 records out | |
| 777560064 bytes (778 MB) copied, 1.81098 s, 429 MB/s | |
| vagrant@vagrant-ubuntu-saucy-64:~$ df -hT | |
| Filesystem Type Size Used Avail Use% Mounted on | |
| /dev/sda1 ext4 4.0G 3.7G 196K 100% / | |
| none tmpfs 4.0K 0 4.0K 0% /sys/fs/cgroup | |
| udev devtmpfs 241M 8.0K 241M 1% /dev | |
| tmpfs tmpfs 50M 336K 49M 1% /run | |
| none tmpfs 5.0M 0 5.0M 0% /run/lock | |
| none tmpfs 246M 0 246M 0% /run/shm | |
| none tmpfs 100M 0 100M 0% /run/user | |
| /vagrant vboxsf 74G 65G 9.1G 88% /vagrant | |
| vagrant@vagrant-ubuntu-saucy-64:~$ |
Mac OS X-hosted 32-bit Cloud Image VM:
| gstafford@mac-development:cloudimage-test-osx $ vagrant box add saucycloud32 http://cloud-images.ubuntu.com/vagrant/saucy/current/saucy-server-cloudimg-i386-vagrant-disk1.box | |
| Downloading box from URL: http://cloud-images.ubuntu.com/vagrant/saucy/current/saucy-server-cloudimg-i386-vagrant-disk1.box | |
| Extracting box...te: 1383k/s, Estimated time remaining: 0:00:01) | |
| Successfully added box 'saucycloud32' with provider 'virtualbox'! | |
| gstafford@mac-development:cloudimage-test-osx $ vagrant init saucycloud32 | |
| A `Vagrantfile` has been placed in this directory. You are now | |
| ready to `vagrant up` your first virtual environment! Please read | |
| the comments in the Vagrantfile as well as documentation on | |
| `vagrantup.com` for more information on using Vagrant. | |
| gstafford@mac-development:cloudimage-test-osx $ vagrant up | |
| Bringing machine 'default' up with 'virtualbox' provider... | |
| [default] Importing base box 'saucycloud32'... | |
| [default] Matching MAC address for NAT networking... | |
| [default] Setting the name of the VM... | |
| [default] Clearing any previously set forwarded ports... | |
| [default] Clearing any previously set network interfaces... | |
| [default] Preparing network interfaces based on configuration... | |
| [default] Forwarding ports... | |
| [default] -- 22 => 2222 (adapter 1) | |
| [default] Booting VM... | |
| [default] Waiting for machine to boot. This may take a few minutes... | |
| [default] Machine booted and ready! | |
| [default] The guest additions on this VM do not match the installed version of | |
| VirtualBox! In most cases this is fine, but in rare cases it can | |
| prevent things such as shared folders from working properly. If you see | |
| shared folder errors, please make sure the guest additions within the | |
| virtual machine match the version of VirtualBox you have installed on | |
| your host and reload your VM. | |
| Guest Additions Version: 4.2.16 | |
| VirtualBox Version: 4.3 | |
| [default] Mounting shared folders... | |
| [default] -- /vagrant | |
| gstafford@mac-development:cloudimage-test-osx $ vagrant ssh | |
| Welcome to Ubuntu 13.10 (GNU/Linux 3.11.0-15-generic i686) | |
| * Documentation: https://help.ubuntu.com/ | |
| System information disabled due to load higher than 1.0 | |
| Get cloud support with Ubuntu Advantage Cloud Guest: | |
| http://www.ubuntu.com/business/services/cloud | |
| vagrant@vagrant-ubuntu-saucy-32:~$ df -hT | |
| Filesystem Type Size Used Avail Use% Mounted on | |
| /dev/sda1 ext4 4.0G 1012M 2.8G 27% / | |
| none tmpfs 4.0K 0 4.0K 0% /sys/fs/cgroup | |
| udev devtmpfs 245M 12K 245M 1% /dev | |
| tmpfs tmpfs 50M 336K 50M 1% /run | |
| none tmpfs 5.0M 0 5.0M 0% /run/lock | |
| none tmpfs 248M 0 248M 0% /run/shm | |
| none tmpfs 100M 0 100M 0% /run/user | |
| /vagrant vboxsf 149G 71G 79G 48% /vagrant | |
| vagrant@vagrant-ubuntu-saucy-32:~$ exit | |
| gstafford@mac-development:MacOS$ VBoxManage list vms --long hdds | |
| UUID: ee72161f-25c5-4714-ab28-6ee9929500e8 | |
| Parent UUID: base | |
| State: locked write | |
| Type: normal (base) | |
| Location: /Users/gstafford/VirtualBox VMs/cloudimage-test-osx_default_1389280075070_65829/box-disk1.vmdk | |
| Storage format: VMDK | |
| Format variant: dynamic default | |
| Capacity: 40960 MBytes | |
| Size on disk: 1031 MBytes | |
| In use by VMs: cloudimage-test-osx_default_1389280075070_65829 (UUID: 51df4527-99af-48be-92cd-ad73110be88c) |
Resources
Ubuntu Cloud Images for Vagrant
Fourth Extended Filesystem (ext4)
Similar Issue on StackOverflow
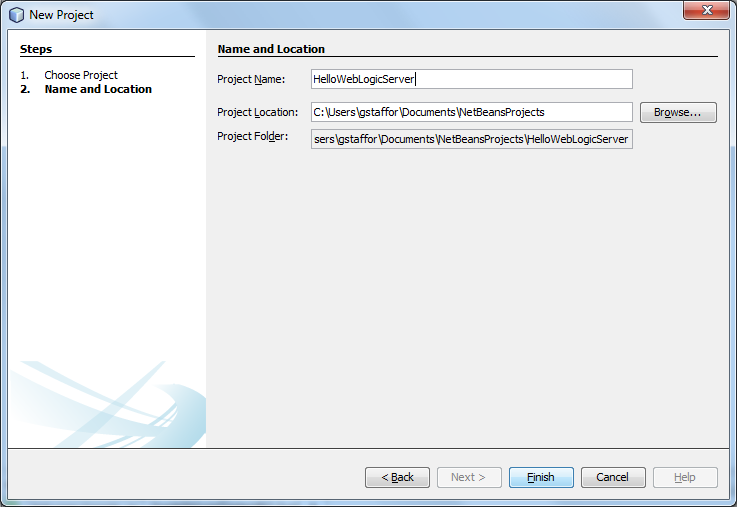
Build a Continuous Deployment System with Maven, Hudson, WebLogic Server, and JUnit
Posted by Gary A. Stafford in Build Automation, DevOps, Enterprise Software Development, Java Development, Software Development on May 31, 2013
Build an automated testing, continuous integration, and continuous deployment system, using Maven, Hudson, WebLogic Server, JUnit, and NetBeans. Developed with Oracle’s Pre-Built Enterprise Java Development VM. Download the complete source code from Dropbox and on GitHub.
Introduction
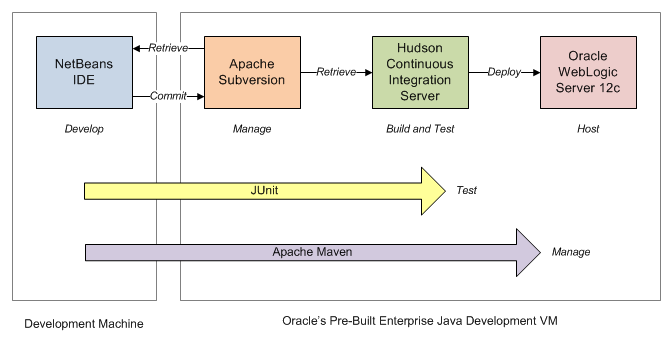
In this post, we will build a basic automated testing, continuous integration, and continuous deployment system, using Oracle’s Pre-Built Enterprise Java Development VM. The primary goal of the system is to automatically compile, test, and deploy a simple Java EE web application to a test environment. As this post will demonstrate, the key to a successful system is not a single application, but the effective integration of all the system’s applications into a well-coordinated and consistent workflow.
Building system such as this can be complex and time-consuming. However, Oracle’s Pre-Built Enterprise Java Development VM already has all the components we need. The Oracle VM includes NetBeans IDE for development, Apache Subversion for version control, Hudson Continuous Integration (CI) Server for build automation, JUnit and Hudson for unit test automation, and WebLogic Server for application hosting.
In addition, we will use Apache Maven, also included on the Oracle VM, to help manage our project’s dependencies, as well as the build and deployment process. Overlapping with some of Apache Ant’s build task functionality, Maven is a powerful cross-cutting tool for managing the modern software development projects. This post will only draw upon a small part of Maven’s functionality.
Demonstration Requirements
To save some time, we will use the same WebLogic Server (WLS) domain we built-in the last post, Deploying Applications to WebLogic Server on Oracle’s Pre-Built Development VM. We will also use code from the sample Hello World Java EE web project from that post. If you haven’t already done so, work through the last post’s example, first.
Here is a quick list of requirements for this demonstration:
- Oracle VM
- Oracle’s Pre-Built Enterprise Java Development VM running on current version of Oracle VM VirtualBox (mine: 4.2.12)
- Oracle VM’s has the latest system updates installed (see earlier post for directions)
- WLS domain from last post created and running in Oracle VM
- Credentials supplied with Oracle VM for Hudson (username and password)
- Window’s Development Machine
- Current version of Apache Maven installed and configured (mine: 3.0.5)
- Current version of NetBeans IDE installed and configured (mine: 7.3)
- Optional: Current version of WebLogic Server installed and configured
- All environmental variables properly configured for Maven, Java, WLS, etc. (MW_HOME, M2, etc.)
The Process
The steps involved in this post’s demonstration are as follows:
- Install the WebLogic Maven Plugin into the Oracle VM’s Maven Repositories, as well as the Development machine
- Create a new Maven Web Application Project in NetBeans
- Copy the classes from the Hello World project in the last post to new project
- Create a properties file to store Maven configuration values for the project
- Add the Maven Properties Plugin to the Project’s POM file
- Add the WebLogic Maven Plugin to project’s POM file
- Add JUnit tests and JUnit dependencies to project
- Add a WebLogic Descriptor to the project
- Enable Tunneling on the new WLS domain from the last post
- Build, test, and deploy the project locally in NetBeans
- Add project to Subversion
- Optional: Upgrade existing Hudson 2.2.0 and plugins on the Oracle VM latest 3.x version
- Create and configure new Hudson CI job for the project
- Build the Hudson job to compile, test, and deploy project to WLS
WebLogic Maven Plugin
First, we need to install the WebLogic Maven Plugin (‘weblogic-maven-plugin’) onto both the Development machine’s local Maven Repository and the Oracle VM’s Maven Repository. Installing the plugin will allow us to deploy our sample application from NetBeans and Hudson, using Maven. The weblogic-maven-plugin, a JAR file, is not part of the Maven repository by default. According to Oracle, ‘WebLogic Server provides support for Maven through the provisioning of plug-ins that enable you to perform various operations on WebLogic Server from within a Maven environment. As of this release, there are two separate plug-ins available.’ In this post, we will use the weblogic-maven-plugin, as opposed to the wls-maven-plugin. Again, according to Oracle, the weblogic-maven-plugin “delivered in WebLogic Server 11g Release 1, provides support for deployment operations.”
The best way to understand the plugin install process is by reading the Using the WebLogic Development Maven Plug-In section of the Oracle Fusion Middleware documentation on Developing Applications for Oracle WebLogic Server. It goes into detail on how to install and configure the plugin.
In a nutshell, below is a list of the commands I executed to install the weblogic-maven-plugin version 12.1.1.0 on both my Windows development machine and on my Oracle VM. If you do not have WebLogic Server installed on your development machine, and therefore no access to the plugin, install it into the Maven Repository on the Oracle VM first, then copy the jar file to the development machine and follow the normal install process from that point forward.
On Windows Development Machine:

Installing weblogic-maven-plugin on a Windows Machine
| cd %MW_HOME%/wlserver/server/lib | |
| java -jar wljarbuilder.jar -profile weblogic-maven-plugin | |
| mkdir c:\tmp | |
| copy weblogic-maven-plugin.jar c:\tmp | |
| cd c:\tmp | |
| jar xvf c:\tmp\weblogic-maven-plugin.jar META-INF/maven/com.oracle.weblogic/weblogic-maven-plugin/pom.xml | |
| mvn install:install-file -DpomFile=META-INF/maven/com.oracle.weblogic/weblogic-maven-plugin/pom.xml -Dfile=c:\tmp\weblogic-maven-plugin.jar |
On the Oracle VM:
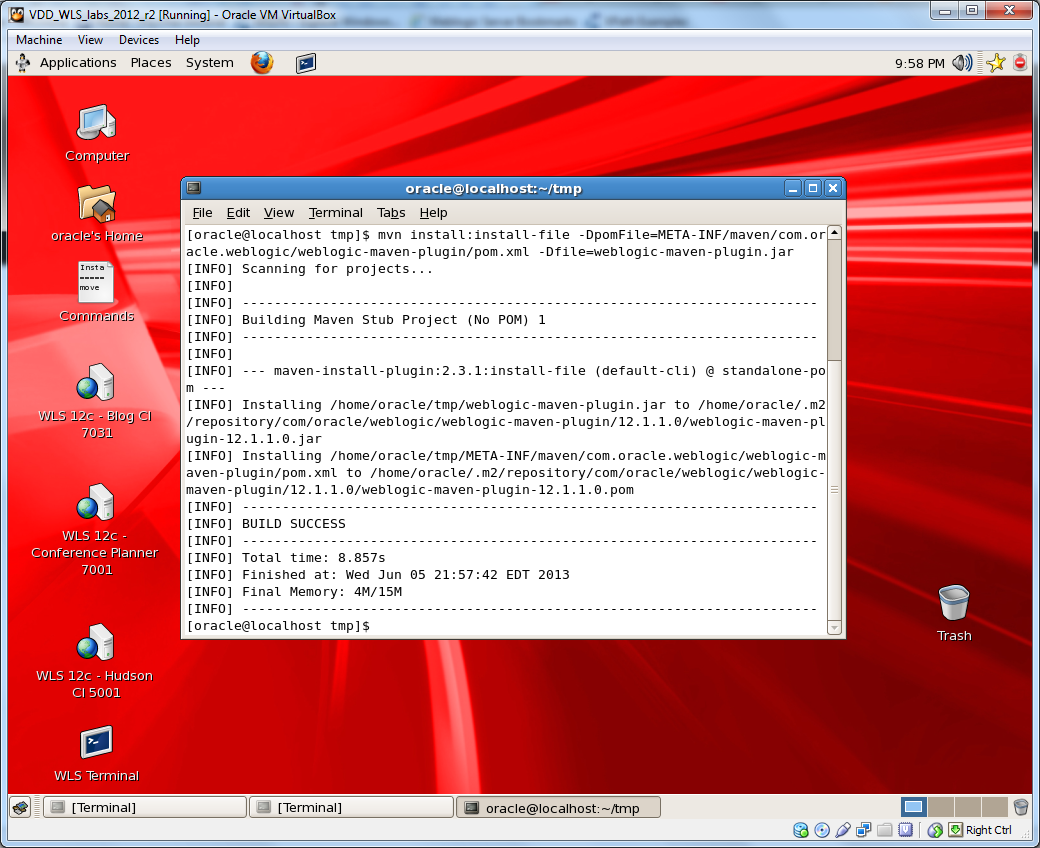
Installing WebLogic Maven Plugin into the Oracle VM
| cd $MW_HOME/wlserver_12.1/server/lib | |
| java -jar wljarbuilder.jar -profile weblogic-maven-plugin | |
| mkdir /home/oracle/tmp | |
| cp weblogic-maven-plugin.jar /home/oracle/tmp | |
| cd /home/oracle/tmp | |
| jar xvf weblogic-maven-plugin.jar META-INF/maven/com.oracle.weblogic/weblogic-maven-plugin/pom.xml | |
| mvn install:install-file -DpomFile=META-INF/maven/com.oracle.weblogic/weblogic-maven-plugin/pom.xml -Dfile=weblogic-maven-plugin.jar |
To test the success of your plugin installation, you can run the following maven command on Windows or Linux:
mvn help:describe -Dplugin=com.oracle.weblogic:weblogic-maven-plugin
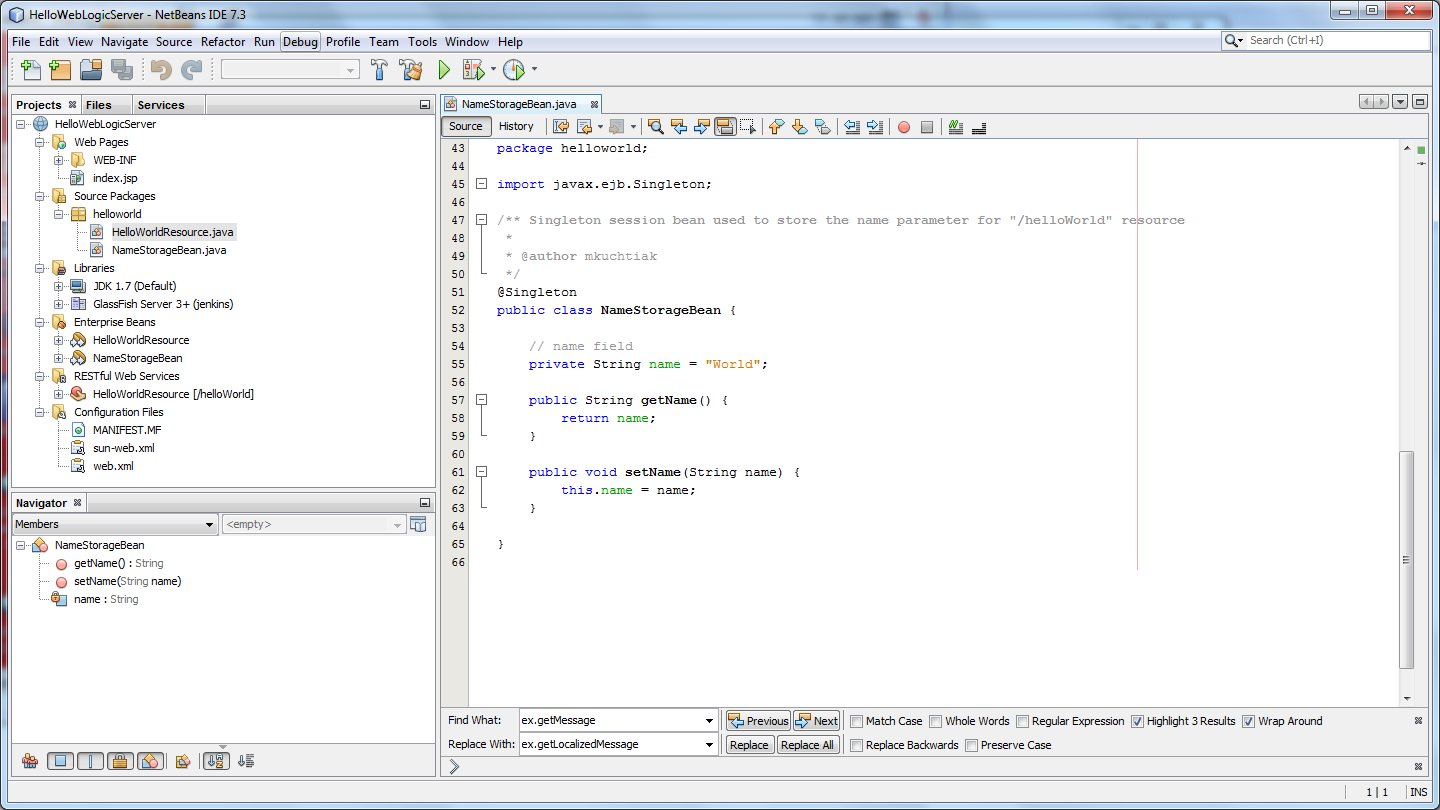
Sample Maven Web Application
Using NetBeans on your development machine, create a new Maven Web Application. For those of you familiar with Maven, the NetBeans’ Maven Web Application project is based on the ‘webapp-javaee6:1.5’ Archetype. NetBeans creates the project by executing a ‘archetype:generate’ Maven Goal. This is seen in the ‘Output’ tab after the project is created.
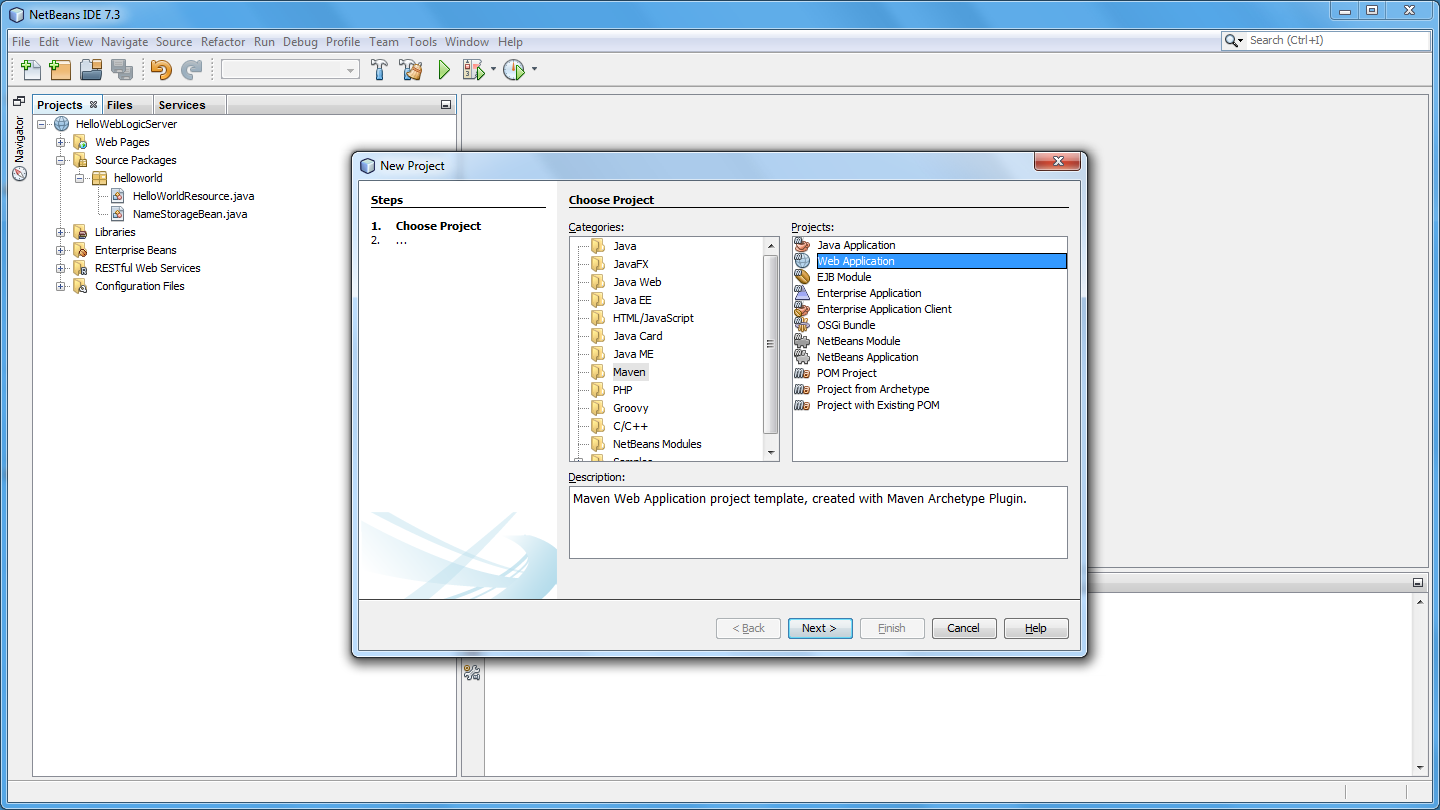
1a – Choose the Maven Web Application Project Type
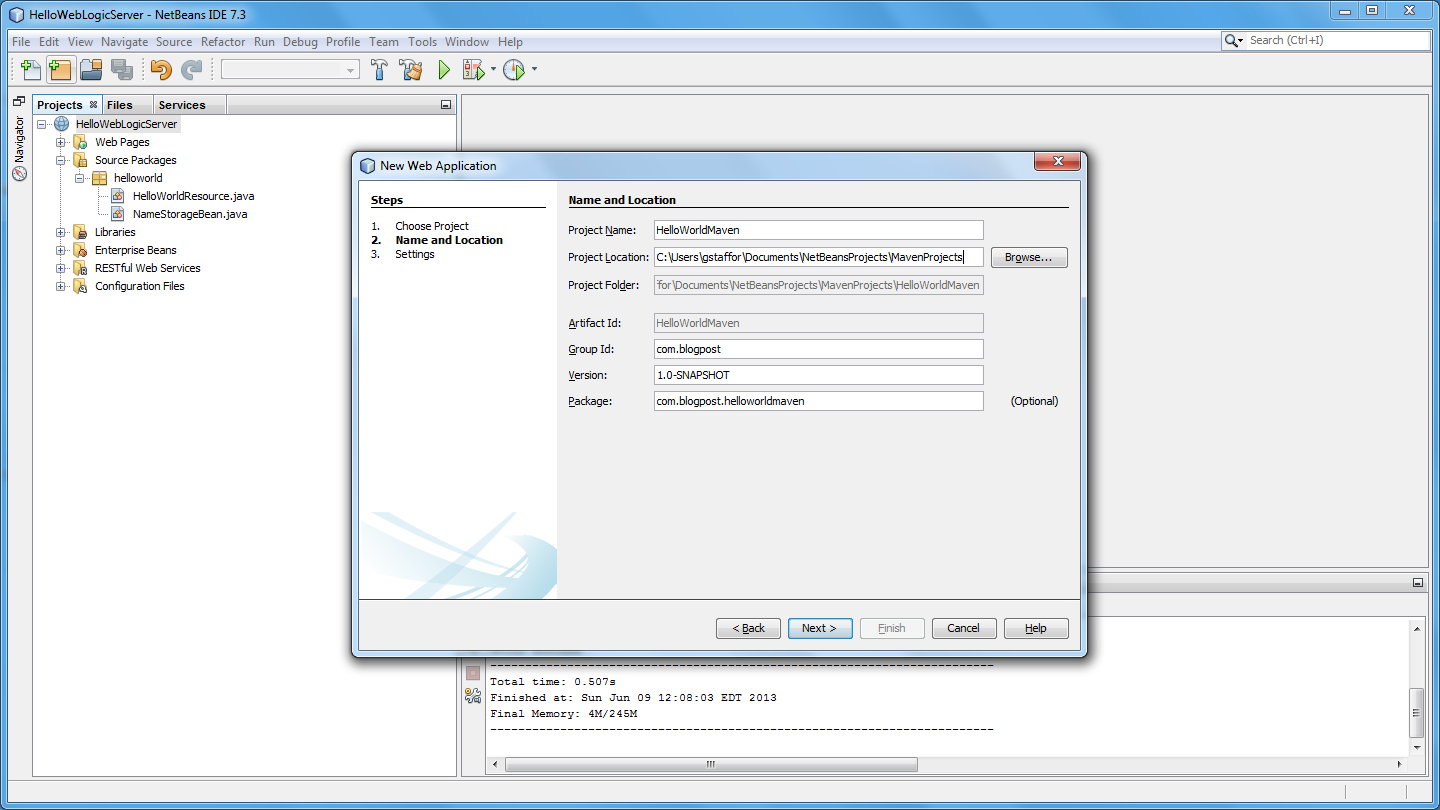
1b – Name and Location of New Project
By default you may have Tomcat and GlassFish as installed options on your system. Unfortunately, NetBeans currently does not have the ability to configure a remote connection to the WLS instance running on the Oracle VM, as I understand. You do not need an instance of WLS installed on your development machine since we are going to use the copy on the Oracle VM. We will use Maven to deploy the project to WLS on the Oracle VM, later in the post.
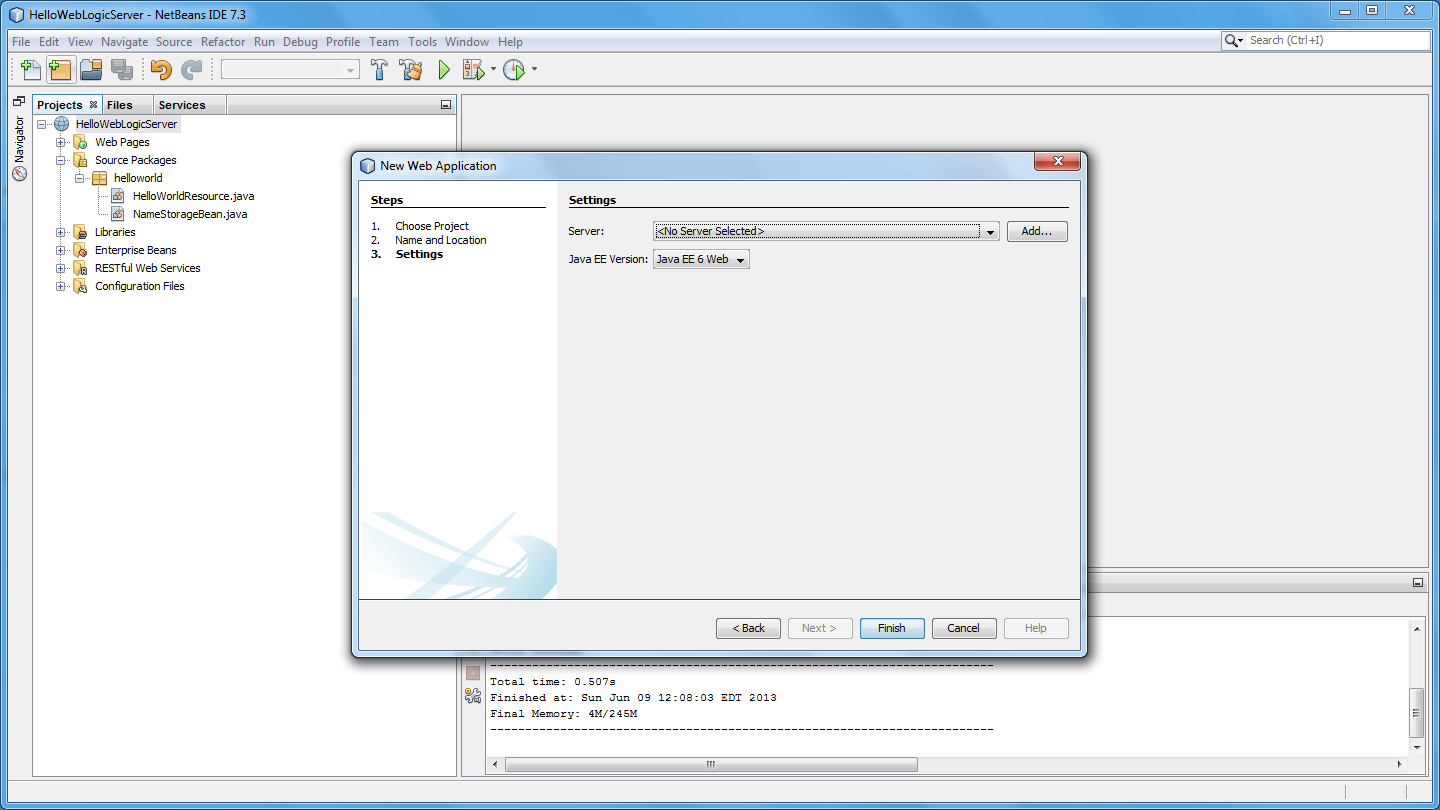
1c – Default Server and Java Settings
1d – New Maven Project in NetBeans
Next, copy the two java class files from the previous blog post’s Hello World project to the new project’s source package. Alternately, download a zipped copy this post’s complete sample code from Dropbox or on GitHub.

2a – Copy Two Class Files from Previous Project
Because we are copying a RESTful web service to our new project, NetBeans will prompt us for some REST resource configuration options. To keep this new example simple, choose the first option and uncheck the Jersey option.
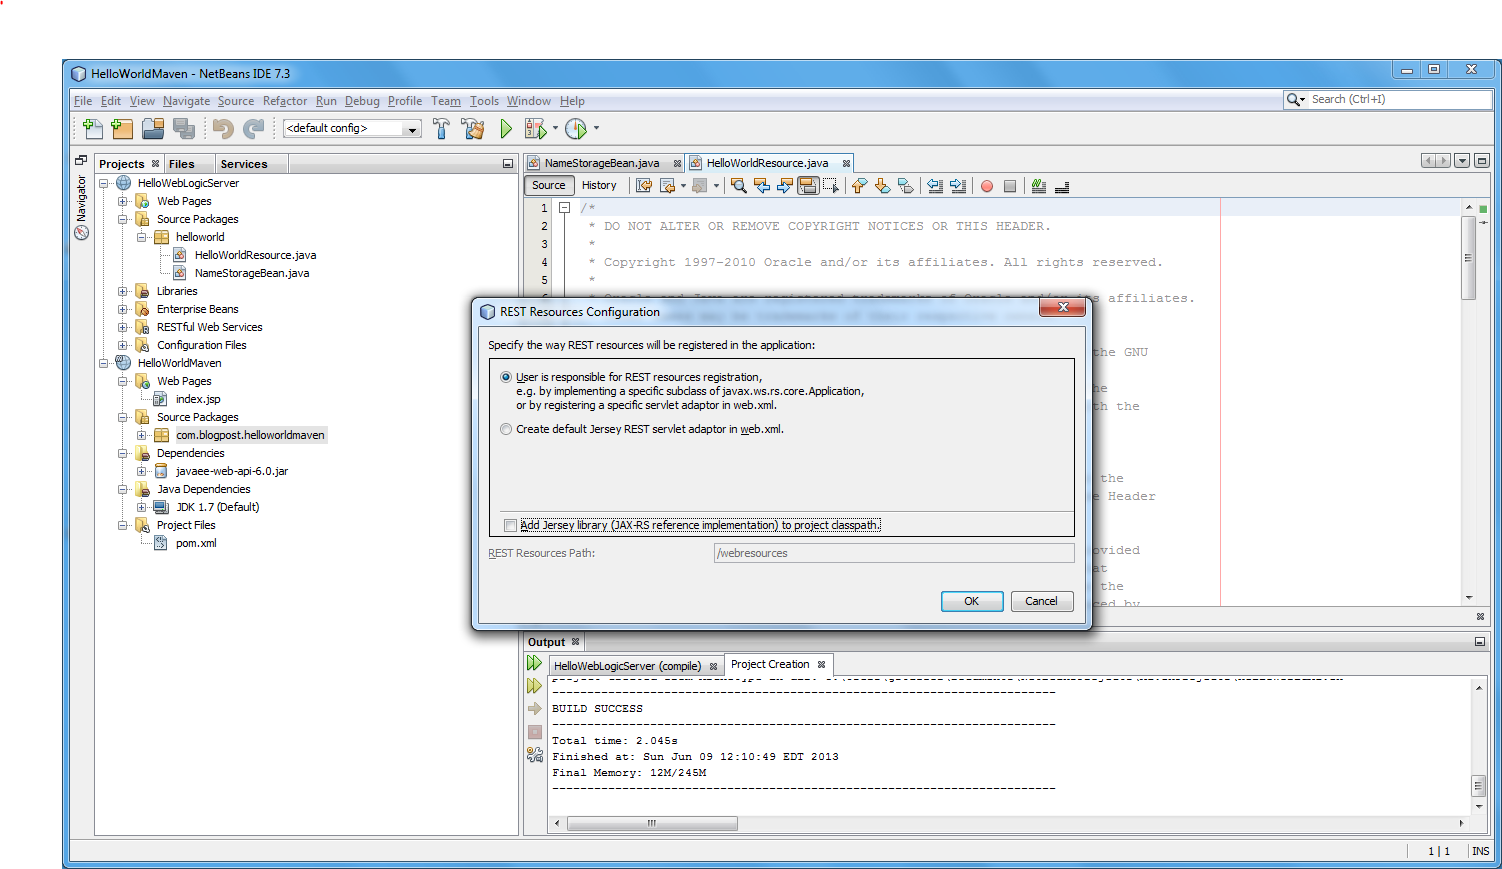
2b – REST Resource Configuration
2c – New Project with Files Copied from Previous Project
JUnit Tests
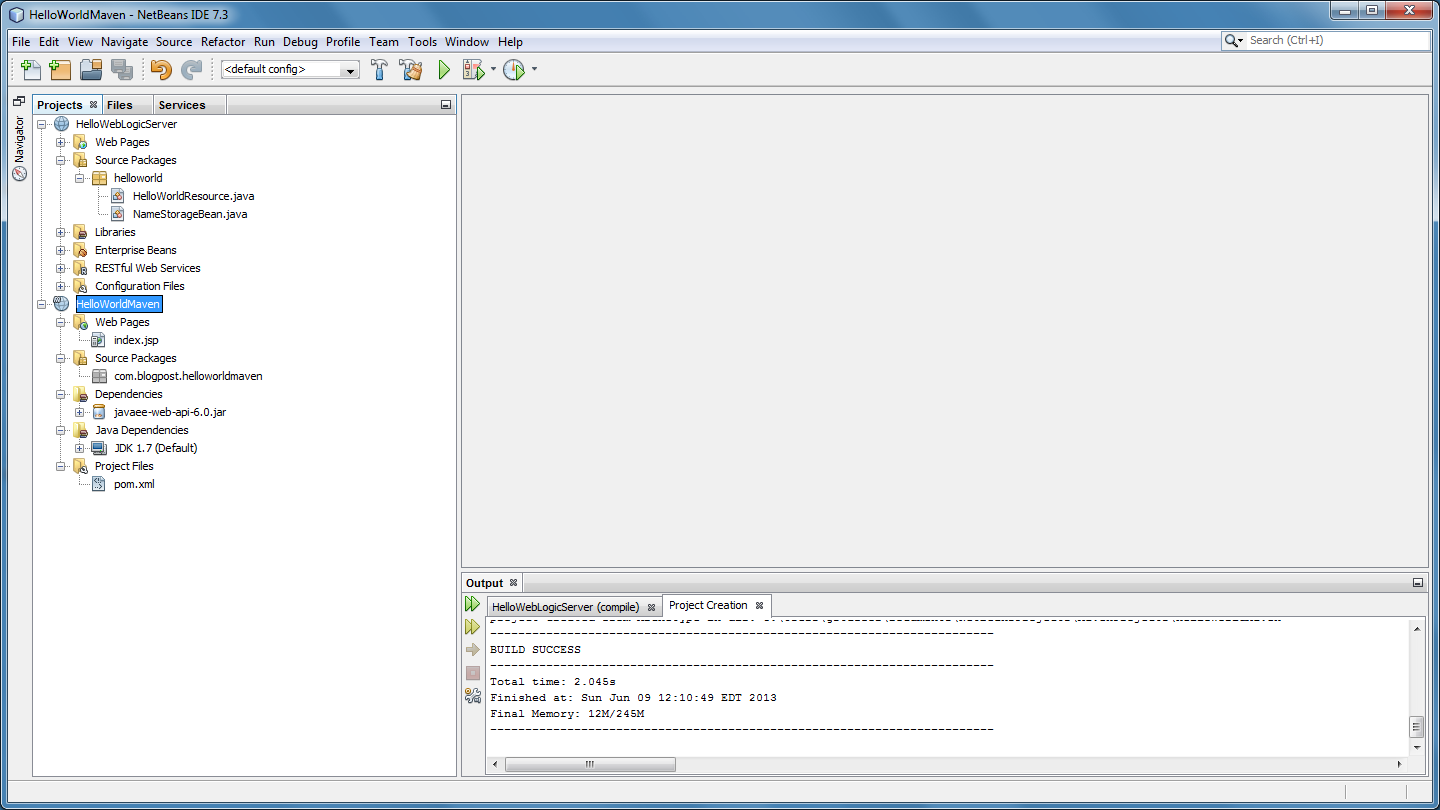
Next, create a set of JUnit tests for each class by right-clicking on both classes and selecting ‘Tools’ -> ‘Create Tests’.
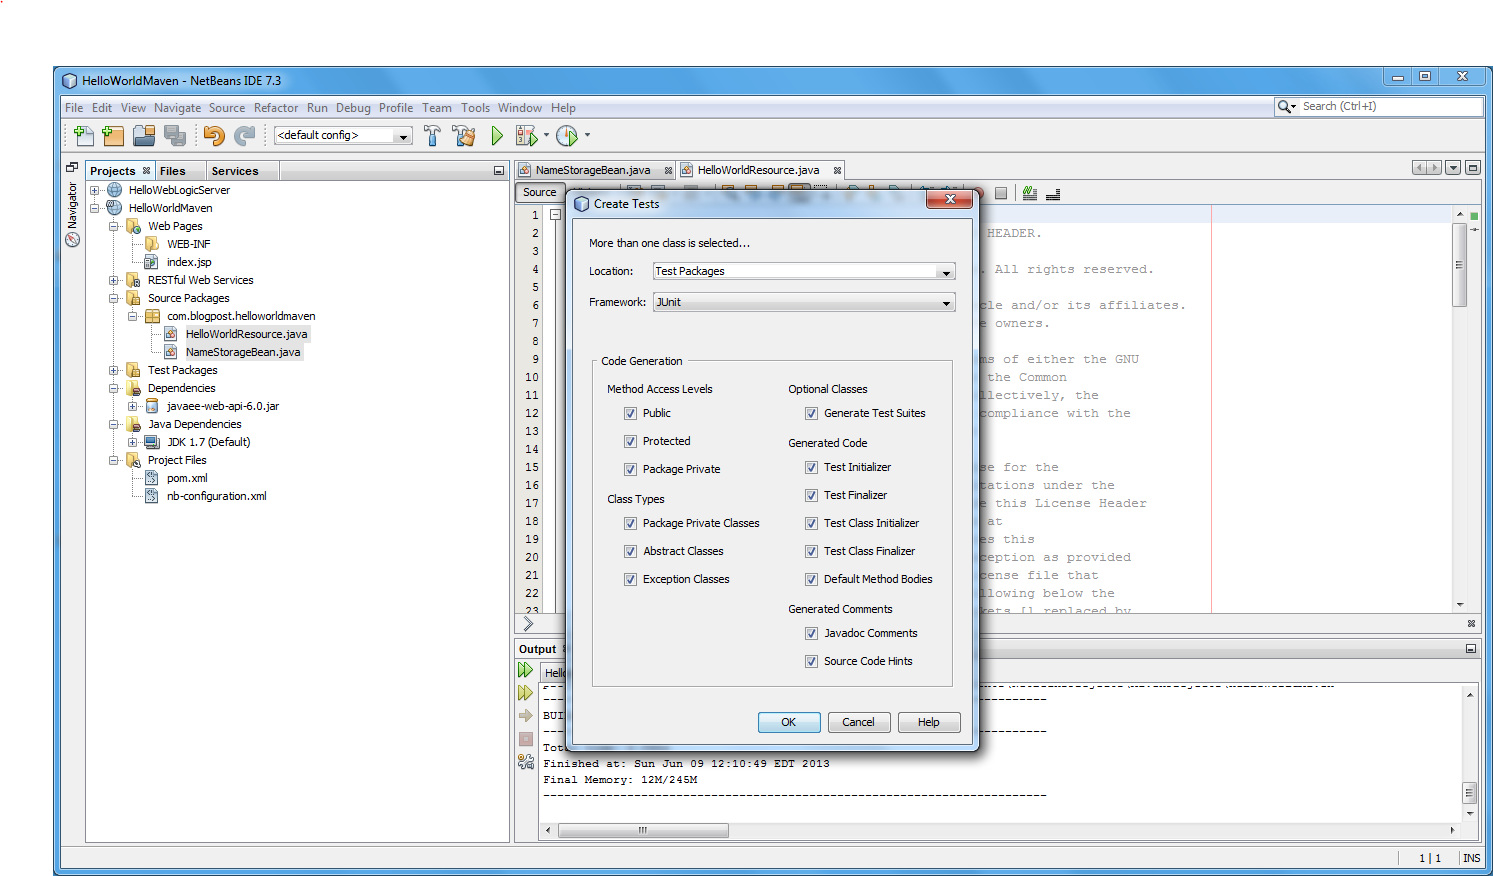
3a – Create JUnit Tests for Both Class Files

3b – Choose JUnit Version 4.x

3c – New Project with Test Classes and JUnit Test Dependencies
We will use the test classes and dependencies NetBeans just added to the project. However, we will not use the actual JUnit tests themselves that NetBeans created. To properly set-up the default JUnit tests to work with an embedded version of WLS is well beyond the scope of this post.
Overwrite the contents of the class file with the code provided from Dropbox. I have replaced the default JUnit tests with simpler versions for this demonstration. Build the file to make sure all the JUnit tests all pass.

3d – Project Successfully Built with New JUnit Tests
Project Properties
Next, add a new Properties file to the project, entitled ‘maven.properties’.

4a – Add Properties File to Project

4b – Add Properties File to Project
Add the following key/value pairs to the properties file. These key/value pairs are referenced will be referenced the POM.xml by the weblogic-maven-plugin, added in the next step. Placing the configuration values into a Properties file is not necessary for this post. However, if you wish to deploy to multiple environments, moving environmentally-specific configurations into separate properties files, using Maven Build Profiles, and/or using frameworks such as Spring, are all best practices.
Java Properties File (maven.properties):
| # weblogic-maven-plugin configuration values for Oracle VM environment | |
| wls.adminurl=t3://192.168.1.88:7031 | |
| wls.user=weblogic | |
| wls.password=welcome1 | |
| wls.upload=true | |
| wls.remote=false | |
| wls.verbose=true | |
| wls.middlewareHome=/labs/wls1211 | |
| wls.name=HelloWorldMaven |
Maven Plugins and the POM File
Next, add the WLS Maven Plugin (‘weblogic-maven-plugin’) and the Maven Properties Plugin (‘properties-maven-plugin’) to the end of the project’s Maven POM.xml file. The Maven Properties Plugin, part of the Mojo Project, allows us to substitute configuration values in the Maven POM file from a properties file. According to codehaus,org, who hosts the Mojo Project, ‘It’s main use-case is loading properties from files instead of declaring them in pom.xml, something that comes in handy when dealing with different environments.’
Project Object Model File (pom.xml):
| <project xmlns="http://maven.apache.org/POM/4.0.0" xmlns:xsi="http://www.w3.org/2001/XMLSchema-instance" | |
| xsi:schemaLocation="http://maven.apache.org/POM/4.0.0 http://maven.apache.org/xsd/maven-4.0.0.xsd"> | |
| <modelVersion>4.0.0</modelVersion> | |
| <groupId>com.blogpost</groupId> | |
| <artifactId>HelloWorldMaven</artifactId> | |
| <version>1.0</version> | |
| <packaging>war</packaging> | |
| <name>HelloWorldMaven</name> | |
| <properties> | |
| <endorsed.dir>${project.build.directory}/endorsed</endorsed.dir> | |
| <project.build.sourceEncoding>UTF-8</project.build.sourceEncoding> | |
| </properties> | |
| <dependencies> | |
| <dependency> | |
| <groupId>junit</groupId> | |
| <artifactId>junit</artifactId> | |
| <version>4.10</version> | |
| <scope>test</scope> | |
| </dependency> | |
| <dependency> | |
| <groupId>javax</groupId> | |
| <artifactId>javaee-web-api</artifactId> | |
| <version>6.0</version> | |
| <scope>provided</scope> | |
| </dependency> | |
| </dependencies> | |
| <build> | |
| <plugins> | |
| <plugin> | |
| <groupId>org.apache.maven.plugins</groupId> | |
| <artifactId>maven-compiler-plugin</artifactId> | |
| <version>3.1</version> | |
| <configuration> | |
| <source>1.6</source> | |
| <target>1.6</target> | |
| <compilerArguments> | |
| <endorseddirs>${endorsed.dir}</endorseddirs> | |
| </compilerArguments> | |
| </configuration> | |
| </plugin> | |
| <plugin> | |
| <groupId>org.apache.maven.plugins</groupId> | |
| <artifactId>maven-war-plugin</artifactId> | |
| <version>2.4</version> | |
| <configuration> | |
| <failOnMissingWebXml>false</failOnMissingWebXml> | |
| </configuration> | |
| </plugin> | |
| <plugin> | |
| <groupId>org.apache.maven.plugins</groupId> | |
| <artifactId>maven-dependency-plugin</artifactId> | |
| <version>2.8</version> | |
| <executions> | |
| <execution> | |
| <phase>validate</phase> | |
| <goals> | |
| <goal>copy</goal> | |
| </goals> | |
| <configuration> | |
| <outputDirectory>${endorsed.dir}</outputDirectory> | |
| <silent>true</silent> | |
| <artifactItems> | |
| <artifactItem> | |
| <groupId>javax</groupId> | |
| <artifactId>javaee-endorsed-api</artifactId> | |
| <version>6.0</version> | |
| <type>jar</type> | |
| </artifactItem> | |
| </artifactItems> | |
| </configuration> | |
| </execution> | |
| </executions> | |
| </plugin> | |
| <plugin> | |
| <groupId>org.codehaus.mojo</groupId> | |
| <artifactId>properties-maven-plugin</artifactId> | |
| <version>1.0-alpha-2</version> | |
| <executions> | |
| <execution> | |
| <phase>initialize</phase> | |
| <goals> | |
| <goal>read-project-properties</goal> | |
| </goals> | |
| <configuration> | |
| <files> | |
| <file>maven_wls_local.properties</file> | |
| </files> | |
| </configuration> | |
| </execution> | |
| </executions> | |
| </plugin> | |
| <plugin> | |
| <groupId>com.oracle.weblogic</groupId> | |
| <artifactId>weblogic-maven-plugin</artifactId> | |
| <version>12.1.1.0</version> | |
| <configuration> | |
| <adminurl>${wls.adminurl}</adminurl> | |
| <user>${wls.user}</user> | |
| <password>${wls.password}</password> | |
| <upload>${wls.upload}</upload> | |
| <action>deploy</action> | |
| <remote>${wls.remote}</remote> | |
| <verbose>${wls.verbose}</verbose> | |
| <source>${project.build.directory}/${project.build.finalName}.${project.packaging}</source> | |
| <name>${wls.name}</name> | |
| </configuration> | |
| <executions> | |
| <execution> | |
| <phase>install</phase> | |
| <goals> | |
| <goal>deploy</goal> | |
| </goals> | |
| </execution> | |
| </executions> | |
| </plugin> | |
| </plugins> | |
| </build> | |
| </project> |
WebLogic Deployment Descriptor
A WebLogic Deployment Descriptor file is the last item we need to add to the new Maven Web Application project. NetBeans has descriptors for multiple servers, including Tomcat (context.xml), GlassFish (application.xml), and WebLogic (weblogic.xml). They provide a convenient location to store specific server properties, used during the deployment of the project.

6a – Add New WebLogic Descriptor

6b – Add New WebLogic Descriptor
Add the ‘context-root’ tag. The value will be the name of our project, ‘HelloWorldMaven’, as shown below. According to Oracle, “the context-root element defines the context root of this standalone Web application.” The context-root of the application will form part of the URL we enter to display our application, later.

6c – Add Context Root Element to Descriptor
Make sure to the WebLogic descriptor file (‘weblogic.xml’) is placed in the WEB-INF folder. If not, the descriptor’s properties will not be read. If the descriptor is not read, the context-root of the deployed application will default to the project’s WAR file’s name. Instead of ‘HelloWorldMaven’ as the context-root, you would see ‘HelloWorldMaven-1.0-SNAPSHOT’.

6d – Move WebLogic Descriptor into WEB-INF Folder
Enable Tunneling
Before we compile, test, and deploy our project, we need to make a small change to WLS. In order to deploy our project remotely to the Oracle VM’s WLS, using the WebLogic Maven Plugin, we must enable tunneling on our WLS domain. According to Oracle, the ‘Enable Tunneling’ option “Specifies whether tunneling for the T3, T3S, HTTP, HTTPS, IIOP, and IIOPS protocols should be enabled for this server.” To enable tunneling, from the WLS Administration Console, select the ‘AdminServer’ Server, ‘Protocols’ tab, ‘General’ sub-tab.

Enabling Tunneling on WLS for HTTP Deployments
Build and Test the Project
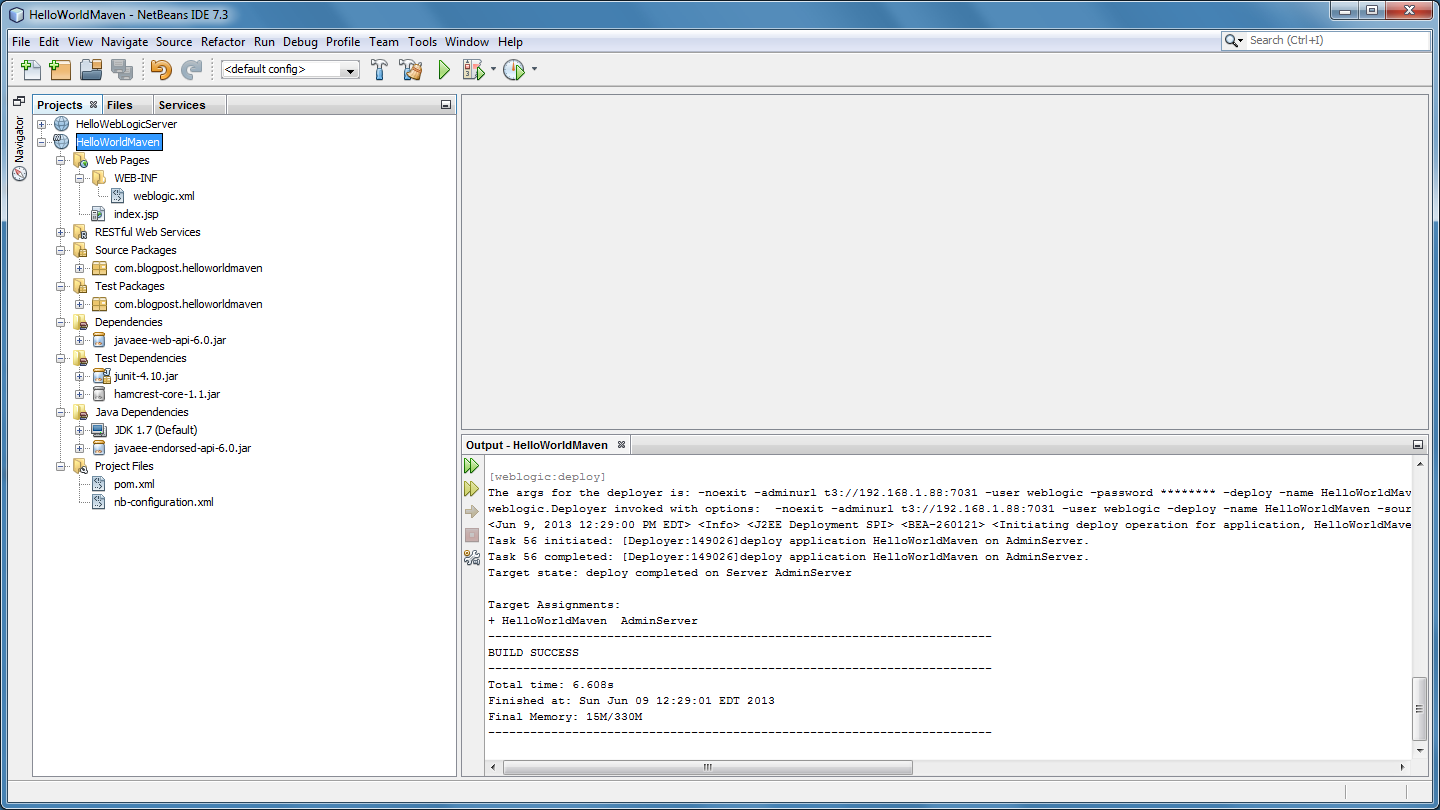
Right-click and select ‘Build’, ‘Clean and Build’, or ‘Build with Dependencies’. NetBeans executes a ‘mvn install’ command. This command initiates a series of Maven Goals. The goals, visible NetBean’s Output window, include ‘dependency:copy’, ‘properties:read-project-properties’, ‘compiler:compile’, ‘surefire:test’, and so forth. They move the project’s code through the Maven Build Lifecycle. Most goals are self-explanatory by their title.
The last Maven Goal to execute, if the other goals have succeeded, is the ‘weblogic:deploy’ goal. This goal deploys the project to the Oracle VM’s WLS domain we configured in our project. Recall in the POM file, we configured the weblogic-maven-plugin to call the ‘deploy’ goal whenever ‘install’, referred to as Execution Phase by Maven, is executed. If all goals complete without error, you have just compiled, tested, and deployed your first Maven web application to a remote WLS domain. Later, we will have Hudson do it for us, automatically.
6e – Successful Build of Project
Executing Maven Goals in NetBeans
A small aside, if you wish to run alternate Maven goals in NetBeans, right-click on the project and select ‘Custom’ -> ‘Goals…’. Alternately, click on the lighter green arrows (‘Re-run with different parameters’), adjacent to the ‘Output’ tab.
For example, in the ‘Run Maven’ pop-up, replace ‘install’ with ‘surefire:test’ or simply ‘test’. This will compile the project and run the JUnit tests. There are many Maven goals that can be ran this way. Use the Control key and Space Bar key combination in the Maven Goals text box to display a pop-up list of available goals.

7a – Executing Other Maven Goals

7a – JUnit Test Results using Maven ‘test’ Goal
Subversion
Now that our project is complete and tested, we will commit the project to Subversion (SVN). We will commit a copy of our source code to SVN, installed on the Oracle VM, for safe-keeping. Having our source code in SVN also allows Hudson to retrieve a copy. Hudson will then compile, test, and deploy the project to WLS.
The Repository URL, User, and Password are all supplied in the Oracle VM information, along with the other URLs and credentials.

8a – Add Project to Subversion Repository

8b – Subversion Repository Folder for Project
When you import you project for the first time, you will see more files than are displayed below. I had already imported part of the project earlier while creating this post. Therefore most of my files were already managed by Subversion.

8c – List of Files Imported into Subversion (you will see more)
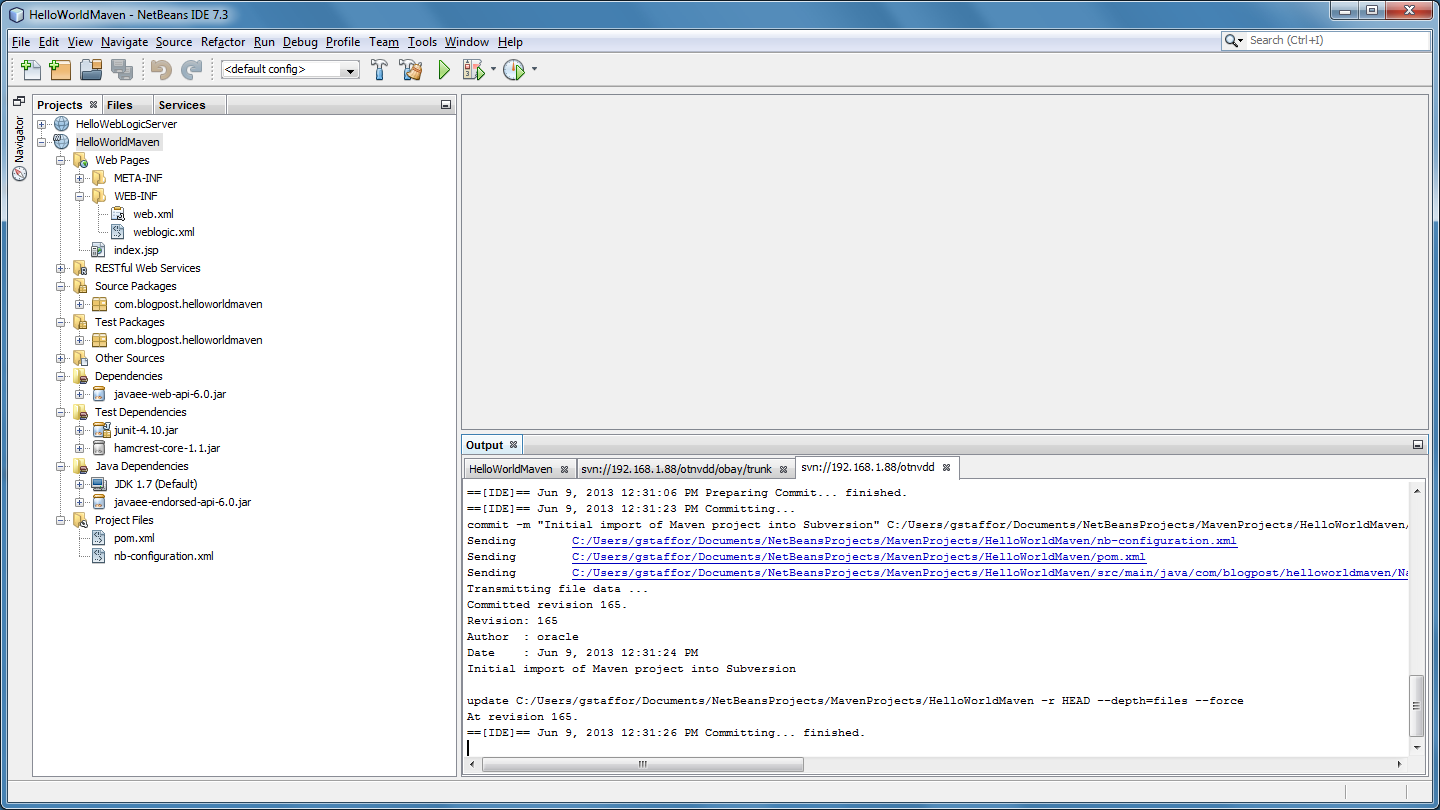
08d – Project Successfully Imported into Subversion
Upgrading Hudson CI Server
The Oracle VM comes with Hudson pre-installed in it’s own WLS domain, ‘hudson-ci_dev’, running on port 5001. Start the domain from within the VM by double-clicking the ‘WLS 12c – Hudson CI 5001’ icon on the desktop, or by executing the domain’s WLS start-up script from a terminal window:
/labs/wls1211/user_projects/domains/hudson-ci_dev/startWebLogic.sh
Once started, the WLS Administration Console 12c is accessible at the following URL. User your VM’s IP address or ‘localhost’ if you are within the VM.
http://[your_vm_ip_address]:5001/console/login/LoginForm.jsp
The Oracle VM comes loaded with Hudson version 2.2.0. I strongly suggest is updating Hudson to the latest version (3.0.1 at the time of this post). To upgrade, download, deploy, and started a new 3.0.1 version in the same domain on the same ‘AdminServer’ Server. I was able to do this remotely, from my development machine, using the browser-based Hudson Dashboard and WLS Administration Console. There is no need to do any of the installation from within the VM, itself.
When the upgrade is complete, stop the 2.2.0 deployment currently running in the WLS domain.

Hudson 3.0.1 Deployed to WLS Domain on VM
The new version of Hudson is accessible from the following URL (adjust the URL your exact version of Hudson):
http://[your_vm_ip_address]:5001/hudson-3.0.1/
It’s also important to update all the Hudson plugins. Hudson makes this easy with the Hudson Plugin Manager, accessible via the Manage Hudson’ option.

View of Hudson 3.0.1 Running on WLS with All Plugins Updated
Note on the top of the Manage Hudson page, there is a warning about the server’s container not using UTF-8 to decode URLs. You can follow this post, if you want to resolve the issue by configuring Hudson differently. I did not worry about it for this post.
Building a Hudson Job
We are ready to configure Hudson to build, test, and deploy our Maven Web Application project. Return to the ‘Hudson Dashboard’, select ‘New Job’, and then ‘Build a new free-style software job’. This will open the ‘Job Configurations’ for the new job.
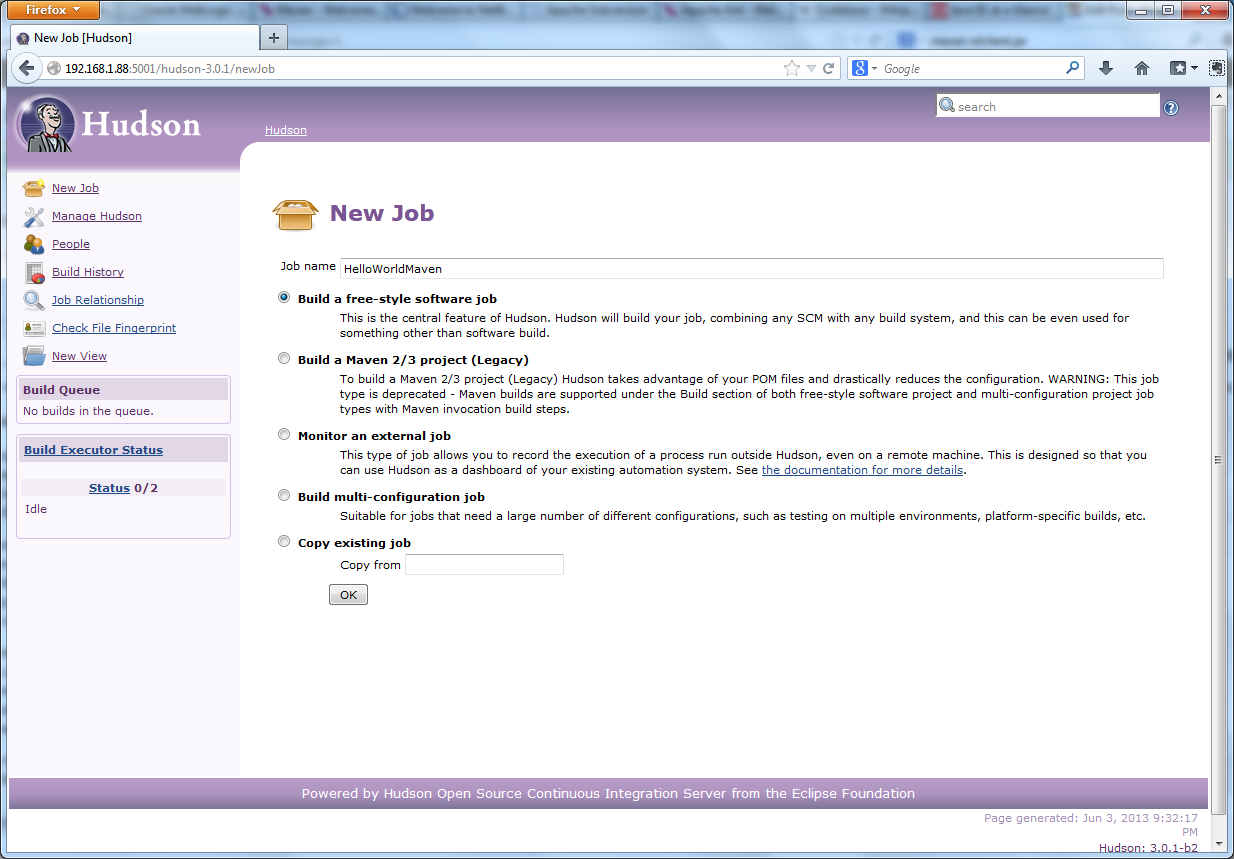
1 – Creating New Hudson Free-Style Software Job

2 -Default Job Configurations
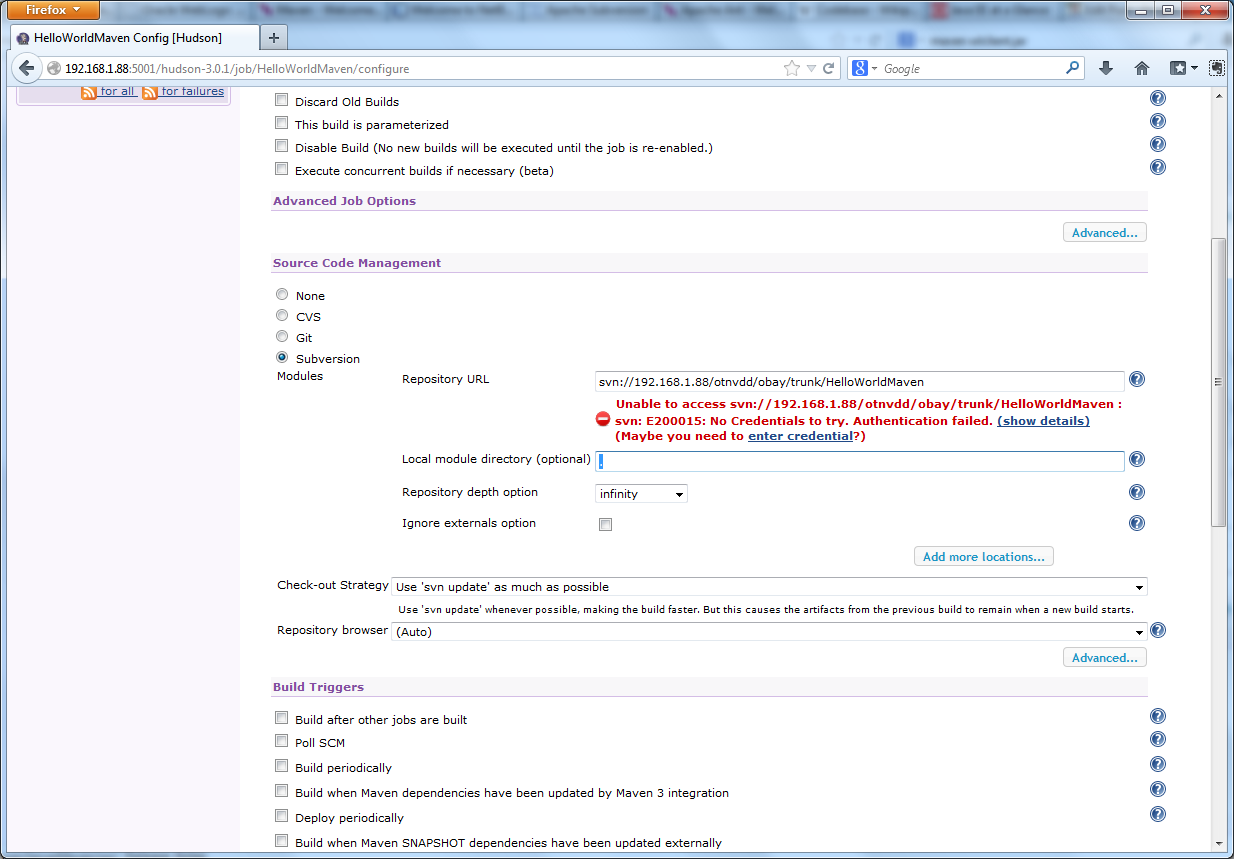
Start by configuring the ‘Source Code Management’ section. The Subversion Repository URL is the same as the one you used in NetBeans to commit the code. To avoid the access error seen below, you must provide the Subversion credentials to Hudson, just as you did in NetBeans.
3 -Subversion SCM Configuration

4 – Subversion SCM Authentication
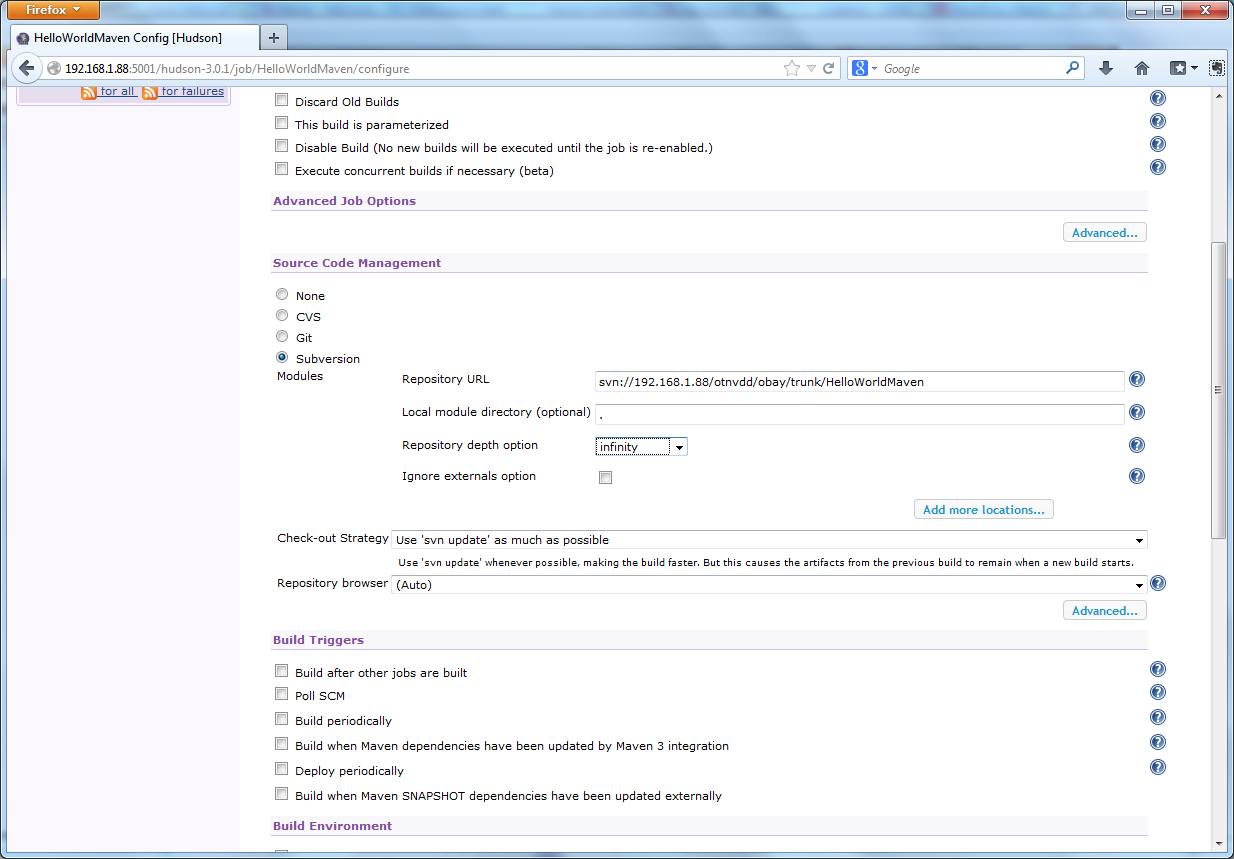
5 -Subversion SCM Configuration Authenticated
Next, configure the Maven 3 Goals. I chose the ‘clean’ and ‘install’ goals. Using ‘clean’ insures the project is compiled each time by deleting the output of the build directory.
Optionally, you can configure Hudson to publish the JUnit test results as shown below. Be sure to save your configuration.
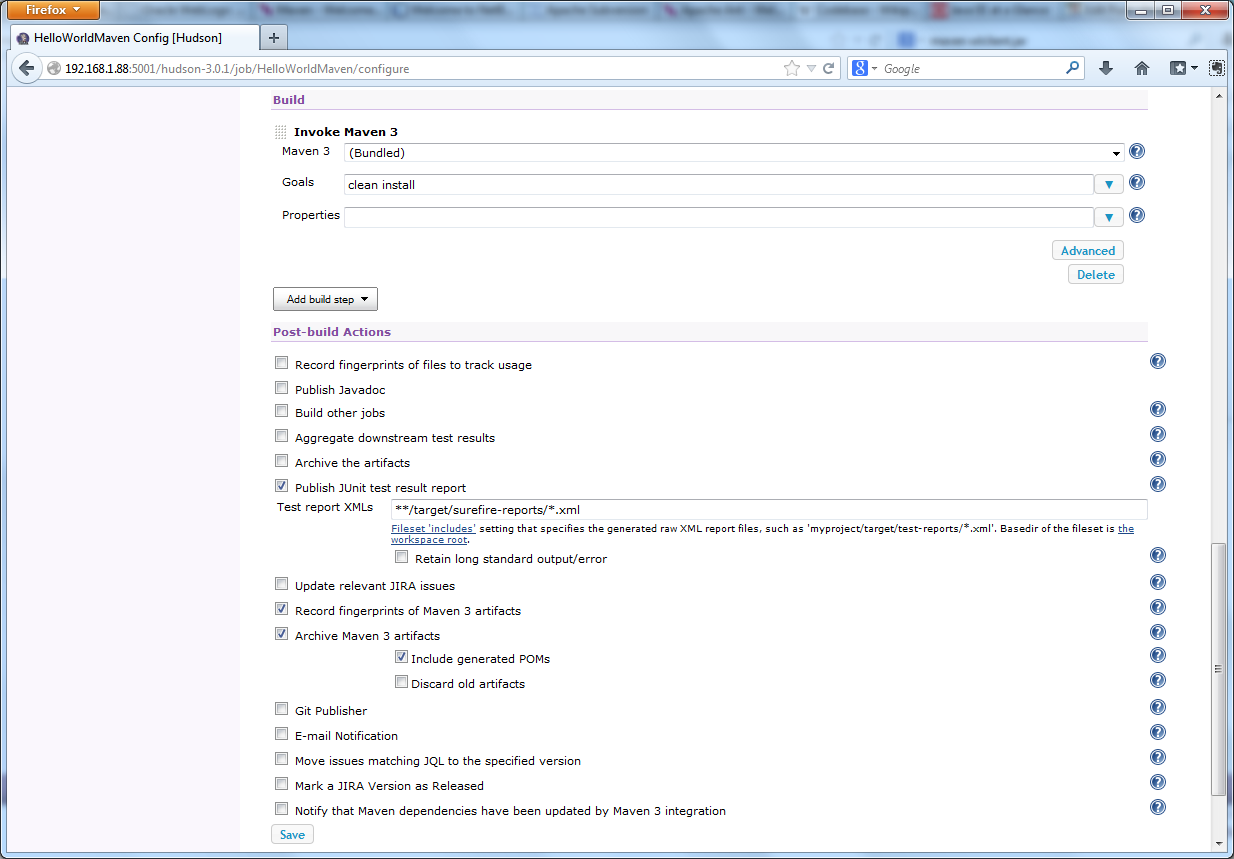
6 -Maven 3 and JUnit Configurations
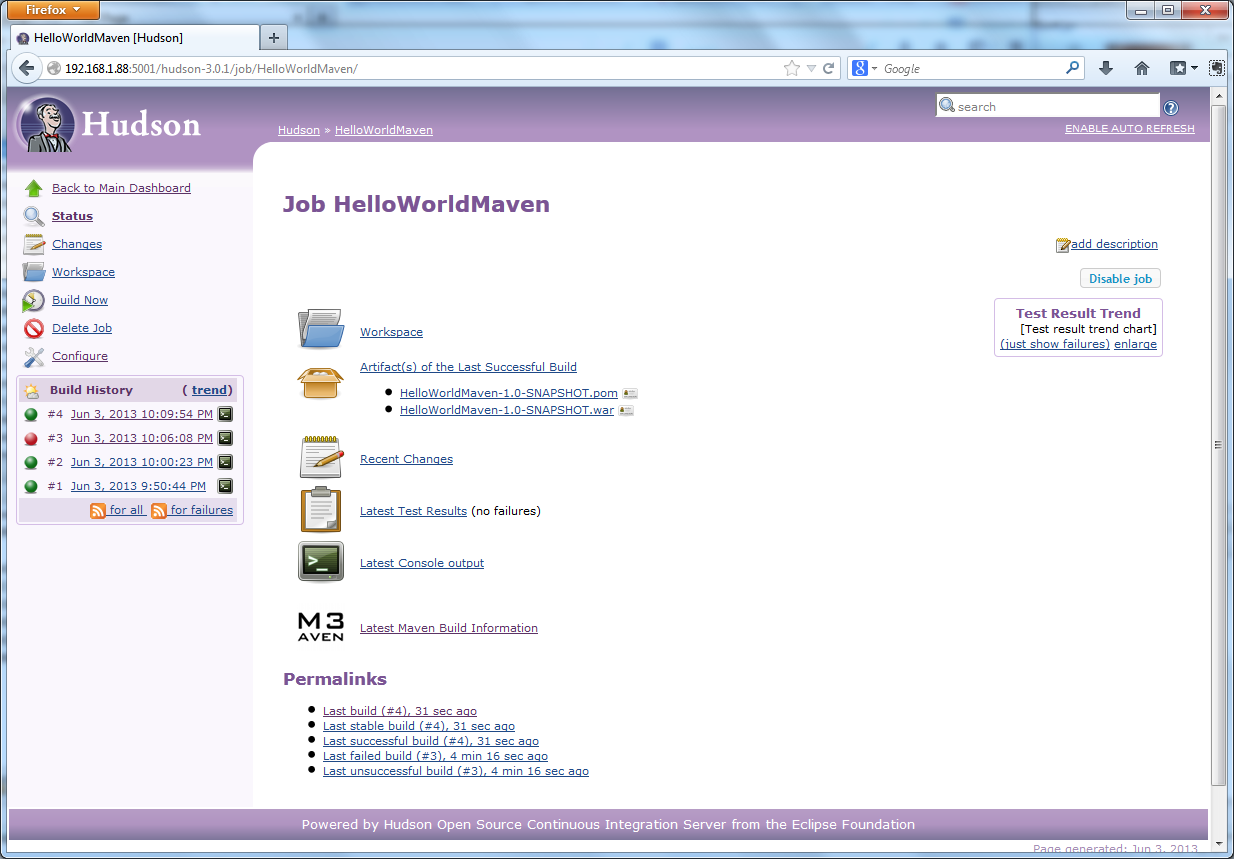
Start a build of the new Hudson Job, by clicking ‘Build Now’. If your Hudson job’s configurations are correct, and the new WLS domain is running, you should have a clean build. This means the project compiled without error, all tests passed, and the web application’s WAR file was deployed successfully to the new WLS domain within the Oracle VM.

7 -Job Built Successfully Using Configurations
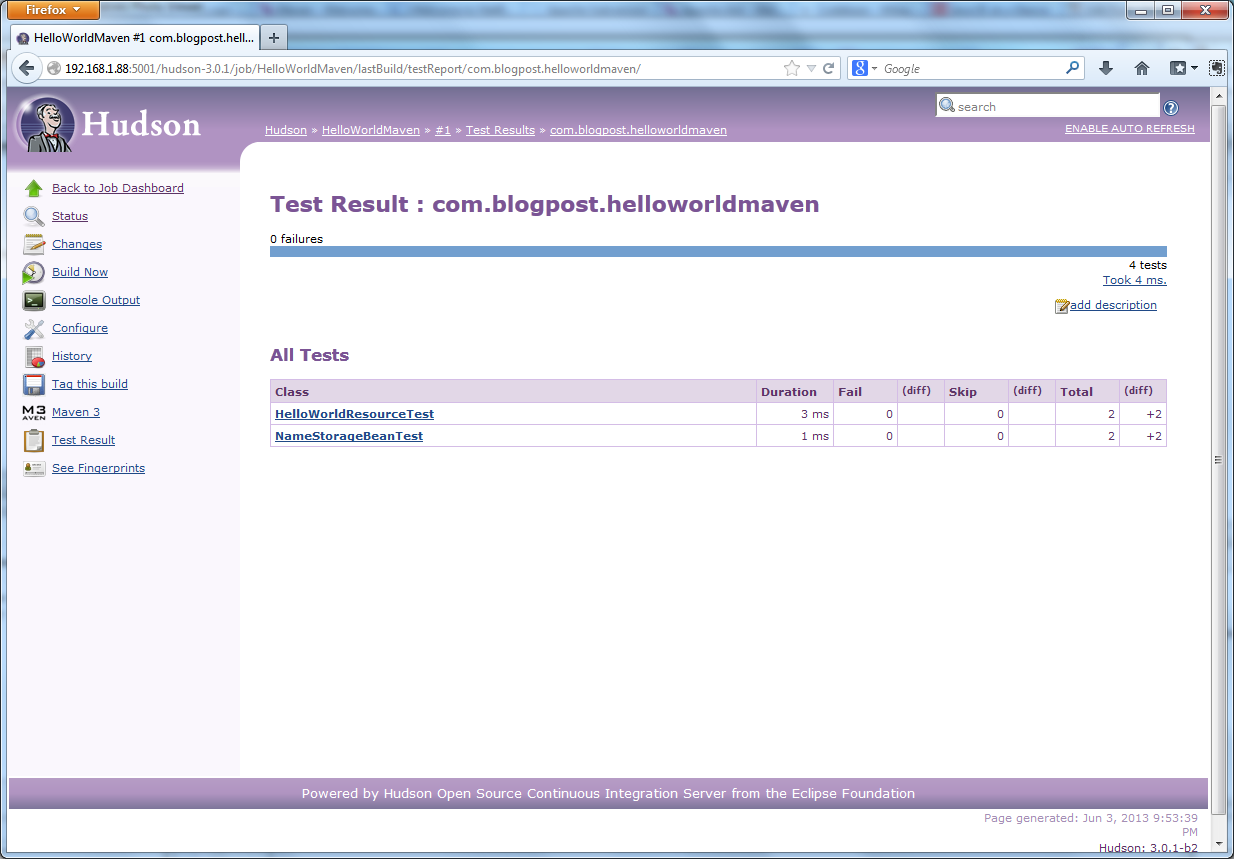
8 – Test Results from Build
WebLogic Server
To view the newly deployed Maven Web Application, log into the WebLogic Server Administration Console for the new domain. In my case, the new domain was running on port 7031, so the URL would be:
http://[your_vm_ip_address]:7031/console/login/LoginForm.jsp
You should see the deployment, in an ‘Active’ state, as shown below.

9a – Project Deployed to WLS from Hudson Build

9b – Project’s Context Root Set by WebLogic Descriptor File

9c – Project’s Servlet Paths
To test the deployment, open a new browser tab and go to the URL of the Servlet. In this case the URL would be:
http://[your_vm_ip_address]:7031/HelloWorldMaven/resources/helloWorld
You should see the original phrase from the previous project displayed, ‘Hello WebLogic Server!’.

10 – Project’s Web Application Running in Browser
To further test the system, make a simple change to the project in NetBeans. I changed the name variable’s default value from ‘WebLogic Server’ to ‘Hudson, Maven, and WLS’. Commit the change to SVN.

11 – Make a Code Change to Project and Commit to Subversion
Return to Hudson and run a new build of the job.
12 – Rebuild Project with Changes in Hudson
After the build completes, refresh the sample Web Application’s browser window. You should see the new text string displayed. Your code change was just re-compiled, re-tested, and re-deployed by Hudson.

13 – Project Showing Code Change
True Continuous Deployment
Although Hudson is now doing a lot of the work for us, the system still is not fully automated. We are still manually building our Hudson Job, in order to deploy our application. If you want true continuous integration and deployment, you need to trust the system to automatically deploy the project, based on certain criteria.
SCM polling with Hudson is one way to demonstrate continuous deployment. In ‘Job Configurations’, turn on ‘Poll SCM’ and enter Unix cron-like value(s) in the ‘Schedule’ text box. In the example below, I have indicated a polling frequency every hour (‘@hourly’). Every hour, Hudson will look for committed changes to the project in Subversion. If changes are found, Hudson w retrieves the source code, compiles, and tests. If the project compiles and passes all tests, it is deployed to WLS.
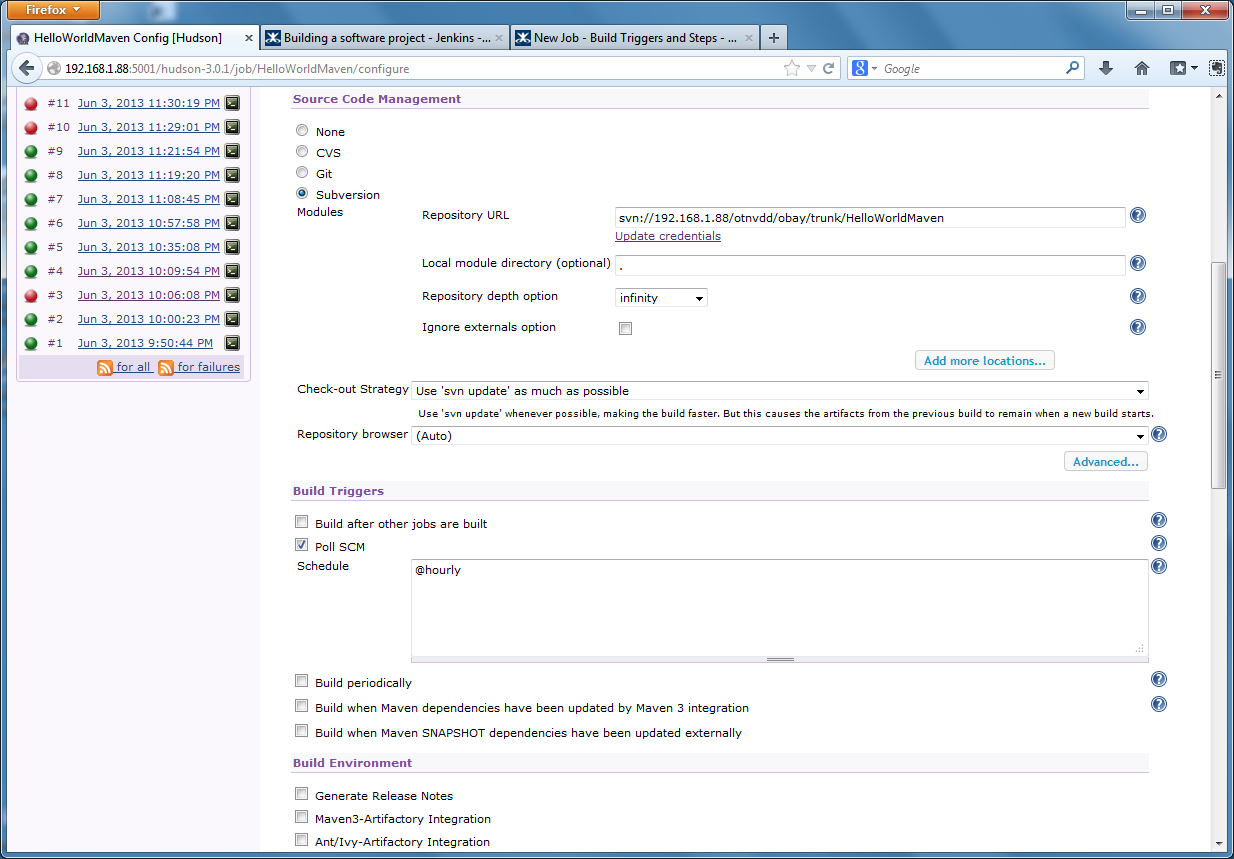
SCM Polling Interval
There are less resource-intense methods to react to changes than SCM polling. Push-notifications from the repository is alternate, more preferable method.
Additionally, you should configure messaging in Hudson to notify team members of new deployments and the changes they contain. You should also implement a good deployment versioning strategy, for tracking purposes. Knowing the version of deployed artifacts is critical for accurate change management and defect tracking.
Helpful Links
Configuring and Using the WebLogic Maven Plug-In for Deployment
Jenkins: Building a Software Project
Kohsuke Kawaguchi: Polling must die: triggering Jenkins builds from a git hook
Deploying Applications to WebLogic Server on Oracle’s Pre-Built Development VM
Posted by Gary A. Stafford in DevOps, Enterprise Software Development, Java Development, Software Development on May 24, 2013
Create a new WebLogic Server domain on Oracle’s Pre-built Development VM. Remotely deploy a sample web application to the domain from a remote machine.
Introduction
In my last two posts, Using Oracle’s Pre-Built Enterprise Java VM for Development Testing and Resizing Oracle’s Pre-Built Development Virtual Machines, I introduced Oracle’s Pre-Built Enterprise Java Development VM, aka a ‘virtual appliance’. Oracle has provided ready-made VMs that would take a team of IT professionals days to assemble. The Oracle Linux 5 OS-based VM has almost everything that comprises basic enterprise test and production environment based on the Oracle/Java technology stack. The VM includes Java JDK 1.6+, WebLogic Server, Coherence, TopLink, Subversion, Hudson, Maven, NetBeans, Enterprise Pack for Eclipse, and so forth.
One of the first things you will probably want to do, once your Oracle’s Pre-Built Enterprise Java Development VM is up and running, is deploy an application to WebLogic Server. According to Oracle, WebLogic Server is ‘a scalable, enterprise-ready Java Platform, Enterprise Edition (Java EE) application server.’ Even if you haven’t used WebLogic Server before, don’t worry, Oracle has designed it to be easy to get started.
In this post I will cover creating a new WebLogic Server (WLS) domain, and the deployment a simple application to WLS from a remote development machine. The major steps in the process presented in this post are as follows:
- Create a new WLS domain
- Create and build a sample application
- Deploy the sample application to the new WLS domain
- Access deployed application via a web browser
Networking
First, let me review how I have my VM configured for networking, so you will understand my deployment methodology, discussed later. The way you configure your Oracle VM VirtualBox appliance will depend on your network topology. Again, keeping it simple for this post, I have given the Oracle VM a static IP address (192.168.1.88). The machine on which I am hosting VirtualBox uses DHCP to obtain an IP address on the same local wireless network.
For the VM’s VirtualBox networking mode, I have chosen the ‘Bridged Adapter‘ mode. Using this mode, any machine on the network can access the VM through the host machine, via the VM’s IP address. One of the best posts I have read on VM networking is on Oracle’s The Fat Bloke Sings blog, here.
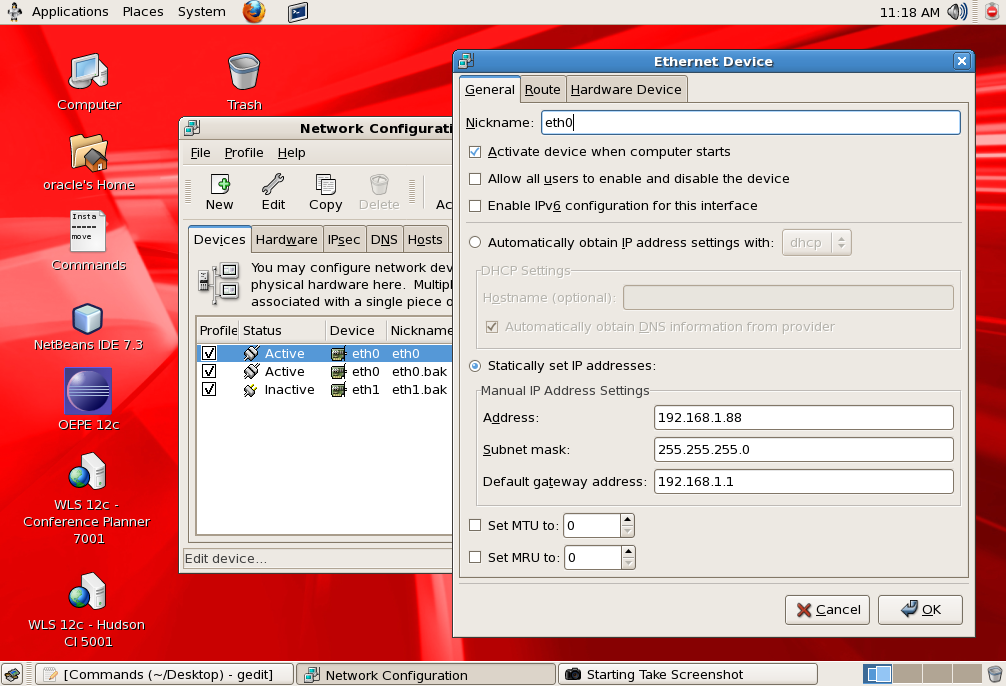
Setting Static IP Address for VM
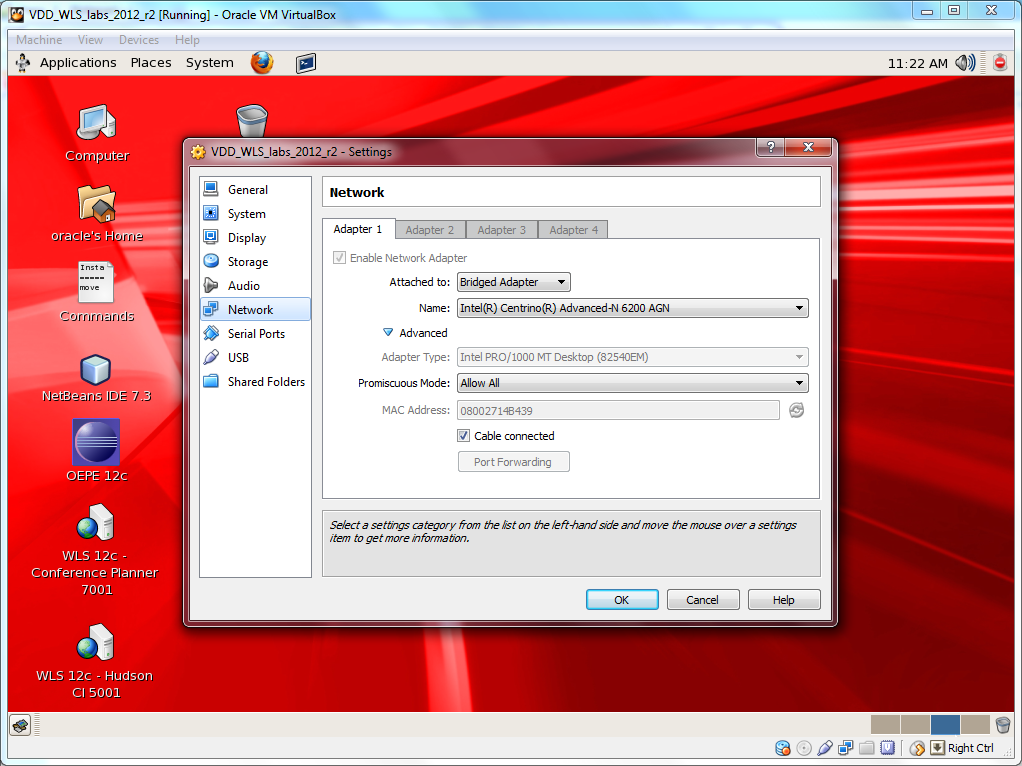
Using VirtualBox’s Bridged Adapter Networking Mode
Creating New WLS Domain
A domain, according Oracle, is ‘the basic administrative unit of WebLogic Server. It consists of one or more WebLogic Server instances, and logically related resources and services that are managed, collectively, as one unit.’ Although the Oracle Development VM comes with pre-existing domains, we will create our own for this post.
To create the new domain, we will use the Oracle’s Fusion Middleware Configuration Wizard. The Wizard will take you through a step-by-step process to configure your new domain. To start the wizard, from within the Oracle VM, open a terminal window, and use the following command to switch to the Wizard’s home directory and start the application.
/labs/wls1211/wlserver_12.1/common/bin/config.sh
There are a lot of configuration options available, using the Wizard. I have selected some basic settings, shown below, to configure the new domain. Feel free to change the settings as you step through the Wizard, to meet your own needs. Make sure to use the ‘Development Mode’ Start Mode Option for this post. Also, make sure to note the admin port of the domain, the domain’s location, and the username and password you choose.
-
- 01 – New WebLogic Domain
-
- 02 – Selecting the Domain Source
-
- 03 – Naming the Domain
-

- 04 – Domain User Name and Password
-

- 05 – Startup and JDK
-
- 06 – Optional Configuration
-
- 07 – Administrative Configuration
-
- 08 – JMS Configuration
-

- 09 – Managed Servers
-
- 10 – Clusters
-
- 11 – Machines
-
- 12 – Target Services
-
- 13 – JMS File Stores
-
- 14 – RDBMS
-
- 15 – Configuration Summary
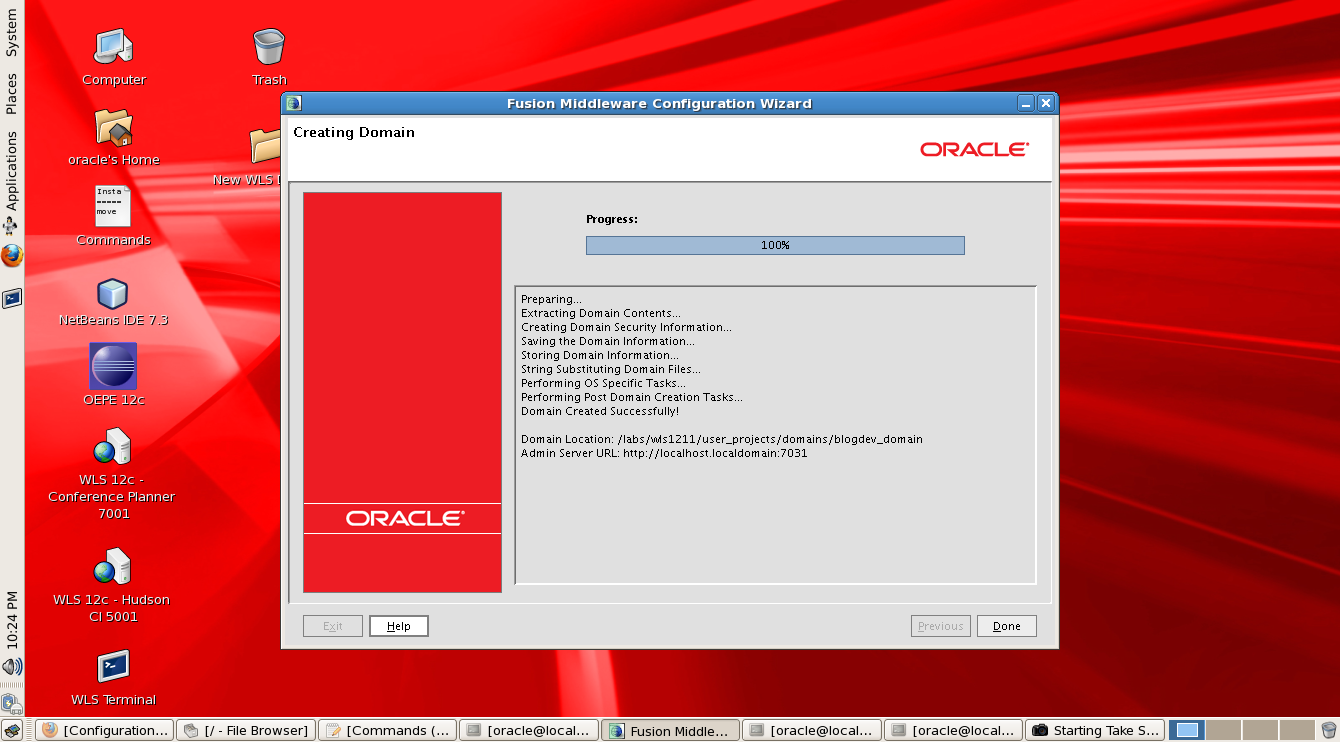
Creating the New Domain
Starting the Domain
To start the new domain, open a terminal window in the VM and run the following command to change to the root directory of the new domain and start the WLS domain instance. Your domain path and domain name may be different. The start script command will bring up a new terminal window, showing you the domain starting.
/labs/wls1211/user_projects/domains/blogdev_domain/startWebLogic.sh
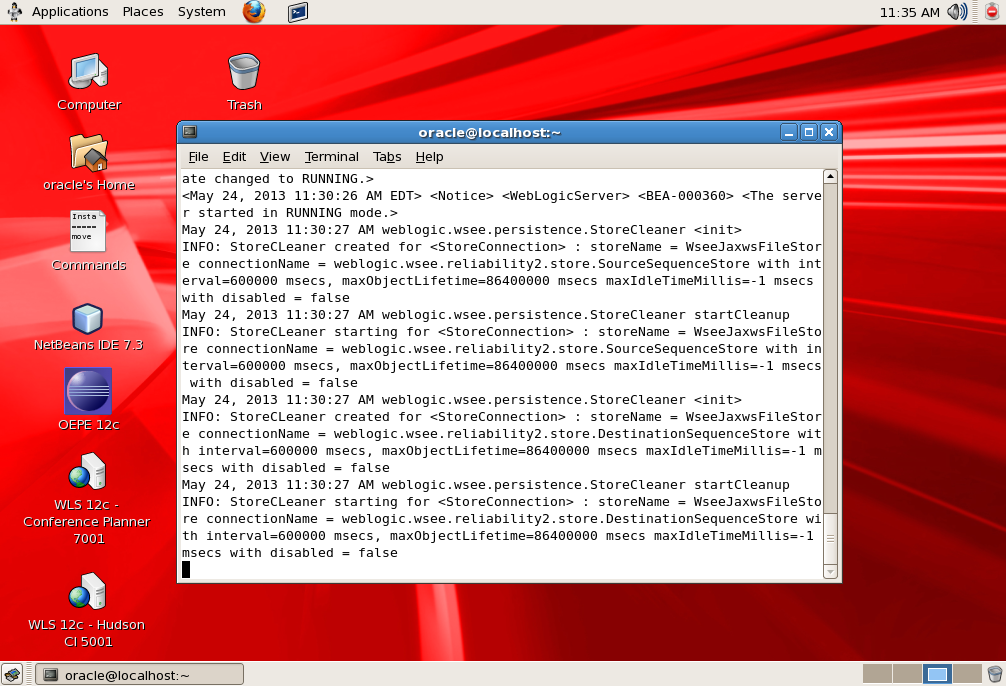
New WLS Domain Starting
WLS Administration Console
Once the domain starts, test it by opening a web browser from the host machine and entering the URL of the WLS Administration Console. If your networking is set-up correctly, the host machine will able to connect to the VM and open the domain, running on the port you indicated when creating the domain, on the static IP address of the VM. If your IP address and port are different, make sure to change the URL. To log into WLS Administration Console, use the username and password you chose when you created the domain.
http://192.168.1.88:7031/console/login/LoginForm.jsp
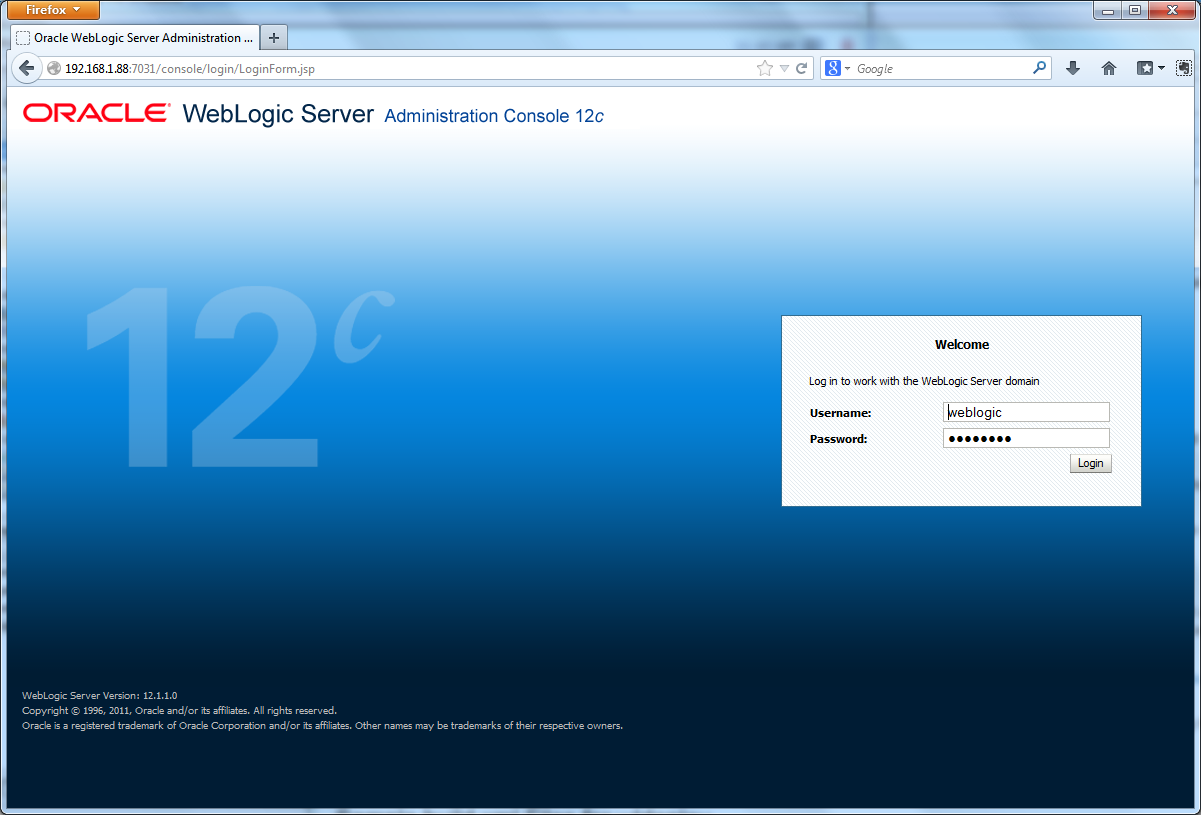
Logging into the New WLS Domain
Before we start looking around the new domain however, let’s install an application into it.
Sample Java Application
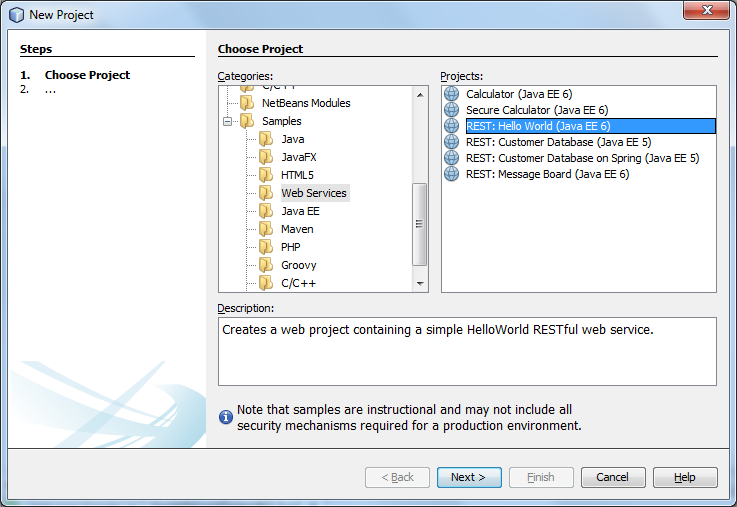
If you have an existing application you want to install, you can skip this part. If you don’t, we will quickly create a simple Java EE Hello World web application, using a pre-existing sample project in NetBeans – no coding required. From your development machine, create a new Samples -> Web Services -> REST: Hello World (Java EE 6) Project. You now have a web project containing a simple RESTful web service, Servlet, and Java Server Page (.jsp). Build the project in NetBeans. We will upload the resulting .war file manually, in the next step.
In a previous post, Automated Deployment to GlassFish Using Jenkins CI Server and Apache Ant, we used the same sample web application to demonstrate automated deployments to Oracle’s GlassFish application server.
Creating the Sample Java EE 6 Web Application in NetBeans
Naming the New Project
New Project in NetBeans
Hello World WAR File After Building Project
Deploying the Application
There are several methods to deploy applications to WLS, depending on your development workflow. For this post, we will keep it simple. We will manually deploy our web application’s .war file to WLS using the browser-based WLS Administration Console. In a future post, we will use Hudson, also included on the VM, to build and deploy an application, but for now we will do it ourselves.
To deploy the application, switch back to the WLS Administration Console. Following the screen grabs below, you will select the .war file, built from the above web application, and upload it to the Oracle VM’s new WLS domain. The .war file has all the necessary files, including the RESTful web service, Servlet, and the .jsp page. Make sure to deploy it as an ‘application’ as opposed to a ‘library’ (see ‘target style’ configuration screen, below).

Select the Deployment Tab Lists All Deployed Applications

Select Install to Start the Installation Process
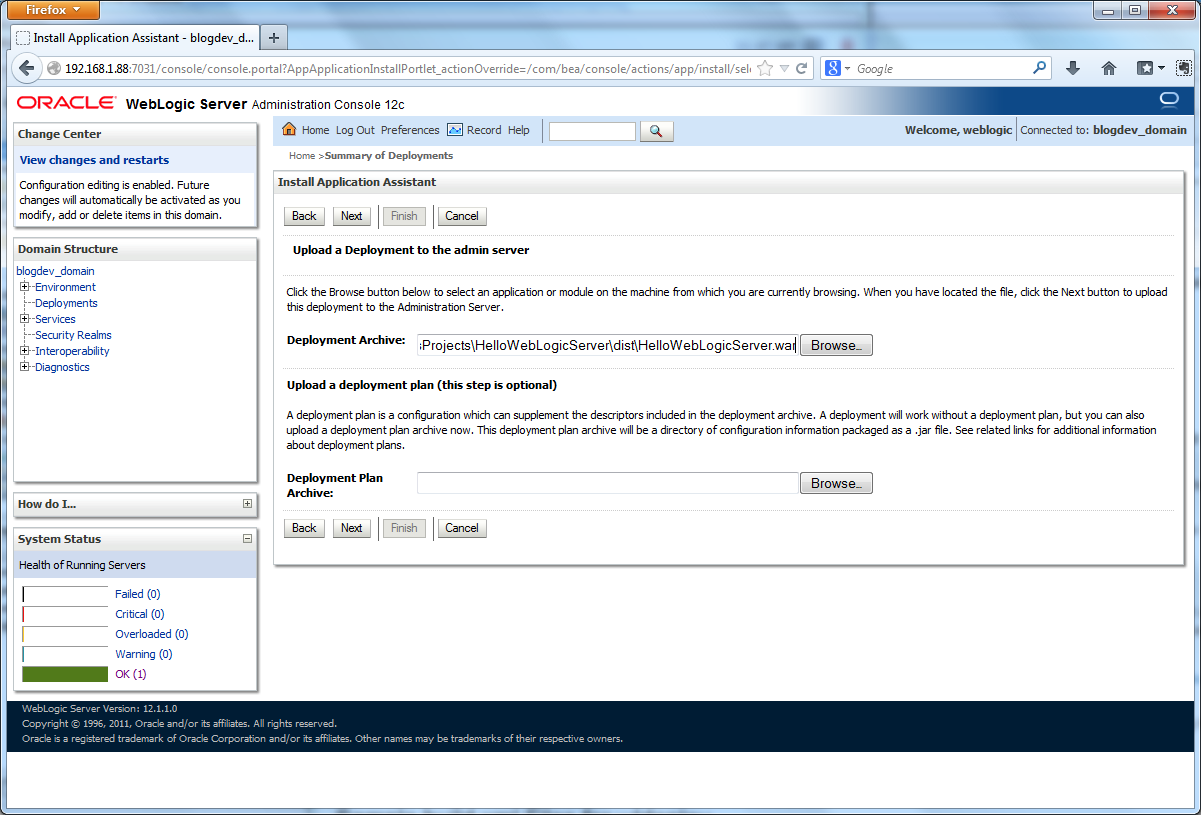
Select Next then Browse for .war File
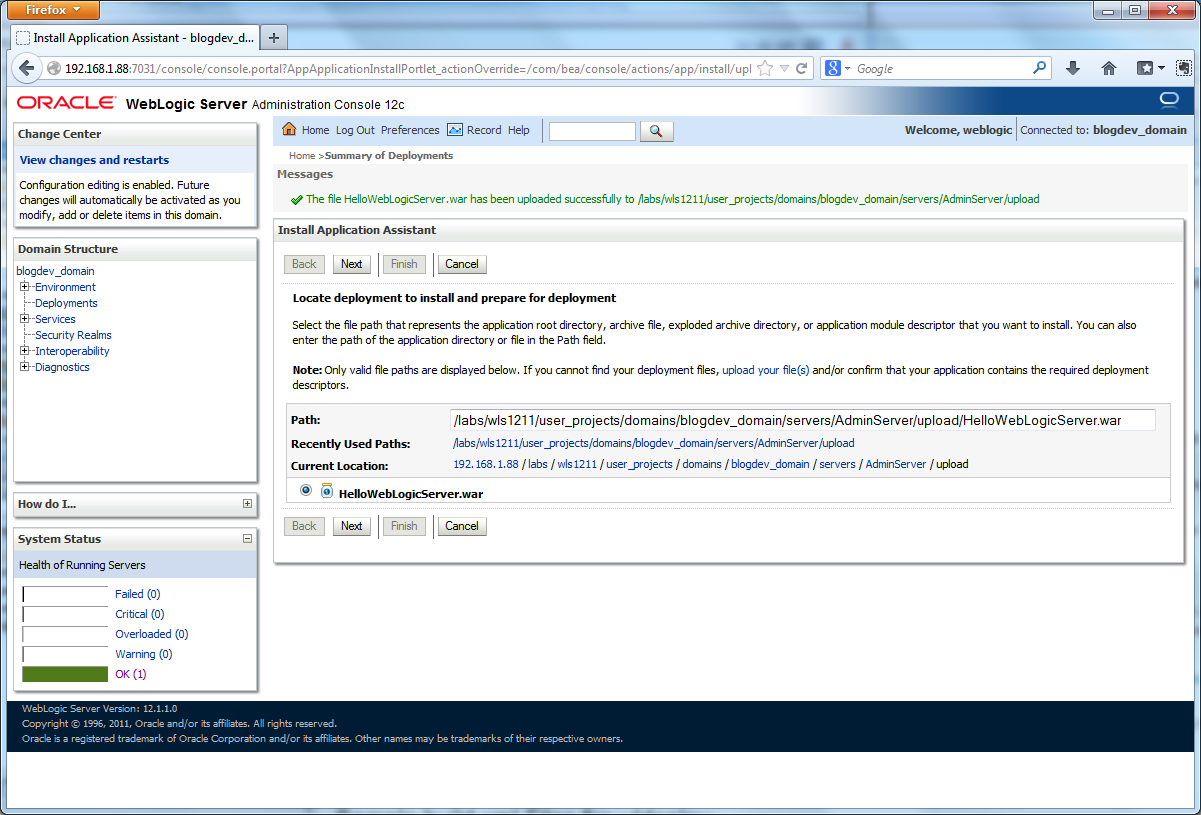
Select Next Again to Install the Application
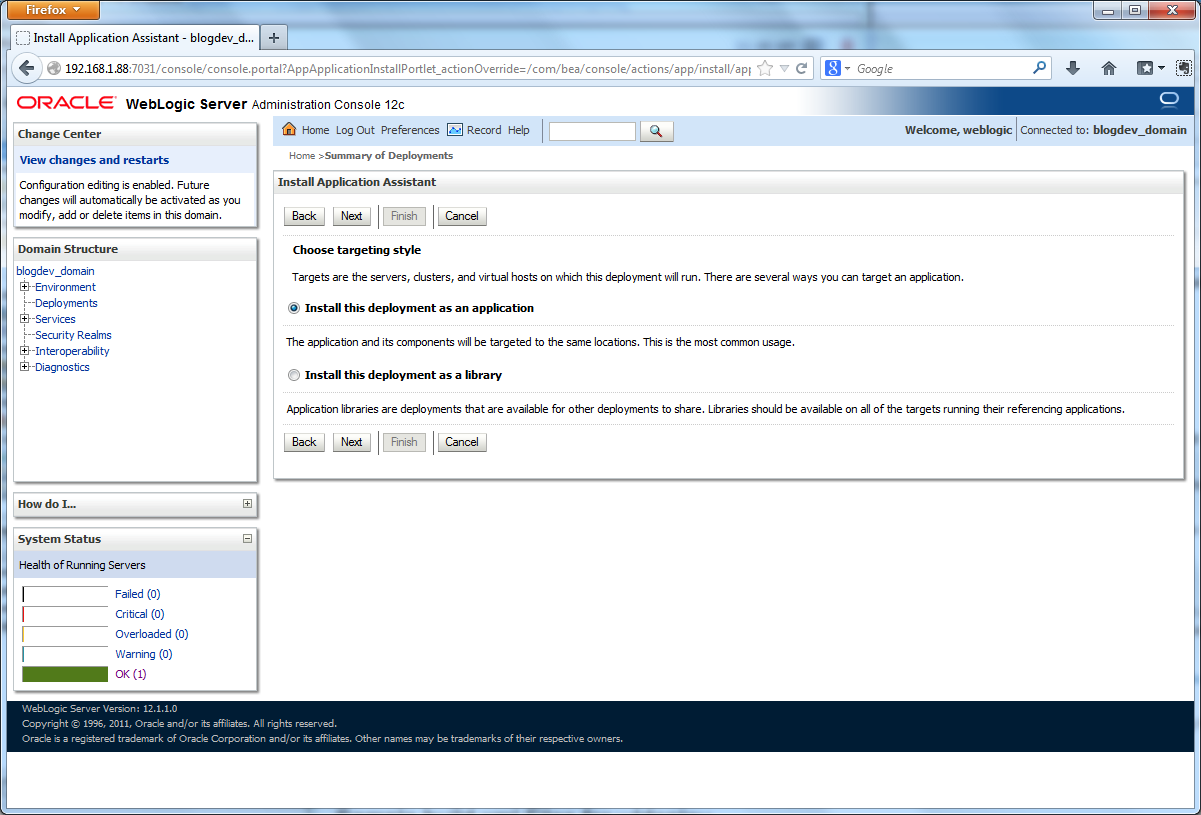
Install the Deployment as an Application
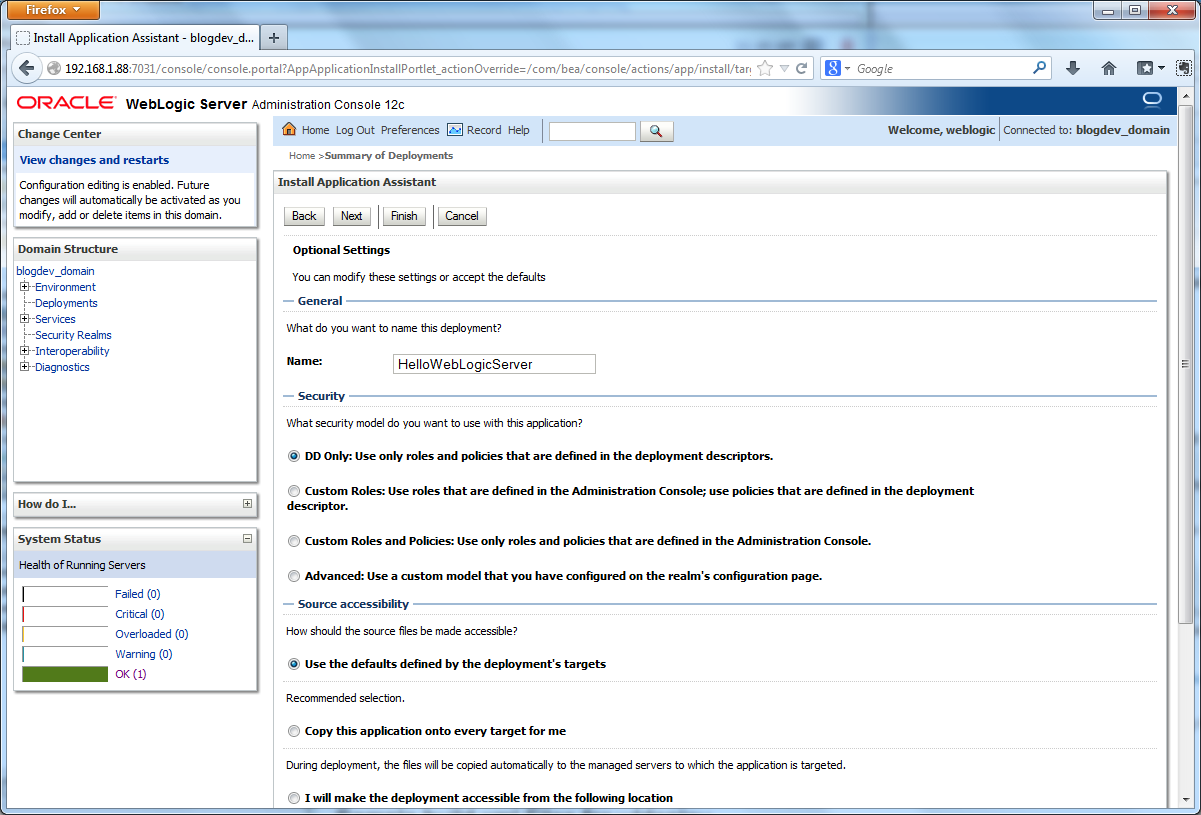
The Default Settings Are Fine for Application
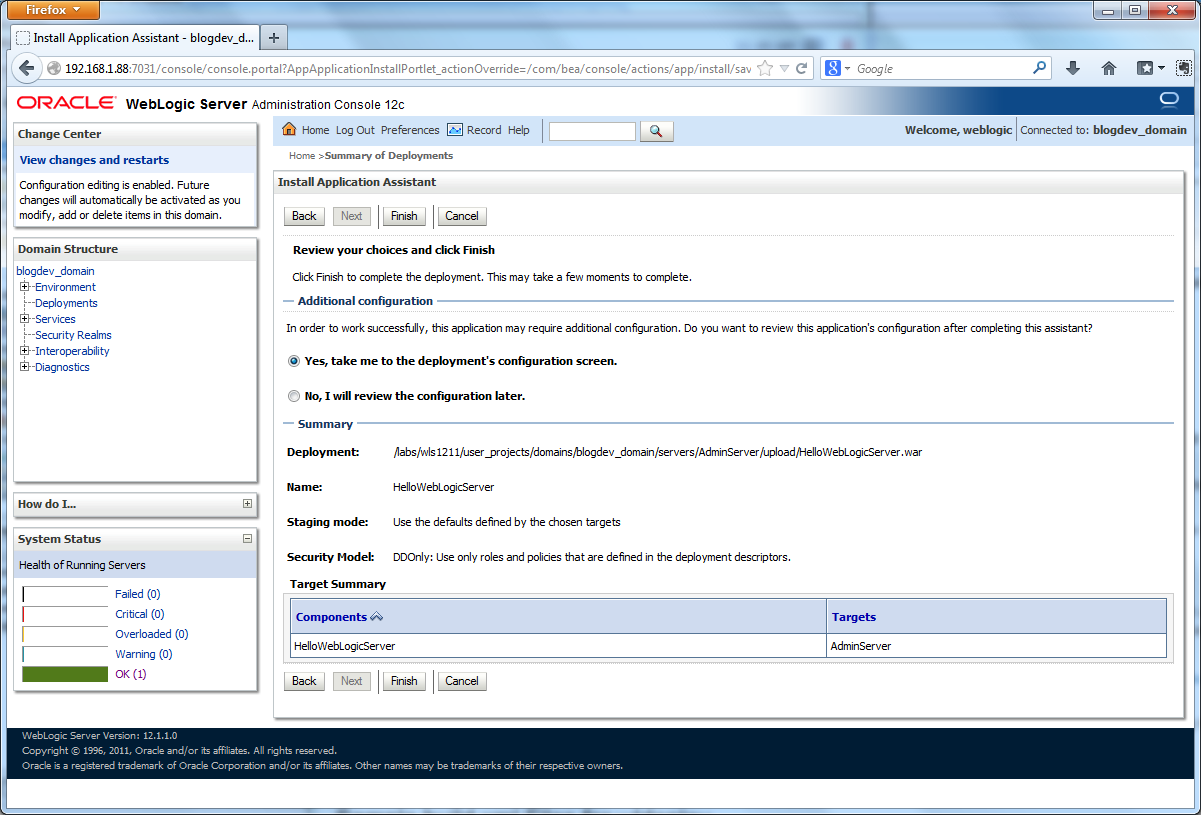
Select Finish to Complete the Installation

The Overview Tab Reviews the Installed Application’s Configuration

Switch Back to the Deployments Tab to See the Installed Application
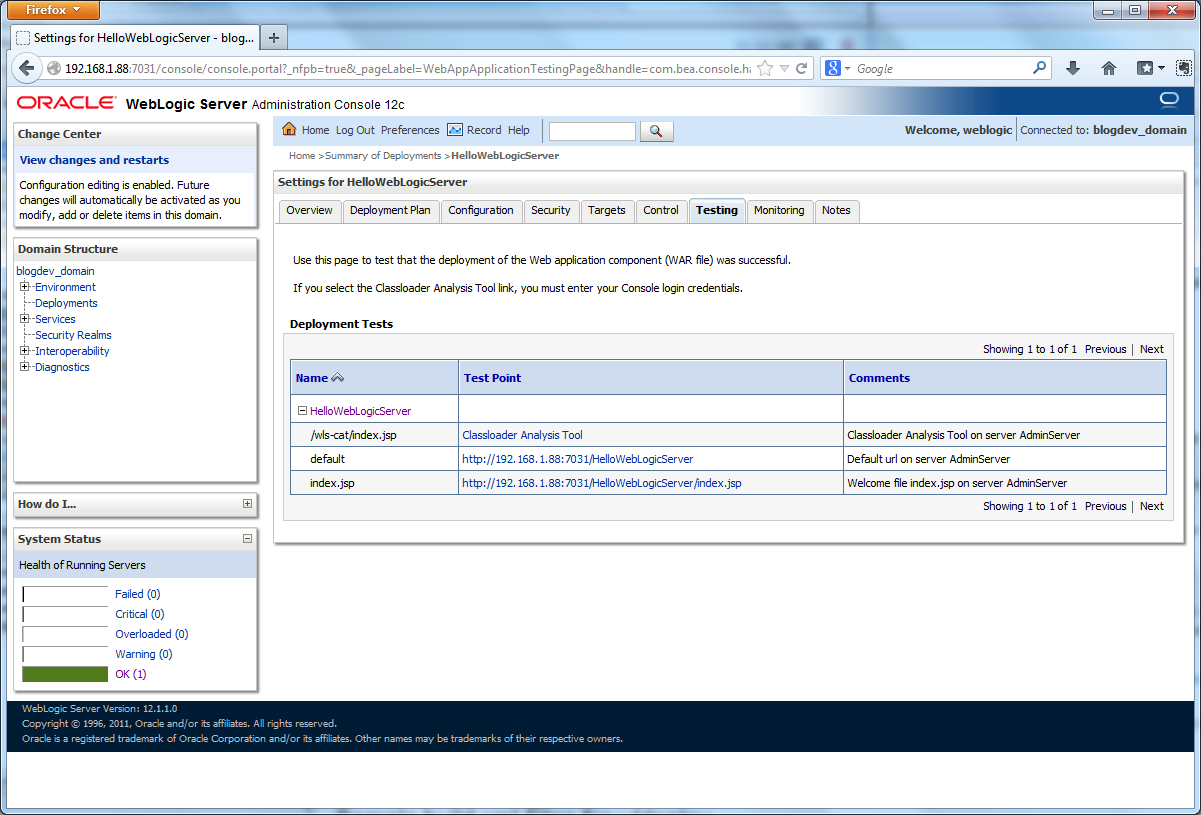
Click on the Application and Select the Testing Tab
Accessing the Application
Now that we have deployed the Hello World application, we will access it from our browser. From any machine on the same network, point a browser to the following URL. Adjust your URL if your VM’s IP address and domain’s port is different.
http://192.168.1.88:7031/HelloWebLogicServer/resources/helloWorld
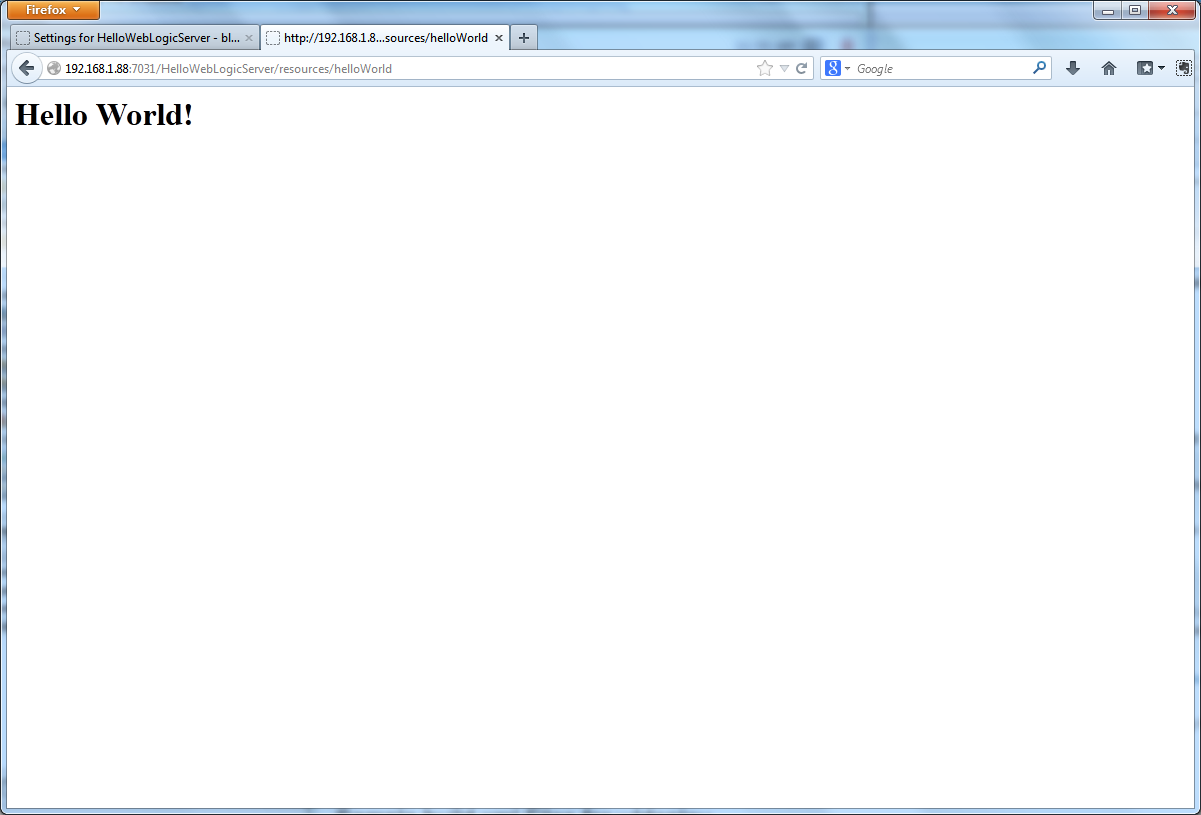
Hello World Application Running from WLS Domain
The Hello World RESTful web service’s Web Application Description Language (WADL) description can be viewed at:
http://192.168.1.88:7031/HelloWebLogicServer/resources/application.wadl
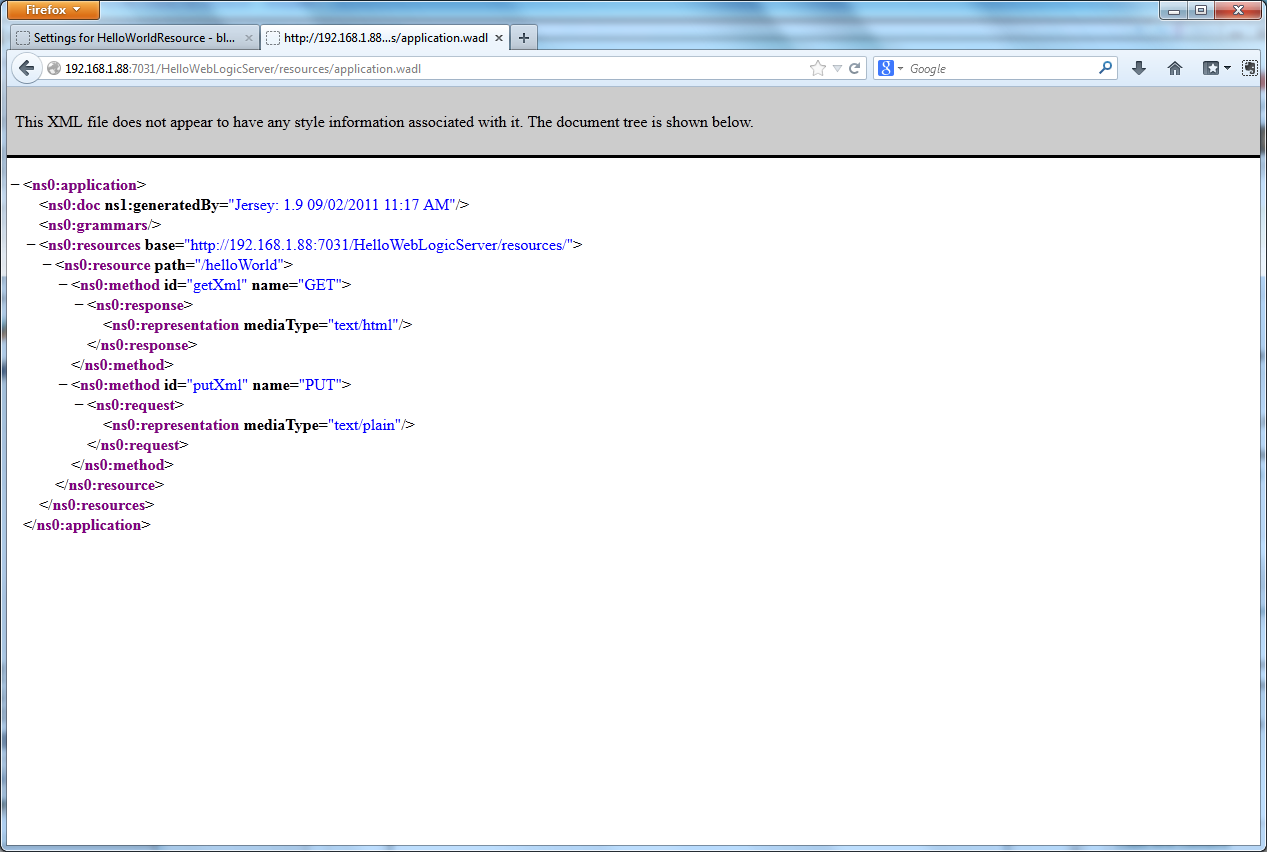
RESTful Web Service’s WADL
Since the Oracle VM is accessible from anywhere on the network, the deployed application is also accessible from any device on the network, as demonstrated below.

Hello World Application Running from WLS Domain on iPhone
Conclusion
This was a simple demonstration of deploying an application to WebLogic Server on Oracle’s Pre-Built Enterprise Java Development VM. WebLogic Server is a powerful, feature-rich Java application server. Once you understand how to configure and administer WLS, you can deploy more complex applications. In future posts we will show a more common, slightly more complex example of automated deployment from Hudson. In addition, we will show how to create a datasource in WLS and access it from the deployed application, to talk to a relational database.
Helpful Links
Resizing Oracle’s Pre-Built Development Virtual Machines
Posted by Gary A. Stafford in DevOps, Enterprise Software Development, Java Development, Software Development on April 25, 2013
Expand the size of Oracle’s Pre-Built Development VM’s (virtual appliances) to accommodate software package updates and additional software installations.
Introduction
In my last post, Using Oracle’s Pre-Built Enterprise Java VM for Development Testing, I discussed issues with the small footprint of the VM. Oracle’s Pre-Built Enterprise Java Development VM, aka virtual appliance, is comprised of (2) 8 GB Virtual Machine Disks (VMDK). The small size of the VM made it impossible to update the system software, or install new applications. After much trial and error, and a few late nights reading posts by others who had run into this problem, I found a fairly easy series of steps to increase the size of the VM. In the following example, I’ll demonstrate how to resize the VM’s virtual disks to 15 GB each; you can resize the disks to whatever size you need.
Terminology
Before we start, a few quick terms. It’s not critical to have a complete understanding of Linux’s Logical Volume Manager (LVM). However, without some basic knowledge of how Linux manages virtual disks and physical storage, the following process might seem a bit confusing. I pulled the definitions directly from Wikipedia and LVM How-To.
- Logical Volume Manager (LVM) – LVM is a logical volume manager for the Linux kernel; it manages disk drivers and similar mass-storage devices.
- Volume Group (VG) – Highest level abstraction within the LVM. Gathers Logical Volumes (LV) and Physical Volumes (PV) into one administrative unit.
- Physical Volume (PV) – Typically a hard disk, or any device that ‘looks’ like a hard disk (eg. a software raid device).
- Logical Volume (LV) – Equivalent of disk partition in a non-LVM system. Visible as a standard block device; as such the LV can contain a file system (eg. /home).
- Logical Extents (LE) – Each LV is split into chunks of data, known as logical extents. The extent size is the same for all logical volumes in the volume group. The system pools LEs into a VG. The pooled LEs can then be concatenated together into virtual disk partitions (LV).
- Virtual Machine Disk (VMDK) – Container for virtual hard disk drives used in virtual machines. Developed by VMware for its virtual appliance products, but is now an open format.
- Virtual Disk Image (VDI) – VirtualBox-specific container format for storing files on the host operating system.
Ten Simple Steps
After having downloaded, assembled, and imported the original virtual appliance into VirtualBox Manager on my Windows computer, I followed the these simple steps to enlarge the size of the VM’s (2) 8 GB VMDK files:
- Locate the VM’s virtual disk images;
- Clone VMDK files to VDI files;
- Resize VDI files;
- Replace VM’s original VMDK files;
- Boot VM using GParted Live;
- Resize VDI partitions;
- Resize Logical Volume (LV);
- Resize file system;
- Restart the VM;
- Delete the original VMDK files.
Original VM in VirtualBox Manager Before Resizing

Original View of VM Before Resizing and Software Updates
1. Locate the VM’s virtual disk images
- From the Windows command line, run the following command to find information about virtual disk images currently in use by VirtualBox.
- Locate the (2) VMDK images associated with the VM you are going to resize.
cd C:\Program Files\Oracle\VirtualBox
VBoxManage list hdds

Two Virtual Disk Images in use by VM
2. Clone the (2) VMDK files to VDI files (substitute your own file paths and VMDK file names)
VBoxManage clonehd "C:\Users\your_username\VirtualBox VMs\VDD_WLS_labs_2012\VDD_WLS_labs_2012-disk1.vmdk" "C:\Users\your_username\VirtualBox VMs\VDD_WLS_labs_2012\VDD_WLS_labs_2012-disk1_ext.vdi" --format vdi
VBoxManage clonehd "C:\Users\your_username\VirtualBox VMs\VDD_WLS_labs_2012\VDD_WLS_labs_2012-disk2.vmdk" "C:\Users\your_username\VirtualBox VMs\VDD_WLS_labs_2012\VDD_WLS_labs_2012-disk2_ext.vdi" --format vdi
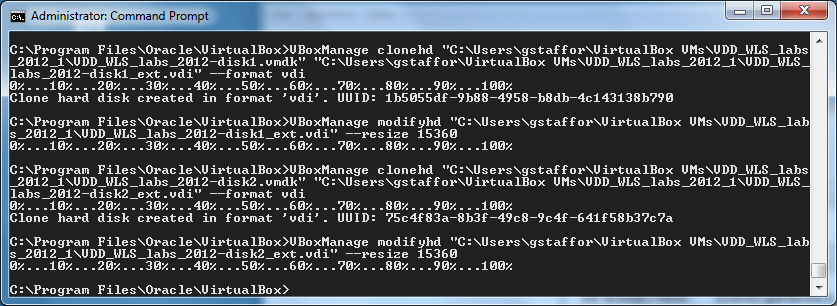
3. Resize the (2) VDI files
To calculate the new size, multiple the number of gigabytes you want to end up with by 1,024 (ie. 15 x 1,024 = 15,360)
VBoxManage modifyhd "C:\Users\your_username\VirtualBox VMs\VDD_WLS_labs_2012\VDD_WLS_labs_2012-disk1_ext.vdi" --resize 15360
VBoxManage modifyhd "C:\Users\your_username\VirtualBox VMs\VDD_WLS_labs_2012\VDD_WLS_labs_2012-disk2_ext.vdi" --resize 15360
4. Replace the VM’s original VMDK files with the VDI files
- Using VirtualBox Manger -> Settings -> Storage, replace the (2) original VMDK files with the new VDI files.
- Keep the Attributes -> Hard Disk set to the same SATA Port 0 and SATA Port 1 of the original VMDK files.

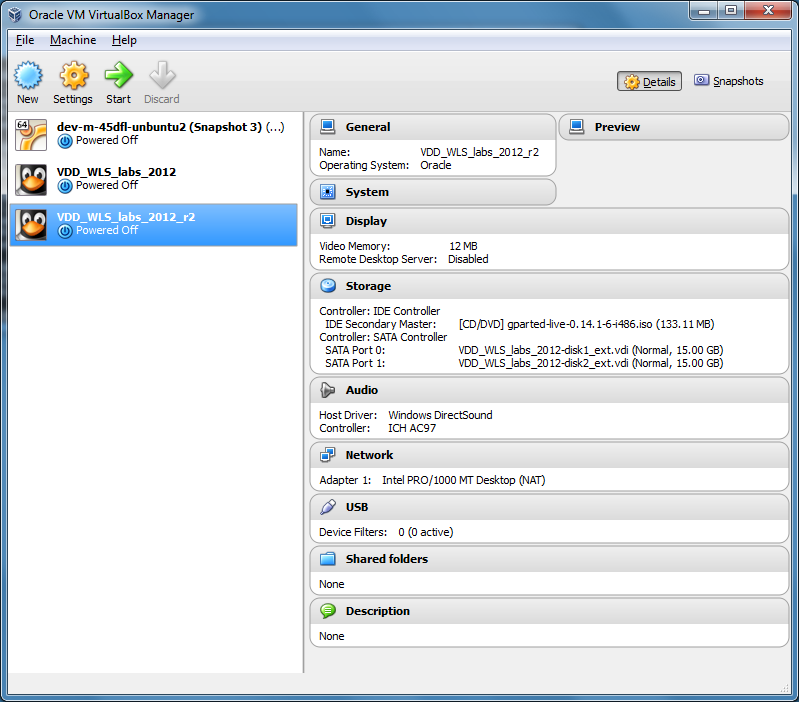
VirtualBox Manager Showing VM with Larger Disks and GParted Live ISO
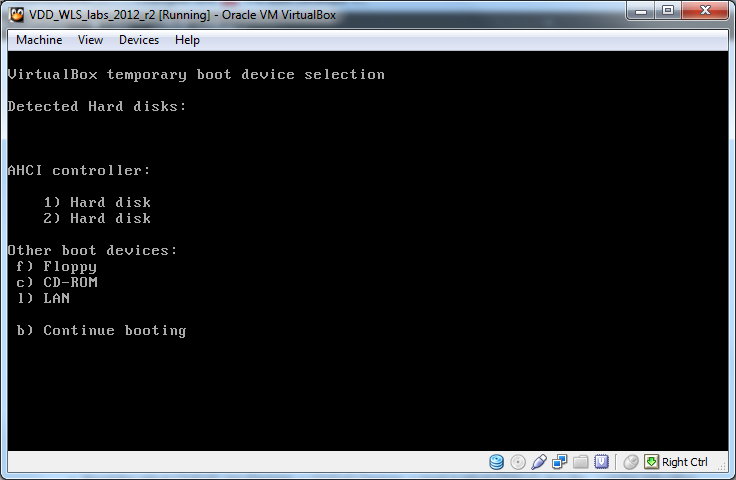
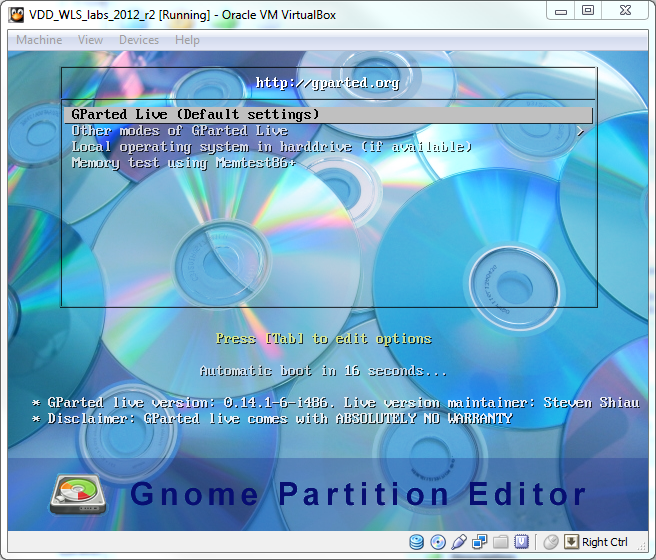
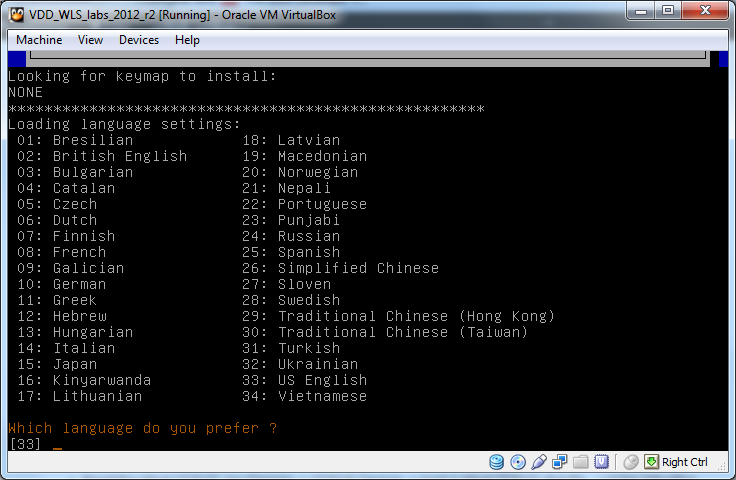
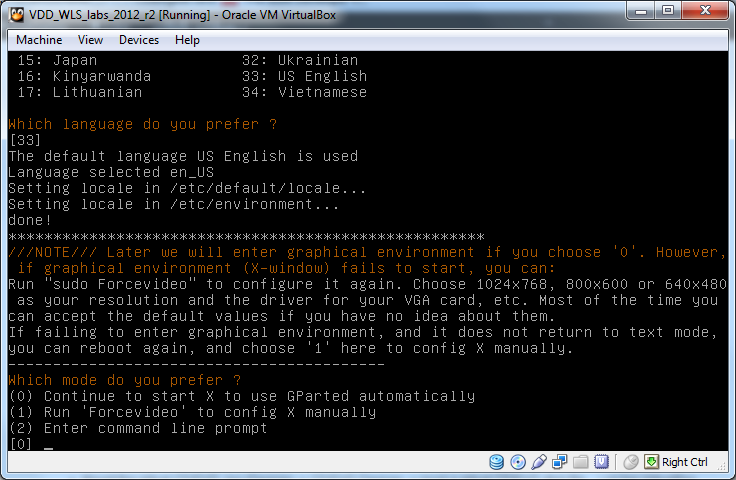
5. Boot VM using the GParted Live ISO image
- Download GParted Live ISO image to the host system (Windows).
- Mount the GParted ISO (Devices -> CD/DVD Devices -> Chose a virtual CD/DVD disk file…).
- Start the VM, hit f12 as VM boots up, and select CD/DVD (option c).
- Answer a few questions for GParted to boot up properly.
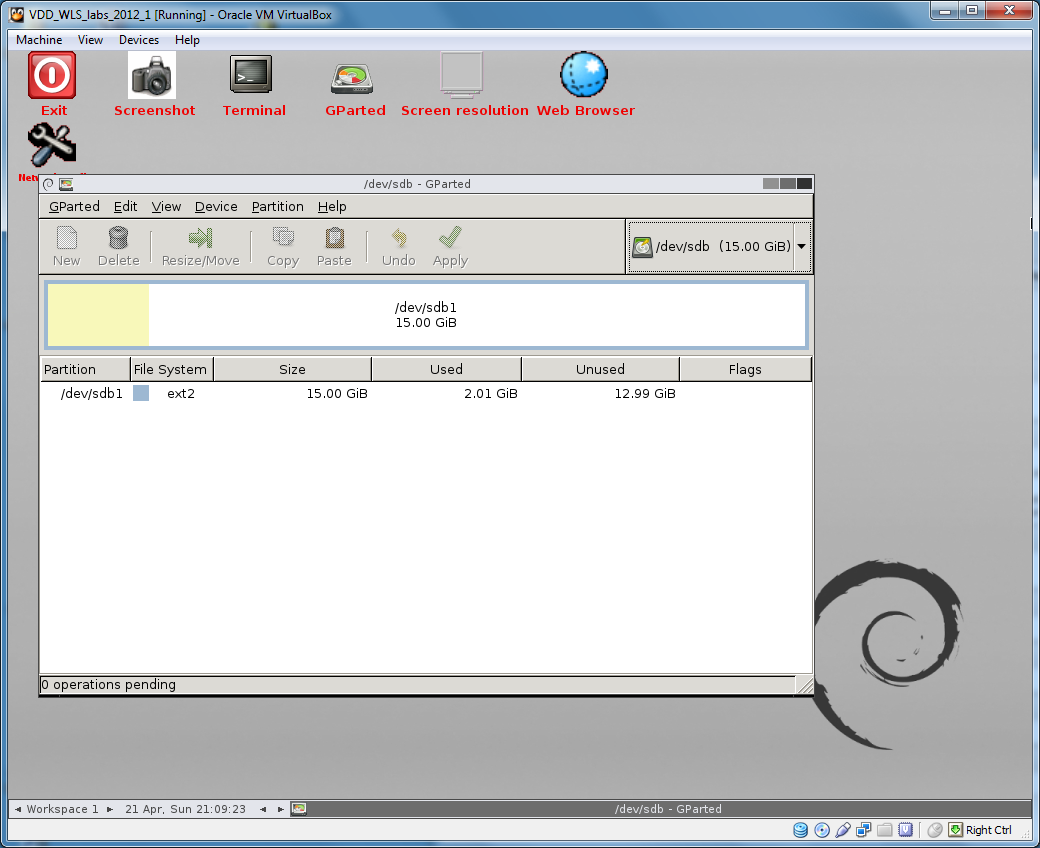
6. Using GParted, resize the (2) VDI partitions
- Expand the ‘/dev/sda2’ and ‘/dev/sdb1’ partitions to use all unallocated space (in gray below).
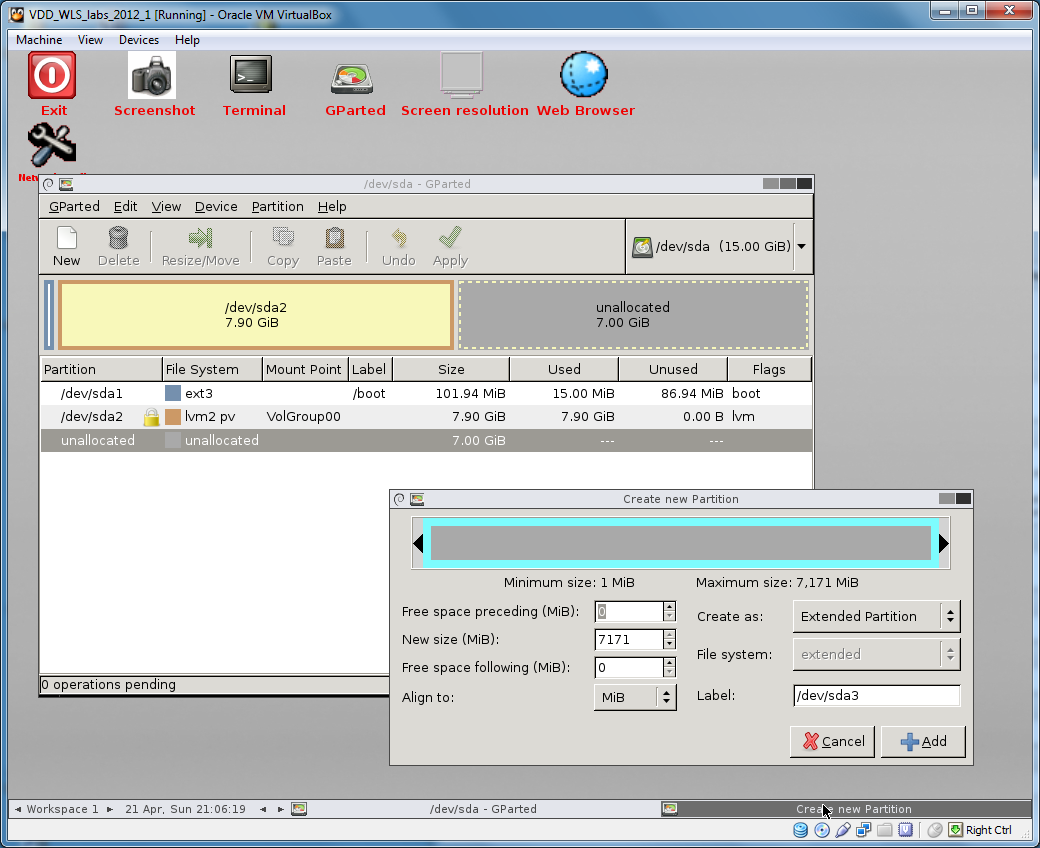
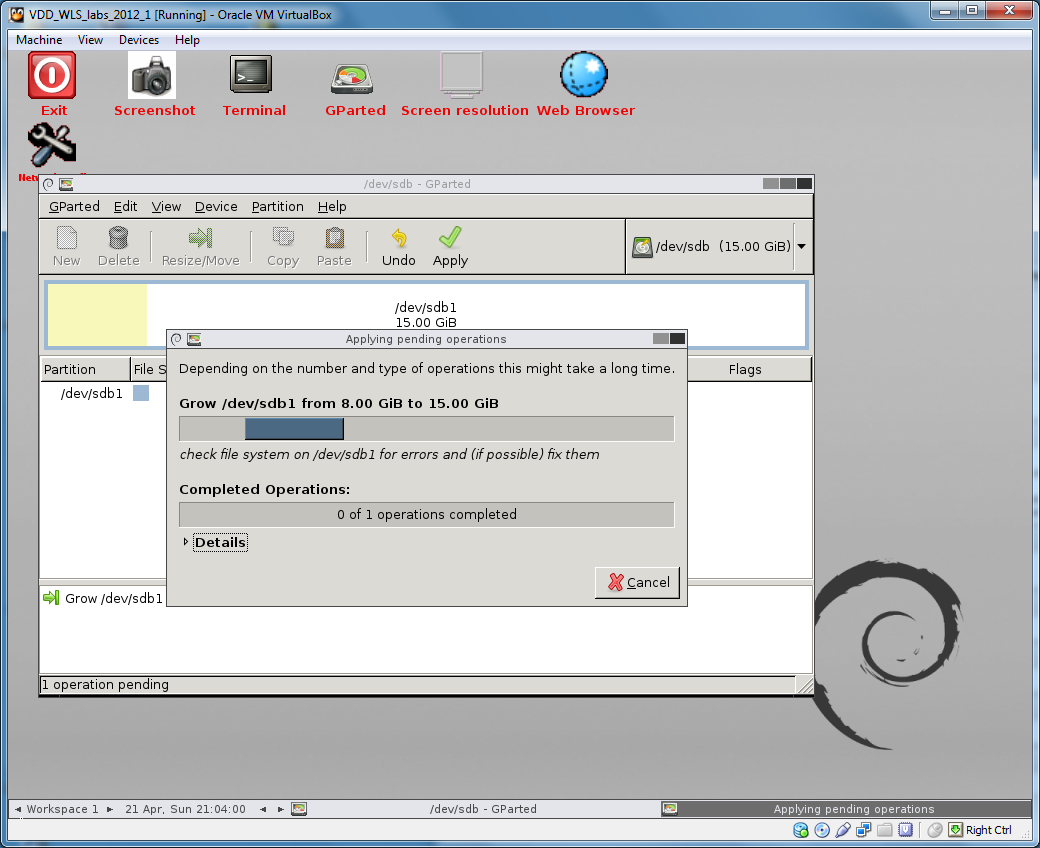
7. Resize Logical Volume (LV)
- Using the Terminal, resize the Logical Volume to the new size of the VDI (‘/dev/sda’).
lvresize -L +7GB /dev/VolGroup00/LogVol00
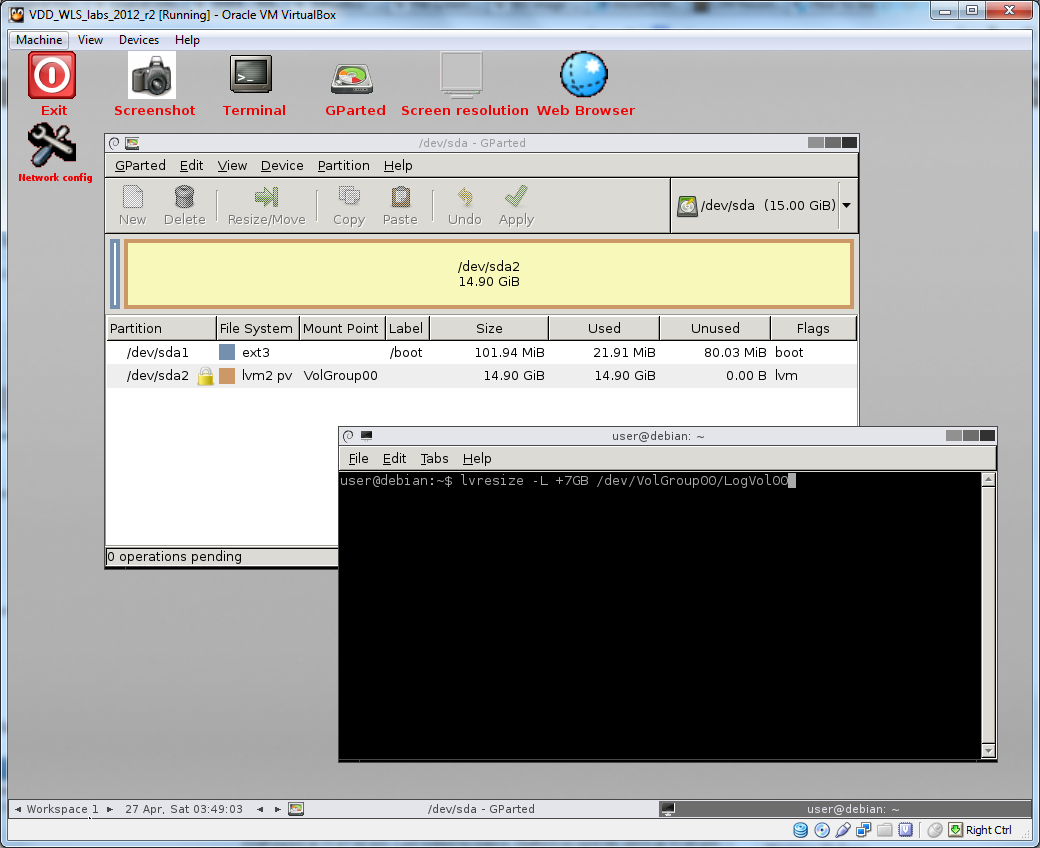
8. Resize file system
- Using the Terminal, resize the file system to match Logical Volume size.
resize2fs -p /dev/mapper/VolGroup00-LogVol00
9. Restart the VM
- Restart the VM, hit f12 as it’s booting up, and select ‘1) Hard disk’ as the boot device.
- Open the Terminal and enter ‘df -hT’ to confirm your results.
- You can now safely install YUM Server configuration to update software packages, and install new applications.

Final View of VM After Resizing and Software Updates
10. Delete the original VMDK files
- Once you sure everything worked, don’t forget to delete the original VMDK files. They are taking up 16 GB of disk space.
Links
Here are links to the two posts where I found most of the above information:
Using Oracle’s Pre-Built Enterprise Java VM for Development Testing
Posted by Gary A. Stafford in Enterprise Software Development, Java Development, Oracle Database Development, Software Development on April 19, 2013
Install and configure Oracle’s Pre-Built Enterprise Java Development VM, with Oracle Linux 5, to create quick, full-featured development test environments.
Virtual Machines for Software Developers
As software engineers, we spend a great deal of time configuring our development machines to simulate test and production environments in which our code will eventually run. With the Microsoft/.NET technology stack, that most often means installing and configuring .NET, IIS, and SQL Server. With the Oracle/Java technology stack – Java, WebLogic or GlassFish Application Server, and Oracle 11g.
Within the last few years, the growth of virtual machines (VMs) within IT/IS organizations has exploded. According to Wikipedia, a virtual machine (VM), is ‘a software implementation of a machine (i.e. a computer) that executes programs like a physical machine.’ Rapid and inexpensive virtualization of business infrastructure using VMs has led to the exponential growth of private and public cloud platforms.
Instead of attempting to configure development machines to simulate the test and production environments, which are simultaneously running development applications and often personal programs, software engineers can leverage VMs in the same way as IT/IS organizations. Free, open-source virtualization software products from Oracle and VMware offer developers the ability to easily ‘spin-up’ fresh environments to compile, deploy, and test code. Code is tested in a pristine environment, closely configured to match production, without the overhead and baggage of day-to-day development. When testing is complete, the VM is simply deleted and a new copy re-deployed for the next project.
Oracle Pre-Built Virtual Appliances
I’ve worked with a number of virtualization products, based on various Windows and Linux operating systems. Not matter the product or OS, the VM still needs to be set up just like any other new computer system, with software and configuration. However, recently I began using Oracle’s pre-built developer VMs. Oracle offers a number of pre-built VMs for various purposes, including database development, enterprise Java development, business intelligence, application hosting, SOA development, and even PHP development. The VMs, called virtual appliances, are Open Virtualization Format Archive files, built to work with Oracle VM VirtualBox. Simply import the appliance into VirtualBox and start it up.
Oracle has provided ready-made VMs that would take even the most experienced team of IT professionals days to download, install, configure, and integrate. All the configuration details, user accounts information, instructions for use, and even pre-loaded tutorials, are provided. Oracle notes on their site that these VMs are not intended for use in production. However, the VMs are more than robust enough to use as a development test environment.
Because of its similarity to my production environment, I the installed the Enterprise Java Development VM on a Windows 7 Enterprise-based development computer. The Oracle Linux 5 OS-based VM has almost everything that comprises basic enterprise test and production environment based on the Oracle/Java technology stack. The VM includes an application server, source control server, build automation server, Java SDK, two popular IDE’s, and related components. The VM includes Java JDK 1.6+, WebLogic Server, Coherence, TopLink, Subversion, Hudson, Maven, NetBeans, Enterprise Pack for Eclipse, and so forth.
Aside from a database server, the environment has everything most developers might need to develop, build, store, and host their code. If you need a database, as most of us do, you can install it into the VM, or better yet, implement the Database App Development VM, in parallel. The Database VM contains Oracle’s 11g Release 2 enterprise-level relational database, along with several related database development and management tools. Using a persistence layer (data access layer), built with the included EclipseLink, you can connect the Enterprise appliance to the database appliance.
View of Oracle WebLogic 12c Running within VM
Set-Up Process
I followed the following steps to setup my VM:
- Update (or download and install) Oracle VM VirtualBox to the latest release.
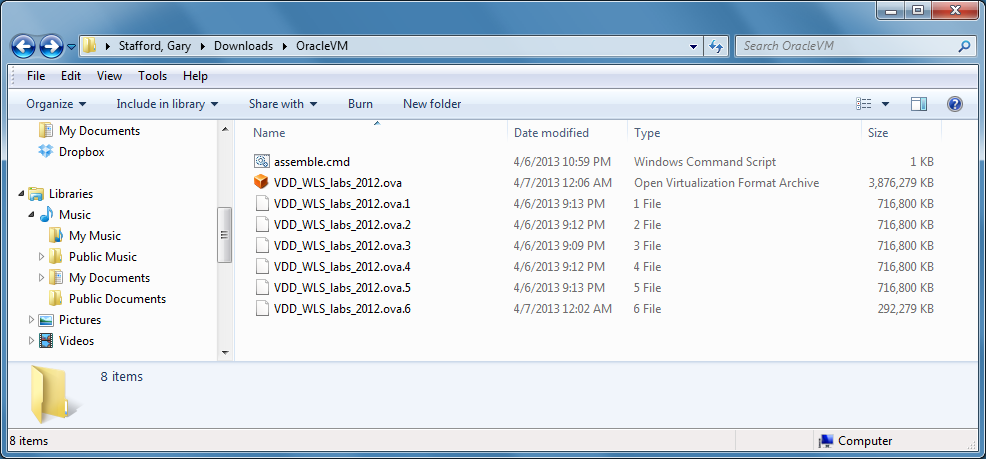
- Download (6) Open Virtualization Format Archive (OVF/.ova) files.
- Download script to combine the .ova files.
- Execute script to assemble (6) .ova files into single. ova file.
- Import the appliance (combined .ova file) into VirtualBox.
- Optional: Clone and resize the appliance’s (2) virtual machines disks (see note below).
- Optional: Add the Yum Server configuration to the VM to enable normal software updates (see instructions below).
- Change any necessary settings within VM: date/time, timezone, etc.
- Install and/or update system software and development applications within VM: Java 1.7, etc.
View of Combined OVF File Ready for Import into VirtualBox
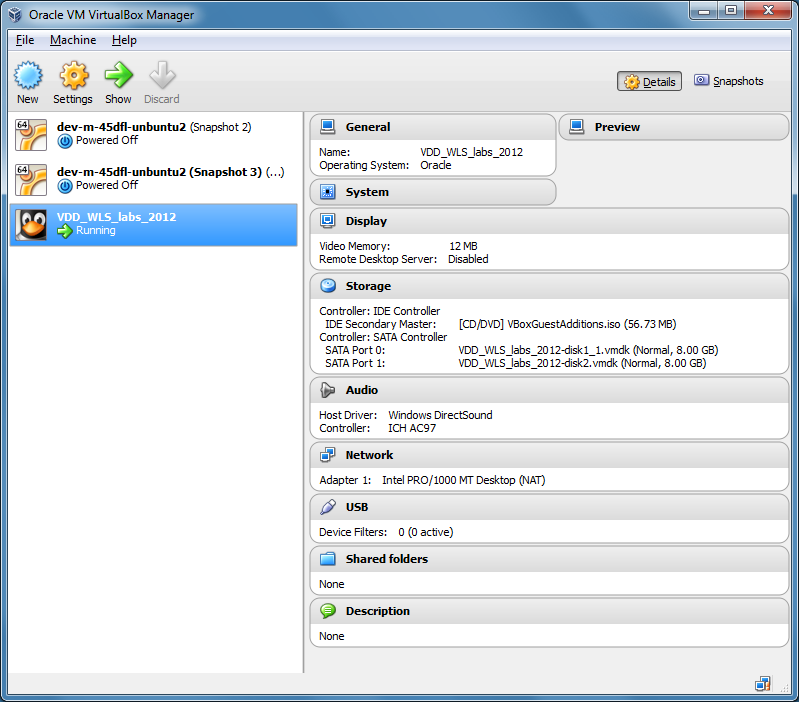
View of Appliance within Oracle VM VirtualBox Manager for Windows

View of Pre-Built VM Running on Oracle VM VirtualBox Prior to Software Updates
Issue with Small Footprint of VM
The small size of the of pre-built VM is major issue I ran into almost immediately. Note in the screen grab above of VirtualBox, the Oracle VM only has (2) 8 GB virtual machine disks (.vmdk). Although Oracle designed the VMs to have a small footprint, it was so small that I quickly filled up its primary partition. At that point, the VM was too full to apply the even the normal system updates. I switched the cache location for yum to a different partition, but then ran out of space again when yum tried to apply the updates it had downloaded to the primary partition.
Lack of disk space was a complete show-stopper for me until I researched a fix. Unfortunately, VirtualBox’s ‘VBoxManage modifyhd –resize’ command is not yet compatible with the virtual machine disk (.vmdk) format. After much trial and error, and a few late nights reading posts by others who had run into this problem, I found a fairly easy series of steps to enlarge the size of the VM. It doesn’t require you to be a complete ‘Linux Geek’, and only takes about 30 minutes of copying and restarting the VM a few times. I will included the instructions in this separate, upcoming post.
Expanded VM Disks in New Copy of Appliance
Issue with Package Updater
While solving the VM’s disk space issue, I also discoverer the VM’s Enterprise Linux System was setup with something called the Unbreakable Linux Network (ULN) Update Agent. From what I understood, without a service agreement with Oracle, I could not update the VM’s software using the standard Package Updater. However, a few quick commands I found on the Yum Server site, overcame that limitation and allowed me to update the VM’s software. Just follow the simple instructions here, for Oracle Linux 5. There are several hundred updates that will be applied, including an upgrade of Oracle Linux from 5.5 to 5.9.
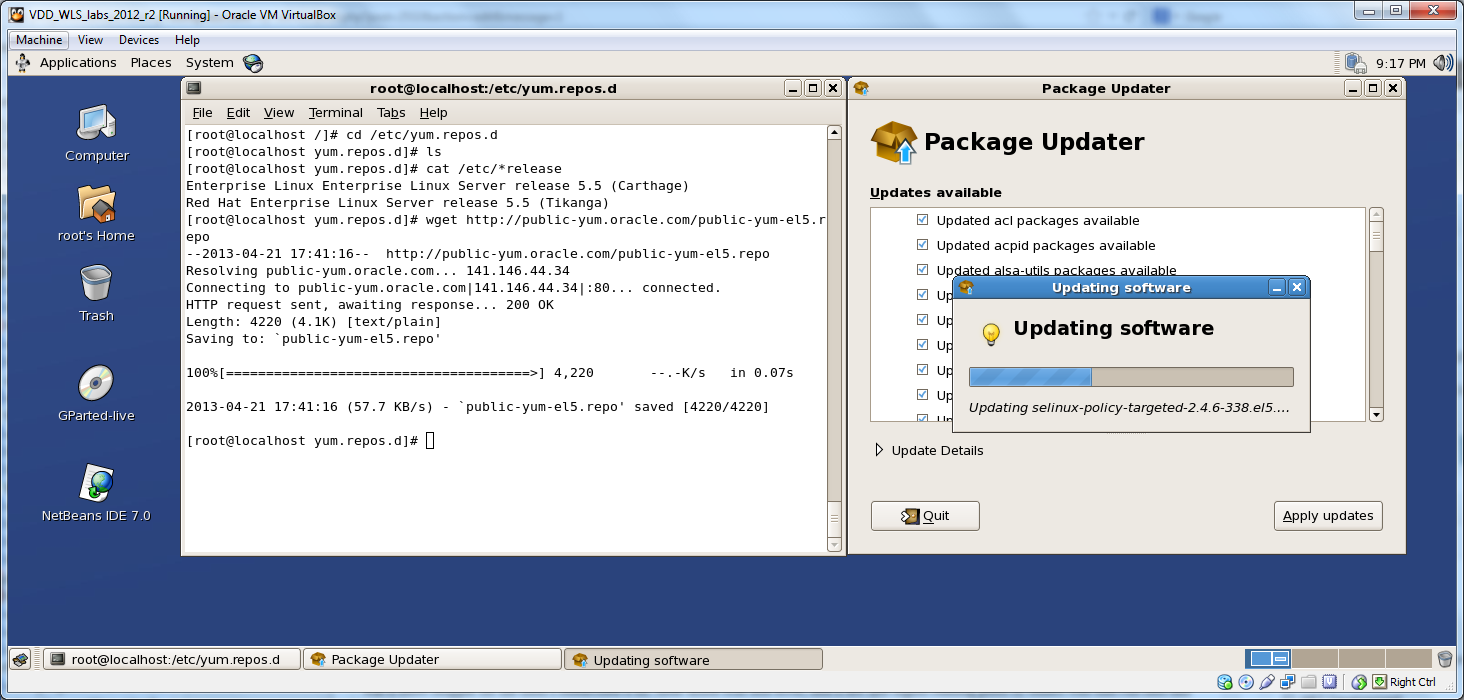
Software Updates Now Working Using Yum Server Repo
Issue with Java Updates
Along with the software updates, I ran into an issue installing the latest version of Java. I attempted to install the standard Oracle package that contained the latest Java JDK, JRE, and NetBeans for Linux. Upon starting the install script, I immediately received a ‘SELinux AVC denial’ message. This security measure halted my installation with the following error: ‘The java application attempted to load /labs/java/jre1.7.0_21/lib/i386/client/libjvm.so which requires text relocation. This is a potential security problem.‘
To get around the SELinux AVC denial issue, I installed the JRE, JDK, and NetBeans separately. Although this took longer and required a number of steps, it allowed me to get around the security and install the latest version of Java.
Note I later discovered that I could have simply changed the SELinux Security Level to ‘Permissive’ in the SELinux Security and Firewall, part of the Administrative Preferences. This would have allowed the original Oracle package containing the JDK, JRE, and NetBeans, to run.
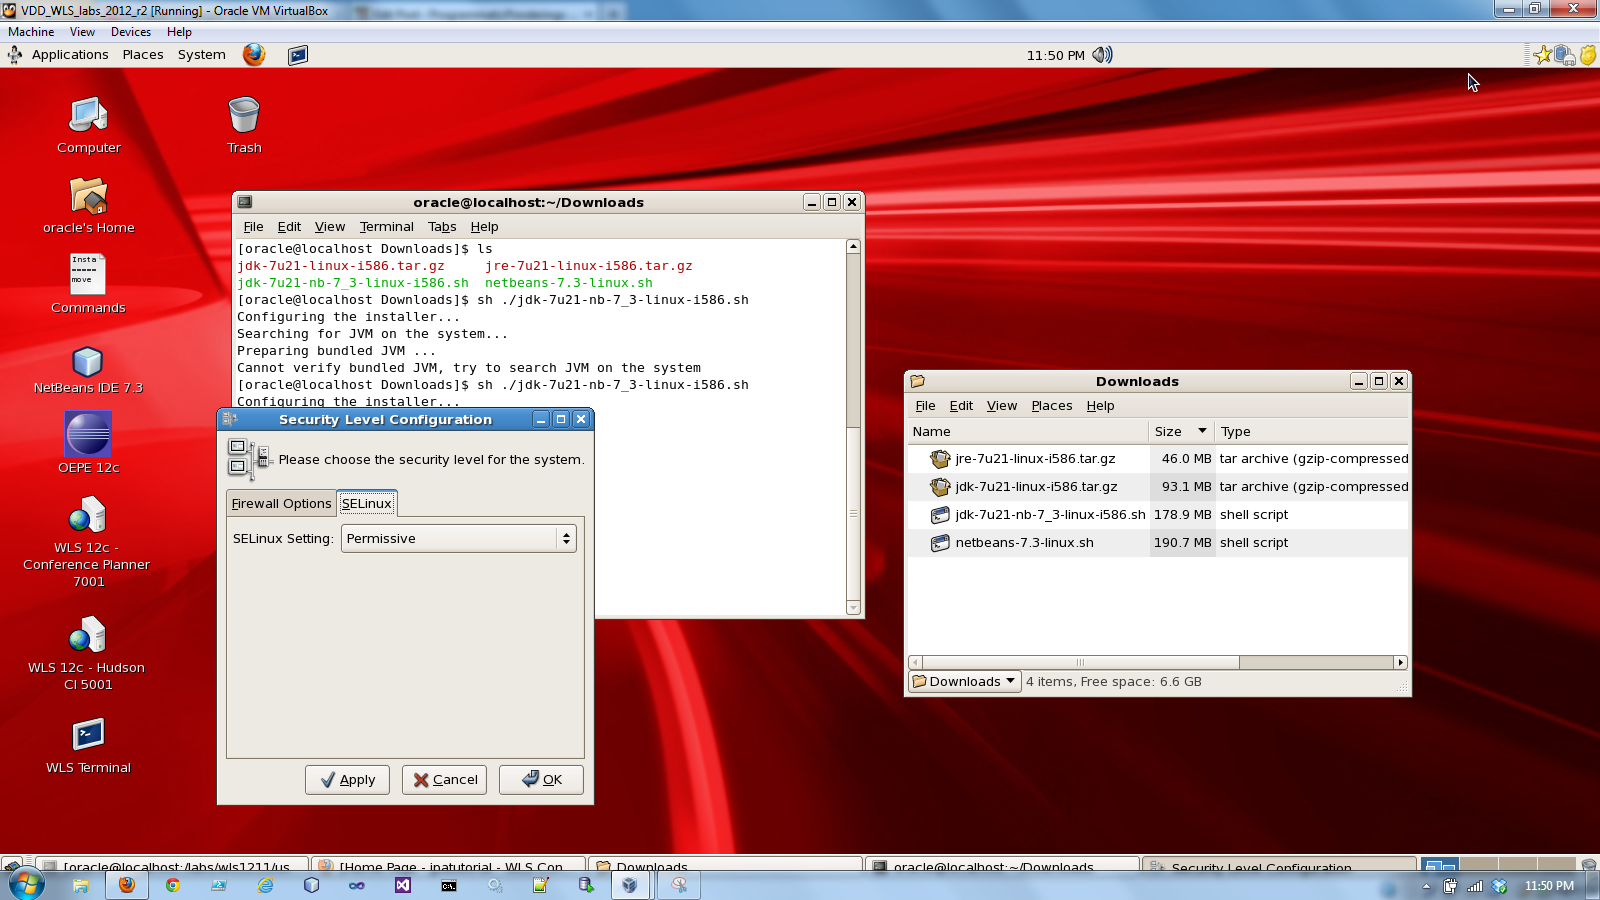
Changing the SELinux Security Level to Allow Installation of Java and NetBeans
Links
Returning JSONP from Java EE RESTful Web Services Using jQuery, Jersey, and GlassFish – Part 2 of 2
Posted by Gary A. Stafford in Java Development, Software Development on October 4, 2012
Create a Jersey-specific Java EE RESTful web service, and an HTML-based client to call the service and display JSONP. Test and deploy the service and the client to different remote instances of GlassFish.
Background
In part 1 of this series, we created a Jersey-specific RESTful web service from a database using NetBeans. The service returns JSONP in addition to JSON and XML. The service was deployed to a GlassFish domain, running on a Windows box. On this same box is the SQL Server instance, running the Adventure Works database, from which the service obtains data, via the entity class.
Objectives
In part two of this series, we will create a simple web client to consume and display the JSONP returned by the RESTful web service. There are many options available for creating a service consumer (client) depending on your development platform and project requirements. We will keep it simple, no complex, complied code, just HTML and JavaScript with jQuery, the well-known JavaScript library.
We will host the client on a separate GlassFish domain, running on an Ubuntu Linux VM using Oracle’s VM VirtualBox. This is a different machine than the service was installed on. When opened by the end-user in a web browser, the client files, including the JavaScript file that calls the service, are downloaded to the end-users machine. This will simulate a typical cross-domain situation where a client application needs to consume RESTful web services from a remote source. This is not allowed by the same origin policy, but overcome by returning JSONP to the client, which wraps the JSON payload in a function call.
Here are the high-level steps we will walk-through in part two:
- Create a simple HTML client using jQuery and ajax to call the RESTful web service;
- Add jQuery functionality to parse and display the JSONP returned by the service;
- Deploy the client to a separate remote instance of GlassFish using Apache Ant;
- Test the client’s ability to call the service across domains and display JSONP.
Creating the RESTful Web Service Client
New NetBeans Web Application Project
Create a new Java Web Application project in NetBeans. Name the project ‘JerseyRESTfulClient’. The choice of GlassFish server and domain where the project will be deployed is unimportant. We will use Apache Ant to deploy the client when we finish the building the project. By default, I chose my local instance of GlassFish, for testing purposes.

Create a New Web Application Project in NetBeans

Name and Location of New Web Application Project

Server and Settings of New Web Application Project

Optional Frameworks to Include in New Web Application Project

View of New Web Application Project in NetBeans
Adding Files to Project
The final client project will contains four new files:
- employees.html – HTML web page that displays a list of employees;
- employees.css – CSS information used to by employees.html;
- employees.js – JavaScript code used to by employees.html;
- jquery-1.8.2.min.js – jQuery 1.8.2 JavaScript library, minified.
First, we need to download and install jQuery. At the time of this post, jQuery 1.8.2 was the latest version. I installed the minified version (jquery-1.8.2.min.js) to save space.
Next, we will create the three new files (employees.html, employees.css, and employees.js), using the code below. When finished, we need to place all four files into the ‘Web Pages’ folder. The final project should look like:

Final Client Project View
HTML
The HTML file is the smallest of the three files. The HTML page references the CSS file, the JavaScript file, and the jQuery library file. The CSS file provides the presentation (look and feel) and JavaScript file, using jQuery, dynamically provides much of the content that the HTML page normally would contain.
<!DOCTYPE html>
<html>
    <head>
        <title>Employee List</title>
        <meta http-equiv="Content-Type" content="text/html; charset=UTF-8">
        <link type="text/css" rel="stylesheet" href="employees.css" />
        <script src="jquery-1.8.2.min.js" type="text/javascript"></script>
        <script src="employees.js" type="text/javascript"></script>
    </head>
    <body>
        <div id="pageTitle">Employee List</div>
        <div id="employeeList"></div>
    </body>
</html>
Cascading Style Sheets (CSS)
The CSS file is also pretty straight-forward. The pageTitle and employeeList id selectors and type selectors are used directly by the HTML page. The class selectors are all applied to the page by jQuery, in the JavaScript file.
body {
    font-family: sans-serif;
    font-size: small;
    padding-left: 6px;
}

span {
    padding: 6px;
    display: inline-block;
}

div {
    border-bottom: lightgray solid 1px;
}

#pageTitle {
    font-size: medium;
    font-weight: bold;
    padding: 12px 0px 12px 0px;
    border: none;
}

#employeeList {
    float: left;
    border: gray solid 1px;
}

.empId {
    width: 50px;
    text-align: center;
    border-right: lightgray solid 1px;
}

.name {
    width: 200px;
    border-right: lightgray solid 1px;
}

.jobTitle {
    width: 250px;
}

.header {
    font-weight: bold;
    border-bottom: gray solid 1px;
}

.even{
    background-color: rgba(0, 255, 128, 0.09);
}

.odd {
    background-color: rgba(0, 255, 128, 0.05);
}

.last {
    border-bottom: none;
}
jQuery and JavaScript
The JavaScript file is where all the magic happens. There are two primary functions. First, getEmployees, which calls the jQuery.ajax() method. According jQuery’s website, the jQuery Ajax method performs an asynchronous HTTP (Ajax) request. In this case, it calls our RESTful web service and returns JSONP. The jQuery Ajax method uses an HTTP GET method to request the following service resource (URI):
http://[your-service's-glassfish-server-name]:[your-service's-glassfish-domain-port]/JerseyRESTfulService/webresources/entities.vemployee/{from}/{to}/jsonp?callback={callback}.
The base (root) URI of the service in the URI above is as follows:
http://[server]:[port]/JerseyRESTfulService/webresources/entities.vemployee/
This is followed by a series of elements (nodes), {from}/{to}/jsonp, which together form a reference to a specific method in our service. As explained in the first post of this series, we include the /jsonp element to indicate we want to call the new findRangeJsonP method to return JSONP, as opposed to findRange method that returns JSON or XML. We pass the {from} path parameter a value of ‘0’ and the {to} path parameter a value of ‘10’.
Lastly, the method specifies the callback function name for the JSONP request, parseResponse, using the jsonpCallback setting. This value will be used instead of the random name automatically generated by jQuery. The callback function name is appended to the end of the URI as a query parameter. The final URL is as follows:
http://[server]:[port]/JerseyRESTfulService/webresources/entities.vemployee/0/10/jsonp?callback=parseResponse.
Note the use of the jsonpCallback setting is not required, or necessarily recommended by jQuery. Without it, jQuery generate a unique name as it will make it easier to manage the requests and provide callbacks and error handling. This example will work fine if you exclude the jsonpCallback: "parseResponse" setting.
getEmployees = function () {
    $.ajax({
        cache: true,
        url: restfulWebServiceURI,
        data: "{}",
        type: "GET",
        jsonpCallback: "parseResponse",
        contentType: "application/javascript",
        dataType: "jsonp",
        error: ajaxCallFailed,
        failure: ajaxCallFailed,
        success: parseResponse
    });
};
Once we have successfully returned the JSONP, the jQuery Ajax method calls the parseResponse(data) function, passing the JSON to the data argument. The parseResponse function iterates through the employee objects using the jQuery.each() method. Each field of data is surrounding with span and div tags, and concatenated to the employeeList string variable. The string is appended to the div tag with the id of ‘employeeList’, using jQuery’s .append() method. The result is an HTML table-like grid of employee names, ids, and job title, displayed on the employees.html page.
Lastly, we call the colorRows() function. This function uses jQuery’s .addClass(className) to assign CSS classes to objects in the DOM. The classes are added to stylize the grid with alternating row colors and other formatting.
parseResponse = function (data) {
    var employee = data.vEmployee;

    var employeeList = "";

    employeeList = employeeList.concat("<div class='header'>" +
        "<span class='empId'>Id</span>" +
        "<span class='name'>Employee Name</span>" +
        "<span class='jobTitle'>Job Title</span>" +
        "</div>");

    $.each(employee, function(index, employee) {
        employeeList = employeeList.concat("<div class='employee'>" +
            "<span class='empId'>" +
            employee.businessEntityID +
            "</span><span class='name'>" +
            employee.firstName + " " + employee.lastName +
            "</span><span class='jobTitle'>" +
            employee.jobTitle +
            "</span></div>");
    });

    $("#employeeList").empty();
    $("#employeeList").append(employeeList);
    colorRows();
};
Here are the complete JavaScript file contents:
// Immediate function
(function () {
    "use strict";

    var restfulWebServiceURI, getEmployees, ajaxCallFailed, colorRows, parseResponse;

    restfulWebServiceURI = "http://[your-service's-server-name]:[your-service's-port]/JerseyRESTfulService/webresources/entities.vemployee/0/10/jsonp";

    // Execute after the DOM is fully loaded
    $(document).ready(function () {
        getEmployees();
    });

    // Retrieve Employee List as JSONP
    getEmployees = function () {
        $.ajax({
            cache: true,
            url: restfulWebServiceURI,
            data: "{}",
            type: "GET",
            jsonpCallback: "parseResponse",
            contentType: "application/javascript",
            dataType: "jsonp",
            error: ajaxCallFailed,
            failure: ajaxCallFailed,
            success: parseResponse
        });
    };

    // Called if ajax call fails
    ajaxCallFailed = function (jqXHR, textStatus) {
        console.log("Error: " + textStatus);
        console.log(jqXHR);
        $("#employeeList").empty();
        $("#employeeList").append("Error: " + textStatus);
    };

    // Called if ajax call is successful
    parseResponse = function (data) {
        var employee = data.vEmployee;

        var employeeList = "";

        employeeList = employeeList.concat("<div class='header'>" +
            "<span class='empId'>Id</span>" +
            "<span class='name'>Employee Name</span>" +
            "<span class='jobTitle'>Job Title</span>" +
            "</div>");

        $.each(employee, function(index, employee) {
            employeeList = employeeList.concat("<div class='employee'>" +
                "<span class='empId'>" +
                employee.businessEntityID +
                "</span><span class='name'>" +
                employee.firstName + " " + employee.lastName +
                "</span><span class='jobTitle'>" +
                employee.jobTitle +
                "</span></div>");
        });

        $("#employeeList").empty();
        $("#employeeList").append(employeeList);
        colorRows();
    };

    // Styles the Employee List
    colorRows = function(){
        $("#employeeList .employee:odd").addClass("odd");
        $("#employeeList .employee:even").addClass("even");
        $("#employeeList .employee:last").addClass("last");
    };
} ());
Deployment to GlassFish
To deploy the RESTful web service client to GlassFish, run the following Apache Ant target. The target first calls the clean and dist targets to build the .war file, Then, the target calls GlassFish’s asadmin deploy command. It specifies the remote GlassFish server, admin port, admin user, admin password (in the password file), secure or insecure connection, the name of the container, and the name of the .war file to be deployed. Note that the server is different for the client than it was for the service in part 1 of the series.
<target name="glassfish-deploy-remote" depends="clean, dist"
        description="Build distribution (WAR) and deploy to GlassFish">
    <exec failonerror="true" executable="cmd" description="asadmin deploy">
        <arg value="/c" />
        <arg value="asadmin --host=[your-client's-glassfish-server-name]
            --port=[your-client's-glassfish-domain-admin-port]
            --user=admin --passwordfile=pwdfile --secure=false
            deploy --force=true --name=JerseyRESTfulClient
            --contextroot=/JerseyRESTfulClient dist\JerseyRESTfulClient.war" />
    </exec>
</target>
Although the client application does not require any Java code, JSP pages, or Servlets, I chose to use NetBeans’ Web Application project template to create the client and chose to create a .war file to make deployment to GlassFish easier. You could just install the four client files (jQuery, HTML, CSS, and JavaScript) on Apache, IIS, or any other web server as a simple HTML site.

Deploy Client Application to Remote GlassFish Domain Using Ant Target
Once the application is deployed to GlassFish, you should see the ‘JerseyRESTfulClient’ listed under the Applications tab within the remote server domain.

Client Application Deployed to Remote GlassFish Domain
We will call the client application from our browser. The client application, whose files are downloaded and are now local on our machine, will in turn will call the service. The URL to call the client is: http://[your-client's-glassfish-server-name]:[your-client's-glassfish-domain-port]/JerseyRESTfulClient/employees.html (see call-out 1, in the screen-grab, below).
Using Firefox with Firebug, we can observe a few important items once the results are displayed (see the screen-grab, below):
- The four client files (jQuery, HTML, CSS, and JavaScript) are cached after the first time the client URL loads, but the jQuery Ajax service call is never cached (call-out 2);
- All the client application files are loaded from one domain, while the service is called from another domain (call-out 3);
- The ‘parseRequest’ callback function in the JSONP response payload, wraps the JSON data (call-out 4).
")
Employee List Displayed by Client Application in Firefox
The JSONP returned by the service to the client (abridged for length):
parseResponse({"vEmployee":[{"addressLine1":"4350 Minute Dr.","businessEntityID":"1","city":"Newport Hills","countryRegionName":"United States","emailAddress":"ken0@adventure-works.com","emailPromotion":"0","firstName":"Ken","jobTitle":"Chief Executive Officer","lastName":"Sánchez","middleName":"J","phoneNumber":"697-555-0142","phoneNumberType":"Cell","postalCode":"98006","stateProvinceName":"Washington"},{"addressLine1":"7559 Worth Ct.","businessEntityID":"2","city":"Renton","countryRegionName":"United States","emailAddress":"terri0@adventure-works.com","emailPromotion":"1","firstName":"Terri","jobTitle":"Vice President of Engineering","lastName":"Duffy","middleName":"Lee","phoneNumber":"819-555-0175","phoneNumberType":"Work","postalCode":"98055","stateProvinceName":"Washington"},{...}]})
The JSON passed to the parseResponse(data) function’s data argument (abridged for length):
{"vEmployee":[{"addressLine1":"4350 Minute Dr.","businessEntityID":"1","city":"Newport Hills","countryRegionName":"United States","emailAddress":"ken0@adventure-works.com","emailPromotion":"0","firstName":"Ken","jobTitle":"Chief Executive Officer","lastName":"Sánchez","middleName":"J","phoneNumber":"697-555-0142","phoneNumberType":"Cell","postalCode":"98006","stateProvinceName":"Washington"},{"addressLine1":"7559 Worth Ct.","businessEntityID":"2","city":"Renton","countryRegionName":"United States","emailAddress":"terri0@adventure-works.com","emailPromotion":"1","firstName":"Terri","jobTitle":"Vice President of Engineering","lastName":"Duffy","middleName":"Lee","phoneNumber":"819-555-0175","phoneNumberType":"Work","postalCode":"98055","stateProvinceName":"Washington"},{...}]}
Firebug also allows us to view the JSON in a more structured and object-oriented view:
")
Firefox Showing formatted JSON Data Using Firebug
Conclusion
We have successfully built and deployed a RESTful web service to one GlassFish domain, capable of returning JSONP. We have also built and deployed an HTML client to another GlassFish domain, capable of calling the service and displaying the JSONP. The service and client in this example have very minimal functionality. However, the service can easily be scaled to include multiple entities and RESTful services. The client’s capability can be expanded to perform a full array of CRUD operations on the database, through the RESTful web service(s).
Returning JSONP from Java EE RESTful Web Services Using jQuery, Jersey, and GlassFish – Part 1 of 2
Posted by Gary A. Stafford in Java Development, Software Development on October 1, 2012
Create a Jersey-specific Java EE RESTful web service and an HTML-based client to call the service and display JSONP. Test and deploy the service and the client to different remote instances of GlassFish.
Background
According to Wikipedia, JSONP (JSON with Padding) is a complement to the base JSON (JavaScript Object Notation) data format. It provides a method to request data from a server in a different domain, something prohibited by typical web browsers because of the same origin policy.
Jersey is the open source, production quality, JAX-RS (JSR 311) Reference Implementation for building RESTful Web services on the Java platform according to jersey.java.net. Jersey is a core component of GlassFish.
What do these two things have in common? One of the key features of Jersey is its ability to return JSONP. According to Oracle’s documentation, using Jersey, if an instance is returned by a resource method and the most acceptable media type is one of application/javascript, application/x-javascript, text/ecmascript, application/ecmascript or text/jscript then the object that is contained by the instance is serialized as JSON (if supported, using the application/json media type) and the result is wrapped around a JavaScript callback function, whose name by default is “callback”. Otherwise, the object is serialized directly according to the most acceptable media type. This means that an instance can be used to produce the media types application/json, application/xml in addition to application.
There is plenty of opinions on the Internet about the pros and cons of using JSONP over other alternatives to get around the same origin policy. Regardless of the cons, JSONP, with the help of Jersey, provides the ability to call a RESTful web service from a remote server, without a lot of additional coding or security considerations.
Objectives
Similar to GlassFish, Jersey is also tightly integrated into NetBeans. NetBeans provides the option to use Jersey-specific features when creating RESTful web services. According to documentation, NetBeans will generate a web.xml deployment descriptor and to register the RESTful services in that deployment descriptor instead of generating an application configuration class. In this post, we will create Jersey-specific RESTful web service from a database using NetBeans. The service will return JSONP in addition to JSON and XML.
In addition to creating the RESTful web service, in part 2 of this series, we will create a simple web client to display the JSONP returned by the service. There are many options available for creating clients, depending on your development platform and project requirements. We will keep it simple – no complex compiled code, just simple JavaScript using Ajax and jQuery, the well-known JavaScript library.
We will host the RESTful web service on one GlassFish domain, running on a Windows box, along with the SQL Server database. We will host the client on a second GlassFish domain, running on an Ubuntu Linux VM using Oracle’s VM VirtualBox. This is a different machine than the service was installed on. When opened by the end-user in a web browser, the client files, including the JavaScript file that calls the service, are downloaded to the end-users machine. This will simulate a typical cross-domain situation where a client application needs to consume RESTful web services from a remote source. This is not allowed by the same origin policy, but overcome by returning JSONP to the client, which wraps the JSON payload in a function call.
Demonstration
Here are the high-level steps we will walk-through in this two-part series of posts:
- In a new RESTful web service web application project,
- Create an entity class from the Adventure Works database using EclipseLink;
- Create a Jersey-specific RESTful web service using the entity class using Jersey and JAXB;
- Add a new method to service, which leverages Jersey and Jackson’s abilities to return JSONP;
- Deploy the RESTful web service to a remote instance of GlassFish, using Apache Ant;
- Test the RESTful web service using cURL.
- In a new RESTful web service client web application project,
- Create a simple HTML client using jQuery and Ajax to call the RESTful web service;
- Add jQuery functionality to parse and display the JSONP returned by the service;
- Deploy the client to a separate remote instance of GlassFish using Apache Ant;
- Test the client’s ability to call the service across domains and display JSONP.
To demonstrate the example in this post, I have the follow applications installed, configured, and running in my development environment:
- Microsoft SQL Server 2008 R2 (www.microsoft.com/sqlserver)
- Microsoft’s Adventure Works 2008 R2 Sample Database (msftdbprodsamples.codeplex.com)
- Microsoft JDBC Driver 4.0 for SQL Server (msdn.microsoft.com/en-us/sqlserver/aa937724.aspx)
- NetBeans 7.2 Open Source IDE (netbeans.org)
- Apache Any 1.82 (installed with NetBeans or downloaded separately from ant.apache.org)
- GlassFish 3.2.2.2 Open Source Edition Application Server (installed with NetBeans or downloaded separately from glassfish.java.net)
For the database we will use the Microsoft SQL Server 2008 R2 Adventure Works database I’ve used in the past few posts. For more on the Adventure Works database, see my post, ‘Convert VS 2010 Database Project to SSDT and Automate Publishing with Jenkins – Part 1/3’. Not using SQL Server? Once you’ve created your data source, most remaining steps in this post are independent of the database you choose, be it MySQL, Oracle, Microsoft SQL Server, Derby, etc.
For a full explanation of the use of Jersey and Jackson JSON Processor, for non-Maven developers, as this post demonstrates, see this link to the Jersey 1.8 User Guide. It discusses several relevant topics to this article: Java Architecture for XML Binding (JAXB), JSON serialization, and natural JSON notation (or, convention). See this link from the User Guide, for more on natural JSON notation. Note this example does not implement natural JSON notation functionality.
Creating the RESTful Web Service
New NetBeans Web Application Project
Create a new Java Web Application project in NetBeans. Name the project. I named mine ‘JerseyRESTfulService’. The choice of GlassFish server and domain where the project will be deployed is unimportant. We will use Apache Ant to deploy the service when we finish the building the project. By default, I chose my local instance of GlassFish, for testing purposes.

Create a New Web Application Project in NetBeans

Name and Location of New Web Application Project

Server and Settings of New Web Application Project

Optional Frameworks to Include in New Web Application Project

View of New Web Application Project in NetBeans
Create Entity Class from Database
Right-click on the project again and select ‘New’ -> ‘Other…’. From the list of Categories, select ‘Persistence’. From the list of Persistence choices, choose ‘Entity Classes from Database’. Click Next.

Create Entity Classes from the Database
Before we can choose which database table we want from the Adventure Works database to create entity class, we must create a connection to the database – a SQL Server Data Source. Click on the Data Source drop down and select ‘New Data Source…’. Give a Java Naming and Directory Interface (JNDI) name for the data source. I called mine ‘AdventureWorks_HumanResources’. Click on the ‘Database Connection’ drop down menu, select ‘New Database Connection…’.

Select Database Tables for Entity Classes (No Data Source Exists Yet)

Create and Name a New Data Source
This starts the ‘New Connection Wizard’. The first screen, ‘Locate Driver’, is where we point NetBeans to the Microsoft JDBC Driver 4.0 for SQL Server Driver. Locate the sqljdbc4.jar file.

Add the Microsoft JDBC Driver 4.0 for SQL Server Jar File
On the next screen, ‘Customize the Connection’, input the required SQL Server information. The host is the machine your instance of SQL Server is installed on, such as ‘localhost’. The instance is the name of the SQL Server instance in which the Adventure Works database is installed, such as ‘Development’. Once you complete the form, click ‘Test Connection’. If it doesn’t succeed, check your settings, again. Keep in mind, ‘localhost’ will only work if your SQL Server instance is local to your GlassFish server instance where the service will be deployed. If it is on a separate server, make sure to use that server’s IP address or domain name.

Configure New Database Connection
As I mentioned in an earlier post, the SQL Server Data Source forces you to select a single database schema. On the ‘Choose Database Schema’ screen, select the ‘HumanResources’ schema. The database tables you will be able to reference from you entity classes are limited to just this schema, when using this data source. To reference other schemas, you will need to create more data sources.

Select Human Resources Database Schema
Back in the ‘New Entity Classes from Database’ window, you will now have the ‘AdventureWorks’ data source selected as the Data Source. After a few seconds of processing, all ‘Available Tables’ within the ‘HumanResources’ schema are displayed. Choose the ‘vEmployee(view)’. A database view is a virtual database table. Note the Entity ID message. We will need to do an extra step later on, to use the entity class built from the database view.

Choice of Database Tables and Views from Human Resources Schema

Choose the ‘vEmployee(view)’ Database View
On the next screen, ‘Entity Classes’, in the ‘New Entity Classes from Database’ window, select or create the Package to place the individual entity classes into. I chose to call mine ‘entities’.

Select/Create the Package Location for the Entity Class
On the next screen, ‘Mapping Options’, choose ‘Fully Qualified Database Table Names’. Without this option selected, I have had problems trying to make the RESTful web services function properly. This is also the reason I chose to create the entity classes first, and then create the RESTful web services, separately. NetBeans has an option that combines these two tasks into a single step, by choosing ‘RESTful Web Services from Database’. However, the ‘Fully Qualified Database Table Names’ option is not available on the equivalent screen, using that process (at least in my version of NetBeans 7.2). I prefer the two-step approach.

Select the ‘Fully Qualified Database Table Names’ Mapping Options
Click finished. You have successfully created the SQL Server data source and entity classes.

Project View of New VEmployee Entity Class
If you recall, I mentioned a problem with the entity class we created from the database view. To avoid an error when you build and deploy your project to GlassFish, we need to make a small change to the VEmployee.java entity class. Entity classes need a unique identifier, a primary key (or, Entity ID) identified. Since this entity class was built from database view, as opposed to database table, it lacks a primary key. To fix, annotate the businessEntityID field with @Id. This indicates that businessEntityID is the primary key (Entity ID) for this class. The field, businessEntityID, must contain unique values, for this to work properly. NetBeans will make the suggested correction for you, if you allow it.

Fix the Entity Class’s Missing Primary Key (Entity ID)

Fix the Entity Class’s Missing Primary Key (Entity ID)

Entity Class With Primary Key (Entity ID)
The JPA Persistence Unit is found in the ‘persistence.xml’ file in the ‘Configuration Files’ folder. This file describes the Persistence Unit (PU). The PU serves to register the project’s persistable entity class, which are referred to by JPA as ‘managed classes’.

View of New JPA Persistence Unit
The data source we created, which will be deployed to GlassFish, is referred to as a JDBC Resource and JDBC Connection Pool. This information is stored in the ‘glassfish-resources.xml’.

View of New JDBC Resource and JDBC Connection Pool
Create RESTful Web Service
Now that have a SQL Server Data Source and our entity class, we will create the RESTful web service. Right-click on the project and select ‘New’ -> ‘Other…’ -> ‘Persistence’ -> ‘RESTful Web Services from ‘Entity Classes’. You will see the entity class we just created, from which to choose. Add the entity class.

Create RESTful Web Services from Entity Classes

Choose from List of Available Entity Classes

Choose the VEmployee Entity Class
On the next screen, select or create the Resource Package to store the service class in; I called mine ‘service’. Select the ‘Use Jersey Specific Features’ option.

Select/Create the Service’s Package Location and Select the Option to ‘Use Jersey Specific Features’
That’s it. You now have a Jersey-specific RESTful web service and the corresponding Enterprise Bean and Façade service class in the project.

Project View of New RESTful Web Service and Associated Files
NetBeans provides an easy way to test the RESTful web services, locally. Right-click on the ‘RESTful Web Services’ project folder within the main project, and select ‘Test RESTful Web Services’. Select the first option, ‘Locally Generated Test Client’, in the ‘Configure REST Test Client’ pop-up window. NetBeans will use the locally configured GlassFish instance to deploy and test the service.
NetBeans opens a web browser window and display the RESTful URIs (Universal Resource Identifier) for the service in a tree structure. There is a parent URI, ‘entities.vemployee’. Selecting this URI will return all employees from the vEmployee database view. The ‘entities.vemployee’ URI has additional children URIs grouped under it, including ‘{id}’, ‘count’, and ‘{from/to}’, each mapped to separate methods in the service class.
Click on the ‘{id}’ URI. Choose the HTTP ‘GET()’ request method from the drop-down, enter ‘1’ for ‘id’, and click the ‘Test’ button. The service should return a status of ‘200 (OK)’, along with xml output containing information on all the Adventure Works employees. Change the MIME type to ‘application/json’. This should return the same result, formatted as JSON. Congratulation, the RESTful web services have just returned data to your browser from the SQL Server Adventure Works database, using the entity classes and data source you created.
Are they URIs or URLs? I found this excellent post that does a very good job explaining the difference between the URL (how to get there) and the URI (the resource), which is part of the URL.

Test the RESTful Web Service Locally in NetBeans (XML Response Shown)

Test the RESTful Web Service Locally in NetBeans (JSON Response Shown)
Using Jersey for JSONP
GlassFish comes with the jersey-core.jar installed. In order to deliver JSONP, we also need to import and use com.sun.jersey.api.json.JSONWithPadding package from jersey-json.jar. I downloaded and installed version 1.8. You can download the jar from several locations. I chose to download it from www.java2.com. You can also download from the download.java.net Maven2 repository.

Add the Jersey JSON Jar File to the Project
The com.sun.jersey.api.json.JSONWithPadding package has dependencies two Jackson JSON Processor jars. You will also need to download the necessary Jackson JSON Processor jars. They are the jackson-core-asl-1.9.8.jar and jackson-mapper-asl-1.9.8.jar. At the time of this post, I downloaded the latest 1.9.8 versions from the grepcode.com Maven2 repository.

Add the two Jackson JSON Processor Jar Files to the Project
Create New JSONP Method
NetBeans creates several default methods in the VEmployeeFacadeREST class. One of those is the findRange method. The method accepts two integer parameters, from and to. The parameter values are extracted from the URL (JAX-RS @Path annotation). The parameters are called path parameters (@PathParam). The method returns a List of VEmployee objects (List<VEmployee>). The findRange method can return two MIME types, XML and JSON (@Produces). The List<VEmployee> is serialized in either format and returned to the caller.
@GET
@Path("{from}/{to}")
@Produces({"application/xml", "application/json"})
public List<VEmployee> findRange(@PathParam("from") Integer from, @PathParam("to") Integer to) {
    return super.findRange(new int[]{from, to});
}
Neither XML nor JSON will do, we want to return JSONP. Well, using the JSONWithPadding class we can do just that. We will copy and re-write the findRange method to return JSONP. The new findRangeJsonP method looks similar to the findRange. However instead of returning a List<VEmployee>, the new method returns an instance of the JSONWithPadding class. Since List<E> extends Collection<E>, we make the same call as the first method, then cast the List<VEmployee> to Collection<VEmployee>. We then wrap the Collection in a GenericEntity<T>, which extends Object. The GenericEntity<T> represents a response entity of a generic type T. This is used to instantiate a new instance of the JSONWithPadding class, using the JSONWithPadding(Object jsonSource, String callbackName) constructor. The JSONWithPadding instance, which contains serialized JSON wrapped with the callback function, is returned to the client.
@GET
@Path("{from}/{to}/jsonp")
@Produces({"application/javascript"})
public JSONWithPadding findRangeJsonP(@PathParam("from") Integer from,
        @PathParam("to") Integer to, @QueryParam("callback") String callback) {
    Collection<VEmployee> employees = super.findRange(new int[]{from, to});
    return new JSONWithPadding(new GenericEntity<Collection<VEmployee>>(employees) {
    }, callback);
}
We have added a two new parts to the ‘from/to’ URL. First, we added ‘/jsonp’ to the end to signify the new findRangeJsonP method is to be called, instead of the original findRange method. Secondly, we added a new ‘callback’ query parameter (@QueryParam). The ‘callback’ parameter will pass in the name of the callback function, which will then be returned with the JSONP payload. The new URL format is as follows:
http://[your-service's-glassfish-server-name]:[your-service's-glassfish-domain-port]/JerseyRESTfulService/webresources/entities.vemployee/{from}/{to}/jsonp?callback={callback}

Add the Following Jersey JSONP Method to the RESTful Web Service Class

Adding the Method Requires Importing the ‘JSONWithPadding’ Library
Deployment to GlassFish
To deploy the RESTful web service to GlassFish, run the following Apache Ant target. The target first calls the clean and dist targets to build the .war file, Then, the target calls GlassFish’s asadmin deploy command. It specifies the remote GlassFish server, admin port, admin user, admin password (in the password file), secure or insecure connection, the name of the container, and the name of the .war file to be deployed. Note that the server is different for the service than it will be for the client in part 2 of the series.
<target name="glassfish-deploy-remote" depends="clean, dist"
        description="Build distribution (WAR) and deploy to GlassFish">
    <exec failonerror="true" executable="cmd" description="asadmin deploy">
        <arg value="/c" />
        <arg value="asadmin --host=[your-service's-glassfish-server-name]
            --port=[your-service's-glassfish-domain-admin-port]
            --user=admin --passwordfile=pwdfile --secure=false
            deploy --force=true --name=JerseyRESTfulService
            --contextroot=/JerseyRESTfulServicedist\JerseyRESTfulService.war" />
    </exec>
</target>

Deploy RESTful Web Service to Remote GlassFish Server Using Apache Ant Target
In GlassFish, you should see the several new elements: 1) JerseyRESTfulService Application, 2) AdventureWorks_HumanResources JDBC Resource, 3) microsoft_sql_AdventureWorks_aw_devPool JDBC Connection Pool. These are the elements that were deployed by Ant. Also note, 4) the RESTful web service class, VEmployeeFacadeREST, is an EJB StatelessSessionBean.

RESTful Web Service Deployed to Remote GlassFish Server
Test the Service with cURL
What is the easiest way to test our RESTful web service without a client? Answer, cURL, the free open-source URL tool. According to the website, “curl is a command line tool for transferring data with URL syntax, supporting DICT, FILE, FTP, FTPS, Gopher, HTTP, HTTPS, IMAP, IMAPS, LDAP, LDAPS, POP3, POP3S, RTMP, RTSP, SCP, SFTP, SMTP, SMTPS, Telnet and TFTP. curl supports SSL certificates, HTTP POST, HTTP PUT, FTP uploading, HTTP form based upload, proxies, cookies, user+password authentication (Basic, Digest, NTLM, Negotiate, kerberos…), file transfer resume, proxy tunneling and a busload of other useful tricks.”
To use cURL, download and unzip the cURL package to your system’s Programs directory. Add the cURL directory path to your system’s PATH environmental variable. Better yet, create a CURL_HOME environmental variable and add that reference to the PATH variable, as I did. Adding the the cURL directory path to PATH allows you to call the cURL.exe application, directly from the command line.

Add the cURL Directory Path to the ‘PATH’ Environmental Variable
With cURL installed, we can call the RESTful web service from the command line. To test the service’s new method, call it with the following cURL command:
curl -i -H "Accept: application/x-javascript" -X GET http://[your-service's-glassfish-server-name]:[your-service's-glassfish-domain-port]/JerseyRESTfulService/webresources/entities.vemployee/1/3/jsonp?callback=parseResponse

Using cURL to Call RESTful Web Service and Return JSONP
Using cURL is great for testing the RESTful web service. However, the command line results are hard to read. I recommend copy the cURL results into NotePad++ with the JSON Viewer Plugin. Like the NotePad++ XML plugin, the JSON plugin will format the JSONP and provide a tree view of the data structure.

Notepad++ Displaying JSONP Using the JSON Viewer Plugin
Conclusion
Congratulations! You have created and deployed a RESTful web service with a method capable of returning JSONP. In part 2 of this series, we will create a client to call the RESTful web service and display the JSONP response payload. There are many options available for creating clients, depending on your development platform and project requirements. We will keep it simple – no complex, compiled code, just simple JavaScript using Ajax and jQuery, the well-known JavaScript library.
Gary Stafford
AWS Area Principal Solutions Architect | 10x AWS Certified Pro | DevOps | Data/ML | Serverless | Polyglot Developer | Former ThoughtWorks and Accenture
