Posts Tagged Script
Shell Script to Automate Creation of Swap File on Linux
Posted by Gary A. Stafford in Bash Scripting, DevOps, Enterprise Software Development, Software Development on December 19, 2013
Introduction
Recently, while scripting the installation of Oracle’s WebLogic Server, I ran into an issue with a lack of a swap space. I was automating the installation of WebLogic in Silent Mode on a Vagrant VM. The VM was built from an Ubuntu Cloud Image of Ubuntu Server. Ubuntu Cloud Images are pre-installed disk images that have been customized by Ubuntu engineering to run on cloud-platforms such as Amazon EC2, Openstack, Windows, LXC, and Vagrant. The Ubuntu image did not have the minimum 512 MB of swap space required by the WebLogic installer.

Swap Space Error During WebLogic Install
Swap
According to Gary Sims on Linux.com, “Linux divides its physical RAM (random access memory) into chucks of memory called pages. Swapping is the process whereby a page of memory is copied to the preconfigured space on the hard disk, called swap space, to free up that page of memory. The combined sizes of the physical memory and the swap space is the amount of virtual memory available.”
Scripts
To create the required swap space, I could create either a swap partition or a swap file. I chose to create a swap file, using a shell script. Actually, there are two scripts. The first script creates creates a 512 MB swap file as a pre-step in the automated installation of WebLogic. Once the WebLogic installation is complete, the second, optional script, may be ran to remove the swap file. ArchWiki (wiki.archlinux.org) has an excellent post on swap space I referenced to build my first script.
Use a ‘sudo ./create_swap.sh’ command to create the swap file and display the results in the terminal.
| #!/bin/sh | |
| # size of swapfile in megabytes | |
| swapsize=512 | |
| # does the swap file already exist? | |
| grep -q "swapfile" /etc/fstab | |
| # if not then create it | |
| if [ $? -ne 0 ]; then | |
| echo 'swapfile not found. Adding swapfile.' | |
| fallocate -l ${swapsize}M /swapfile | |
| chmod 600 /swapfile | |
| mkswap /swapfile | |
| swapon /swapfile | |
| echo '/swapfile none swap defaults 0 0' >> /etc/fstab | |
| else | |
| echo 'swapfile found. No changes made.' | |
| fi | |
| # output results to terminal | |
| cat /proc/swaps | |
| cat /proc/meminfo | grep Swap | |

Creating the Swap File

Installing WebLogic with a Swap File
If the swap file is no longer required, the second script will remove it. Use a ‘sudo ./remove_swap.sh’ command to remove the swap file and display the results in the terminal. LinuxQuestions.org has a good Forum post on removing swap files I referenced to build my second script.
| #!/bin/sh | |
| # does the swap file exist? | |
| grep -q "swapfile" /etc/fstab | |
| # if it does then remove it | |
| if [ $? -eq 0 ]; then | |
| echo 'swapfile found. Removing swapfile.' | |
| sed -i '/swapfile/d' /etc/fstab | |
| echo "3" > /proc/sys/vm/drop_caches | |
| swapoff -a | |
| rm -f /swapfile | |
| else | |
| echo 'No swapfile found. No changes made.' | |
| fi | |
| # output results to terminal | |
| cat /proc/swaps | |
| cat /proc/meminfo | grep Swap |
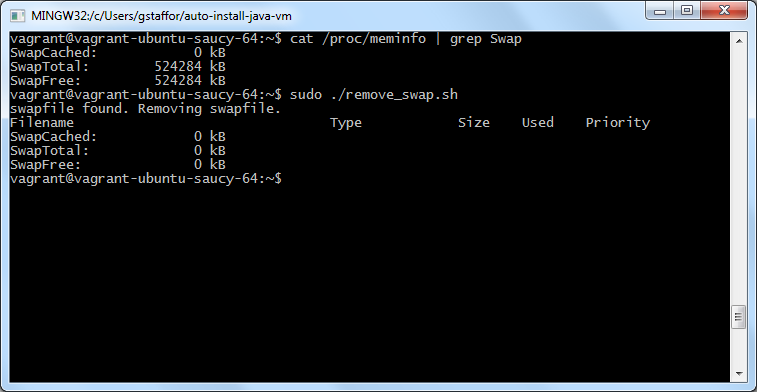
Removing the Swap File
Quick and Easy File Backup Using PowerShell and DotNetZip
Posted by Gary A. Stafford in PowerShell Scripting, Software Development on September 8, 2012
Backup your files easily, using PowerShell and DotNetZip, from the command line.
Backing Up
There is no shortage of file backup utilities, so there is no excuse not to back up your files. However, over the course of a typical workday, many of us create and edit files on our own computer, as well as files on multiple networked computers. Although these networked computers usually have their own backup processes, restoring lost files from them often requires contacting Support, filling out paperwork, and waiting, and waiting, and…
As a result, I prefer to create my own backup of important files I am working with on networked computers, using a simple PowerShell script. I call the PowerShell script from the command line on an ad-hoc basis, and nightly using a scheduled task. When creating the backup, to save space, the script compresses the files using the free DotNetZip Library, available on CodePlex. This is a popular library used by .NET and PowerShell developers. There are many code examples on the Internet. The script also appends the backup file’s name with a descriptive suffix and timestamp, making the backup file unique.
Using the Script
The script’s main function, Create-ZipBackup, takes three parameters:
$target– Target directory or file to be backed up (i.e. ‘\\RemoteServer\ShareName\MyProject’)$destination– Destination directory for backup file (i.e. ‘c:\My Backups’)$fileNameSuffix– File suffix used to name the backup file (i.e. ‘ProjectPlan’ – ‘ProjectPlan.BU.20120908_070913.zip’)
Here is an example of calling the script from the command line, using the above example parameters. To save time when calling the script multiple times, I’ve placed the path to the script into a temporary variable:
SET script=C:\Users\gstaffor\Documents\PowerShell\BackupAndZip.ps1
powershell -command "& { . %script%; Create-ZipBackup -target '\\RemoteServer\ShareName\MyProject' -destination 'c:\My Backups' -fileNameSuffix 'ProjectPlan'}"
Alternately, to call the Create-ZipBackup function from within the script directly, you would use the following PowerShell command:
Create-ZipBackup -target '\\RemoteServer\ShareName\MyProject' -destination 'c:\My Backups' -fileNameSuffix 'ProjectPlan'}"
The Script
################################################
#                                              #
# Compress and backup files using DotNetZip    #
#                                              #
# Gary A. Stafford - rev. 09/08/2012           #
# www.programmaticponderings.com               #
#                                              #
################################################

# Enforce coding rules in expressions & scripts
Set-StrictMode -version 2.0

# Location of Ionic.Zip.dll
[Void] [System.Reflection.Assembly]::LoadFrom(
    "C:\Ionic.Zip.dll")

function Create-ZipBackup
{
    param (
        $target,
        $destination,
        $fileNameSuffix
    )

    [string] $date = Get-Date -format yyyyMMdd_HHmmss
    [string] $fileName = "{0}\$fileNameSuffix.BU.{1}.zip" -f $destination, $date
    [IO.FileInfo] $outputFile = [IO.FileInfo] $fileName
    [Ionic.Zip.ZipFile] $zipfile = new-object Ionic.Zip.ZipFile

    [Ionic.Zip.SelfExtractorSaveOptions] $selfExtractOptions =
        New-Object Ionic.Zip.SelfExtractorSaveOptions
    $selfExtractOptions.Flavor = [Ionic.Zip.SelfExtractorFlavor]::ConsoleApplication
    $selfExtractOptions.DefaultExtractDirectory = $outputFile.Directory.FullName
    $selfExtractOptions.RemoveUnpackedFilesAfterExecute = $false

    $zipfile.AddDirectory("$target")
    $zipfile.UseZip64WhenSaving = [Ionic.Zip.Zip64Option]::Always
    $zipfile.SaveSelfExtractor($outputFile.FullName, $selfExtractOptions)
    $zipfile.Dispose();

    If (!(Test-Path $fileName))
    {
        Write-Host ("ERROR: Backup file '{0}' not created!" -f $fileName)
        break
    }

    Write-Host ("SUCCESS: Backup file '{0}' created." -f $fileName)
}
Error Handling
Note, this basic script does not contain much in the way of error handling. There are a some common reasons the script can fail. For example, a file whose file path exceeds the maximum character length of 260 characters, will throw an error. Trying to back up files which you (logged on user account) does not have permissions to, will also throw an error. To catch these types of errors, you would need to add functionality to iterate recursively through all the target files first, before compressing.
Gary Stafford
AWS Area Principal Solutions Architect | 10x AWS Certified Pro | DevOps | Data/ML | Serverless | Polyglot Developer | Former ThoughtWorks and Accenture
