Posts Tagged Windows
Managing Windows Servers with Chef, Book Review
Posted by Gary A. Stafford in .NET Development, Build Automation, DevOps, Enterprise Software Development, PowerShell Scripting, Software Development on August 11, 2014
Harness the power of Chef to automate management of Windows-based systems using hands-on examples.

Recently, I had the opportunity to read, ‘Managing Windows Servers with Chef’, authored John Ewart, and published in May, 2014 by Packt Publishing. At a svelte 110 pages in paperback form, ‘Managing Windows Servers with Chef’, is a quick read, packed with concise information, relevant examples, and excellent code samples. Available on Packt Publishing’s website for a mere $11.90 for the ebook, it a worthwhile investment for anyone considering Chef Software’s Chef product for automating their Windows-based infrastructure.
As an IT professional, I use Chef for both Windows and Linux-based IT automation, on a regular basis. In my experience, there is a plethora of information on the Internet about properly implementing and scaling Chef. There is seldom a topic I can’t find the answers to, online. However, it has also been my experience, information is often Linux-centric. That is one reason I really appreciated Ewart’s book, concentrating almost exclusively on Windows-based implementations of Chef.
IT professionals, just getting starting with Chef, or migrating from Puppet, will find the ‘Managing Windows Servers with Chef’ invaluable. Ewart does a good job building the user’s understanding of the Chef ecosystem, before beginning to explain its application to a Windows-based environment. If you are considering Chef versus Puppet Lab’s Puppet for Windows-based IT automation, reading this book will give you a solid overview of Chef.
Seasoned users of Chef will also find the ‘Managing Windows Servers with Chef’ useful. Professionals quickly master the Chef principles, and develop the means to automate their specific tasks with Chef. But inevitably, there comes the day when they must automate something new with Chef. That is where the book can serve as a handy reference.
Of all the books topics, I especially found value in Chapter 5 (Managing Cloud Services with Chef) and Chapter 6 (Going Beyond the Basics – Testing Recipes). Even large enterprise-scale corporations are moving infrastructure to cloud providers. Ewart demonstrates Chef’s Windows-based integration with Microsoft’s Azure, Amazon’s EC2, and Rackspace’s Cloud offerings. Also, Ewart’s section on testing is a reminder to all of us, of the importance of unit testing. I admit I more often practice TAD (‘Testing After Development’) than TDD (Test Driven Development), LOL. Ewart introduces both RSpec and ChefSpec for testing Chef recipes.
I recommend ‘Managing Windows Servers with Chef’ for anyone considering Chef, or who is seeking a good introductory guide to getting started with Chef for Windows-based systems.
Installing and Configuring the MEAN Stack, Yeoman, and Associated Tooling on Windows
Posted by Gary A. Stafford in Bash Scripting, Build Automation, Client-Side Development, DevOps, Software Development on March 8, 2014
Configure your Windows environment for developing modern web applications using the popular MEAN Stack and Yeoman suite of utilities.

MEAN Stack Using the MEAN.io Project Running on Windows
Introduction
It’s an exciting time to be involved in web development. There are dozens of popular open-source JavaScript frameworks, libraries, code-generators, and associated tools, exploding on to the development scene. It is now possible to use a variety of popular technology mashups to provide a complete, full-stack JavaScript application platform.
MEAN Stack
One of the JavaScript mashups gaining a lot of traction recently is the MEAN Stack. If you’re reading this post, you probably already know MEAN is an acronym for four leading technologies: MongoDB, ExpressJS, AngularJS, and Node.js. The MEAN stack provides an end-to-end JavaScript application solution. MEAN provides a NoSQL document database (Mongo), a server-side solution for JavaScript (Node/Express), and a magic client-side MV* framework (Angular).
Depending in which MEAN stack generator or pre-build project you start with, in addition to the main four technologies, you will pull down several other smaller libraries and frameworks. These most commonly include jQuery, Twitter Bootstrap, Karma (test runner), Jade (template engine), JSHint, Underscore.js (utility-belt library), Mongoose (MongoDB object modeling tool), Passport (authentication), RequireJS (file and module loader), BreezeJS (data entity management), and so forth.
Common Tooling
If you are involved in these modern web development trends, then you are aware there is also a fairly common set of tools used by a majority of these developers, including source control, IDE, OS, and other helper-utilities. For SCM/VCS, Git is the clear winner. For an IDE, WebStorm, Sublime Text, and Kompozer, are heavy favorites. The platform of choice for most developers most often appears to be either Mac or Linux. It’s far less common to see a demonstration of these technologies, or tutorials built on the Microsoft Windows platform.
Yeoman
Another area of commonality is help-utilities, used to make the development, building, dependency management, and deployment of modern JavaScript applications, easier. Two popular ones are Brunch and Yeoman. Yeoman is also an acronym for a set of popular tools: yo, Grunt, and Bower. The first, yo, is best described as a scaffolding tool. Grunt is the build tool. Bower is a tool for client-side package and dependency management. We will install Yeoman, along with the MEAN Stack, in this post.
Windows
There is no reason Windows cannot serve as your development and hosting platform for modern web development, without specifically using Microsoft’s .NET stack. In fact, with minimal set-up, you would barely know you were using Windows as opposed to Linux or Mac. In this post, I will demonstrate how to configure your Windows machine for developing these modern web applications using the MEAN Stack and Yeoman.
Here is a list of the components we will discuss:
Installations
Git
The use of Git for source control is obvious. Git is the overwhelming choice of modern developers. Git has been integrated into most major IDEs and hosting platforms. There are hooks into Git available for most leading development tools. However, there are more benefits to using Git than just SCM. Being a Linux/Mac user, I prefer to use a Unix-like shell on Windows, versus the native Windows Command Prompt. For this reason, I use Git for Windows, available from msysGit. This package includes Git SCM, Git Bash, and Git GUI. I use the Git Bash interactive shell almost exclusively for my daily interactions requiring a command prompt. I will be using the Git Bash interactive shell for this post. OpenHatch has great post and training materials available on using Git Bash with Windows.

Using Git Bash on Windows for a Unix-like Experience
Git for Windows provides a downloadable Windows executable file for installation. Follow the installation file’s instructions.

To test your installation of Git for Windows, call the Git binary with the ‘–version’ flag. This flag can be used to test all the components we are installing in this post. If the command returns a value, then it’s a good indication that the component is installed properly and can be called from the command prompt:
gstafford: ~/Documents/git_repos $ git --version
git version 1.9.0.msysgit.0
You can also verify Git using the ‘where’ and ‘which’ commands. The ‘where’ command will display the location of files that match the search pattern and are in the paths specified by the PATH environment variable. The ‘which’ command tells you which file gets executed when you run a command. These commands will work for most components we will install:
gstafford: ~/Documents/git_repos $ where git
C:\Program Files (x86)\Git\bin\git.exe
C:\Program Files (x86)\Git\cmd\git.cmd
C:\Program Files (x86)\Git\cmd\git.exe

gstafford: ~/Documents/git_repos $ which git
/bin/git
Ruby
The reasons for Git are obvious, but why Ruby? Yeoman, specifically yo, requires Ruby. Installing Ruby on Windows is easy. Ruby recommends using RubyInstaller for Windows. RubyInstaller downloads an executable file, making install easy. I am using Ruby 1.9.3. I had previously installed the latest 2.0.0, but had to roll-back after some 64-bit compatibility issues with other applications.

To test the Ruby installation, use the ‘–version’ flag again:
gstafford: ~/Documents/git_repos $ ruby --version
ruby 1.9.3p484 (2013-11-22) [i386-mingw32]
RubyGems
Optionally, you might also to install RubyGems. RubyGems allow you to add functionality to the Ruby platform, in the form of ‘Gems’. A common Gem used with the MEAN stack is Compass, the Sass-based stylesheet framework creation and maintenance of CSS. According to their website, Ruby 1.9 and newer ships with RubyGems built-in but you may need to upgrade for bug fixes or new features.
On Windows, installation of RubyGems is as simple as downloading the .zip file from the RubyGems download site. To install, RubyGems, unzip the downloaded file. From the root of the unzipped directory, run the following Ruby command:
ruby setup.rb
To confirm your installation:
gstafford: ~/Documents/git_repos $ gem --version
2.2.2
If you already have RubyGems installed, it’s recommended you update RubyGems before continuing. Use the first command, with the ‘–system’ flag, will update to the latest RubyGems. Use the second command, without the tag, if you want to update each of your individually installed Ruby Gems:
gem update --system
gem update
MongoDB
MongoDB provides a great set of installation and configuration instructions for Windows users. To install MongoDB, download the MongoDB package. Create a ‘mongodb’ folder. Mongo recommends at the root of your system drive. Unzip the MongoDB package to ‘c:\mongodb’ folder. That’s really it, there is no installer file.
Next, make a default Data Directory location, use the following two commands:
mkdir c://data && mkdir c://data/db
Unlike most other components, to call Mongo from the command prompt, I had to manually add the path to the Mongo binaries to my PATH environment variable. You can get access to your Windows environment variables using the Windows and Pause keys. Add the path ‘c:\mongodb\bin’ to end of the PATH environment variable value.

Adding Mongo to the PATH Environment Variable
To test the MongoDB installation, and that the PATH variable is set correctly, close any current interactive shells or command prompt windows. Open a new shell and use the same ‘–version’ flag for Mongo’s three core components:
gstafford: ~/Documents/git_repos
$ mongo --version; mongod --version; mongos --version
MongoDB shell version: 2.4.9

db version v2.4.9
Sun Mar 09 16:26:48.730 git version: 52fe0d21959e32a5bdbecdc62057db386e4e029c

MongoS version 2.4.9 starting: pid=15436 port=27017 64-bit
host=localhost (--help for usage)
git version: 52fe0d21959e32a5bdbecdc62057db386e4e029c
build sys info: windows sys.getwindowsversion(major=6, minor=1, build=7601,
platform=2, service_pack='Service Pack 1')
BOOST_LIB_VERSION=1_49
To start MongoDB, use the ‘mongod’ or ‘start mongod’ commands. Adding ‘start’ opens a new command prompt window, versus tying up your current shell. If you are not using the default MongoDB Data Directory (‘c://data/db’) you created in the previous step, use the ‘–dbpath’ flag, for example ‘start mongod –dbpath ‘c://alternate/path’.

MongoDB Running on Windows
.

MongoDB Default Data Directory Containing New MEAN Database
Node.js
To install Node.js, download and run the Node’s .msi installer for Windows. Along with Node.js, you will get npm (Node Package Manager). You will use npm to install all your server-side components, such as Express, yo, Grunt, and Bower.

gstafford: ~/Documents/git_repos
$ node --version && npm --version
v0.10.26
1.4.3
Express
To install Express, the web application framework for node, use npm:
npm install -g express
The ‘-g’ flag (or, ‘–global’ flag) should be used. According to Stack Overflow, ‘if you’re installing something that you want to use in your shell, on the command line or something, install it globally, so that its binaries end up in your PATH environment variable:
gstafford: ~/Documents/git_repos $ express --version
3.5.0
Yeoman – yo, Grunt, and Bower
You will also use npm to install yo, Grunt, and Bower. Actually, we will use npm to install the Grunt Command Line Interface (CLI). The Grunt task runner will be installed in your MEAN stack project, locally, later. Read these instructions on the Grunt website for a better explanation. Use the same basic command as with Express:
npm install -g yo grunt-cli bower
To test the installs, run the same command as before:
gstafford: ~/Documents/git_repos
$ yo --version; grunt --version; bower --version
1.1.2
grunt-cli v0.1.13
1.2.8
If you already had Yeoman installed, confirm you have the latest versions with the ‘npm update’ command:
gstafford: ~/Documents/git_repos/gen-angular-sample
$ npm update -g yo grunt-cli bower
npm http GET https://registry.npmjs.org/grunt-cli
npm http GET https://registry.npmjs.org/bower
npm http GET https://registry.npmjs.org/yo
npm http 304 https://registry.npmjs.org/bower
npm http 304 https://registry.npmjs.org/yo
npm http 200 https://registry.npmjs.org/grunt-cli
All of the npm installs, including Express, are installed and called from a common location on Windows:
gstafford: ~/Documents/git_repos/gen-angular-sample
$ where express yo grunt bower
c:\Users\gstaffor\AppData\Roaming\npm\yo
c:\Users\gstaffor\AppData\Roaming\npm\yo.cmd
c:\Users\gstaffor\AppData\Roaming\npm\grunt
c:\Users\gstaffor\AppData\Roaming\npm\grunt.cmd
c:\Users\gstaffor\AppData\Roaming\npm\bower
c:\Users\gstaffor\AppData\Roaming\npm\bower.cmd

gstafford: ~/Documents/git_repos
$ which express; which yo; which grunt; which bower
~/AppData/Roaming/npm/express
~/AppData/Roaming/npm/yo
~/AppData/Roaming/npm/grunt
~/AppData/Roaming/npm/bower
Use the command, ‘npm list –global | less’ (or, ‘npm ls -g | less’) to view all npm packages installed globally, in a tree-view. After you have generated your project (see below), check the project-specific server-side packages with the ‘npm ls’ command from within the project’s root directory. For the client-side packages, use the ‘bower ls’ command from within the project’s root directory.
If your in a hurry, or have more Windows boxes to configure you can use one npm command for all four components, above:
npm install -g express yo grunt-cli bower
MEAN Boilerplate Generators and Projects
That’s it, you’ve installed most of the core components you need to get started with the MEAN stack on Windows. Next, you will want to download one of the many MEAN boilerplate projects, or use a MEAN code generator with npm and yo. I recommend trying one or all of the following projects. They are each slightly different architecturally, but fairly stable:
- Linnovate’s MEAN.io project on GitHub (boilerplate MEAN project)
- James Cryer’s npm generator-mean, a Yeoman generator for MEAN stack, inspired by mean.io
- William Lepinski’s MEAN stack generator for Yeoman, generator-meanstack, based on the generator-angular.

Yeoman Running MEAN Generator
.

MEAN Stack Using James Cryer’s ‘generator-mean’
Links
- Jim Lavin’s Introduction to the MEAN Stack on YouTube
- Google Developer’s Getting MEAN on YouTube
- Introduction to the MEAN Stack, Part One: Setting Up Your Tools
- Full-Stack JavaScript With MEAN And Yeoman
- The MEAN Stack: MongoDB, ExpressJS, AngularJS and Node.js
Configure Chef Client on Windows for a Proxy Server
Posted by Gary A. Stafford in Bash Scripting, Build Automation, DevOps, Enterprise Software Development, Software Development on January 1, 2014
Configure Chef Client on Windows to work with a proxy server, by modifying Chef Knife’s configuration file.
Introduction
In my last two post, Configure Git for Windows and Vagrant on a Corporate Network and Easy Configuration of Git for Windows on a Corporate Network, I demonstrated how to configure Git for Windows and Vagrant to work properly on a corporate network with a proxy server. Modifying the .bashrc file and adding a few proxy-related environment variables worked fine for Git and Vagrant.
However, even though Chef Client also uses the Git Bash interactive shell to execute commands on Windows using Knife, Chef depends on Knife’s configuration file (knife.rb) for proxy settings. In the following example, Git and Vagrant connect to the proxy server and authenticate using the proxy-related environment variables created by the ‘proxy_on’ function (described in my last post). However, Chef’s Knife command line tool fails to return the status of the online Hosted Chef server account, because the default knife.rb file contains no proxy server settings.
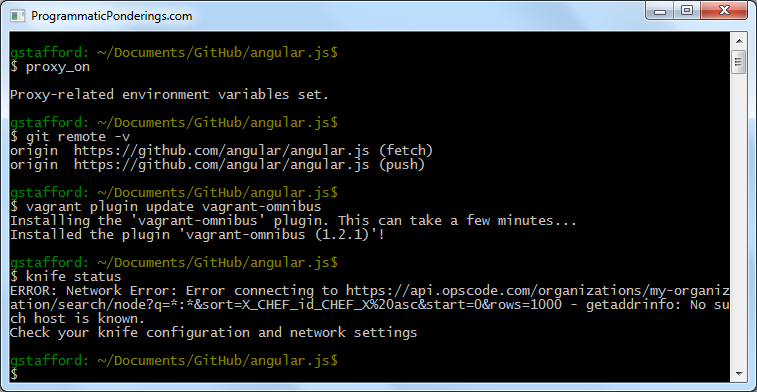
Knife Status Failed Due to Knife’s Proxy Settings
For Chef to work correctly behind a proxy server, you must modify the knife.rb file, adding the necessary proxy-related settings. The good news, we can leverage the same proxy-related environment variables we already created for Git and Vagrant.
Configuring Chef Client
First, make sure you have your knife.rb file in the .chef folder, within your home directory (C:\Users\username\.chef\knife.rb’). This allows Chef to use the knife.rb file’s settings for all Chef repos on your local machine.
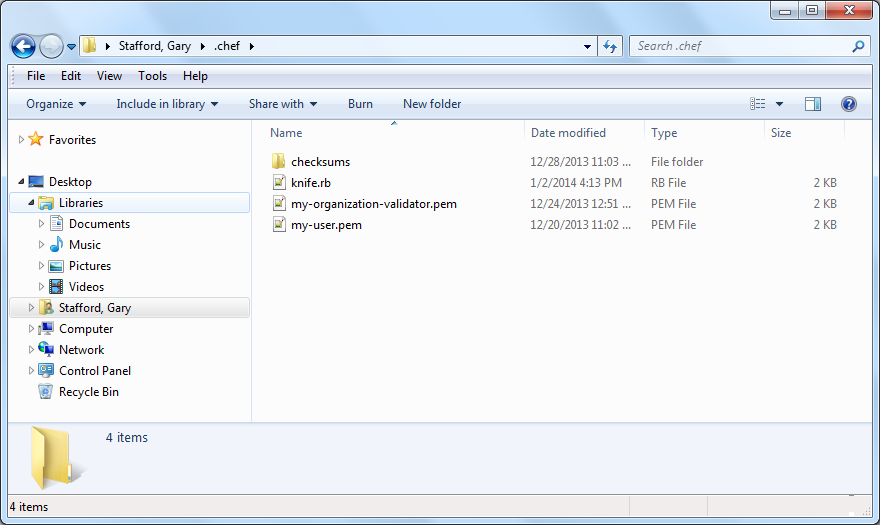
Chef’s knife.rb Location in Home Directory
Next, make sure you have the following environment variables set up on your computer: USERNAME, USERDNSDOMAIN, PASSWORD, PROXY_SERVER, and PROXY_PORT. The USERNAME and USERDNSDOMAIN should already present in the system wide environment variables on Windows. If you haven’t created the PASSWORD, PROXY_SERVER, PROXY_PORT environment variables already, based on my last post, I suggest adding them to the current user environment ( Environment Variables -> User variables, shown below) as opposed to the system wide environment (Environment Variables -> System variables). You can add the User variables manually, using Windows+Pause Keys -> Advanced system settings ->Environment Variables… -> New…
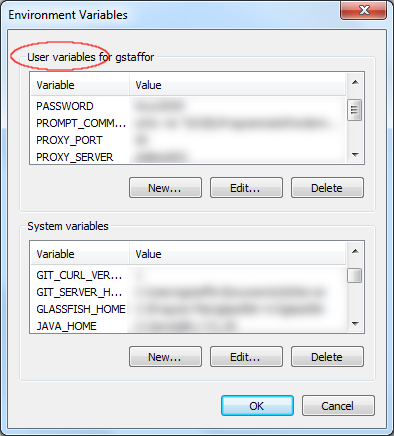
Windows 7 Environment Variables – Current User vs. System
Alternately, you can use the ‘SETX‘ command. See commands below. When using ‘SETX’, do not use the ‘/m’ parameter, especially when setting the PASSWORD variable. According to SETX help (‘SETX /?’), the ‘/m’ parameter specifies that the variable is set in the system wide (HKEY_LOCAL_MACHINE) environment. The default is to set the variable under the HKEY_CURRENT_USER environment (no ‘/m’). If you set your PASSWORD in the system wide environment, all user accounts on your machine could get your PASSWORD.
To see your changes with SETX, close and re-open your current command prompt window. Then, use a ‘env | grep -e PASSWORD -e PROXY’ command to view the three new environment variables.
[gist https://gist.github.com/garystafford/8233123 /]Lastly, modify your existing knife.rb file, adding the required proxy-related settings, shown below. Notice, we use the ‘HTTP_PROXY’ and ‘HTTPS_PROXY’ environment variables set by ‘proxy_on’; no need to redefine them. Since my particular network environment requires proxy authentication, I have also included the ‘http_proxy_user’, ‘http_proxy_pass’, ‘https_proxy_user’, and ‘https_proxy_pass’ settings.
[gist https://gist.github.com/garystafford/8222755 /]If your environment requires authentication and you fail to set these variables, you will see an error similar to the one shown below. Note the first line of the error. In this example, Chef cannot authenticate against the https proxy server. There is a ‘https_proxy’ setting, but no ‘https_proxy_user’ and ‘https_proxy_pass’ settings in the Knife configuration file.

HTTPS Proxy Authentication Credential Settings Missing from knife.rb
Using the Code
Adding the proxy settings to the knife.rb file, Knife is able connect to the proxy server, authenticate, and complete its status check successfully. Now, Git, Vagrant, and Chef all have Internet connectivity through the proxy server, as shown below.

Knife Status Succeeds with Knife.rb Proxy Settings Added
Why Include Authentication Settings?
Even with the domain, username and password, all included in the HTTP_PROXY and HTTPS_PROXY URIs, Chef still insists on using the ‘http_proxy_user’ and ‘http_proxy_pass’ or ‘https_proxy_user’ and ‘https_proxy_pass’ credential settings for proxy authentication. In my tests, if these settings are missing from Knife’s configuration file, Chef fails to authenticate with the proxy server.
Configure Git for Windows and Vagrant on a Corporate Network
Posted by Gary A. Stafford in Bash Scripting, Build Automation, DevOps, Enterprise Software Development, Software Development on December 31, 2013
Modified bashrc configuration for Git for Windows to work with both Git and Vagrant.

Introduction
In my last post, Easy Configuration of Git for Windows on a Corporate Network, I demonstrated how to configure Git for Windows to work when switching between working on-site, working off-site through a VPN, and working totally off the corporate network. Dealing with a proxy server was the main concern. The solution worked fine for Git. However, after further testing with Vagrant using the Git Bash interactive shell, I ran into a snag. Unlike Git, Vagrant did not seem to like the standard URI, which contained ‘domain\username’:
http(s)://domain\username:password@proxy_server:proxy_port
In a corporate environment with LDAP, qualifying the username with a domain is normal, like ‘domain\username’. But, when trying to install a Vagrant plug-in with a command such as ‘vagrant plugin install vagrant-omnibus’, I received an error similar to the following (proxy details obscured):
$ vagrant plugin install vagrant-omnibus
Installing the 'vagrant-omnibus' plugin. This can take a few minutes...
c:/HashiCorp/Vagrant/embedded/lib/ruby/2.0.0/uri/common.rb:176: in `split':
bad URI(is not URI?): http://domain\username:password@proxy:port
(URI::InvalidURIError)...
Solution
After some research, it seems Vagrant’s ‘common.rb’ URI function does not like the ‘domain\username’ format of the original URI. To fix this problem, I modified the original ‘proxy_on’ function, removing the DOMAIN environment variable. I now suggest using the fully qualified domain name (FQDN) of the proxy server. So, instead of ‘my_proxy’, it would be ‘my_proxy.domain.tld’. The acronym ‘tld’ stands for the top-level domain (tld). Although .com is the most common one, there are over 300 top-level domains, so I don’t want assume yours is ‘.com’. The new proxy URI is as follows:
http(s)://username:password@proxy_server.domain.tld:proxy_port
Although all environments have different characteristics, I have found this change to work, with both Git and Vagrant, in my own environment. After making this change, I was able to install plug-ins and do other similar functions with Vagrant, using the Git Bash interactive shell.
$ vagrant plugin install vagrant-omnibus
Installing the 'vagrant-omnibus' plugin. This can take a few minutes...
Installed the plugin 'vagrant-omnibus (1.2.1)'!
Change to Environment Variables
One change you will notice compared to my last post, and unrelated to the Vagrant domain issue, is a change to PASSWORD, PROXY_SERVER, and PROXY_PORT environment variables. In the last post, I created and exported the PASSWORD, PROXY_SERVER, and PROXY_PORT environment variables within the ‘proxy_on’ function. After further consideration, I permanently moved them to Environment Variables -> User variables. I felt this was a better solution, especially for my password. Instead of my user’s account password residing in the .bashrc file, in plain text, it’s now in my user’s environment variables. Although still not ideal, I felt my password was slightly more secure. Also, since my proxy server address rarely change when I am at work or on the VPN, I felt moving these was easier and cleaner than placing them into the .bashrc file.
The New Code
Verbose version:
| # configure proxy for git while on corporate network | |
| function proxy_on(){ | |
| # assumes $USERDOMAIN, $USERNAME, $USERDNSDOMAIN | |
| # are existing Windows system-level environment variables | |
| # assumes $PASSWORD, $PROXY_SERVER, $PROXY_PORT | |
| # are existing Windows current user-level environment variables (your user) | |
| # environment variables are UPPERCASE even in git bash | |
| export HTTP_PROXY="http://$USERNAME:$PASSWORD@$PROXY_SERVER.$USERDNSDOMAIN:$PROXY_PORT" | |
| export HTTPS_PROXY=$HTTP_PROXY | |
| export FTP_PROXY=$HTTP_PROXY | |
| export SOCKS_PROXY=$HTTP_PROXY | |
| export NO_PROXY="localhost,127.0.0.1,$USERDNSDOMAIN" | |
| # optional for debugging | |
| export GIT_CURL_VERBOSE=1 | |
| # optional Self Signed SSL certs and | |
| # internal CA certificate in an corporate environment | |
| export GIT_SSL_NO_VERIFY=1 | |
| env | grep -e _PROXY -e GIT_ | sort | |
| echo -e "\nProxy-related environment variables set." | |
| } | |
| # remove proxy settings when off corporate network | |
| function proxy_off(){ | |
| variables=( \ | |
| "HTTP_PROXY" "HTTPS_PROXY" "FTP_PROXY" "SOCKS_PROXY" \ | |
| "NO_PROXY" "GIT_CURL_VERBOSE" "GIT_SSL_NO_VERIFY" \ | |
| ) | |
| for i in "${variables[@]}" | |
| do | |
| unset $i | |
| done | |
| env | grep -e _PROXY -e GIT_ | sort | |
| echo -e "\nProxy-related environment variables removed." | |
| } | |
| # if you are always behind a proxy uncomment below | |
| #proxy_on | |
| # increase verbosity of Vagrant output | |
| export VAGRANT_LOG=INFO |
Compact version:
| function proxy_on(){ | |
| export HTTP_PROXY="http://$USERNAME:$PASSWORD@$PROXY_SERVER.$USERDNSDOMAIN:$PROXY_PORT" | |
| export HTTPS_PROXY="$HTTP_PROXY" FTP_PROXY="$HTTP_PROXY" ALL_PROXY="$HTTP_PROXY" \ | |
| NO_PROXY="localhost,127.0.0.1,*.$USERDNSDOMAIN" \ | |
| GIT_CURL_VERBOSE=1 GIT_SSL_NO_VERIFY=1 | |
| echo -e "\nProxy-related environment variables set." | |
| } | |
| function proxy_off(){ | |
| variables=( "HTTP_PROXY" "HTTPS_PROXY" "FTP_PROXY" "ALL_PROXY" \ | |
| "NO_PROXY" "GIT_CURL_VERBOSE" "GIT_SSL_NO_VERIFY" ) | |
| for i in "${variables[@]}"; do unset $i; done | |
| echo -e "\nProxy-related environment variables removed." | |
| } | |
| # if you are always behind a proxy uncomment below | |
| #proxy_on | |
| # increase verbosity of Vagrant output | |
| export VAGRANT_LOG=INFO |
Easy Configuration of Git for Windows on a Corporate Network
Posted by Gary A. Stafford in Bash Scripting, DevOps, Enterprise Software Development, Software Development on December 25, 2013
Configure Git for Windows to work when switching between working on-site, working off-site through a VPN, and working totally off the corporate network.
Introduction
Configuring Git to work on your corporate network can be challenging. A typical large corporate network may require Git to work behind proxy servers and firewalls, use LDAP authentication on a corporate domain, handle password expiration, deal with self-signed and internal CA certificates, and so forth. Telecommuters have the added burden of constantly switching device configurations between working on-site, working off-site through a VPN, and working totally off the corporate network at home or the local coffee shop.
There are dozens of posts on the Internet from users trying to configure Git for Windows to work on their corporate network. Many posts are oriented toward Git on Unix-based systems. Many responses only offer partial solutions without any explanation. Some responses incorrectly mix configurations for Unix-based systems with those for Windows.
Most solutions involve one of two approaches to handle proxy servers, authentication, and so forth. They are, modify Git’s .gitconfig file or set equivalent environment variables that Git will look for automatically. In my particular development situation, I spend equal amounts of time on and off a corporate network, on a Windows-based laptop. If I were always on-site, I would modify the .gitconfig file. However, since I am constantly moving on and off the network with a laptop, I chose a solution to create and destroy the environment variables, as I move on and off the corporate network.
Git for Windows
Whether you download Git from the Git website or the msysGit website, you will get the msysGit version of Git for Windows. As explained on the msysGit Wiki, msysGit is the build environment for Git for Windows. MSYS (thus the name, msysGit), is a Bourne Shell command line interpreter system, used by MinGW and originally forked from Cygwin. MinGW is a minimalist development environment for native Microsoft Windows applications.
Why do you care? By installing Git for Windows, you actually get a fairly functional Unix system running on Windows. Many of the commands you use on Unix-based systems also work on Windows, within msysGit’s Git Bash.
Setting Up Code
There are two identical versions of the post’s code, a well-commented version and a compact version. Add either version’s contents to the .bashrc file in home directory. If you’ve worked with Linux, you are probably familiar with the .bashrc file and it’s functionality. On Unix-based systems, your home directory is ‘~/’ (/home/username), while on Windows, the equivalent directory path is ‘C:\Users\username\’.
On Windows, the .bashrc file is not created by default by Git for Windows. If you do not have a .bashrc file already, the easiest way to implement the post’s code is to download either Gist, shown below, from GitHub, rename it to .bashrc, and place it in your home directory.
After adding the code, change the PASSWORD, PROXY_SERVER, and PROXY_PORT environment variable values to match your network. Security note, this solution requires you to store you Windows user account password in plain text on your local system. This presents a certain level of security risk, as would storing it in your .gitconfig file.
The script assumes the same proxy server address for all protocols – HTTP, HTTPS, FTP, and SOCKS. If any of the proxy servers or ports are different, simply change the script’s variables. You may also choose to add other variables and protocols, or remove them, based on your network requirements. Remember, environment variables on Windows are UPPERCASE. Even when using the interactive Git Bash shell, environment variables need to be UPPERCASED.
Lastly, as with most shells, you must exit any current interactive Git Bash shells and re-open a new interactive shell for the new functions in the .bashrc file to be available.
Verbose version:
[gist https://gist.github.com/garystafford/8128922 /]
Compact version:
[gist https://gist.github.com/garystafford/8135027 /]
Using the Code
When on-site and connected to your corporate network, or off-site and connected through a VPN, execute the ‘proxy_on’ function. When off your corporate network, execute the ‘proxy_off’ function.
Below, are a few examples of using Git to clone the popular angular.js repo from github.com (git clone https://github.com/angular/angular.js). The first example shows what happens on the corporate network when Git for Windows is not configured to work with the proxy server.

Failing to Clone GitHub Repo with Proxy Settings Off
The next example demonstrate successfully cloning the angular.js repo from github.com, while on the corporate network. The environment variables are set with the ‘proxy_on’ function. I have obscured the variable’s values and most of the verbose output from Git to hide confidential network-related details.
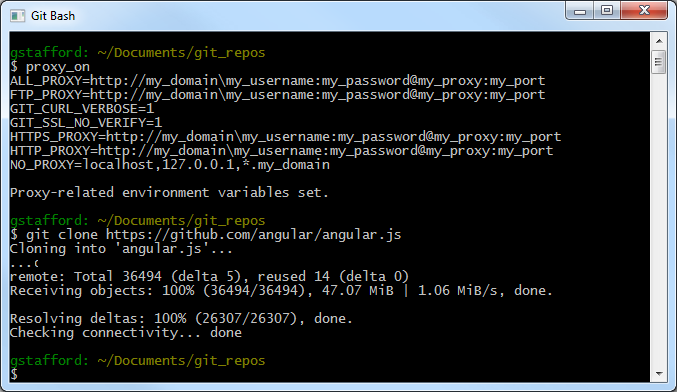
Successful Git Clone with Proxy Settings On
What’s My Proxy Server Address?
To setup the ‘proxy_on’ function, you need to know your proxy server’s address. One way to find this, is Control Panels -> Internet Options -> Connections -> LAN Settings. If your network requires a proxy server, it should be configured here.
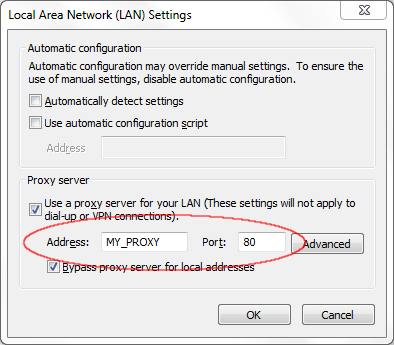
LAN Settings – Proxy Server
However, on many corporate networks, Windows devices are configured to use a proxy auto-config (PAC) file. According to Wikipedia, a PAC file defines how web browsers and other user agents can automatically choose a network’s appropriate proxy server. The downside of a PAC file is that you cannot easily figure out what proxy server you are connected to.

LAN Settings – Using PAC file
To discover your proxy server with a PAC file, open a Windows command prompt and execute the following command. Use the command’s output to populate the script’s PROXY_SERVER and PORT variables.
reg query “HKEY_CURRENT_USER\Software\Microsoft\Windows\CurrentVersion\Internet Settings” | find /i “proxyserver”

Checking Your Proxy from the Command Prompt
Resources
Arch Linux Wiki – Proxy Settings
Quick and Easy File Backup Using PowerShell and DotNetZip
Posted by Gary A. Stafford in PowerShell Scripting, Software Development on September 8, 2012
Backup your files easily, using PowerShell and DotNetZip, from the command line.
Backing Up
There is no shortage of file backup utilities, so there is no excuse not to back up your files. However, over the course of a typical workday, many of us create and edit files on our own computer, as well as files on multiple networked computers. Although these networked computers usually have their own backup processes, restoring lost files from them often requires contacting Support, filling out paperwork, and waiting, and waiting, and…
As a result, I prefer to create my own backup of important files I am working with on networked computers, using a simple PowerShell script. I call the PowerShell script from the command line on an ad-hoc basis, and nightly using a scheduled task. When creating the backup, to save space, the script compresses the files using the free DotNetZip Library, available on CodePlex. This is a popular library used by .NET and PowerShell developers. There are many code examples on the Internet. The script also appends the backup file’s name with a descriptive suffix and timestamp, making the backup file unique.
Using the Script
The script’s main function, Create-ZipBackup, takes three parameters:
$target– Target directory or file to be backed up (i.e. ‘\\RemoteServer\ShareName\MyProject’)$destination– Destination directory for backup file (i.e. ‘c:\My Backups’)$fileNameSuffix– File suffix used to name the backup file (i.e. ‘ProjectPlan’ – ‘ProjectPlan.BU.20120908_070913.zip’)
Here is an example of calling the script from the command line, using the above example parameters. To save time when calling the script multiple times, I’ve placed the path to the script into a temporary variable:
SET script=C:\Users\gstaffor\Documents\PowerShell\BackupAndZip.ps1
powershell -command "& { . %script%; Create-ZipBackup -target '\\RemoteServer\ShareName\MyProject' -destination 'c:\My Backups' -fileNameSuffix 'ProjectPlan'}"
Alternately, to call the Create-ZipBackup function from within the script directly, you would use the following PowerShell command:
Create-ZipBackup -target '\\RemoteServer\ShareName\MyProject' -destination 'c:\My Backups' -fileNameSuffix 'ProjectPlan'}"
The Script
################################################
#                                              #
# Compress and backup files using DotNetZip    #
#                                              #
# Gary A. Stafford - rev. 09/08/2012           #
# www.programmaticponderings.com               #
#                                              #
################################################

# Enforce coding rules in expressions & scripts
Set-StrictMode -version 2.0

# Location of Ionic.Zip.dll
[Void] [System.Reflection.Assembly]::LoadFrom(
    "C:\Ionic.Zip.dll")

function Create-ZipBackup
{
    param (
        $target,
        $destination,
        $fileNameSuffix
    )

    [string] $date = Get-Date -format yyyyMMdd_HHmmss
    [string] $fileName = "{0}\$fileNameSuffix.BU.{1}.zip" -f $destination, $date
    [IO.FileInfo] $outputFile = [IO.FileInfo] $fileName
    [Ionic.Zip.ZipFile] $zipfile = new-object Ionic.Zip.ZipFile

    [Ionic.Zip.SelfExtractorSaveOptions] $selfExtractOptions =
        New-Object Ionic.Zip.SelfExtractorSaveOptions
    $selfExtractOptions.Flavor = [Ionic.Zip.SelfExtractorFlavor]::ConsoleApplication
    $selfExtractOptions.DefaultExtractDirectory = $outputFile.Directory.FullName
    $selfExtractOptions.RemoveUnpackedFilesAfterExecute = $false

    $zipfile.AddDirectory("$target")
    $zipfile.UseZip64WhenSaving = [Ionic.Zip.Zip64Option]::Always
    $zipfile.SaveSelfExtractor($outputFile.FullName, $selfExtractOptions)
    $zipfile.Dispose();

    If (!(Test-Path $fileName))
    {
        Write-Host ("ERROR: Backup file '{0}' not created!" -f $fileName)
        break
    }

    Write-Host ("SUCCESS: Backup file '{0}' created." -f $fileName)
}
Error Handling
Note, this basic script does not contain much in the way of error handling. There are a some common reasons the script can fail. For example, a file whose file path exceeds the maximum character length of 260 characters, will throw an error. Trying to back up files which you (logged on user account) does not have permissions to, will also throw an error. To catch these types of errors, you would need to add functionality to iterate recursively through all the target files first, before compressing.
Automating Work Item Creation in TFS 2010 with PowerShell, Continued
Posted by Gary A. Stafford in .NET Development, PowerShell Scripting, Software Development, Team Foundation Server (TFS) Development on July 18, 2012
In a previous post, Automating Task Creation in Team Foundation Server with PowerShell, I demonstrated how to automate the creation of TFS Task-type Work Items using PowerShell. After writing that post, I decided to go back and further automate my own processes. I combined two separate scripts that I use on a regular basis, one that creates the initial Change Request (CR) Work Item, and a second that creates the Task Work Items associated with the CR. Since I usually run both scripts successively and both share many of the same variables, combining the scripts made sense. I now have a single PowerShell script that will create the parent Change Request and the associated Tasks in TFS. The script reduces my overall time to create the Work Items by a few minutes for each new CR. The script also greatly reduces the risk of input errors from typing the same information multiple times in Visual Studio. The only remaining manual step is to link the Tasks to the Change Request in TFS.
The Script
Similar to the previous post, for simplicity sake, I have presented a basic PowerShell script. The script could easily be optimized by wrapping the logic into a function with input parameters, further automating the process. I’ve placed a lot of comments in the script to explain what each part does, and help make customization easier. The script explicitly declares all variables, adhering to PowerShell’s Strict Mode (Set-StrictMode -Version 2.0). I feel this makes the script easier to understand and reduces the possibility of runtime errors.
#############################################################
#
# Description: Automatically creates
# (1) Change Request-type Work Item and
# (5) Task-type Work Items in TFS.
#
# Author: Gary A. Stafford
# Created: 07/18/2012
# Modified: 07/18/2012
#
#############################################################

# Clear Output Pane
clear

# Loads Windows PowerShell snap-in if not already loaded
if ( (Get-PSSnapin -Name Microsoft.TeamFoundation.PowerShell -ErrorAction SilentlyContinue) -eq $null )
{
	Add-PSSnapin Microsoft.TeamFoundation.PowerShell
}

# Set Strict Mode - optional
Set-StrictMode -Version 2.0

#############################################################

# Usually remains constant
[string] $tfsServerString = "http://[YourServerNameGoesHere]/[PathToCollection]"
[string] $areaPath = "Development\PowerShell"
[string] $workItemType = "Development\Change Request"
[string] $description = "Create Task Automation PowerShell Script"

# Usually changes for each Sprint - both specific to your environment
[string] $iterationPath = "PowerShell\TFS2010"

# Usually changes for each CR and Tasks
[string] $requestName = "Name of CR from Service Manager"
[string] $crId = "000000"
[string] $priority = "1"
[string] $totalEstimate = "10" # Total of $taskEstimateArray
[string] $assignee = "Doe, John"
[string] $testType = "Unit Test"

# Task values represent units of work, often 'man-hours'
[decimal[]] $taskEstimateArray = @(2,3,10,3,.5)
[string[]] $taskNameArray = @("Analysis", "Design", "Coding", "Unit Testing", "Resolve Tasks")
[string[]] $taskDisciplineArray = @("Analysis", "Development", "Development", "Test", $null)

#############################################################

Write-Host `n`r**** Create CR started...`n`r

# Build string of field parameters (key/value pairs)
[string] $fields = "Title=$($requestName);Description=$($description);CR Id=$($crId);"
$fields += "Estimate=$($totalEstimate);Assigned To=$($assignee);Test Type=$($testType);"
$fields += "Area Path=$($areaPath);Iteration Path=$($iterationPath);Priority=$($priority);"

#For debugging - optional console output
Write-Host `n`r $fields

# Create the CR (Work Item)
tfpt workitem /new $workItemType /collection:$tfsServerString /fields:$fields

Write-Host `n`r**** Create CR completed...`n`r

#############################################################

# Loop and create of eack of the (5) Tasks in prioritized order
[int] $i = 0

Write-Host `n`r**** Create Tasks started...`n`r

# Usually remains constant
$workItemType = "Development\Task"

while ($i -le 4) {
	# Concatenate name of task with CR name for Title and Description fields
	$taskTitle = $taskNameArray[$i] + " - " + $requestName

	 # Build string of field parameters (key/value pairs)
	 [string] $fields = "Title=$($taskTitle);Description=$($taskTitle);Assigned To=$($assignee);"
	 $fields += "Area Path=$($areaPath);Iteration Path=$($iterationPath);Discipline=$($taskDisciplineArray[$i]);Priority=$($i+1);"
	 $fields += "Estimate=$($taskEstimateArray[$i]);Remaining Work=$($taskEstimateArray[$i]);Completed Work=0"

	 #For debugging - optional console output
	 Write-Host `n`r $fields

	 # Create the Task (Work Item)
	 tfpt workitem /new $workItemType /collection:$tfsServerString /fields:$fields

	 $i++
}

Write-Host `n`r**** Create Tasks completed...`n`r
Deleting Work Items with PowerShell
Team Foundation Server Administrators know there is no delete button for Work Items in TFS. So, how do you delete (destroy, as TFS calls it) a Work Item? One way is from the command line, as demonstrated in the previous post. You can also use PowerShell, calling the witAdmin command-line tool, but this time from within PowerShell, as follows:
[string] $tfsServerString = "http://[YourServerNameGoesHere]/[PathToCollection]"
[string] $tfsWorkIemId = "00000"
$env:path += ";C:\Program Files (x86)\Microsoft Visual Studio 10.0\Common7\IDE"
witadmin destroywi /collection:$tfsServerString /id:$tfsWorkIemId /noprompt
First, use PowerShell to set your path environmental variable to include your local path to witadmin.exe. Then set your TFS Server path and the TFS Work Item ID of the Work Item you want to delete. Or, you can call witAdmin, including the full file path, avoiding setting the path environmental variable. True, you could simplify the above to a single line of code, but I feel using variables is easier to understand for readers then one long line of code.
Automating Task Creation in Team Foundation Server with PowerShell
Posted by Gary A. Stafford in .NET Development, PowerShell Scripting, Software Development, Team Foundation Server (TFS) Development on April 15, 2012
Administrating Team Foundation Server often involves repeating the same tasks over and over with only slight variation in the details. This is especially true if your team adheres to an Agile software development methodology. Every few weeks a new Iteration begins, which means inputting new Change Requests into Team Foundation Server along with their associated Tasks*.
Repetition equals Automation equals PowerShell. If you have to repeat the same task in Windows more than a few times, consider automating it with PowerShell. Microsoft has done an outstanding job equipping PowerShell to access a majority of the functionary of their primary application; Team Foundation Server 2010 (TFS) is no exception.
Microsoft’s latest release of Team Foundation Server Power Tools December 2011 includes Windows PowerShell Cmdlets for Visual Studio Team System Team Foundation Server. According to Microsoft, Power Tools are a set of enhancements, tools and command-line utilities that increase productivity of Team Foundation Server scenarios. Power Tool’s TFS PowerShell Cmdlets give you control of common version control commands in TFS.
One gotcha with TFS Power Tools, it doesn’t install PowerShell extras by default. Yes I agree, it makes no sense. If you already have Power Tools installed, you must rerun the installer, select the Modify Install option and add the PowerShell features. If you are installing Power Tools for the first time, make sure to select the Custom install option and add the PowerShell features.
*Tasks are a type of TFS Work Item. Work Item types can also include Bugs, Defects, Test Cases, Risks, QoS Requirements, or whatever your teams decides to define as Work Items. There is a comprehensive explanation of Work Items in chapter 12 of Microsoft’s Patterns & Practices, available to review on Codeplex.
Automating Task Creation
Working with different teams during my career that practice SCRUM, a variation of Agile, we usually start a new Sprint (Iteration) ever four to six weeks with an average Sprint Backlog of 15-25 items. Each item in the backlog translates into individual CRs in TFS. Each CR has several boilerplate Tasks associated with them. Many Tasks are common to all Change Requests (CR). Common Tasks often include analysis, design, coding, unit testing, and administration. Nothing is more mind-numbing as a Manager than having to input a hundred or more Tasks into TFS every few weeks, with each Task requiring an average of ten or more fields of data. In addition to the time requirement, there is the opportunity for human error.
The following PowerShell script creates a series of five different Tasks for a specific CR, which has been previously created in TFS. Once the Tasks are created, I use a separate method to link the Tasks to the CR. Every team’s development methodologies are different; ever team’s use of TFS is different. Don’t get hung up on exactly which fields I’ve chosen to populate. Your processes will undoubtedly require different fields.
There are many fields in a Work Item template that can be populated with data, using PowerShell. Understanding each field’s definition – name, data type, and rules for use (range of input values, required field, etc.) is essential. To review the field definitions, in Visual Studio 2010, select the Tools tab -> Process Editor -> Work Item Types -> Open WIT from Server. Select your Work Item Template (WIT) from the list of available templates. The template you chose will be the same template defined in the PowerShell script, with the variable $workItemType. To change the fields, you will need the necessary TFS privileges.

Task WIT Data Fields
Avoiding Errors
When developing the script for this article, I was stuck for a number of hours with a generic error (shown below) on some of the Tasks the script tried to create – “…Work Item is not ready to save” I tried repeatedly debugging and altering the script to resolve the error without luck. An end up the error was not in the script, but in my lack of understanding of the Task Work Item Template (WIT) and its field definitions.

Incorrect Task Input Error
By trial and error, I discovered this error usually means that either the data being input into a field is invalid based on the field’s definition, or that a required field failed to have data input for it. Both were true in my case at different points in the development of the script. First, I failed to include the Completed Time field, which was a required field in our Task template. Secondly, I tried to set the Priority of the Tasks to a number between 1 and 5. Unbeknownst to me, the existing Task template only allowed values between 1 and 3. The best way to solve these types of errors is to create a new Task in TFS, and try inputting the same data as you tried to inject with the script. The cause of the error should quickly become clear.
The Script
For simplicity sake I have presented a simple PowerShell script. The script could easily be optimized by wrapping the logic into a function with input parameters, further automating the process. I’ve placed a lot of comments in the script to explain what each part does, and help make customization easier.The script explicitly declares all variables and adheres to PowerShell’s Strict Mode (Set-StrictMode -Version 2.0). I feel this makes the script easier to understand and reduces the number of runtime errors.
#############################################################
#
# Description: Automatically creates (5) standard Task-type
#              Work Items in TFS for a given Change Request.
#
# Author:      Gary A. Stafford
# Created:     04/12/2012
# Modified:    04/14/2012
#
#############################################################

# Clear Output Pane
clear

# Loads Windows PowerShell snap-in if not already loaded
if ( (Get-PSSnapin -Name Microsoft.TeamFoundation.PowerShell -ErrorAction SilentlyContinue) -eq $null )
{
    Add-PSSnapin Microsoft.TeamFoundation.PowerShell
}

# Set Strict Mode - optional
Set-StrictMode -Version 2.0

# Usually changes for each Sprint - both specific to your environment
[string] $areaPath = "Development\PowerShell"
[string] $iterationPath = "PowerShell\TFS2010"

# Usually changes for each CR
[string] $changeRequestName = "Create Task Automation PowerShell Script"
[string] $assignee = "Stafford, Gary"

# Values represent units of work, often 'man-hours'
[decimal[]] $taskEstimateArray = @(2,3,10,3,.5)
# Remaining Time is usually set to Estimated time at start (optional use of this array)
[decimal[]] $taskRemainingArray = @(2,3,10,3,.5)
# Completed Time is usually set to zero at start (optional use of this array)
[decimal[]] $tasktaskCompletedArray = @(0,0,0,0,0,0)

# Usually remains constant
# TFS Server address - specific to your environment
[string] $tfsServerString = "http://[YourServerNameGoesHere]/[PathToCollection]"

# Work Item Type - specific to your environment
[string] $workItemType = "Development\Task"

[string[]] $taskNameArray = @("Analysis", "Design", "Coding", "Unit Testing", "Resolve Tasks")
[string[]] $taskDisciplineArray = @("Analysis", "Development", "Development", "Test", $null)

# Loop and create of eack of the (5) Tasks in prioritized order
[int] $i = 0

Write-Host `n`r**** Script started...`n`r

while ($i -le 4) {
    # Concatenate name of task with CR name for Title and Description fields
    $taskTitle = $taskNameArray[$i] + ": " + $changeRequestName

    # Build string of field parameters (key/value pairs)
    [string] $fields = "Title=$($taskTitle);Description=$($taskTitle);Assigned To=$($assignee);"
    $fields += "Area Path=$($areaPath);Iteration Path=$($iterationPath);Discipline=$($taskDisciplineArray[$i]);Priority=$($i+1);"
    $fields += "Estimate=$($taskEstimateArray[$i]);Remaining Work=$($taskRemainingArray[$i]);Completed Work=$($tasktaskCompletedArray[$i])"

    #For debugging - optional console output
    Write-Host $fields

    # Create the Task (Work Item)
    tfpt workitem /new $workItemType /collection:$tfsServerString /fields:$fields

    $i++
 }

 Write-Host `n`r**** Script completed...
The script begins by setting up a series of variables. Some variables will not change once they are set, such as the path to the TFS server, unless you work with multiple TFS instances. Some variables will only change at the beginning of each iteration (Sprint), such as the Iteration Path. Other variables will change for each CR or for each Task. These include the CR title and Estimated, Completed, and Remaining Time. Again, your process will dictate different fields with different variables.Once you have set up the script to your requirements and run it successfully, you should see output similar to the following:

Successful Creation of all Five Tasks
In TFS, the resulting Tasks, produced by the script look like the Task, below:

New Task Created by PowerShell
Deleting Work Items after Developing and Testing the Script
TFS Administrators know there is no Work Item delete button in TFS. So, how do you delete the Tasks you may have created during developing and testing this script? The quickest way is from the command line or from PowerShell. You can also delete Work Items programmatically in .NET. I usually use the command line, as follows:
- Open the Visual Studio 2010 Command Prompt.
- Change the directory to the location of witadmin.exe. My default location is:
C:\Program Files (x86)\Microsoft Visual Studio 10.0\Common7\IDE. - Run the following command, substituting the Task Id for the Task Id or Task Ids, comma delimited without spaces, of the Tasks you want to delete:
witadmin destroywi /collection:[Your TFS Collection Path Here] /id:12930 /noprompt

Deleting a Task from the Command Line
Almost the same command can be run in PowerShell by including the path to witadmin.exe in the script. I found this method at Goshoom.NET Dev Blog. You can read more, there.
Be warned, there is no undoing the delete command. The noprompt is optional; using it speeds up the deletion of Tasks. However, leaving out noprompt means you are given a chance to confirm the Task’s deletion. Not a bad idea when you’re busy doing a dozen other things.
Further PowerShell Automation
Creating Tasks with PowerShell, I save at least two hours of time each Sprint cycle, and greatly reduce my chance for errors. Beyond Tasks, there are many more mundane TFS-related chores that can be automated using PowerShell. These chores include bulk import of CRs and Tasks from Excel or other Project Management programs, creating and distributing Agile reports, and turnover and release management automation, to name but a few. I’ll explore some of these topics in future blog.
Consuming Cross-Domain WCF REST Services with jQuery using JSONP
Posted by Gary A. Stafford in .NET Development, Software Development, SQL Server Development on September 25, 2011

Restaurant Menu / Order Form Preview
Introduction
In a previous article, Interactive Form Functionality on the Client-Side Using jQuery, I demonstrated the use of HTML, JavaScript, jQuery, and jQuery’s AJAX API to create a simple restaurant menu/order form. Although the previous article effectively demonstrated the use of these client-side technologies, the source of the restaurant’s menu items, a static XML file, was not intended to represent a true ‘production-class’ data source. Nowadays, to access data and business logic across the Enterprise or across the Internet, developers are more apt to build service-oriented applications that expose RESTful web services, and client applications that consume those services. RESTful services are services which conform to the REST (Representational State Transfer) architectural pattern. More information on REST can be obtained by reading Chapter 5 and 6 of REST’s author Roy Fielding’s Doctoral Dissertation. Most modern web technologies communicate with RESTful web services, including Microsoft’s Silverlight, Web Forms, and MVC, JavaFX, Adobe Flash, PHP, Python, and Ruby on Rails.
This article will expand on the restaurant menu/order form example from the previous article, replacing the static XML file with a WCF Service. The article will demonstrate the following:
- Use of jQuery’s AJAX API to bi-bidirectionally communicate with WCF Services
- Cross-domain communication with WCF Services using JSONP
- Serialization of complex, nested .NET objects into JSONP-format HTTP Response Messages
- Deserialization of JSONP-format HTTP Request Messages into complex, nested .NET objects
- Optimization of JavaScript and the use of caching to maximize the speed of content delivery to the Client
Source code is now available on GitHub. As of May 2014, there is a revised version of the project on the ‘rev2014′ branch, on GitHub. The below post describes the original code on the ‘Master’ branch. All details are posted on GitHub.
Background
WCF
For .NET developers, Windows Communication Foundation (WCF), Microsoft’s platform for Service Oriented Architecture (SOA), is the current preferred choice for building service-oriented applications. According to Microsoft, WCF is part of the .NET Framework that provides a unified programming model for rapidly building service-oriented applications that communicate across the web and the enterprise.
Prior to WCF, Microsoft offered ASP.NET XML Web Service, or ASP.NET Web Services for short. ASP.NET Web Services send and receive messages using Simple Object Access Protocol (SOAP) via HTTP. Data is serialized from instances of .NET objects into XML-format SOAP messages (or, ‘XML in a SOAP envelop’ as they are also known), and vice-versus. Metadata about the ASP.NET Web Services is contained in the Web Services Description Language (WSDL). Although still prevalent, ASP.NET Web Services is now considered a legacy technology with the advent of WCF, according to Microsoft. SOAP, a protocol for accessing a Web Service, does not conform to REST architecture guidelines.
Hosted on Microsoft’s IIS (Internet Information Services) Web Server, WCF is a complex, yet robust and flexible service-oriented framework. By properly configuring WCF Services, developers can precisely expose business logic and data sources to clients in a variety of ways. WCF Services can send and receive messages as XML in a SOAP envelop, as well as RESTful formats, including POX (plain old XML), ATOM (an XML language used for web feeds), and JSON (JavaScript Object Notation).
JSON/JSONP
The example in this article uses JSON, more specifically JSONP (JSON with Padding), a specialized type of JSON, to exchange information with WCF Services. JSON is an open and text-based data exchange format that provides a standardized data exchange format better suited for AJAX-style web applications. Compared to XML, JSON-formatted messages are smaller in size. For example, the restaurant menu used in this article, formatted as XML, is 927 bytes. The same message, formatted in JSONP is only 311 bytes, about one-third the size. The savings when transmitting JSON-format messages over slow connections, to mobile devices, or to potentially millions of simultaneous web-browsers, is significant.
Since the WCF Service will be hosted in a different domain (a different port in the example) than the web site with the restaurant menu and order form, we must use JSONP. JSONP, based on JSON, that allows pages to request data from a server in a different domain, normally disallowed, due to ‘same origin policy’. The same origin policy is an important security concept for browser-side programming languages, such as JavaScript. According to Wikipedia, same origin policy permits scripts running on pages originating from the same site to access each others methods and properties with no specific restrictions, but prevents access to most methods and properties across pages on different sites. JSONP takes advantage of the open policy for HTML <script> elements.
Below is an example of the article’s restaurant menu formatted in JSONP, and returned by the WCF Service as part of the HTTP Response to the client’s HTTP Request’s GET method.
    RestaurantMenu([
    {"Description":"Cheeseburger","Id":1,"Price":3.99},
    {"Description":"Chicken Sandwich","Id":4,"Price":4.99},
    {"Description":"Coffee","Id":7,"Price":0.99},{"Description":"French Fries",
    "Id":5,"Price":1.29},{"Description":"Hamburger","Id":2,"Price":2.99},
    {"Description":"Hot Dog","Id":3,"Price":2.49},
    {"Description":"Ice Cream Cone","Id":9,"Price":1.99},
    {"Description":"Soft Drink","Id":6,"Price":1.19},{"Description":"Water",
    "Id":8,"Price":0}]);
AJAX (well, not really…)
AJAX (Asynchronous JavaScript and XML) asynchronously exchanges data between the browser and web server, avoiding page reloads, using object. Despite the name, XMLHttpRequest, AJAX can work with JSON in addition to XML message formatting. Other formats include JSONP, JavaScript, HTML, and text. Using jQuery’s AJAX API, we will make HTTP Requests to the server using the GET method. Other HTTP methods include POST, PUT, and DELETE. To access cross-domain resources, in this case the WCF Service, the client makes a HTTP Request using the GET method.
Writing this article, I discovered that using JSONP technically isn’t AJAX because it does not use the XMLHttpRequest object, a primary requirement of AJAX. JSONP-format HTTP Requests are made by inserting the HTML <script> tag into the DOM, dynamically. The Content-Type of the HTTP Response from the WCF Service, as seen with Firebug, is application/x-javascript, not application/json, as with regular JSON. I’m just happy if it all works, AJAX or not.
Using the Code
The Visual Studio 2010 Solution used in this article contains (3) projects shown below. All code for this article is available for download at on The Code Project.
- Restaurant – C# Class Library
- RestaurantWcfService – C# WCF REST Service Application
- RestaurantDemoSite – Existing Web Site
Restaurant Class Library
The C# Class Library Project, Restaurant, contains the primary business objects and business logic. Classes that will be instantiated to hold the restaurant menu and restaurant orders include RestaurantMenu, MenuItem, RestaurantOrder, and OrderItem. Both RestaurantMenu and RestaurantOrder inherit from System.Collections.ObjectModel.Collection<T>. RestaurantMenu contains instances of MenuItem, while RestaurantOrder contains instances of OrderItem.
The business logic for deserializing the JSON-format HTTP Request containing the restaurant order is handled by the ProcessOrder class. I struggled with deserializing the JSONP-formatted HTTP Request into an instance of RestaurantOrder with the standard .NET System.Web.Script.Serialization.JavaScriptSerializer class. I solved the deserialization issue by using Json.NET. This .NET Framework, described as a flexible JSON serializer to convert .NET objects to JSON and back again, was created by James Newton-King. It was a real lifesaver. Json.NET is available on Codeplex. Before passing the RAW JSONP-format HTTP Request to Json.NET, I still had to clean it up using the NormalizeJsonString method I wrote.
Lastly, ProcessOrder includes the method WriteOrderToFile, which writes the restaurant order to a text file. This is intended to demonstrate how orders could be sent from the client to the server, stored, and then reloaded and deserialized later, as needed. In order to use this method successfully, you need to create the ‘c:\RestaurantOrders‘ folder path and add permissions for the IUSR user account to read and write to the RestaurantOrders folder.
The ProcessOrder class (note the reference to Json.NET: Newtonsoft.Json):
using Newtonsoft.Json;
using System;
using System.Collections.Generic;
using System.IO;
using System.Linq;

namespace Restaurant
{
    public class ProcessOrder
    {
        public const string STR_JsonFilePath = @"c:\RestaurantOrders\";

        public string ProcessOrderJSON(string restaurantOrder)
        {
            if (restaurantOrder.Length < 1)
            {
                return "Error: Empty message string...";
            }

            try
            {
                var orderId = Guid.NewGuid();
                NormalizeJsonString(ref restaurantOrder);

                //Json.NET: http://james.newtonking.com/projects/json-net.aspx
                var order =
                JsonConvert.DeserializeObject
                <restaurantorder>(restaurantOrder);
                WriteOrderToFile(restaurantOrder, orderId);

                return String.Format(
                "ORDER DETAILS{3}Time: {0}{3}Order Id: {1}{3}Items: {2}",
                DateTime.Now.ToLocalTime(), Guid.NewGuid(),
                order.Count(), Environment.NewLine);
            }
            catch (Exception ex)
            {
                return "Error: " + ex.Message;
            }
        }

        private void NormalizeJsonString(ref string restaurantOrder)
        {
            restaurantOrder = Uri.UnescapeDataString(restaurantOrder);
            int start = restaurantOrder.IndexOf("[");
            int end = restaurantOrder.IndexOf("]") + 1;
            int length = end - start;
            restaurantOrder = restaurantOrder.Substring(start, length);
        }

        private void WriteOrderToFile(string restaurantOrder, Guid OrderId)
        {
            //Make sure to add permissions for IUSR to folder path
            var fileName =
            String.Format("{0}{1}.txt", STR_JsonFilePath, OrderId);

            using (TextWriter writer = new StreamWriter(fileName))
            {
                writer.Write(restaurantOrder);
            }
        }
    }
}
Restaurant WCF Service
If you’ve built WCF Services before, you’ll be familiar with the file structure of this project. The RestaurantService.svc, the WCF Service file, contains no actual code, only a pointer to the code-behind RestaurantService.cs file. This file contains each method which will be exposed to the client through the WCF Service. The IRestaurantService.cs Interface file, defines the Service Contract between the RestaurantService class and the WCF Service. The IRestaurantService Interface also defines each Operational Contract with the class’s methods. The Operational Contract includes Operational Contract Attributes, which define how the Service Operation (a method with an Operational Contract) will operate as part of the WCF Service. Operational Contract Attributes in this example include the required invocation (HTTP method – GET), format of the HTTP Request and Response (JSON), and caching (for the restaurant menu). The WFC Service references (has a dependency on) the Restaurant Class Library.
The WCF Web Service Project, RestaurantWcfService, contains two methods that are exposed to the client. The first, GetCurrentMenu, serializes an instance of RestaurantMenu, containing nested instances of MenuItem. It returns the JSONP-format HTTP Response to the client. There are no parameters passed to the method by the HTTP Request.
The second method, SendOrder, accepts the JSONP-format order, through an input parameter of the string data type, from the client’s HTTP Request. SendOrder then passes the order to the ProcessOrderJSON method, part of the Restaurant.ProcessOrder class. ProcessOrderJSON returns a string to SendOrder, containing some order information (Order Id, date/time, and number of order items). This information is serialized and returned in the JSONP-format HTTP Response to the client. The Response verifies that the order was received and understood.
Lastly, the web.config file contains the WCF bindings, behaviors, endpoints, and caching configuration. I always find configuring this file properly to be a challenge due to the almost-infinite number of WCF configuration options. There are many references available on configuring WCF, but be careful, many were written prior to .NET Framework 4. Configuring WCF for REST and JSONP became much easier with .NET Framework 4. Make sure you refer to the latest materials from MSDN on WCF for .NET Framework 4.
The IRestaurantService.cs Interface:
using Restaurant;
using System;
using System.Collections.Generic;
using System.ComponentModel;
using System.Linq;
using System.ServiceModel;
using System.ServiceModel.Web;

namespace RestaurantWcfService
{
    [ServiceContract]
    public interface IRestaurantService
    {
        [OperationContract]
        [Description("Returns a copy of the restaurant menu.")]
        [WebGet(BodyStyle = WebMessageBodyStyle.Bare,
        RequestFormat = WebMessageFormat.Json,
        ResponseFormat = WebMessageFormat.Json)]
        [AspNetCacheProfile("CacheFor10Seconds")]
        RestaurantMenu GetCurrentMenu();

        [OperationContract]
        [Description("Accepts a menu order and return an order confirmation.")]
        [WebGet(BodyStyle = WebMessageBodyStyle.Bare,
        RequestFormat = WebMessageFormat.Json,
        ResponseFormat = WebMessageFormat.Json,
        UriTemplate = "SendOrder?restaurantOrder={restaurantOrder}")]
        string SendOrder(string restaurantOrder);
    }
}
The RestaurantService.cs Class (inherits from IRestaurantService.cs):
using Restaurant;
using System;
using System.Collections.Generic;
using System.Collections.ObjectModel;
using System.Linq;
using System.ServiceModel.Activation;

namespace RestaurantWcfService
{
    [AspNetCompatibilityRequirements(RequirementsMode =
    AspNetCompatibilityRequirementsMode.Allowed)]
    public class RestaurantService : IRestaurantService
    {
        public RestaurantMenu GetCurrentMenu()
        {
            //Instantiates new RestaurantMenu object and
            //sorts MeuItem objects by byDescription using LINQ
            var menuToReturn = new RestaurantMenu();

            var menuToReturnOrdered = (
                from items in menuToReturn
                orderby items.Description
                select items).ToList();

            menuToReturn = new RestaurantMenu(menuToReturnOrdered);
            return menuToReturn;
        }

        public string SendOrder(string restaurantOrder)
        {
            //Instantiates new ProcessOrder object and
            //passes JSON-format order string to ProcessOrderJSON method
            var orderProcessor = new ProcessOrder();
            var orderResponse =
                orderProcessor.ProcessOrderJSON(restaurantOrder);

            return orderResponse;
        }
    }
}
The WCF Service’s web.config File:
<?xml version="1.0"?>
<configuration>
    <system.web>
        <compilation debug="false" targetFramework="4.0" />
        <caching>
            <outputCacheSettings>
                <outputCacheProfiles>
                    <add name="CacheFor10Seconds" duration="10"
                         varyByParam="none" />
                </outputCacheProfiles>
            </outputCacheSettings>
        </caching>
    </system.web>
    <system.serviceModel>
        <bindings>
            <webHttpBinding>
                <binding name="webHttpBindingWithJsonP"
                         crossDomainScriptAccessEnabled="true" />
            </webHttpBinding>
        </bindings>
        <behaviors>
            <endpointBehaviors>
                <behavior name="webHttpBehavior">
                    <webHttp helpEnabled="true"/>
                </behavior>
            </endpointBehaviors>
            <serviceBehaviors>
                <behavior>
                    <serviceMetadata httpGetEnabled="true" />
                </behavior>
            </serviceBehaviors>
        </behaviors>
        <serviceHostingEnvironment aspNetCompatibilityEnabled="true"
            multipleSiteBindingsEnabled="true" />
        <services>
            <service name="RestaurantWcfService.RestaurantService">
                <endpoint address="" behaviorConfiguration="webHttpBehavior"
                    binding="webHttpBinding"
                          bindingConfiguration="webHttpBindingWithJsonP"
                    contract="RestaurantWcfService.IRestaurantService" />
            </service>
        </services>
    </system.serviceModel>
    <system.webServer>
        <modules runAllManagedModulesForAllRequests="true"/>
    </system.webServer>
</configuration>
WCF Web HTTP Service Help
Once you have the article’s code installed and running, you can view more details about the WCF Service’s operations (methods) using the new .NET Framework 4 WCF Web HTTP Service Help Page feature. Depending on your IIS configuration, the local address should be similar to: http://localhost/MenuWcfRestService/RestaurantService.svc/Help.

.NET Framework 4 WCF Web HTTP Service Help Page
Restaurant Demo Site
RestaurantDemoSite is a non-ASP.NET website, just HTML and JavaScript. For this article, I chose to host the RestaurantDemoSiteweb site on a different port (2929) than the WCF Service on default port 80. I did this to demonstrate the necessity of JSONP for cross-domain scripting. Hosting them on two different ports is considered hosting on two different domains. Port 2929 is a randomly-selected open port on my particular development machine. Both the WCF Service and the website were setup as Virtual Directories in IIS, and then added to the Visual Studio 2010 Solution, along with the Restaurant Class Library.
Following the format of the first article, the website contains two identical pages, each with the same restaurant menu/order form. The ‘Development’ version is optimized for debugging and demonstration. The other, ‘Production’, with the JavaScript and CSS files minified and packed, is optimized for use in production. The demo uses the latest available jQuery JavaScript Library (jquery-1.6.3.js) and the jQuery plug-in, Format Currency (jquery.formatCurrency-1.4.0.js).
The page contains the new HTML5 <!DOCTYPE> declaration. I used HTML5’s new numeric input type for inputting the number of items to order. I defined a min and max value, also a new HTML5 feature. You can these HTML features working in the latest version of Google Chrome.
All of the client-side business logic is contained in the restaurant.js JavaScript file. This file makes calls to jQuery and Format Currency. I chose the sometimes controversial, static code analysis tool JSLint to help debug and refactor my JavaScript code. Even if you don’t agree with all of JSLint’s warnings, understanding the reason for them will really enhance your overall knowledge of JavaScript. A good alternative to JSLint, which I’ve also tried, is JSHint, a fork of the JSLint project. JSHint advertises itself as a more configurable version of JSLint.
The restaurant.js JavaScript file:
var addMenuItemToOrder, calculateSubtotal, clearForm, clickRemove,
formatRowColor, formatRowCurrency, getRestaurantMenu, handleOrder,
orderTotal, populateDropdown, tableToJson, sendOrder, wcfServiceUrl;

// Populate drop-down box with JSON data (menu)
populateDropdown = function () {
    var id, price, description;
    id = this.Id;
    price = this.Price;
    description = this.Description;
    $("#select_item")
        .append($("<option></option>")
        .val(id)
        .html(description)
        .attr("title", price));
};

// Use strict for all other functions
// Based on post at:
// http://ejohn.org/blog/ecmascript-5-strict-mode-json-and-more/
(function () {
    "use strict";

    wcfServiceUrl =
        "http://localhost/MenuWcfRestService/RestaurantService.svc/";

    // Execute when the DOM is fully loaded
    $(document).ready(function () {
        getRestaurantMenu();
    });

    // Add selected item to order
    $(function () {
        $("#add_btn").click(addMenuItemToOrder);
    });

    // Place order if it contains items
    $(function () {
        $("#order_btn").click(handleOrder);
    });

    // Retrieve JSON data (menu) and loop for each menu item
    getRestaurantMenu = function () {
        $.ajax({
            cache: true,
            url: wcfServiceUrl + "GetCurrentMenu",
            data: "{}",
            type: "GET",
            jsonpCallback: "RestaurantMenu",
            contentType: "application/javascript",
            dataType: "jsonp",
            error: function () {
                alert("Menu failed!");
            },
            success: function (menu) {
                $.each(menu, populateDropdown); // must call function as var
            }
        });
    };

    // Add selected menu item to order table
    addMenuItemToOrder = function () {
        var order_item_selected_quantity, selected_item,
            order_item_selected_id, order_item_selected_description,
            order_item_selected_price, order_item_selected_subtotal;

        // Limit order quantity to between 1-99
        order_item_selected_quantity =
            parseInt($("#select_quantity").val(), 10);

        if (order_item_selected_quantity < 1 ||
        order_item_selected_quantity > 99 ||
        isNaN(order_item_selected_quantity)) {
            return;
        }

        // Can't add 'Select an Item...' to order
        if ($("#select_item").get(0).selectedIndex === 0) {
            return;
        }

        // Get values
        selected_item = $("#select_item option:selected");
        order_item_selected_id = parseInt(selected_item.val(), 10);
        order_item_selected_description = selected_item.text();
        order_item_selected_price = parseFloat(selected_item.attr("title"));

        // Calculate subtotal
        order_item_selected_subtotal =
            calculateSubtotal(order_item_selected_price,
            order_item_selected_quantity);

        // Write out menu selection to table row
        $("<tr class='order_row'></tr>").html("<td>" +
            order_item_selected_quantity +
            "</td><td class='order_item_id'>" +
            order_item_selected_id +
            "</td><td class='order_item_name'>" +
            order_item_selected_description +
            "</td><td class='order_item_price'>" +
            order_item_selected_price +
            "</td><td class='order_item_subtotal'>" +
            order_item_selected_subtotal +
            "</td><td><input type='button' value='remove' /></td>")
            .appendTo("#order_cart").hide();

        // Display grand total of order_item_selected_id
        $("#order_cart tr.order_row:last").fadeIn("medium", function () {
            // Callback once animation is complete
            orderTotal();
        });

        formatRowCurrency();
        formatRowColor();
        clickRemove();
        clearForm();
    };

    // Calculate subtotal
    calculateSubtotal = function (price, quantity) {
        return price * quantity;
    };

    // Create alternating colored rows in order table
    formatRowColor = function () {
        $("#order_cart tr.order_row:odd").css("background-color", "#FAF9F9");
        $("#order_cart tr.order_row:even").css("background-color", "#FFF");
    };

    // Format new order item values to currency
    formatRowCurrency = function () {
        $("#order_cart td.order_item_price:last").formatCurrency();
        $("#order_cart td.order_item_subtotal:last").formatCurrency();
    };

    // Bind a click event to the correct remove button
    clickRemove = function () {
        $("#order_cart tr.order_row:last input").click(function () {
            $(this).parent().parent().children().fadeOut("fast", function () {
                $(this).parent().slideUp("slow", function () { // the row (tr)
                    $(this).remove(); // the row (tr)
                    orderTotal();
                });
            });
        });
    };

    // Clear order input form and re-focus cursor
    clearForm = function () {
        $("#select_quantity").val("");
        $("#select_item option:first-child").attr("selected", "selected");
        $("#select_quantity").focus();
    };

    // Calculate new order total
    orderTotal = function () {
        var order_total = 0;

        $("#order_cart td.order_item_subtotal").each(function () {
            var amount = ($(this).html()).replace("$", "");
            order_total += parseFloat(amount);
        });

        $("#order_total").text(order_total).formatCurrency();
    };

    // Call functions to prepare order and send to WCF Service
    handleOrder = function () {
        if ($("#order_cart tr.order_row:last").length === 0) {
            alert("No items selected...");
        } else {
            var data = tableToJson();
            sendOrder(data);
        }
    };

    // Convert HTML table data into an array
    // Based on code from:
    // http://johndyer.name/post/table-tag-to-json-data.aspx
    tableToJson = function () {
        var data, headers, orderCartTable, myTableRow, rowData, i, j;

        headers = ["Quantity", "Id"];
        data = [];
        orderCartTable = document.getElementById("order_cart");

        // Go through cells
        for (i = 1; i < orderCartTable.rows.length - 1; i++) {
            myTableRow = orderCartTable.rows[i];
            rowData = {};

            for (j = 0; j < 2; j++) {
                rowData[headers[j]] = myTableRow.cells[j].innerHTML;
            }

            data.push(rowData);
        }

        return data;
    };

    // Convert array to JSON and send to WCF Service
    sendOrder = function (data) {
        var jsonString = JSON.stringify({ restaurantOrder: data });

        $.ajax({
            url: wcfServiceUrl + "SendOrder?restaurantOrder=" + jsonString,
            type: "GET",
            contentType: "application/javascript",
            dataType: "jsonp",
            jsonpCallback: "OrderResponse",
            error: function () {
                alert("Order failed!");
            },
            success: function (confirmation) {
                alert(confirmation.toString());
            }
        });
    };
} ());
Using Firebug to Look Behind the Scenes
In real life, a restaurant’s menu changes pretty infrequently. Therefore, to speed page delivery, I chose to cache the restaurant’s menu on the client-side. Caching is configured as part of the Operational Contract in IRestaurantService, as well as in the jQuery AJAX call to GetCurrentMenu in restaurant.js. In this example, I set the cache to 10 seconds, which can be confirmed by looking at the Cache-Control property in the HTTP Response Header of the call to GetCurrentMenu, using Firebug.
Below is a screen grab of initial load of the restaurant menu/order form page in Firefox with Firebug running. Note the ‘Domain’ of the AJAX call is different than the page and associated files. Also, both the ‘Status’ and ‘Remote IP’ indicate the HTTP Response to GetCurrentMenu (the restaurant’s menu) is cached, along with the page and associated files. Firebug is an invaluable tool in the development and debugging of JavaScript, especially when working with AJAX.

Firebug in Firefox – Caching
Points of Interest
Several things stood out to me as a result of writing this article:
- WCF – No matter how many times I work with WCF Services, getting them configured properly seems like 90% technical knowledge and 10% luck. Ok, maybe 20% luck! Seriously, there are a lot of great resources on the web regarding WCF configuration issues. If you have a specific problem with WCF, odds are someone else already had it and has published a solution. Make sure the information is current to the .NET Framework you are working with.
- Third-party Libraries, Plug-ins, and Frameworks – Don’t confine yourself to using the out-of-the-box .NET Framework, JavaScript, or jQuery to solve all your coding challenges. There are an endless variety of Frameworks, JavaScript Libraries, and jQuery Plug-ins, available. Being a good developer is about providing the best solution to a problem, not necessarily writing each and every line of code, yourself. A few minutes of research can be worth hours of coding!
- Refactoring – Refactoring your code is critical. Just making it work is not good enough. Added bonus? I’ve personally gained a considerable amount of knowledge about software development through refactoring. Forcing yourself to go back and optimize code can be a tremendous learning opportunity. Using third-party refactoring tools such JSLint/JSHint, FxCop, RefactorPro!, CodeRush, ReSharper, and others is a great way to improve both your refactoring and coding skills. I use all these tools as much as possible.
- Cross-Domain with JSONP – Using JSONP is one technique to get around the limitations imposed by the same origin policy. JSONP has its pros and cons. Spend some time to research other methods that might better benefit your project requirements.
Using ImageMagick to Create Previews and Thumbnails from Uploaded Images
Posted by Gary A. Stafford in .NET Development, Software Development on July 2, 2009

ImageMagick Results in Internet Explorer
Introduction
This article and the accompanying ASP.NET Web Application demonstrate the use of ImageMagick, a well-known open-source application from ImageMagick Studio LLC. The application creates a small thumbnail image and a larger preview image, both from a single JPEG or TIFF image, uploaded by the user through a web-browser. The application was written in C# using Microsoft Visual Studio 2008 and Developer Express’ CodeRush. Developer Express’ Refactor! Pro was used to optimize and refactor the source code.
Background
Working in the graphic arts industry, much of the development I am involved with deals with the creation, processing, storage, and distribution of images and visually rich documents. One such recent project was the creation of a web-to-print solution for the Fine Art Reproduction division of our company, Lazer Incorporated. Preview the site at Lazer Incorporated Fine Art Gallery. The fine arts web-to-print web solution consists of three primary user interfaces, as follows:
- Public art gallery to display the works of artists who use our services
- Private and secure ordering system for artists to order fine art prints and other services
- Customer service interface to administer the artists, artwork, thumbnail/previews, and orders.
The fine arts application is an ASP.NET 2.0 Web Application, written in C# 2.0 using Microsoft Visual Studio 2005. The solution uses SQL Server 2005 for storage of artist and artwork data. The solution integrates XML Flash Slideshow v3, an Adobe Dreamweaver Flash-based extension from dwusers.com, to display the artist’s portfolio. In addition, the solution automatically creates thumbnails and larger preview images of the artwork using ImageMagick. ImageMagick is a free application from ImageMagick Studio LLC. ImageMagick is available for multiple Operating Systems and programming environments.
Using the Code
The Application
The application calls ImageMagick v6.4.5 from the command-line to create thumbnails and previews from a single uploaded image file. It duplicates the approximate functionality of the aforementioned fine art solution’s thumbnail/preview creation routine. The application is written in Visual Studio 2008 using C# 3.0. This simple application contains a single Web Form and an associated class file. The application’s workflow is as follows:
- User uploads a TIFF or JPEG image, less than 5 Mbs in size, through the web browser.
- Application verifies the image has been successfully uploaded, and is within the specs above.
- Application calls ImageMagick from the command-line to return information about the uploaded image (optional).
- Application calls ImageMagick to create a small thumbnail image from the uploaded image, no bigger than 100 pixels in height.
- Application calls ImageMagick to create a larger-sized preview image, no bigger than 450 pixels in width or height.
- Application deletes the original uploaded file from the server.
- Application returns a detailed status report of all the actions to the user.
Preparing to Install the Application
All code for this article is available for download at on The Code Project. Before you compile and run the source files provided, you must complete two simple tasks. First, download and install ImageMagick. As of the date of this article, v6.5.2-1 is the most current. Since the instructions to install ImageMagick are so well documented at http://www.imagemagick.org/script/binary-releases.php#windows, I won’t be redundant, herein.
Secondly, install the folder-set I have provided as part of the source code. Inside the ImageMagick parent folder of the set, there are four folders. They will hold uploaded images, thumbnails, previews, and an ICC color profile. The profile ensures optimal color accuracy during image conversion and display of images in the web-browser. The source code assumes you will install the folder-set at the root-level of your C: drive (c:\imagemagick). You can easily change this property in the source code, if necessary.
After downloading the folders, create a virtual directory within Internet Information Services (IIS) Web Server, with the local path pointed to the ‘imagemagick‘ folder (see screen capture below). This step is necessary so the application can display the preview and thumbnail in the web-browser after they are created.

Creating Virtual Directory in IIS
Lastly, you must give the ASP.NET user account read and write access to the folder-set (see screen capture below). The Web Application, and subsequently ImageMagick, will need these privileges to create the new images in the appropriate folders, read the images back into the web-browser, and delete the original uploaded image.

ASP.NET User Account Permissions
Installing the Application
Now, you can download and install the source files and compile the web application. To do so:
- Create a new C# ASP.NET Web Application in VS 2008 called ‘IMPreviewDemo’.
- Replace the Default.aspx Web Form with the Default.aspx form provided.
- Install the Global.aspx, ImageMaker.cs, Result.cs files in the root directory of the IMPreviewDemo application.
- Optionally, open your existing Web.config file and add a <httpRuntime/> tag to the <system.web> section (see screen capture below). This will allow you to also adjust the maximum allowable uploaded image size, and also importantly, set a time limit for uploads to complete.

Modifying the Web.config File Settings
The Code
The Default.aspx Web Form contains the VerifyUpload() method. When the Process button is clicked,VerifyUpload() checks that the file has successfully been uploaded, and checks that the file is either a JPEG or TIFF file. VerifyUpload() returns a value indicating whether or not the tests were passed. Only then is an instance of the ImageMaker class created, and a call placed to the ProcessImage(string uploadedFile,int detailLevel) method, part of the ImageMaker class.
using System;

namespace IMPreviewDemo
{
    public partial class Default : System.Web.UI.Page
    {
        protected void Page_Load(object sender, EventArgs e)
        {
            if(Request.QueryString["error"] == "filesize")
            {
                Message.CssClass = "textred";
                Message.Text = "File was to large to upload. Must be < 5 Mb.";
            }
        }
        protected void Process_Click(object sender, EventArgs e)
        {
            ImagePanel.Visible = false;
            if(VerifyUpload() == Result.Success)
            {
                CreateImages();
            }
        }
        protected Result VerifyUpload()
        {
            if(ImageUpload.HasFile)
            {
                string fileExtension = System.IO.Path
                    .GetExtension(ImageUpload.FileName).ToLower();
                string[] allowedExtensions =
                    new string[] { ".jpeg", ".jpg", ".tif", ".tiff" };
                foreach(string allowedExtension in allowedExtensions)
                    if(fileExtension == allowedExtension)
                        return Result.Success;
            }
            Message.CssClass = "textred";
            Message.Text =
                "Cannot accept this image type. Must be JPEG or TIFF.";
            ImagePanel.Visible = false;
            return Result.Failure;
        }
        private void CreateImages()
        {
            ImageMaker PreviewMaker = new ImageMaker();
            string uploadedFile = String.Format("{0}{1}",
                ImageMaker.PathUploadedFiles,
                ImageUpload.FileName.Replace(" ", "_"));
            ImageUpload.PostedFile.SaveAs(uploadedFile);
            int detailLevel = Convert.ToInt16(DetailLevel.SelectedValue);
            Message.CssClass = "";
            Message.Text = PreviewMaker.ProcessImage(uploadedFile, detailLevel)
                .Replace("\n", "<br />");
            Thumbnail.ImageUrl = PreviewMaker.UrlThumbnail.ToString();
            Preview.ImageUrl = PreviewMaker.UrlPreview.ToString();
            ImagePanel.Visible = true;
        }
    }
}
The latest version of this application, starting 1.1, uses the Global.aspx file to check uploaded file size. I found this technique on Vikram Lakhotia’s Blog. The Application_BeginRequest event checks the uploaded file size. If the file is bigger than the limit I have set, 5 Mb (measured in bytes), an error sent back to the Default.aspx page.
Reviewing the ImageMaker class, you will notice that all file paths are stored in a series of properties and fields at the top of the class. You can modify these to suit your own local file environment. The ImageMaker class also has two fields that identify the path to the ImageMagick application you installed. Again, adjust the fields to match your own environment.
The ImageMaker class has two primary methods. The ProcessImage(string uploadedFile, intdetailLevel) method formats the file arguments to be send to the ImageMagick application through the command-line. This method also concatenates and formats the status information returned to the user.
The second method, CallImageMagick(string fileArgs), uses the argument passed to it by ProcessImage(string uploadedFile, int detailLevel) to direct the ImageMagic application from the command-line. Depending on the argument, CallImageMagick(string fileArgs) may or may not return a response string. ImageMagick is called by instantiating the System.Diagnostics.Process class. This class is able to start and stop local system processes.
In the source code, the file arguments passed to ImageMagick are specific to our workflow. We convert the uploaded image to an 8-bit RGB file, scale it down, sharpen it, assign a color profile, and finally save it as a compressed JPEG for display in a web-browser. You can change any of the ImageMagick arguments to fit your needs, along with the file size limitations and file types used in this demo. Refer to the ImageMagick website for a complete list of all ImageMagick’s tools and options (arguments).
using System;
using System.Diagnostics;
using System.IO;
using System.Text;

namespace IMPreviewDemo
{
    public class ImageMaker
    {
        //Location of the ImageMagick applications
        private const string pathImageMagick =
            @"C:\Program Files\ImageMagick-6.4.5-Q16\";
        private const string appImageMagick = "MagickCMD.exe";

        //Names for images created by ImageMagick
        private string ticksID;
        private string previewName;
        private string thumbnailName;

        //Paths to all the file folders
        private const string pathRoot = @"C:\imagemagick";
        private const string pathPreviews = pathRoot + @"\previews\";
        private const string pathThumbnails = pathRoot + @"\thumbnails\";
        private const string pathColorProfile = pathRoot + @"\profiles\";

        private const string colorProfile =
            "sRGB_IEC61966-2-1_black_scaled.icc";

        public static string PathUploadedFiles
        { get { return String.Format(@"{0}\uploads\", pathRoot); } }

        //URLs of images created by ImageMagick
        //(assumes imagemagick folder a virtual directory in IIS)
        public Uri UrlThumbnail { get; private set; }
        public Uri UrlPreview { get; private set; }

        StringBuilder sbResults = new StringBuilder();

        public string ProcessImage(string uploadedFile, int detailLevel)
        {
            try
            {
                ticksID = DateTime.Now.Ticks.ToString();
                sbResults.AppendLine(String.Format("Start time: {0}\n",
                    DateTime.Now.ToLongTimeString()));
                if(detailLevel == 1) { GetFileInfo(uploadedFile); }
                CreateThumbnailImage(uploadedFile);
                CreatePreviewImage(uploadedFile);
                File.Delete(uploadedFile);
                sbResults.AppendLine(String.Format("Uploaded file deleted: {0}\n",
                    uploadedFile));
                sbResults.AppendLine(String.Format("Stop time: {0}\n",
                    DateTime.Now.ToLongTimeString()));
                return sbResults.ToString();
            }
            catch(Exception ex)
            {
                return ex.Message;
            }
        }
        private void GetFileInfo(string uploadedFile)
        {
            string fileArgs = String.Format("identify -verbose {0}", uploadedFile);
            sbResults.AppendLine(String.Format("Uploaded file arguments: {0}\n",
                fileArgs));
            sbResults.AppendLine(String.Format("Uploaded file info: {0}\n",
                CallImageMagick(fileArgs)));
        }
        private void CreatePreviewImage(string uploadedFile)
        {
            previewName = String.Format("preview_{0}.jpg", ticksID);
            UrlPreview =
                new Uri(String.Format(@"http://localhost/imagemagick/previews/{0}",
                previewName));
            StringBuilder sbFileArgs = new StringBuilder()
                .Append(String.Format("convert {0}", uploadedFile))
                .Append(@" -intent relative")
                .Append(String.Format(@" -profile {0}{1}",
                    pathColorProfile, colorProfile))
                .Append(@" -filter Sinc -resize 450x450>")
                .Append(@" -unsharp .5x.5+.5+0")
                .Append(@" -depth 8")
                .Append(@" -strip")
                .Append(String.Format(@" -profile {0}{1}",
                    pathColorProfile, colorProfile))
                .Append(@" -quality 80 ")
                .Append(pathPreviews + previewName);
            string fileArgs = sbFileArgs.ToString();
            sbResults.AppendLine(String.Format("Thumbnail file arguments: {0}\n",
                fileArgs));
            sbResults.AppendLine(String.Format("Thumbnail created: {0}\n",
                CallImageMagick(fileArgs)));
        }
        private void CreateThumbnailImage(string uploadedFile)
        {
            thumbnailName = String.Format("thumbnail_{0}.jpg", ticksID);
            UrlThumbnail =
                new Uri(String.Format(@"http://localhost/imagemagick/thumbnails/{0}",
                thumbnailName));
            StringBuilder sbFileArgs = new StringBuilder()
                .Append(String.Format("convert {0}", uploadedFile))
                .Append(@" -intent relative")
                .Append(String.Format(@" -profile {0}{1}",
                    pathColorProfile, colorProfile))
                .Append(@" -filter Sinc -resize x100>")
                .Append(@" -unsharp .5x.5+.5+0")
                .Append(@" -depth 8")
                .Append(@" -strip")
                .Append(String.Format(@" -profile {0}{1}",
                    pathColorProfile, colorProfile))
                .Append(@" -quality 60 ")
                .Append(pathThumbnails + thumbnailName);
            string fileArgs = sbFileArgs.ToString();
            sbResults.AppendLine(String.Format("Preview file arguments: {0}\n",
                fileArgs));
            sbResults.AppendLine(String.Format("Preview created: {0}\n",
                CallImageMagick(fileArgs)));
        }
        private static string CallImageMagick(string fileArgs)
        {
            ProcessStartInfo startInfo = new ProcessStartInfo
            {
                Arguments = fileArgs,
                WorkingDirectory = pathImageMagick,
                FileName = appImageMagick,
                UseShellExecute = false,
                CreateNoWindow = true,
                RedirectStandardOutput = true
            };
            using(Process exeProcess = Process.Start(startInfo))
            {
                string IMResponse = exeProcess.StandardOutput.ReadToEnd();
                exeProcess.WaitForExit();
                exeProcess.Close();
                return !String.IsNullOrEmpty(IMResponse) ? IMResponse : "True";
            }
        }
    }
}
Conclusion
ImageMagick is a powerful image creation and image-processing engine, capable of the most complex tasks. It is similar to Adobe Photoshop without the GUI in many respects. In addition to the command-line, ImageMagick can be accessed programmatically through its API. There are options available to Windows programmers using COM+ and .NET. You can read more at http://imagemagick.net/script/api.php.
Gary Stafford
AWS Area Principal Solutions Architect | 10x AWS Certified Pro | DevOps | Data/ML | Serverless | Polyglot Developer | Former ThoughtWorks and Accenture
