Introduction
Recently, I purchased a USB-powered wireless router for to use with my Raspberry Pi when travelling. In an earlier post, Raspberry Pi-Powered Dashboard Video Camera Using Motion and FFmpeg, I discussed the use of the Raspberry Pi, combined with a webcam, Motion, and FFmpeg, to create a low-cost dashboard video camera. Like many, I find one the big challenges with the Raspberry Pi, is how to connect and interact with it. Being in my car, and usually out of range of my home’s wireless network, except maybe in the garage, this becomes even more of an issue. That’s where adding an inexpensive travel-size router to my vehicle comes in handy.
I chose the TP-LINK TL-WR702N Wireless N150 Travel Router, sold by Amazon. The TP-LINK router, described as ‘nano size’, measures only 2.2 inches square by 0.7 inches wide. It has several modes of operation, including as a router, access point, client, bridge, or repeater. It operates at wireless speeds up to 150Mpbs and is compatible with IEEE 802.11b/g/n networks. It supports several common network security protocols, including WEP, WPA/WPA2, WPA-PSK/WPA2-PSK encryption. For $22 USD, what more could you ask for!

My goal with the router was to do the following:
- Have the Raspberry Pi auto-connect to the new TP-LINK router’s wireless network when in range, just like my home network.
- Since I might still be in range of my home network, have the Raspberry Pi try to connect to the TP-LINK first, before falling back to my home network.
- Ensure the network was relatively secure, since I would be exposed to many more potential threats when traveling.
My vehicle has two power outlets. I plug my Raspberry Pi into one outlet and the router into the other. You could daisy chain the router off the Pi. However, my Pi’s ports are in use my the USB wireless adapter and the USB webcam. Using the TP-LINK router, I can easily connect to the Raspberry Pi with my mobile phone or tablet, using an SSH client.

Using Fing to Locate the Pi on the TP-LINK Wireless Network
When I arrive at my destination, I log into the Pi and do a proper shutdown. This activates my shutdown script (see my last post), which moves the newly created Motion/FFmpeg time-lapse dash-cam videos to a secure folder on my Pi, before powering down.

Using SSH Terminal for iOS to Shutdown the Pi
Of course there are many other uses for the router. For example, I can remove the Pi and router from my car and plug it back in at the hotel while traveling, or power the router from my laptop while at work or the coffee shop. I now have my own private wireless network wherever I am to use the Raspberry Pi, or work with other users. Remember the TP-LINK can act as a router, access point, client, bridge, or a repeater.

The Raspberry Pi and Router both fit in a Small Container for Travel
Network Security
Before configuring your Raspberry Pi, the first thing you should do is change all the default security related settings for the router. Start with the default SSID and the PSK password. Both these default values are printed right on the router. That’s motivation enough to change!

Additionally, change the default IP address of the router and the username and password for the browser-based Administration Console.

Lastly, pick the most secure protocol possible. I chose ‘WPA-PSK/WPA2-PSK’. All these changes are done through the TP-LINK’s browser-based Administration Console.
Configuring Multiple Wireless Networks
In an earlier post, Installing a Miniature WiFi Module on the Raspberry Pi (w/ Roaming Enabled), I detailed the installation and configuration of a Miniature WiFi Module, from Adafruit Industries, on a Pi running Soft-float Debian “wheezy”. I normally connect my Pi to my home wireless network. I wanted to continue to do this in the house, but connect the new router when traveling.
Based on the earlier post, I was already using Jouni Malinen’s wpa_supplicant, the WPA Supplicant for Linux, BSD, Mac OS X, and Windows with support for WPA and WPA2. This made network configuration relatively simple. If you use wpa_supplicant, your ‘/etc/network/interfaces’ file should look like the following. If you’re not familiar with configuring the interfaces file for wpa_supplicant, this post on NoWiresSecurity.com is a good starting point.
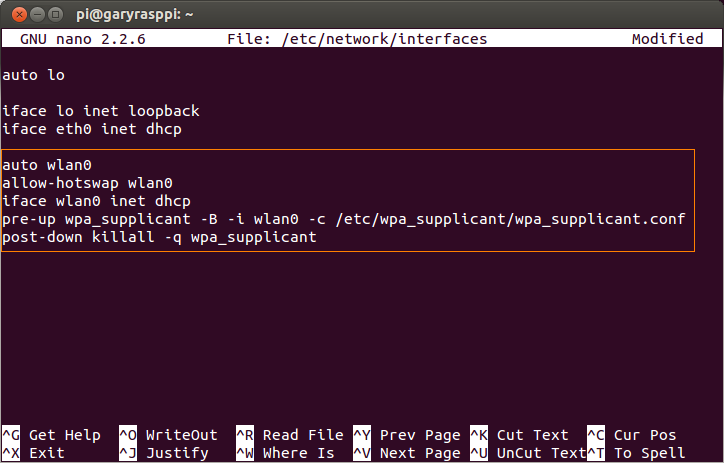
Note that in this example, I am using DHCP for all wireless network connections. If you chose to use static IP addresses for any of the networks, you will have to change the interfaces file accordingly. Once you add multiple networks, configuring static IP addresses for each network, becomes more complex. That is my next project…
First, I generated a new pre-shared key (PSK) for the router’s SSID configuration using the following command. Substitute your own SSID (‘your_ssid’) and passphrase (‘your_passphrase’).
wpa_passphrase your_ssid your_passphrase
Based your SSID and passphrase, this command will generate a pre-shared key (PSK), similar to the following. Save or copy the PSK to the clipboard. We will need the PSK in the next step.

Then, I modified my wpa_supplicant configuration file with the following command:
sudo nano /etc/wpa_supplicant/wpa_supplicant.conf
I added the second network configuration, similar to the existing configuration for my home wireless network, using the newly generated PSK. Below is an example of what mine looks like (of course, not the actual PSKs).

Depending on your Raspberry Pi and router configurations, your wpa_supplicant configuration will look slightly different. You may wish to add more settings. Don’t consider my example the absolute right way for your networks.
Wireless Network Priority
Note the priority of the TP-LINK router is set to 2, while my home NETGEAR router is set to 1. This ensures wpa_supplicant will attempt to connect to the TP-LINK network first, before attempting the home network. The higher number gets priority. The best resource I’ve found, which explains all the configuration options is detail, is here. In this example wpa_supplicant configuration file, priority is explained this way, ‘by default, all networks will get same priority group (0). If some of the networks are more desirable, this field can be used to change the order in which wpa_supplicant goes through the networks when selecting a BSS. The priority groups will be iterated in decreasing priority (i.e., the larger the priority value, the sooner the network is matched against the scan results). Within each priority group, networks will be selected based on security policy, signal strength, etc.’
Conclusion
If you want an easy, inexpensive, secure way to connect to your Raspberry Pi, in the vehicle or other location, a travel-size wireless router is a great solution. Best of all, configuring it for your Raspberry Pi is simple if you use wpa_supplicant.

#1 by JM on August 20, 2013 - 7:20 pm
what do you use it for now, and what future potential do you see for DIY network connected raspberry pi in your vehicle?
#2 by Gary A. Stafford on August 22, 2013 - 7:01 pm
Peer to peer gaming, music sharing, etc.
#3 by morton on December 31, 2013 - 2:29 am
Hi Gary,
nice post! I am not quite sure how the option: use as a router in an internet cafe would work though.
Lets say we are in a hotel or at starbucks: The connection is made once the wlan card has connected to the wlan network. Thereafter a login page appears (browser). the raspberry pi can do that right? but there needs to be a second network card to rout the connection to other devices, correct? I only see one netword card (the TP link). I could spare the browser login if I log in with my laptop and the clone the ip adress of the registered laptop but I need a 2nd netword card correct?
#4 by Paul Williams on December 12, 2017 - 2:27 pm
Thanks for posting this. I just ordered the new version of this router with plans to do this same thing.
Did you consider connecting the router to the Pi with the RJ45 jack?
I was worried that the power from the Pi USB ports wasn’t sufficient to power both the router and the USB wifi. I thought my connecting the two units thru the ethernet cable, I could remove the USB wifi and have enough juice to fully power the router via USB. Any thoughts on that?