Posts Tagged RPi
Prevent Motion From Running Without a Camera Connected
Posted by Gary A. Stafford in Bash Scripting, Raspberry Pi, Software Development on July 19, 2013
Introduction
If you read my post, Raspberry Pi-Powered Dashboard Video Camera Using Motion and FFmpeg, you know Motion with FFmpeg on a Raspberry Pi makes an ideal dashboard camera system. However, an issue I still struggled with when using the dash-cam was Motion running without a webcam connected.
When I start my car, the Raspberry Pi boots-up, and subsequently, Motion starts. No interaction with the Pi is required. The dash-cam starts capturing images and making the time-lapse video. However, when I get home and plug my Pi back into my local network, Motion starts up again and starts recording blank images and creating the time-lapse video, even though there is no webcam connected.
To get prevent Motion from starting up without a webcam connected, I’ve added a simple function to the Motion startup script. When the system calls Motion on startup, the new function checks if a webcam is connected. If not, it immediately exits the script, without ever starting Motion. No blank images or empty time-lapse videos are created. This saves a lot of wasted processing on the Pi. It also saves a lot of wasted time moving videos and images off the Pi that end up being blank, because no webcam was connected.
Find Your Webcam
First, attach your webcam to the Raspberry Pi. Run the following command to list the USB devices connected to the Pi:
lsusb
You should see similar output to the example below. Note your webcam’s ID(s). I ran the command twice in this example, to identify both of my webcams.

Identifying Webcams with lsusb Command
There are several ways to detect your webcam, depending on you Linux distro. I found this post particularly helpful, The Webcam HOWTO.
Modify Motion
Next, open the Motion startup script, using the following command:
sudo nano /etc/init.d/motion
Add the following ‘check_for_webcam ()’ function to the top of the script, adjacent to the existing ‘check_daemon_enabled()’ function:
# Check if specific webcam(s) are connected to Pi
check_for_webcam () {
    if lsusb | grep -s -q -e 0000:ABCD
    then
        echo "Webcam found. Continuing..."
        return 0
    else
        echo "No webcam found? Shutting down Motion!"
        return 1
    fi
}
You will need to modify the function, changing the string ‘0000:ABCD’, to match your webcam’s ID. If you change your webcam model, remember to update the ID you entered in this function.
Next add the following statement to the beginning of the ‘start’ function. This code calls the new function when Motion’s ‘start’ command is executed. If no webcam is found, the Motion script exits without starting.
if ! check_for_webcam; then
    exit 1
fi
In my example below, I have two possible webcams that might be connected, so I search (grep) for either ID.

Modifying Motion Startup Script
Testing the Script Change
Save and close the Motion script. To test the script is working, run the following command to stop Motion:
sudo /etc/init.d/motion stop
Unplug your webcam from the Raspberry Pi. Then, run the following command to start Motion:
sudo /etc/init.d/motion start
You should see the following output:
No webcam found? Shutting down Motion!
Now, plug your webcam back in and run the ‘start’ command, again. You should now see the following output:
Webcam found. Continuing...

Starting Motion With and Without Webcam
Conclusion
Now, when you start the Raspberry Pi and don’t have a web-cam connected, Motion will no longer automatically start. Just remember, if you don’t have a way to interact directly with your Pi, you will need to restart the Pi to get Motion running again after connecting a webcam.
Travel-Size Wireless Router for Your Raspberry Pi
Posted by Gary A. Stafford in Bash Scripting, Raspberry Pi, Software Development on July 15, 2013
Introduction
Recently, I purchased a USB-powered wireless router for to use with my Raspberry Pi when travelling. In an earlier post, Raspberry Pi-Powered Dashboard Video Camera Using Motion and FFmpeg, I discussed the use of the Raspberry Pi, combined with a webcam, Motion, and FFmpeg, to create a low-cost dashboard video camera. Like many, I find one the big challenges with the Raspberry Pi, is how to connect and interact with it. Being in my car, and usually out of range of my home’s wireless network, except maybe in the garage, this becomes even more of an issue. That’s where adding an inexpensive travel-size router to my vehicle comes in handy.
I chose the TP-LINK TL-WR702N Wireless N150 Travel Router, sold by Amazon. The TP-LINK router, described as ‘nano size’, measures only 2.2 inches square by 0.7 inches wide. It has several modes of operation, including as a router, access point, client, bridge, or repeater. It operates at wireless speeds up to 150Mpbs and is compatible with IEEE 802.11b/g/n networks. It supports several common network security protocols, including WEP, WPA/WPA2, WPA-PSK/WPA2-PSK encryption. For $22 USD, what more could you ask for!

My goal with the router was to do the following:
- Have the Raspberry Pi auto-connect to the new TP-LINK router’s wireless network when in range, just like my home network.
- Since I might still be in range of my home network, have the Raspberry Pi try to connect to the TP-LINK first, before falling back to my home network.
- Ensure the network was relatively secure, since I would be exposed to many more potential threats when traveling.
My vehicle has two power outlets. I plug my Raspberry Pi into one outlet and the router into the other. You could daisy chain the router off the Pi. However, my Pi’s ports are in use my the USB wireless adapter and the USB webcam. Using the TP-LINK router, I can easily connect to the Raspberry Pi with my mobile phone or tablet, using an SSH client.

Using Fing to Locate the Pi on the TP-LINK Wireless Network
When I arrive at my destination, I log into the Pi and do a proper shutdown. This activates my shutdown script (see my last post), which moves the newly created Motion/FFmpeg time-lapse dash-cam videos to a secure folder on my Pi, before powering down.

Using SSH Terminal for iOS to Shutdown the Pi
Of course there are many other uses for the router. For example, I can remove the Pi and router from my car and plug it back in at the hotel while traveling, or power the router from my laptop while at work or the coffee shop. I now have my own private wireless network wherever I am to use the Raspberry Pi, or work with other users. Remember the TP-LINK can act as a router, access point, client, bridge, or a repeater.

The Raspberry Pi and Router both fit in a Small Container for Travel
Network Security
Before configuring your Raspberry Pi, the first thing you should do is change all the default security related settings for the router. Start with the default SSID and the PSK password. Both these default values are printed right on the router. That’s motivation enough to change!

Additionally, change the default IP address of the router and the username and password for the browser-based Administration Console.

Lastly, pick the most secure protocol possible. I chose ‘WPA-PSK/WPA2-PSK’. All these changes are done through the TP-LINK’s browser-based Administration Console.
Configuring Multiple Wireless Networks
In an earlier post, Installing a Miniature WiFi Module on the Raspberry Pi (w/ Roaming Enabled), I detailed the installation and configuration of a Miniature WiFi Module, from Adafruit Industries, on a Pi running Soft-float Debian “wheezy”. I normally connect my Pi to my home wireless network. I wanted to continue to do this in the house, but connect the new router when traveling.
Based on the earlier post, I was already using Jouni Malinen’s wpa_supplicant, the WPA Supplicant for Linux, BSD, Mac OS X, and Windows with support for WPA and WPA2. This made network configuration relatively simple. If you use wpa_supplicant, your ‘/etc/network/interfaces’ file should look like the following. If you’re not familiar with configuring the interfaces file for wpa_supplicant, this post on NoWiresSecurity.com is a good starting point.
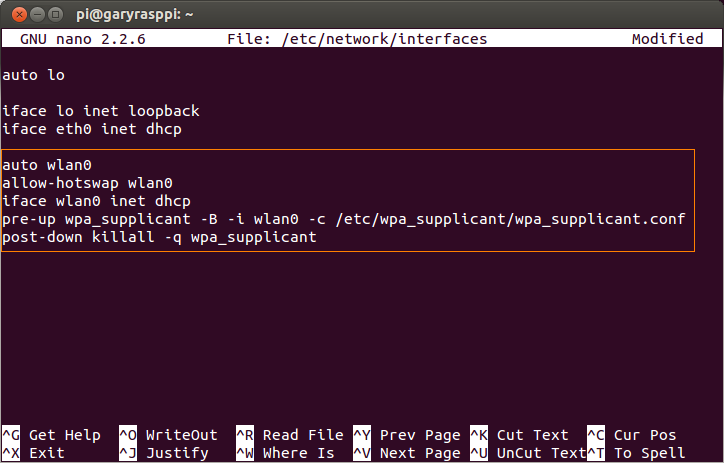
Note that in this example, I am using DHCP for all wireless network connections. If you chose to use static IP addresses for any of the networks, you will have to change the interfaces file accordingly. Once you add multiple networks, configuring static IP addresses for each network, becomes more complex. That is my next project…
First, I generated a new pre-shared key (PSK) for the router’s SSID configuration using the following command. Substitute your own SSID (‘your_ssid’) and passphrase (‘your_passphrase’).
wpa_passphrase your_ssid your_passphrase
Based your SSID and passphrase, this command will generate a pre-shared key (PSK), similar to the following. Save or copy the PSK to the clipboard. We will need the PSK in the next step.

Then, I modified my wpa_supplicant configuration file with the following command:
sudo nano /etc/wpa_supplicant/wpa_supplicant.conf
I added the second network configuration, similar to the existing configuration for my home wireless network, using the newly generated PSK. Below is an example of what mine looks like (of course, not the actual PSKs).

Depending on your Raspberry Pi and router configurations, your wpa_supplicant configuration will look slightly different. You may wish to add more settings. Don’t consider my example the absolute right way for your networks.
Wireless Network Priority
Note the priority of the TP-LINK router is set to 2, while my home NETGEAR router is set to 1. This ensures wpa_supplicant will attempt to connect to the TP-LINK network first, before attempting the home network. The higher number gets priority. The best resource I’ve found, which explains all the configuration options is detail, is here. In this example wpa_supplicant configuration file, priority is explained this way, ‘by default, all networks will get same priority group (0). If some of the networks are more desirable, this field can be used to change the order in which wpa_supplicant goes through the networks when selecting a BSS. The priority groups will be iterated in decreasing priority (i.e., the larger the priority value, the sooner the network is matched against the scan results). Within each priority group, networks will be selected based on security policy, signal strength, etc.’
Conclusion
If you want an easy, inexpensive, secure way to connect to your Raspberry Pi, in the vehicle or other location, a travel-size wireless router is a great solution. Best of all, configuring it for your Raspberry Pi is simple if you use wpa_supplicant.
Raspberry Pi-Powered Dashboard Video Camera Using Motion and FFmpeg
Posted by Gary A. Stafford in Bash Scripting, Raspberry Pi, Software Development on June 30, 2013
Demonstrate the use of the Raspberry Pi and a basic webcam, along with Motion and FFmpeg, to build low-cost dashboard video camera for your daily commute.
Dashboard Video Cameras
Most of us remember the proliferation of dashboard camera videos of the February 2013 meteor racing across the skies of Russia. This rare astronomical event was captured on many Russian motorist’s dashboard cameras. Due to the dangerous driving conditions in Russia, many drivers rely on dashboard cameras for insurance and legal purposes. In the United States, we are more use to seeing dashboard cameras used by law-enforcement. Who hasn’t seen those thrilling police videos of car crashes, drunk drivers, and traffic stops gone wrong.
Although driving in the United States is not as dangerous as in Russia, there is reason we can’t also use dashboard cameras. In case you are involved in an accident, you will have a video record of the event for your insurance company. If you witness an accident or other dangerous situation, your video may help law enforcement and other emergency responders. Maybe you just want to record a video diary of your next road trip.
A wide variety of dashboard video cameras, available for civilian vehicles, can be seen on Amazon’s website. They range in price and quality from less that $50 USD to well over $300 USD or more, depending on their features. In a popular earlier post, Remote Motion-Activated Web-Based Surveillance with Raspberry Pi, I demonstrated the use of the Raspberry Pi and a webcam, along with Motion and FFmpeg, to provide low-cost web-based, remote surveillance. There are many other uses for this combination of hardware and software, including as a dashboard video camera.
Methods for Creating Dashboard Camera Videos
I’ve found two methods for capturing dashboard camera videos. The first and easiest method involves configuring Motion to use FFmpeg to create a video. FFmpeg creates a video from individual images (frames) taken at regular intervals while driving. The upside of the FFmpeg option, it gives you a quick ready-made video. The downside of FFmpeg option, your inability to fully control the high-level of video compression and high frame-rate (fps). This makes it hard to discern fine details when viewing the video.
Alternately, you can capture individual JPEG images and combine them using FFmpeg from the command line or using third-party movie-editing tools. The advantage of combining the images yourself, you have more control over the quality and frame-rate of the video. Altering the frame-rate, alters your perception of the speed of the vehicle recording the video. The only disadvantage of combining the images yourself, you have the extra steps involved to process the images into a video.
At one frame every two seconds (.5 fps), a 30 minute commute to work will generate 30 frames/minute x 30 minutes, or 900 jpeg images. At 640 x 480 pixels, depending on your jpeg compression ratio, that’s a lot of data to move around and crunch into a video. If you just want a basic record of your travels, use FFmpeg. If you want a higher-quality record of trip, maybe for a video-diary, combining the frames yourself is a better way to go.
Configuring Motion for a Dashboard Camera
The installation and setup of FFmpeg and Motion are covered in my earlier post so I won’t repeat that here. Below are several Motion settings I recommend starting with for use with a dashboard video camera. To configure Motion, open it’s configuration file, by entering the following command on your Raspberry Pi:
sudo nano /etc/motion/motion.conf
To use FFmpeg, the first method, find the ‘FFMPEG related options’ section of the configuration and locate ‘Use ffmpeg to encode a timelapse movie’. Enter a number for the ‘ffmpeg_timelapse’ setting. This is the rate at which images are captured and combined into a video. I suggest starting with 2 seconds. With a dashboard camera, you are trying to record important events as you drive. In as little as 2-3 seconds at 55 mph, you can miss a lot of action. Moving the setting down to 1 second will give more detail, but you will chew up a lot of disk space, if that is an issue for you. I would experiment with different values:
# Use ffmpeg to encode a timelapse movie
# Default value 0 = off - else save frame every Nth second
ffmpeg_timelapse 2
To use the ‘do-it-yourself’ FFmpeg method, locate the ‘Snapshots’ section. Find ‘Make automated snapshot every N seconds (default: 0 = disabled)’. Change the ‘snapshot_interval’ setting, using the same logic as the ‘ffmpeg_timelapse’ setting, above:
# Make automated snapshot every N seconds (default: 0 = disabled)
snapshot_interval 2
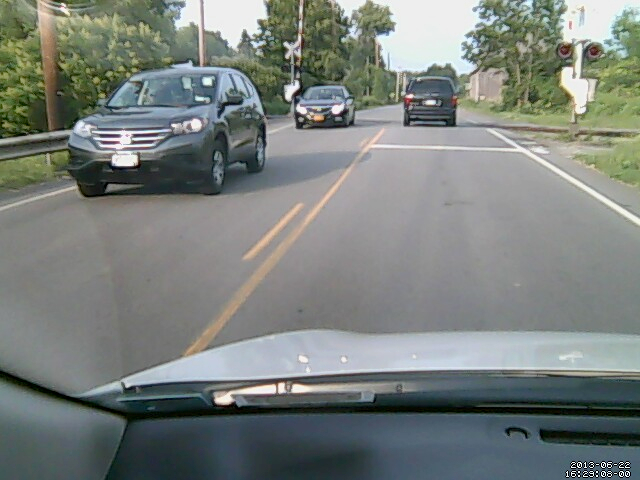
Irregardless of which method you choose (or use them both), you will want to tweak some more settings. In the ‘Text Display’ section, locate ‘Set to ‘preview’ will only draw a box in preview_shot pictures.’ Change the ‘locate’ setting to ‘off’. As shown in the video frame below, since you are moving in your vehicle most of the time, there is no sense turning on this option. Motion cannot differentiate between the highway zipping by the camera and the approaching vehicles. Everything is in motion to the camera, the box just gets in the way:
# Set to 'preview' will only draw a box in preview_shot pictures.
locate off

Optionally, I recommend turning on the time-stamp option. This is found right below the ‘locate’ setting. Especially in the event of an accident, you want an accurate time-stamp on the video or still images (make sure you Raspberry Pi’s time is correct):
# Draws the timestamp using same options as C function strftime(3)
# Default: %Y-%m-%d\n%T = date in ISO format and time in 24 hour clock
# Text is placed in lower right corner
text_right %Y-%m-%d\n%T-%q

Starting with the largest, best quality images will ensure the video quality is optimal. Start with a large size capture and reduce it only if you are having trouble capturing the video quickly enough. These settings are found in the ‘Capture device options’ section:
# Image width (pixels). Valid range: Camera dependent, default: 352
width 640

# Image height (pixels). Valid range: Camera dependent, default: 288
height 480
Similarly, I suggest starting with a low amount of jpeg compression to maximize quality and only lower if necessary. This setting is found in the ‘Image File Output’ section:
# The quality (in percent) to be used by the jpeg compression (default: 75)
quality 90
Once you have completed the configuration of Motion, restart Motion for the changes to take effect:
sudo /etc/init.d/motion restart
Since you will be powering on your Raspberry Pi in your vehicle, and may have no way to reach Motion from a command line, you will want Motion to start capturing video and images for you automatically at startup. To enable Motion (the motion daemon) on start-up, edit the /etc/default/motion file.
sudo nano /etc/default/motion
Change the ‘start_motion_daemon‘ setting to ‘yes’. If you decide to stop using the Raspberry Pi for capturing video, remember to disable this option. Motion will keep generating video and images, even without a camera connected, if the daemon process is running.
Capturing Dashboard Video
Although taking dashboard camera videos with your Raspberry Pi sounds easy, it presents several challenges. How will you mount your camera? How will you adjust your camera’s view? How will you power your Raspberry Pi in the vehicle? How will you power-down your Raspberry Pi from the vehicle? How will you make sure Motion is running? How will you get the video and images off the Raspberry Pi? Do you have one a mini keyboard and LCD monitor to use in your vehicle? Or, is your Raspberry Pi on your wireless network? If so, do you know how to bring up the camera’s view and Motion’s admin site on your smartphone’s web-browser?
My start-up process is as follows:
- Start my car.
- Plug the webcam and the power cable into the Raspberry Pi.
- Let the Raspberry Pi boot up fully and allow Motion to start. This takes less than one minute.
- Open the http address Motion serves up using my mobile browser.
(Since my Raspberry Pi has a wireless USB adapter installed and I’m still able to connect from my garage). - Adjust the camera using the mobile browser view from the camera.
- Optionally, use Motion’s ‘HTTP Based Control’ feature to adjust any Motion configurations, on-the-fly (great option).

Logitech Webcam C210 Webcam Mounted on Car Sun Visor

Raspberry Pi in Vehicle with iPhone Preview of Dashboard Camera

Adjusting Camera using iPhone WiFi Connection to Raspberry Pi

Using Motion’s HTTP Based Control on iPhone Mobile Web Browser
Once I reach my destination, I copy the video and/or still image frames off the Raspberry Pi:
- Let the car run for at least 1-2 minutes after you stop. The Raspberry Pi is still processing the images and video.
- Copy the files off the Raspberry Pi over the local network, right from car (if in range of my LAN).
- Alternately, shut down the Raspberry Pi by using a SSH mobile app on your smartphone, or just shut the car off (this not the safest method!).
- Place the Pi’s SDHC card into my laptop and copy the video and/or still image frames.

Shutting Down Raspberry Pi Using SSH Terminal iPhone App
Here are some tips I’ve found to make creating dashboard camera video’s easier and better quality:
- Leave your camera in your vehicle once you mount and position it.
- Make sure your camera is secure so the vehicle’s vibrations while driving don’t create bouncy-images or change the position of the camera field of view.
- Clean your vehicle’s front window, inside and out. Bugs or other dirt are picked up by the camera and may affect the webcam’s focus.
- Likewise, film on the window from smoking or dirt will soften the details of the video and create harsh glare when driving on sunny days.
- Similarly, make sure your camera’s lens is clean.
- Keep your dashboard clear of objects such as paper, as it reflects on the window and will obscure the dashboard camera’s video.
- Constantly stopping your Raspberry Pi by shutting the vehicle off can potential damage the Raspberry Pi and/or corrupt the operating system.
- Make sure to keep your Raspberry Pi out of sight of potential thieves and the direct sun when you are not driving.
- Backup your Raspberry Pi’s SDHC card before using for dashboard camera, see Duplicating Your Raspberry Pi’s SDHC Card.
Creating Video from Individual Dashboard Camera Images
FFmpeg
If you choose the second method for capturing dashboard camera videos, the easiest way to combine the individual dashboard camera images is by calling FFmpeg from the command line. To create the example #3 video, shown below, I ran two commands from a Linux Terminal prompt. The first command is a bash command to rename all the images to four-digit incremented numbers (‘0001.jpg’, ‘0002.jpg’, ‘0003.jpg’, etc.). This makes it easier to execute the second command. I found this script on stackoverflow. It requires Gawk (‘sudo apt-get install gawk’). If you are unsure about running this command, make a copy of the original images in case something goes wrong.
The second command is a basic FFmpeg command to combine the images into a 20 fps MPEG-4 video file. More information on running FFmpeg can be found on their website. There is a huge number of options available with FFmpeg from the command line. Running this command, FFmpeg processed 4,666 frames at 640 x 480 pixels in 233.30 seconds, outputting a 147.5 Mb MPEG-4 video file.
find -name '*.jpg' | sort | gawk '{ printf "mv %s %04d.jpg\n", $0, NR }' | bash
ffmpeg -r 20 -qscale 2  -i %04d.jpg output.mp4

FFmpeg Command Line Video Creation Output
Example #3 – FFmpeg Video from Command Line
If you want to compress the video, you can chain a second FFmpeg command to the first one, similar to the one below. In my tests, this reduced the video size to 20-25% of the original uncompressed version.
ffmpeg -r 20 -qscale 2 -i %04d.jpg output.mp4 && ffmpeg -i output.mp4 -vcodec mpeg2video output_compressed.mp4
If your images are to dark (early morning or overcast) or have a color-cast (poor webcam or tinted-windows), you can use programs like ImageMagick to adjust all the images as a single batch. In example #5 below, I pre-processed all the images prior to making the video. With one ImageMagick command, I adjusting their levels to make them lighter and less flat.
mogrify -level 12%,98%,1.79 *.jpg
Example #5 – FFmpeg Uncompressed Video from Command Line
Windows MovieMaker
Using Windows MovieMaker was not my first choice, but I’ve had a tough time finding an equivalent Linux gui-based application. If you are going to create your own video from the still images, you need to be able to import and adjust thousands of images quickly and easily. I can import, create, and export a typical video of a 30 minute trip in 10 minutes with MovieMaker. With MovieMaker, you can also add titles, special effects, and so forth.

Single Images Combined in Windows MovieMaker
Sample Videos
Below are a few dashboard video examples using a variety of methods. In the first two examples, I captured still images and created the FFmpeg video at the same time. You can compare quality of Method #1 to #2.
Example #2a – Motion/FFmpeg Video
Example #2b – Windows MovieMaker
Example #5 – FFmpeg Compressed Video from Command Line
Example #6 – FFmpeg Compressed Video from Command Line
Useful Links
Renaming files in a folder to sequential numbers
ImageMagick: Command-line Options
ImageMagick: Mogrify — in-place batch processing
Duplicating Your Raspberry Pi’s SDHC Card
Posted by Gary A. Stafford in Software Development on February 12, 2013
There are a few reasons you might want to duplicate (clone/copy) your Raspberry Pi’s Secure Digital High-Capacity (SDHC) card. I had two, backup and a second Raspberry Pi. I spent untold hours installing and configuring software on your Raspberry Pi with Java, OpenCV, Motion, etc. Having a backup of all my work seemed like a good idea.
Second reason, a second Raspberry Pi. I wanted to set up a second Raspberry Pi, but didn’t want to spend the time to duplicate my previous efforts. Nor, could I probably ever duplicate the first Pi’s configuration, exactly. To ensure consistency across multiple Raspberry Pi’s, duplicating my first Raspberry Pi’s SDHC card made a lot of sense.
I found several posts on the web about duplicating an SDHC card. One of the best articles was on the PIXHAWK website. It only took me a few simple steps to backup my original 8 GB SDHC card, and then create a clone by copying the backup to a new 8 GB SDHC card, as follows:
1) Remove the original SDHC card from Raspberry Pi and insert it into a card reader on your computer. I strongly suggest locking the card to protect it against any mistakes while backing up.
2) Locate where the SDHC card is mounted on your computer. This can be done using GParted, or in a terminal window, using the ‘blkid’ (block device attributes) command. My Raspberry Pi’s SDHC card, with its three separate partitions was found at ‘/dev/sdb’.

GParted View of SDHC Card

Terminal Window View of Partitions
3) Use the ‘dd’ (convert and copy a file) command to duplicate the contents of the SDHC card to your computer. This can take a while and there is no progress bar. The command I used to back up the card to my computer’s $HOME directory was:
sudo dd if=/dev/sdb of=~/sdhc-card-bu.bin
4) Unmount and unlock the original SDHC card. Mount the new SDHC card. It should mount in the same place.
5) Reverse the process by copying the backup file, ‘sdhc-card-bu.bin’, to the new SDHC card. Again, this can take a while and there is no progress bar. The command I used was:
sudo dd if=~/sdhc-card-bu.bin of=/dev/sdb
Using ‘dd’, backups and restores the entire SDHC card, partitions and all. I was able to insert the card into a brand new Raspberry Pi and boot it up, without any problems.
Obviously, there are some things you may want to change on a cloned Raspberry Pi. For example, you should change the cloned Raspberry Pi’s host name, so it doesn’t conflict with the original Raspberry Pi on the network. This is easily done:
sudo nano /etc/hostname
sudo /etc/init.d/hostname.sh start
Also, changing the cloned Raspberry Pi’s root password is a wise idea for both security and sanity, especially if you have more than one Pi on your network. This guarantees you know which one you are logging into. This is easily done using the ‘passwd’ command:

Changing the Root Password on Raspberry Pi
Object Tracking on the Raspberry Pi with C++, OpenCV, and cvBlob
Posted by Gary A. Stafford in Bash Scripting, C++ Development, Raspberry Pi on February 9, 2013
Use C++ with OpenCV and cvBlob to perform image processing and object tracking on the Raspberry Pi, using a webcam.
Source code and compiled samples are now available on GitHub. The below post describes the original code on the ‘Master’ branch. As of May 2014, there is a revised and improved version of the project on the ‘rev05_2014’ branch, on GitHub. The README.md details the changes and also describes how to install OpenCV, cvBlob, and all dependencies!
Introduction
As part of a project with a local FIRST Robotics Competition (FRC) Team, I’ve been involved in developing a Computer Vision application for use on the Raspberry Pi. Our FRC team’s goal is to develop an object tracking and target acquisition application that could be run on the Raspberry Pi, as opposed to the robot’s primary embedded processor, a National Instrument’s NI cRIO-FRC II. We chose to work in C++ for its speed, We also decided to test two popular open-source Computer Vision (CV) libraries, OpenCV and cvBlob.
Due to its single ARM1176JZF-S 700 MHz ARM processor, a significant limitation of the Raspberry Pi is the ability to perform complex operations in real-time, such as image processing. In an earlier post, I discussed Motion to detect motion with a webcam on the Raspberry Pi. Although the Raspberry Pi was capable of running Motion, it required a greatly reduced capture size and frame-rate. And even then, the Raspberry Pi’s ability to process the webcam’s feed was very slow. I had doubts it would be able to meet the processor-intense requirements of this project.
Development for the Raspberry Pi
Using C++ in NetBeans 7.2.1 on Ubuntu 12.04.1 LTS and 12.10, I wrote several small pieces of code to demonstrate the Raspberry Pi’s ability to perform basic image processing and object tracking. Parts of the follow code are based on several OpenCV and cvBlob code examples, found in my research. Many of those examples are linked on the end of this article. Examples of cvBlob are especially hard to find.
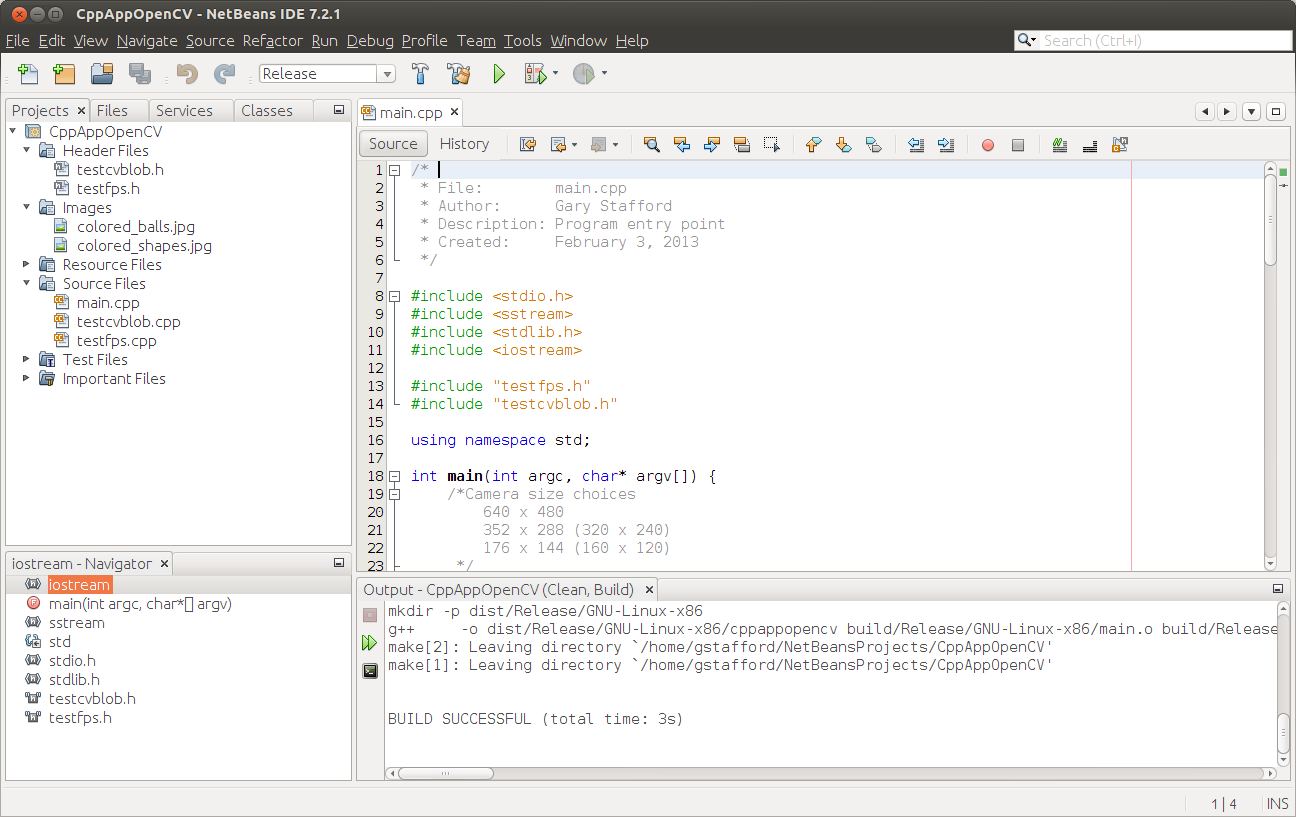
Project in NetBeans
The Code
There are five files: ‘main.cpp’, ‘testfps.cpp (testfps.h)’, and ‘testcvblob.cpp (testcvblob.h)’. The main.cpp file’s main method calls the test methods in the other two files. The cvBlob library only works with the pre-OpenCV 2.0. Therefore, I wrote all the code using the older objects and methods. The code is not written using the latest OpenCV 2.0 conventions. For example, cvBlob uses 1.0’s ‘IplImage’ image type instead 2.0’s newer ‘CvMat’ image type. My next projects is to re-write the cvBlob code to use OpenCV 2.0 conventions and/or find a newer library. The cvBlob library offered so many advantages, I felt not using the newer OpenCV 2.0 features was still worthwhile.
Main Program Method (main.cpp)
| /* | |
| * File: main.cpp | |
| * Author: Gary Stafford | |
| * Description: Program entry point | |
| * Created: February 3, 2013 | |
| */ | |
| #include <stdio.h> | |
| #include <sstream> | |
| #include <stdlib.h> | |
| #include <iostream> | |
| #include "testfps.hpp" | |
| #include "testcvblob.hpp" | |
| using namespace std; | |
| int main(int argc, char* argv[]) { | |
| int captureMethod = 0; | |
| int captureWidth = 0; | |
| int captureHeight = 0; | |
| if (argc == 4) { // user input parameters with call | |
| captureMethod = strtol(argv[1], NULL, 0); | |
| captureWidth = strtol(argv[2], NULL, 0); | |
| captureHeight = strtol(argv[3], NULL, 0); | |
| } else { // user did not input parameters with call | |
| cout << endl << "Demonstrations/Tests: " << endl; | |
| cout << endl << "(1) Test OpenCV - Show Webcam" << endl; | |
| cout << endl << "(2) Test OpenCV - No Webcam" << endl; | |
| cout << endl << "(3) Test cvBlob - Show Image" << endl; | |
| cout << endl << "(4) Test cvBlob - No Image" << endl; | |
| cout << endl << "(5) Test Blob Tracking - Show Webcam" << endl; | |
| cout << endl << "(6) Test Blob Tracking - No Webcam" << endl; | |
| cout << endl << "Input test # (1-6): "; | |
| cin >> captureMethod; | |
| // test 3 and 4 don't require width and height parameters | |
| if (captureMethod != 3 && captureMethod != 4) { | |
| cout << endl << "Input capture width (pixels): "; | |
| cin >> captureWidth; | |
| cout << endl << "Input capture height (pixels): "; | |
| cin >> captureHeight; | |
| cout << endl; | |
| if (!captureWidth > 0) { | |
| cout << endl << "Width value incorrect" << endl; | |
| return -1; | |
| } | |
| if (!captureHeight > 0) { | |
| cout << endl << "Height value incorrect" << endl; | |
| return -1; | |
| } | |
| } | |
| } | |
| switch (captureMethod) { | |
| case 1: | |
| TestFpsShowVideo(captureWidth, captureHeight); | |
| case 2: | |
| TestFpsNoVideo(captureWidth, captureHeight); | |
| break; | |
| case 3: | |
| DetectBlobsShowStillImage(); | |
| break; | |
| case 4: | |
| DetectBlobsNoStillImage(); | |
| break; | |
| case 5: | |
| DetectBlobsShowVideo(captureWidth, captureHeight); | |
| break; | |
| case 6: | |
| DetectBlobsNoVideo(captureWidth, captureHeight); | |
| break; | |
| default: | |
| break; | |
| } | |
| return 0; | |
| } |
Tests 1-2 (testcvblob.hpp)
| // -*- C++ -*- | |
| /* | |
| * File: testcvblob.hpp | |
| * Author: Gary Stafford | |
| * Created: February 3, 2013 | |
| */ | |
| #ifndef TESTCVBLOB_HPP | |
| #define TESTCVBLOB_HPP | |
| int DetectBlobsNoStillImage(); | |
| int DetectBlobsShowStillImage(); | |
| int DetectBlobsNoVideo(int captureWidth, int captureHeight); | |
| int DetectBlobsShowVideo(int captureWidth, int captureHeight); | |
| #endif /* TESTCVBLOB_HPP */ |
Tests 1-2 (testcvblob.cpp)
| /* | |
| * File: testcvblob.cpp | |
| * Author: Gary Stafford | |
| * Description: Track blobs using OpenCV and cvBlob | |
| * Created: February 3, 2013 | |
| */ | |
| #include <cv.h> | |
| #include <highgui.h> | |
| #include <cvblob.h> | |
| #include "testcvblob.hpp" | |
| using namespace cvb; | |
| using namespace std; | |
| // Test 3: OpenCV and cvBlob (w/ webcam feed) | |
| int DetectBlobsNoStillImage() { | |
| /// Variables ///////////////////////////////////////////////////////// | |
| CvSize imgSize; | |
| IplImage *image, *segmentated, *labelImg; | |
| CvBlobs blobs; | |
| unsigned int result = 0; | |
| /////////////////////////////////////////////////////////////////////// | |
| image = cvLoadImage("colored_balls.jpg"); | |
| if (image == NULL) { | |
| return -1; | |
| } | |
| imgSize = cvGetSize(image); | |
| cout << endl << "Width (pixels): " << image->width; | |
| cout << endl << "Height (pixels): " << image->height; | |
| cout << endl << "Channels: " << image->nChannels; | |
| cout << endl << "Bit Depth: " << image->depth; | |
| cout << endl << "Image Data Size (kB): " | |
| << image->imageSize / 1024 << endl << endl; | |
| segmentated = cvCreateImage(imgSize, 8, 1); | |
| cvInRangeS(image, CV_RGB(155, 0, 0), CV_RGB(255, 130, 130), segmentated); | |
| labelImg = cvCreateImage(cvGetSize(image), IPL_DEPTH_LABEL, 1); | |
| result = cvLabel(segmentated, labelImg, blobs); | |
| cvFilterByArea(blobs, 500, 1000000); | |
| cout << endl << "Blob Count: " << blobs.size(); | |
| cout << endl << "Pixels Labeled: " << result << endl << endl; | |
| cvReleaseBlobs(blobs); | |
| cvReleaseImage(&labelImg); | |
| cvReleaseImage(&segmentated); | |
| cvReleaseImage(&image); | |
| return 0; | |
| } | |
| // Test 4: OpenCV and cvBlob (w/o webcam feed) | |
| int DetectBlobsShowStillImage() { | |
| /// Variables ///////////////////////////////////////////////////////// | |
| CvSize imgSize; | |
| IplImage *image, *frame, *segmentated, *labelImg; | |
| CvBlobs blobs; | |
| unsigned int result = 0; | |
| bool quit = false; | |
| /////////////////////////////////////////////////////////////////////// | |
| cvNamedWindow("Processed Image", CV_WINDOW_AUTOSIZE); | |
| cvMoveWindow("Processed Image", 750, 100); | |
| cvNamedWindow("Image", CV_WINDOW_AUTOSIZE); | |
| cvMoveWindow("Image", 100, 100); | |
| image = cvLoadImage("colored_balls.jpg"); | |
| if (image == NULL) { | |
| return -1; | |
| } | |
| imgSize = cvGetSize(image); | |
| cout << endl << "Width (pixels): " << image->width; | |
| cout << endl << "Height (pixels): " << image->height; | |
| cout << endl << "Channels: " << image->nChannels; | |
| cout << endl << "Bit Depth: " << image->depth; | |
| cout << endl << "Image Data Size (kB): " | |
| << image->imageSize / 1024 << endl << endl; | |
| frame = cvCreateImage(imgSize, image->depth, image->nChannels); | |
| cvConvertScale(image, frame, 1, 0); | |
| segmentated = cvCreateImage(imgSize, 8, 1); | |
| cvInRangeS(image, CV_RGB(155, 0, 0), CV_RGB(255, 130, 130), segmentated); | |
| cvSmooth(segmentated, segmentated, CV_MEDIAN, 7, 7); | |
| labelImg = cvCreateImage(cvGetSize(frame), IPL_DEPTH_LABEL, 1); | |
| result = cvLabel(segmentated, labelImg, blobs); | |
| cvFilterByArea(blobs, 500, 1000000); | |
| cvRenderBlobs(labelImg, blobs, frame, frame, | |
| CV_BLOB_RENDER_BOUNDING_BOX | CV_BLOB_RENDER_TO_STD, 1.); | |
| cvShowImage("Image", frame); | |
| cvShowImage("Processed Image", segmentated); | |
| while (!quit) { | |
| char k = cvWaitKey(10)&0xff; | |
| switch (k) { | |
| case 27: | |
| case 'q': | |
| case 'Q': | |
| quit = true; | |
| break; | |
| } | |
| } | |
| cvReleaseBlobs(blobs); | |
| cvReleaseImage(&labelImg); | |
| cvReleaseImage(&segmentated); | |
| cvReleaseImage(&frame); | |
| cvReleaseImage(&image); | |
| cvDestroyAllWindows(); | |
| return 0; | |
| } | |
| // Test 5: Blob Tracking (w/ webcam feed) | |
| int DetectBlobsNoVideo(int captureWidth, int captureHeight) { | |
| /// Variables ///////////////////////////////////////////////////////// | |
| CvCapture *capture; | |
| CvSize imgSize; | |
| IplImage *image, *frame, *segmentated, *labelImg; | |
| int picWidth, picHeight; | |
| CvTracks tracks; | |
| CvBlobs blobs; | |
| CvBlob* blob; | |
| unsigned int result = 0; | |
| bool quit = false; | |
| /////////////////////////////////////////////////////////////////////// | |
| capture = cvCaptureFromCAM(-1); | |
| cvSetCaptureProperty(capture, CV_CAP_PROP_FRAME_WIDTH, captureWidth); | |
| cvSetCaptureProperty(capture, CV_CAP_PROP_FRAME_HEIGHT, captureHeight); | |
| cvGrabFrame(capture); | |
| image = cvRetrieveFrame(capture); | |
| if (image == NULL) { | |
| return -1; | |
| } | |
| imgSize = cvGetSize(image); | |
| cout << endl << "Width (pixels): " << image->width; | |
| cout << endl << "Height (pixels): " << image->height << endl << endl; | |
| frame = cvCreateImage(imgSize, image->depth, image->nChannels); | |
| while (!quit && cvGrabFrame(capture)) { | |
| image = cvRetrieveFrame(capture); | |
| cvConvertScale(image, frame, 1, 0); | |
| segmentated = cvCreateImage(imgSize, 8, 1); | |
| cvInRangeS(image, CV_RGB(155, 0, 0), CV_RGB(255, 130, 130), segmentated); | |
| //Can experiment either or both | |
| cvSmooth(segmentated, segmentated, CV_MEDIAN, 7, 7); | |
| cvSmooth(segmentated, segmentated, CV_GAUSSIAN, 9, 9); | |
| labelImg = cvCreateImage(cvGetSize(frame), IPL_DEPTH_LABEL, 1); | |
| result = cvLabel(segmentated, labelImg, blobs); | |
| cvFilterByArea(blobs, 500, 1000000); | |
| cvRenderBlobs(labelImg, blobs, frame, frame, 0x000f, 1.); | |
| cvUpdateTracks(blobs, tracks, 200., 5); | |
| cvRenderTracks(tracks, frame, frame, 0x000f, NULL); | |
| picWidth = frame->width; | |
| picHeight = frame->height; | |
| if (cvGreaterBlob(blobs)) { | |
| blob = blobs[cvGreaterBlob(blobs)]; | |
| cout << "Blobs found: " << blobs.size() << endl; | |
| cout << "Pixels labeled: " << result << endl; | |
| cout << "center-x: " << blob->centroid.x | |
| << " center-y: " << blob->centroid.y | |
| << endl; | |
| cout << "offset-x: " << ((picWidth / 2)-(blob->centroid.x)) | |
| << " offset-y: " << (picHeight / 2)-(blob->centroid.y) | |
| << endl; | |
| cout << "\n"; | |
| } | |
| char k = cvWaitKey(10)&0xff; | |
| switch (k) { | |
| case 27: | |
| case 'q': | |
| case 'Q': | |
| quit = true; | |
| break; | |
| } | |
| } | |
| cvReleaseBlobs(blobs); | |
| cvReleaseImage(&labelImg); | |
| cvReleaseImage(&segmentated); | |
| cvReleaseImage(&frame); | |
| cvReleaseImage(&image); | |
| cvDestroyAllWindows(); | |
| cvReleaseCapture(&capture); | |
| return 0; | |
| } | |
| // Test 6: Blob Tracking (w/o webcam feed) | |
| int DetectBlobsShowVideo(int captureWidth, int captureHeight) { | |
| /// Variables ///////////////////////////////////////////////////////// | |
| CvCapture *capture; | |
| CvSize imgSize; | |
| IplImage *image, *frame, *segmentated, *labelImg; | |
| CvPoint pt1, pt2, pt3, pt4, pt5, pt6; | |
| CvScalar red, green, blue; | |
| int picWidth, picHeight, thickness; | |
| CvTracks tracks; | |
| CvBlobs blobs; | |
| CvBlob* blob; | |
| unsigned int result = 0; | |
| bool quit = false; | |
| /////////////////////////////////////////////////////////////////////// | |
| cvNamedWindow("Processed Video Frames", CV_WINDOW_AUTOSIZE); | |
| cvMoveWindow("Processed Video Frames", 750, 400); | |
| cvNamedWindow("Webcam Preview", CV_WINDOW_AUTOSIZE); | |
| cvMoveWindow("Webcam Preview", 200, 100); | |
| capture = cvCaptureFromCAM(1); | |
| cvSetCaptureProperty(capture, CV_CAP_PROP_FRAME_WIDTH, captureWidth); | |
| cvSetCaptureProperty(capture, CV_CAP_PROP_FRAME_HEIGHT, captureHeight); | |
| cvGrabFrame(capture); | |
| image = cvRetrieveFrame(capture); | |
| if (image == NULL) { | |
| return -1; | |
| } | |
| imgSize = cvGetSize(image); | |
| cout << endl << "Width (pixels): " << image->width; | |
| cout << endl << "Height (pixels): " << image->height << endl << endl; | |
| frame = cvCreateImage(imgSize, image->depth, image->nChannels); | |
| while (!quit && cvGrabFrame(capture)) { | |
| image = cvRetrieveFrame(capture); | |
| cvFlip(image, image, 1); | |
| cvConvertScale(image, frame, 1, 0); | |
| segmentated = cvCreateImage(imgSize, 8, 1); | |
| //Blue paper | |
| cvInRangeS(image, CV_RGB(49, 69, 100), CV_RGB(134, 163, 216), segmentated); | |
| //Green paper | |
| //cvInRangeS(image, CV_RGB(45, 92, 76), CV_RGB(70, 155, 124), segmentated); | |
| //Can experiment either or both | |
| cvSmooth(segmentated, segmentated, CV_MEDIAN, 7, 7); | |
| cvSmooth(segmentated, segmentated, CV_GAUSSIAN, 9, 9); | |
| labelImg = cvCreateImage(cvGetSize(frame), IPL_DEPTH_LABEL, 1); | |
| result = cvLabel(segmentated, labelImg, blobs); | |
| cvFilterByArea(blobs, 500, 1000000); | |
| cvRenderBlobs(labelImg, blobs, frame, frame, CV_BLOB_RENDER_COLOR, 0.5); | |
| cvUpdateTracks(blobs, tracks, 200., 5); | |
| cvRenderTracks(tracks, frame, frame, CV_TRACK_RENDER_BOUNDING_BOX, NULL); | |
| red = CV_RGB(250, 0, 0); | |
| green = CV_RGB(0, 250, 0); | |
| blue = CV_RGB(0, 0, 250); | |
| thickness = 1; | |
| picWidth = frame->width; | |
| picHeight = frame->height; | |
| pt1 = cvPoint(picWidth / 2, 0); | |
| pt2 = cvPoint(picWidth / 2, picHeight); | |
| cvLine(frame, pt1, pt2, red, thickness); | |
| pt3 = cvPoint(0, picHeight / 2); | |
| pt4 = cvPoint(picWidth, picHeight / 2); | |
| cvLine(frame, pt3, pt4, red, thickness); | |
| cvShowImage("Webcam Preview", frame); | |
| cvShowImage("Processed Video Frames", segmentated); | |
| if (cvGreaterBlob(blobs)) { | |
| blob = blobs[cvGreaterBlob(blobs)]; | |
| pt5 = cvPoint(picWidth / 2, picHeight / 2); | |
| pt6 = cvPoint(blob->centroid.x, blob->centroid.y); | |
| cvLine(frame, pt5, pt6, green, thickness); | |
| cvCircle(frame, pt6, 3, green, 2, CV_FILLED, 0); | |
| cvShowImage("Webcam Preview", frame); | |
| cvShowImage("Processed Video Frames", segmentated); | |
| cout << "Blobs found: " << blobs.size() << endl; | |
| cout << "Pixels labeled: " << result << endl; | |
| cout << "center-x: " << blob->centroid.x | |
| << " center-y: " << blob->centroid.y | |
| << endl; | |
| cout << "offset-x: " << ((picWidth / 2)-(blob->centroid.x)) | |
| << " offset-y: " << (picHeight / 2)-(blob->centroid.y) | |
| << endl; | |
| cout << "\n"; | |
| } | |
| char k = cvWaitKey(10)&0xff; | |
| switch (k) { | |
| case 27: | |
| case 'q': | |
| case 'Q': | |
| quit = true; | |
| break; | |
| } | |
| } | |
| cvReleaseBlobs(blobs); | |
| cvReleaseImage(&labelImg); | |
| cvReleaseImage(&segmentated); | |
| cvReleaseImage(&frame); | |
| cvReleaseImage(&image); | |
| cvDestroyAllWindows(); | |
| cvReleaseCapture(&capture); | |
| return 0; | |
| } |
Tests 2-6 (testfps.hpp)
// -*- C++ -*-
/*
* File: testfps.hpp
* Author: Gary Stafford
* Created: February 3, 2013
*/
#ifndef TESTFPS_HPP
#define TESTFPS_HPP
int TestFpsNoVideo(int captureWidth, int captureHeight);
int TestFpsShowVideo(int captureWidth, int captureHeight);
#endif /* TESTFPS_HPP */
Tests 2-6 (testfps.cpp)
/*
* File: testfps.cpp
* Author: Gary Stafford
* Description: Test the fps of a webcam using OpenCV
* Created: February 3, 2013
*/
#include <cv.h>
#include <highgui.h>
#include <time.h>
#include <stdio.h>
#include "testfps.hpp"
using namespace std;
// Test 1: OpenCV (w/ webcam feed)
int TestFpsNoVideo(int captureWidth, int captureHeight) {
IplImage* frame;
CvCapture* capture = cvCreateCameraCapture(-1);
cvSetCaptureProperty(capture, CV_CAP_PROP_FRAME_WIDTH, captureWidth);
cvSetCaptureProperty(capture, CV_CAP_PROP_FRAME_HEIGHT, captureHeight);
time_t start, end;
double fps, sec;
int counter = 0;
char k;
time(&start);
while (1) {
frame = cvQueryFrame(capture);
time(&end);
++counter;
sec = difftime(end, start);
fps = counter / sec;
printf("FPS = %.2f\n", fps);
if (!frame) {
printf("Error");
break;
}
k = cvWaitKey(10)&0xff;
switch (k) {
case 27:
case 'q':
case 'Q':
break;
}
}
cvReleaseCapture(&capture);
return 0;
}
// Test 2: OpenCV (w/o webcam feed)
int TestFpsShowVideo(int captureWidth, int captureHeight) {
IplImage* frame;
CvCapture* capture = cvCreateCameraCapture(-1);
cvSetCaptureProperty(capture, CV_CAP_PROP_FRAME_WIDTH, captureWidth);
cvSetCaptureProperty(capture, CV_CAP_PROP_FRAME_HEIGHT, captureHeight);
cvNamedWindow("Webcam Preview", CV_WINDOW_AUTOSIZE);
cvMoveWindow("Webcam Preview", 300, 200);
time_t start, end;
double fps, sec;
int counter = 0;
char k;
time(&start);
while (1) {
frame = cvQueryFrame(capture);
time(&end);
++counter;
sec = difftime(end, start);
fps = counter / sec;
printf("FPS = %.2f\n", fps);
if (!frame) {
printf("Error");
break;
}
cvShowImage("Webcam Preview", frame);
k = cvWaitKey(10)&0xff;
switch (k) {
case 27:
case 'q':
case 'Q':
break;
}
}
cvDestroyWindow("Webcam Preview");
cvReleaseCapture(&capture);
return 0;
}
Compiling Locally on the Raspberry Pi
After writing the code, the first big challenge was cross-compiling the native C++ code, written on Intel IA-32 and 64-bit x86-64 processor-based laptops, to run on the Raspberry Pi’s ARM architecture. After failing to successfully cross-compile the C++ source code using crosstools-ng, mostly due to my lack of cross-compiling experience, I resorted to using g++ to compile the C++ source code directly on the Raspberry Pi.
First, I had to properly install the various CV libraries and the compiler on the Raspberry Pi, which itself is a bit daunting.
Compiling OpenCV 2.4.3, from the source-code, on the Raspberry Pi took an astounding 8 hours. Even though compiling the C++ source code takes longer on the Raspberry Pi, I could be assured the complied code would run locally. Below are the commands that I used to transfer and compile the C++ source code on my Raspberry Pi.
Copy and Compile Commands
| scp *.jpg *.cpp *.h {your-pi-user}@{your.ip.address}:your/file/path/ | |
| ssh {your-pi-user}@{your.ip.address} | |
| cd ~/your/file/path/ | |
| g++ `pkg-config opencv cvblob --cflags --libs` testfps.cpp testcvblob.cpp main.cpp -o FpsTest -v | |
| ./FpsTest |

Compiling Program on Raspberry Pi
Special Note About cvBlob on ARM
At first I had given up on cvBlob working on the Raspberry Pi. All the cvBlob tests I ran, no matter how simple, continued to hang on the Raspberry Pi after working perfectly on my laptop. I had narrowed the problem down to the ‘cvLabel’ method, but was unable to resolve. However, I recently discovered a documented bug on the cvBlob website. It concerned cvBlob and the very same ‘cvLabel’ method on ARM-based devices (ARM = Raspberry Pi!). After making a minor modification to cvBlob’s ‘cvlabel.cpp’ source code, as directed in the bug post, and re-compiling on the Raspberry Pi, the test worked perfectly.
Testing OpenCV and cvBlob
The code contains three pairs of tests (six total), as follows:
- OpenCV (w/ live webcam feed)
Determine if OpenCV is installed and functioning properly with the complied C++ code. Capture a webcam feed using OpenCV, and display the feed and frame rate (fps). - OpenCV (w/o live webcam feed)
Same as Test #1, but only print the frame rate (fps). The computer doesn’t need display the video feed to process the data. More importantly, the webcam’s feed might unnecessarily tax the computer’s processor and GPU. - OpenCV and cvBlob (w/ live webcam feed)
Determine if OpenCV and cvBlob are installed and functioning properly with the complied C++ code. Detect and display all objects (blobs) in a specific red color range, contained in a static jpeg image. - OpenCV and cvBlob (w/o live webcam feed)
Same as Test #3, but only print some basic information about the static image and number of blobs detected. Again, the computer doesn’t need display the video feed to process the data. - Blob Tracking (w/ live webcam feed)
Detect, track, and display all objects (blobs) in a specific blue color range, along with the largest blob’s positional data. Captured with a webcam, using OpenCV and cvBlob. - Blob Tracking (w/o live webcam feed)
Same as Test #5, but only display the largest blob’s positional data. Again, the computer doesn’t need the display the webcam feed, to process the data. The feed taxes the computer’s processor unnecessarily, which is being consumed with detecting and tracking the blobs. The blob’s positional data it sent to the robot and used by its targeting system to position its shooting platform.
The Program
There are two ways to run this program. First, from the command line you can call the application and pass in three parameters. The parameters include:
- Test method you want to run (1-6)
- Width of the webcam capture window in pixels
- Height of the webcam capture window in pixels.
An example would be ‘./TestFps 2 640 480’ or ‘./TestFps 5 320 240’.
The second method to run the program and not pass in any parameters. In that case, the program will prompt you to input the test number and other parameters on-screen.

Input Options for Application
Test 1: Laptop versus Raspberry Pi
")
Test 1: Displaying Webcam Feed using OpenCV (laptop)
")
Test 1: Displaying Webcam Feed using OpenCV (Raspberry Pi)
Test 3: Laptop versus Raspberry Pi
")
Test 3: Detecting Red Color Range in Static Image using OpenCV and cvBlob (laptop)
")
Test 3: Detecting Red Color Range in Static Image using OpenCV and cvBlob (Raspberry Pi)
")
Test 5: Detecting Objects within Blue Color Range using OpenCV and cvBlob (laptop)
Test 5: Laptop versus Raspberry Pi
")
Test 5: Detecting Objects within Blue Color Range using OpenCV and cvBlob (Raspberry Pi)
The Results
Each test was first run on two Linux-based laptops, with Intel 32-bit and 64-bit architectures, and with two different USB webcams. The laptops were used to develop and test the code, as well as provide a baseline for application performance. Many factors can dramatically affect the application’s ability do image processing. They include the computer’s processor(s), RAM, HDD, GPU, USB, Operating System, and the webcam’s video capture size, compression ratio, and frame-rate. There are significant differences in all these elements when comparing an average laptop to the Raspberry Pi.
Frame-rates on the Intel processor-based Ubuntu laptops easily performed at or beyond the maximum 30 fps rate of the webcams, at 640 x 480 pixels. On a positive note, the Raspberry Pi was able to compile and execute the tests of OpenCV and cvBlob (see bug noted at end of article). Unfortunately, at least in my tests, the Raspberry Pi could not achieve more than 1.5 – 2 fps at most, even in the most basic tests, and at a reduced capture size of 320 x 240 pixels. This can be seen in the first and second screen-grabs of Test #1, above. Although, I’m sure there are ways to improve the code and optimize the image capture, the results were much to slow to provide accurate, real-time data to the robot’s targeting system.
Links of Interest
Static Test Images Free from: http://www.rgbstock.com/
Great Website for OpenCV Samples: http://opencv-code.com/
Another Good Website for OpenCV Samples: http://opencv-srf.blogspot.com/2010/09/filtering-images.html
cvBlob Code Sample: https://code.google.com/p/cvblob/source/browse/samples/red_object_tracking.cpp
Detecting Blobs with cvBlob: http://8a52labs.wordpress.com/2011/05/24/detecting-blobs-using-cvblobs-library/
Best Post/Script to Install OpenCV on Ubuntu and Raspberry Pi: http://jayrambhia.wordpress.com/2012/05/02/install-opencv-2-3-1-and-simplecv-in-ubuntu-12-04-precise-pangolin-arch-linux/
Measuring Frame-rate with OpenCV: http://8a52labs.wordpress.com/2011/05/19/frames-per-second-in-opencv/
OpenCV and Raspberry Pi: http://mitchtech.net/raspberry-pi-opencv/
Gary Stafford
AWS Area Principal Solutions Architect | 10x AWS Certified Pro | DevOps | Data/ML | Serverless | Polyglot Developer | Former ThoughtWorks and Accenture
