Configure Chef Client on Windows to work with a proxy server, by modifying Chef Knife’s configuration file.
Introduction
In my last two post, Configure Git for Windows and Vagrant on a Corporate Network and Easy Configuration of Git for Windows on a Corporate Network, I demonstrated how to configure Git for Windows and Vagrant to work properly on a corporate network with a proxy server. Modifying the .bashrc file and adding a few proxy-related environment variables worked fine for Git and Vagrant.
However, even though Chef Client also uses the Git Bash interactive shell to execute commands on Windows using Knife, Chef depends on Knife’s configuration file (knife.rb) for proxy settings. In the following example, Git and Vagrant connect to the proxy server and authenticate using the proxy-related environment variables created by the ‘proxy_on’ function (described in my last post). However, Chef’s Knife command line tool fails to return the status of the online Hosted Chef server account, because the default knife.rb file contains no proxy server settings.
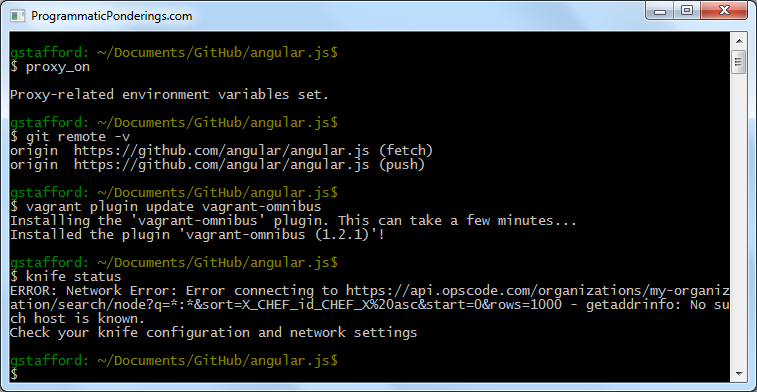
Knife Status Failed Due to Knife’s Proxy Settings
For Chef to work correctly behind a proxy server, you must modify the knife.rb file, adding the necessary proxy-related settings. The good news, we can leverage the same proxy-related environment variables we already created for Git and Vagrant.
Configuring Chef Client
First, make sure you have your knife.rb file in the .chef folder, within your home directory (C:\Users\username\.chef\knife.rb’). This allows Chef to use the knife.rb file’s settings for all Chef repos on your local machine.
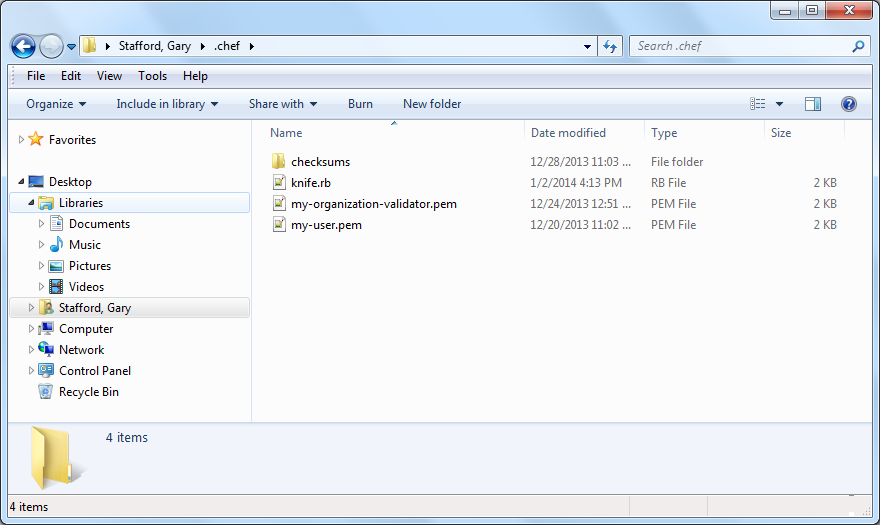
Chef’s knife.rb Location in Home Directory
Next, make sure you have the following environment variables set up on your computer: USERNAME, USERDNSDOMAIN, PASSWORD, PROXY_SERVER, and PROXY_PORT. The USERNAME and USERDNSDOMAIN should already present in the system wide environment variables on Windows. If you haven’t created the PASSWORD, PROXY_SERVER, PROXY_PORT environment variables already, based on my last post, I suggest adding them to the current user environment ( Environment Variables -> User variables, shown below) as opposed to the system wide environment (Environment Variables -> System variables). You can add the User variables manually, using Windows+Pause Keys -> Advanced system settings ->Environment Variables… -> New…
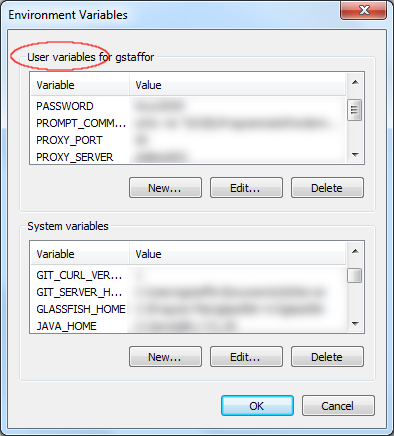
Windows 7 Environment Variables – Current User vs. System
Alternately, you can use the ‘SETX‘ command. See commands below. When using ‘SETX’, do not use the ‘/m’ parameter, especially when setting the PASSWORD variable. According to SETX help (‘SETX /?’), the ‘/m’ parameter specifies that the variable is set in the system wide (HKEY_LOCAL_MACHINE) environment. The default is to set the variable under the HKEY_CURRENT_USER environment (no ‘/m’). If you set your PASSWORD in the system wide environment, all user accounts on your machine could get your PASSWORD.
To see your changes with SETX, close and re-open your current command prompt window. Then, use a ‘env | grep -e PASSWORD -e PROXY’ command to view the three new environment variables.
[gist https://gist.github.com/garystafford/8233123 /]Lastly, modify your existing knife.rb file, adding the required proxy-related settings, shown below. Notice, we use the ‘HTTP_PROXY’ and ‘HTTPS_PROXY’ environment variables set by ‘proxy_on’; no need to redefine them. Since my particular network environment requires proxy authentication, I have also included the ‘http_proxy_user’, ‘http_proxy_pass’, ‘https_proxy_user’, and ‘https_proxy_pass’ settings.
[gist https://gist.github.com/garystafford/8222755 /]If your environment requires authentication and you fail to set these variables, you will see an error similar to the one shown below. Note the first line of the error. In this example, Chef cannot authenticate against the https proxy server. There is a ‘https_proxy’ setting, but no ‘https_proxy_user’ and ‘https_proxy_pass’ settings in the Knife configuration file.

HTTPS Proxy Authentication Credential Settings Missing from knife.rb
Using the Code
Adding the proxy settings to the knife.rb file, Knife is able connect to the proxy server, authenticate, and complete its status check successfully. Now, Git, Vagrant, and Chef all have Internet connectivity through the proxy server, as shown below.

Knife Status Succeeds with Knife.rb Proxy Settings Added
Why Include Authentication Settings?
Even with the domain, username and password, all included in the HTTP_PROXY and HTTPS_PROXY URIs, Chef still insists on using the ‘http_proxy_user’ and ‘http_proxy_pass’ or ‘https_proxy_user’ and ‘https_proxy_pass’ credential settings for proxy authentication. In my tests, if these settings are missing from Knife’s configuration file, Chef fails to authenticate with the proxy server.

#1 by doogie on September 19, 2017 - 3:47 am
What are the requirements for the proxy server? I am trying to proxy my ‘knife’ commands through a Windows machine, but just opening a port doesn’t seem to work. I can only communicate with the proxy through ports 22 and 3389.