Introduction
According to AWS, Amazon Elastic MapReduce (Amazon EMR) is a Cloud-based big data platform for processing vast amounts of data using common open-source tools such as Apache Spark, Hive, HBase, Flink, Hudi, and Zeppelin, Jupyter, and Presto. Using Amazon EMR, data analysts, engineers, and scientists are free to explore, process, and visualize data. EMR takes care of provisioning, configuring, and tuning the underlying compute clusters, allowing you to focus on running analytics.
Users interact with EMR in a variety of ways, depending on their specific requirements. For example, you might create a transient EMR cluster, execute a series of data analytics jobs using Spark, Hive, or Presto, and immediately terminate the cluster upon job completion. You only pay for the time the cluster is up and running. Alternatively, for time-critical workloads or continuously high volumes of jobs, you could choose to create one or more persistent, highly available EMR clusters. These clusters automatically scale compute resources horizontally, including EC2 Spot instances, to meet processing demands, maximizing performance and cost-efficiency.
With EMR, individuals and teams can also use notebooks, including EMR Notebooks, based on JupyterLab, the web-based interactive development environment for Jupyter notebooks for ad-hoc data analytics. Apache Zeppelin is also available to collaborate and interactively explore, process, and visualize data. With EMR notebooks and the EMR API, users can programmatically execute a notebook without the need to interact with the EMR console, referred to as headless execution.
AWS currently offers 5.x and 6.x versions of Amazon EMR. Each major and minor release of Amazon EMR offers incremental versions of nearly 25 different, popular open-source big-data applications to choose from, which Amazon EMR will install and configure when the cluster is created. One major difference between EMR versions relevant to this post is EMR 6.x’s support for the latest Hadoop and Spark 3.x frameworks. The latest Amazon EMR releases are Amazon EMR Release 6.2.0 and Amazon EMR Release 5.32.0.
PySpark on EMR
In the following series of posts, we will focus on the options available to interact with Amazon EMR using the Python API for Apache Spark, known as PySpark. We will divide the methods for accessing PySpark on EMR into two categories: PySpark applications and notebooks. We will explore both interactive and automated patterns for running PySpark applications (Python scripts) and PySpark-based notebooks. In this first post, I will cover the first four PySpark Application Methods listed below. In part two, I will cover Amazon Managed Workflows for Apache Airflow (Amazon MWAA), and in part three, the use of notebooks.
PySpark Application Methods
- Add Job Flow Steps: Remote execution of EMR Steps on an existing EMR cluster using the
add_job_flow_stepsmethod; - EMR Master Node: Remote execution over SSH of PySpark applications using
spark-submiton an existing EMR cluster’s Master node; - Run Job Flow: Remote execution of EMR Steps on a newly created long-lived or auto-terminating EMR cluster using the
run_job_flowmethod; - AWS Step Functions: Remote execution of EMR Steps using AWS Step Functions on an existing or newly created long-lived or auto-terminating EMR cluster;
- Apache Airflow: Remote execution of EMR Steps using the recently released Amazon MWAA on an existing or newly created long-lived or auto-terminating EMR cluster (see part two of this series);
Notebook Methods
- EMR Notebooks for Ad-hoc Analytics: Interactive, ad-hoc analytics and machine learning using Jupyter Notebooks on an existing EMR cluster;
- Headless Execution of EMR Notebooks: Headless execution of notebooks from an existing EMR cluster or newly created auto-terminating cluster;
- Apache Zeppelin for Ad-hoc Analytics: Interactive, ad-hoc analytics and machine learning using Zeppelin notebooks on an existing EMR cluster;
Note that wherever the AWS SDK for Python (boto3) is used in this post, we can substitute the AWS CLI or AWS Tools for PowerShell. Typically, these commands and Python scripts would be run as part of a DevOps or DataOps deployment workflow, using CI/CD platforms like AWS CodePipeline, Jenkins, Harness, CircleCI, Travis CI, or Spinnaker.
Preliminary Tasks
To prepare the AWS EMR environment for this post, we need to perform a few preliminary tasks.
- Download a copy of this post’s GitHub repository;
- Download three Kaggle datasets and organize locally;
- Create an Amazon EC2 key pair;
- Upload the EMR bootstrap script and create the CloudFormation Stack;
- Allow your IP address access to the EMR Master node on port 22;
- Upload CSV data files and PySpark applications to S3;
- Crawl the raw data and create a Data Catalog using AWS Glue;
Step 1: GitHub Repository
Using this git clone command, download a copy of this post’s GitHub repository to your local environment.
git clone --branch main --single-branch --depth 1 --no-tags \
    https://github.com/garystafford/emr-demo.git
Step 2: Kaggle Datasets
Kaggle is a well-known data science resource with 50,000 public datasets and 400,000 public notebooks. We will be using three Kaggle datasets in this post. You will need to join Kaggle to access these free datasets. Download the following three Kaggle datasets as CSV files. Since we are working with (moderately) big data, the total size of the datasets will be approximately 1 GB.
- Movie Ratings: https://www.kaggle.com/rounakbanik/the-movies-dataset
- Bakery: https://www.kaggle.com/sulmansarwar/transactions-from-a-bakery
- Stocks: https://www.kaggle.com/timoboz/stock-data-dow-jones
Organize the (38) downloaded CSV files into the raw_data directory of the locally cloned GitHub repository, exactly as shown below. We will upload these files to Amazon S3, in the proceeding step.
 > tree raw_data --si -v -A

 raw_data
├── [ 128]  bakery
│   ├── [711k]  BreadBasket_DMS.csv
├── [ 320]  movie_ratings
│   ├── [190M]  credits.csv
│   ├── [6.2M]  keywords.csv
│   ├── [989k]  links.csv
│   ├── [183k]  links_small.csv
│   ├── [ 34M]  movies_metadata.csv
│   ├── [710M]  ratings.csv
│   └── [2.4M]  ratings_small.csv
└── [1.1k]  stocks
    ├── [151k]  AAPL.csv
    ├── [146k]  AXP.csv
    ├── [150k]  BA.csv
    ├── [147k]  CAT.csv
    ├── [146k]  CSCO.csv
    ├── [149k]  CVX.csv
    ├── [147k]  DIS.csv
    ├── [ 42k]  DWDP.csv
    ├── [150k]  GS.csv
    └── [...]  abrdiged...
In this post, we will be using three different datasets. However, if you want to limit the potential costs associated with big data analytics on AWS, you can choose to limit job submissions to only one or two of the datasets. For example, the bakery and stocks datasets are fairly small yet effectively demonstrate most EMR features. In contrast, the movie rating dataset has nearly 27 million rows of ratings data, which starts to demonstrate the power of EMR and PySpark for big data.
Step 3: Amazon EC2 key pair
According to AWS, a key pair, consisting of a private key and a public key, is a set of security credentials that you use to prove your identity when connecting to an [EC2] instance. Amazon EC2 stores the public key, and you store the private key. To SSH into the EMR cluster, you will need an Amazon key pair. If you do not have an existing Amazon EC2 key pair, create one now. The easiest way to create a key pair is from the AWS Management Console.

Your private key is automatically downloaded when you create a key pair in the console. Store your private key somewhere safe. If you use an SSH client on a macOS or Linux computer to connect to EMR, use the following chmod command to set the correct permissions of your private key file so that only you can read it.
chmod 0400 /path/to/my-key-pair.pem
Step 4: Bootstrap Script and CloudFormation Stack
The bulk of the resources that are used as part of this demonstration are created using the CloudFormation stack, emr-dem-dev. The CloudFormation template that creates the stack, cloudformation/emr-demo.yml, is included in the repository. Please review all resources and understand the cost and security implications before continuing.
There is also a JSON-format CloudFormation parameters file, cloudformation/emr-demo-params-dev.json, containing values for all but two of the parameters in the CloudFormation template. The two parameters not in the parameter file are the name of the EC2 key pair you just created and the bootstrap bucket’s name. Both will be passed along with the CloudFormation template using the Python script, create_cfn_stack.py. For each type of environment, such as Development, Test, and Production, you could have a separate CloudFormation parameters file, with different configurations.

The template will create approximately (39) AWS resources, including a new AWS VPC, a public subnet, an internet gateway, route tables, a 3-node EMR v6.2.0 cluster, a series of Amazon S3 buckets, AWS Glue data catalog, AWS Glue crawlers, several Systems Manager Parameter Store parameters, and so forth.
The CloudFormation template includes the location of the EMR bootstrap script located on Amazon S3. Before creating the CloudFormation stack, the Python script creates an S3 bootstrap bucket and copies the bootstrap script, bootstrap_actions.sh, from the local project repository to the S3 bucket. The script will be used to install additional packages on EMR cluster nodes, which are required by our PySpark applications. The script also sets the default AWS Region for boto3.
From the GitHub repository’s local copy, run the following command, which will execute a Python script to create the bootstrap bucket, copy the bootstrap script, and provision the CloudFormation stack. You will need to pass the name of your EC2 key pair to the script as a command-line argument.
python3 ./scripts/create_cfn_stack.py \
    --environment dev \
    --ec2-key-name <my-key-pair-name>
The CloudFormation template should create a CloudFormation stack, emr-demo-dev, as shown below.

Step 5: SSH Access to EMR
For this demonstration, we will need access to the new EMR cluster’s Master EC2 node, using SSH and your key pair, on port 22. The easiest way to add a new inbound rule to the correct AWS Security Group is to use the AWS Management Console. First, find your EC2 Security Group named ElasticMapReduce-master.

Then, add a new Inbound rule for SSH (port 22) from your IP address, as shown below.

Alternately, you could use the AWS CLI or AWS SDK to create a new security group ingress rule.
export EMR_MASTER_SG_ID=$(aws ec2 describe-security-groups | \
    jq -r '.SecurityGroups[] | select(.GroupName=="ElasticMapReduce-master").GroupId')
aws ec2 authorize-security-group-ingress \
    --group-id ${EMR_MASTER_SG_ID} \
    --protocol tcp \
    --port 22 \
    --cidr $(curl ipinfo.io/ip)/32
Step 6: Raw Data and PySpark Apps to S3
As part of the emr-demo-dev CloudFormation stack, we now have several new Amazon S3 buckets within our AWS Account. The naming conventions and intended usage of these buckets follow common organizational patterns for data lakes. The data buckets use the common naming convention of raw, processed, and analyzed data in reference to the data stored within them. We also use a widely used, corresponding naming convention of ‘bronze’, ‘silver’, and ‘gold’ when referring to these data buckets as parameters.
> aws s3api list-buckets | \
    jq -r '.Buckets[] | select(.Name | startswith("emr-demo-")).Name'

emr-demo-raw-123456789012-us-east-1
emr-demo-processed-123456789012-us-east-1
emr-demo-analyzed-123456789012-us-east-1
emr-demo-work-123456789012-us-east-1
emr-demo-logs-123456789012-us-east-1
emr-demo-glue-db-123456789012-us-east-1
emr-demo-bootstrap-123456789012-us-east-1
There is a raw data bucket (aka bronze) that will contain the original CSV files. There is a processed data bucket (aka silver) that will contain data that might have had any number of actions applied: data cleansing, obfuscation, data transformation, file format changes, file compression, and data partitioning. Finally, there is an analyzed data bucket (aka gold) that has the results of the data analysis. We also have a work bucket that holds the PySpark applications, a logs bucket that holds EMR logs, and a glue-db bucket to hold the Glue Data Catalog metadata.
Whenever we submit PySpark jobs to EMR, the PySpark application files and data will always be accessed from Amazon S3. From the GitHub repository’s local copy, run the following command, which will execute a Python script to upload the approximately (38) Kaggle dataset CSV files to the raw S3 data bucket.
python3 ./scripts/upload_csv_files_to_s3.py
Next, run the following command, which will execute a Python script to upload a series of PySpark application files to the work S3 data bucket.
python3 ./scripts/upload_apps_to_s3.py
Step 7: Crawl Raw Data with Glue
The last preliminary step to prepare the EMR demonstration environment is to catalog the raw CSV data into an AWS Glue data catalog database, using one of the two Glue Crawlers we created. The three kaggle dataset’s data will reside in Amazon S3, while their schema and metadata will reside within tables in the Glue data catalog database, emr_demo. When we eventually query the data from our PySpark applications, we will be querying the Glue data catalog’s database tables, which reference the underlying data in S3.
From the GitHub repository’s local copy, run the following command, which will execute a Python script to run the Glue Crawler and catalog the raw data’s schema and metadata information into the Glue data catalog database, emr_demo.
python3 ./scripts/crawl_raw_data.py --crawler-name emr-demo-raw
Once the crawler is finished, from the AWS Console, we should see a series of nine tables in the Glue data catalog database, emr_demo, all prefixed with raw_. The tables hold metadata and schema information for the three CSV-format Kaggle datasets loaded into S3.

Alternately, we can use the glue get-tables AWS CLI command to review the tables.
> aws glue get-tables --database emr_demo | \
    jq -r '.TableList[] | select(.Name | startswith("raw_")).Name'

raw_bakery
raw_credits_csv
raw_keywords_csv
raw_links_csv
raw_links_small_csv
raw_movies_metadata_csv
raw_ratings_csv
raw_ratings_small_csv
raw_stocks
PySpark Applications
Let’s explore four methods to run PySpark applications on EMR.
1. Add Job Flow Steps to an Existing EMR Cluster
We will start by looking at running PySpark applications using EMR Steps. According to AWS, we can use Amazon EMR steps to submit work to the Spark framework installed on an EMR cluster. The EMR step for PySpark uses a spark-submit command. According to Spark’s documentation, the spark-submit script, located in Spark’s bin directory, is used to launch applications on a [EMR] cluster. A typical spark-submit command we will be using resembles the following example. This command runs a PySpark application in S3, bakery_sales_ssm.py.
We will target the existing EMR cluster created by CloudFormation earlier to execute our PySpark applications using EMR Steps. We have two sets of PySpark applications. The first set of three PySpark applications will transform the raw CSV-format datasets into Apache Parquet, a more efficient file format for big data analytics. Alternately, for your workflows, you might prefer AWS Glue ETL Jobs, as opposed to PySpark on EMR, to perform nearly identical data processing tasks. The second set of four PySpark applications perform data analysis tasks on the data.
There are two versions of each PySpark application. Files with suffix _ssm use the AWS Systems Manager (SSM) Parameter Store service to obtain dynamic parameter values at runtime on EMR. Corresponding non-SSM applications require those same parameter values to be passed on the command line when they are submitted to Spark. Therefore, these PySpark applications are not tightly coupled to boto3 or the SSM Parameter Store. We will use _ssm versions of the scripts in this post’s demonstration.
 > tree pyspark_apps --si -v -A

 pyspark_apps
├── [ 320]  analyze
│   ├── [1.4k]  bakery_sales.py
│   ├── [1.5k]  bakery_sales_ssm.py
│   ├── [2.6k]  movie_choices.py
│   ├── [2.7k]  movie_choices_ssm.py
│   ├── [2.0k]  movies_avg_ratings.py
│   ├── [2.3k]  movies_avg_ratings_ssm.py
│   ├── [2.2k]  stock_volatility.py
│   └── [2.3k]  stock_volatility_ssm.py
└── [ 256]  process
    ├── [1.1k]  bakery_csv_to_parquet.py
    ├── [1.3k]  bakery_csv_to_parquet_ssm.py
    ├── [1.3k]  movies_csv_to_parquet.py
    ├── [1.5k]  movies_csv_to_parquet_ssm.py
    ├── [1.9k]  stocks_csv_to_parquet.py
    └── [2.0k]  stocks_csv_to_parquet_ssm.py
We will start by executing the three PySpark processing applications. They will convert the CSV data to Parquet. Below, we see an example of one of the PySpark applications we will run, bakery_csv_to_parquet_ssm.py. The PySpark application will convert the Bakery Sales dataset’s CSV file to Parquet and write it to S3.
The three PySpark data processing application’s spark-submit commands are defined in a separate JSON-format file, job_flow_steps_process.json, a snippet of which is shown below. The same goes for the four analytics applications.
Using this pattern of decoupling the Spark job command and arguments from the execution code, we can define and submit any number of Steps without changing the Python script, add_job_flow_steps_process.py, shown below. Note line 31, where the Steps are injected into the add_job_flow_steps method’s parameters.
The Python script used for this task takes advantage of AWS Systems Manager Parameter Store parameters. The parameters were placed in the Parameter Store, within the /emr_demo path, by CloudFormation. We will reference these parameters in several scripts throughout the post.
> aws ssm get-parameters-by-path --path '/emr_demo' | \
      jq -r ".Parameters[] | {Name: .Name, Value: .Value}"
From the GitHub repository’s local copy, run the following command, which will execute a Python script to load the three spark-submit commands from JSON-format file, job_flow_steps_process.json, and run the PySpark processing applications on the existing EMR cluster.
python3 ./scripts/add_job_flow_steps.py --job-type process
While the three Steps are running concurrently, the view from the Amazon EMR Console’s Cluster Steps tab should look similar to the example below.

Once the three Steps have been completed, we should note three sub-directories in the processed data bucket containing Parquet-format files.

Of special note is the Stocks dataset, which has been converted to Parquet and partitioned by stock symbol. According to AWS, by partitioning your data, we can restrict the amount of data scanned by each query by specifying filters based on the partition, thus improving performance and reducing cost.

Lastly, the movie ratings dataset has been divided into sub-directories, based on the schema of each table. Each sub-directory contains Parquet files specific to that unique schema.

Crawl Processed Data with Glue
Similar to the raw data earlier, catalog the newly processed Parquet data into the same AWS Glue data catalog database using one of the two Glue Crawlers we created. Similar to the raw data, earlier, processed data will reside in the Amazon S3 processed data bucket while their schemas and metadata will reside within tables in the Glue data catalog database, emr_demo.
From the GitHub repository’s local copy, run the following command, which will execute a Python script to run the Glue Crawler and catalog the processed data’s schema and metadata information into the Glue data catalog database, emr_demo.
python3 ./scripts/crawl_raw_data.py --crawler-name emr-demo-processed
Once the crawler has finished successfully, using the AWS Console, we should see a series of nine tables in the Glue data catalog database, emr_demo, all prefixed with processed_. The tables represent the three kaggle dataset’s contents converted to Parquet and correspond to the equivalent tables with the raw_ prefix.

Alternately, we can use the glue get-tables AWS CLI command to review the tables.
> aws glue get-tables --database emr_demo | \
    jq -r '.TableList[] | select(.Name | startswith("processed_")).Name'

processed_bakery
processed_credits
processed_keywords
processed_links
processed_links_small
processed_movies_metadata
processed_ratings
processed_ratings_small
processed_stocks
2. Run PySpark Jobs from EMR Master Node
Next, we will explore how to execute PySpark applications remotely on the Master node on the EMR cluster using boto3 and SSH. Although this method may be optimal for certain use cases as opposed to using the EMR SDK, remote SSH execution does not scale as well in my opinion due to a lack of automation, and it exposes some potential security risks.
There are four PySpark applications in the GitHub repository. For this part of the demonstration, we will just submit the bakery_sales_ssm.py application. This application will perform a simple analysis of the bakery sales data. While the other three PySpark applications use AWS Glue, the bakery_sales_ssm.py application reads data directly from the processed data S3 bucket.
The application writes its results into the analyzed data S3 bucket, in both Parquet and CSV formats. The CSV file is handy for business analysts and other non-technical stakeholders who might wish to import the results of the analysis into Excel or business applications.
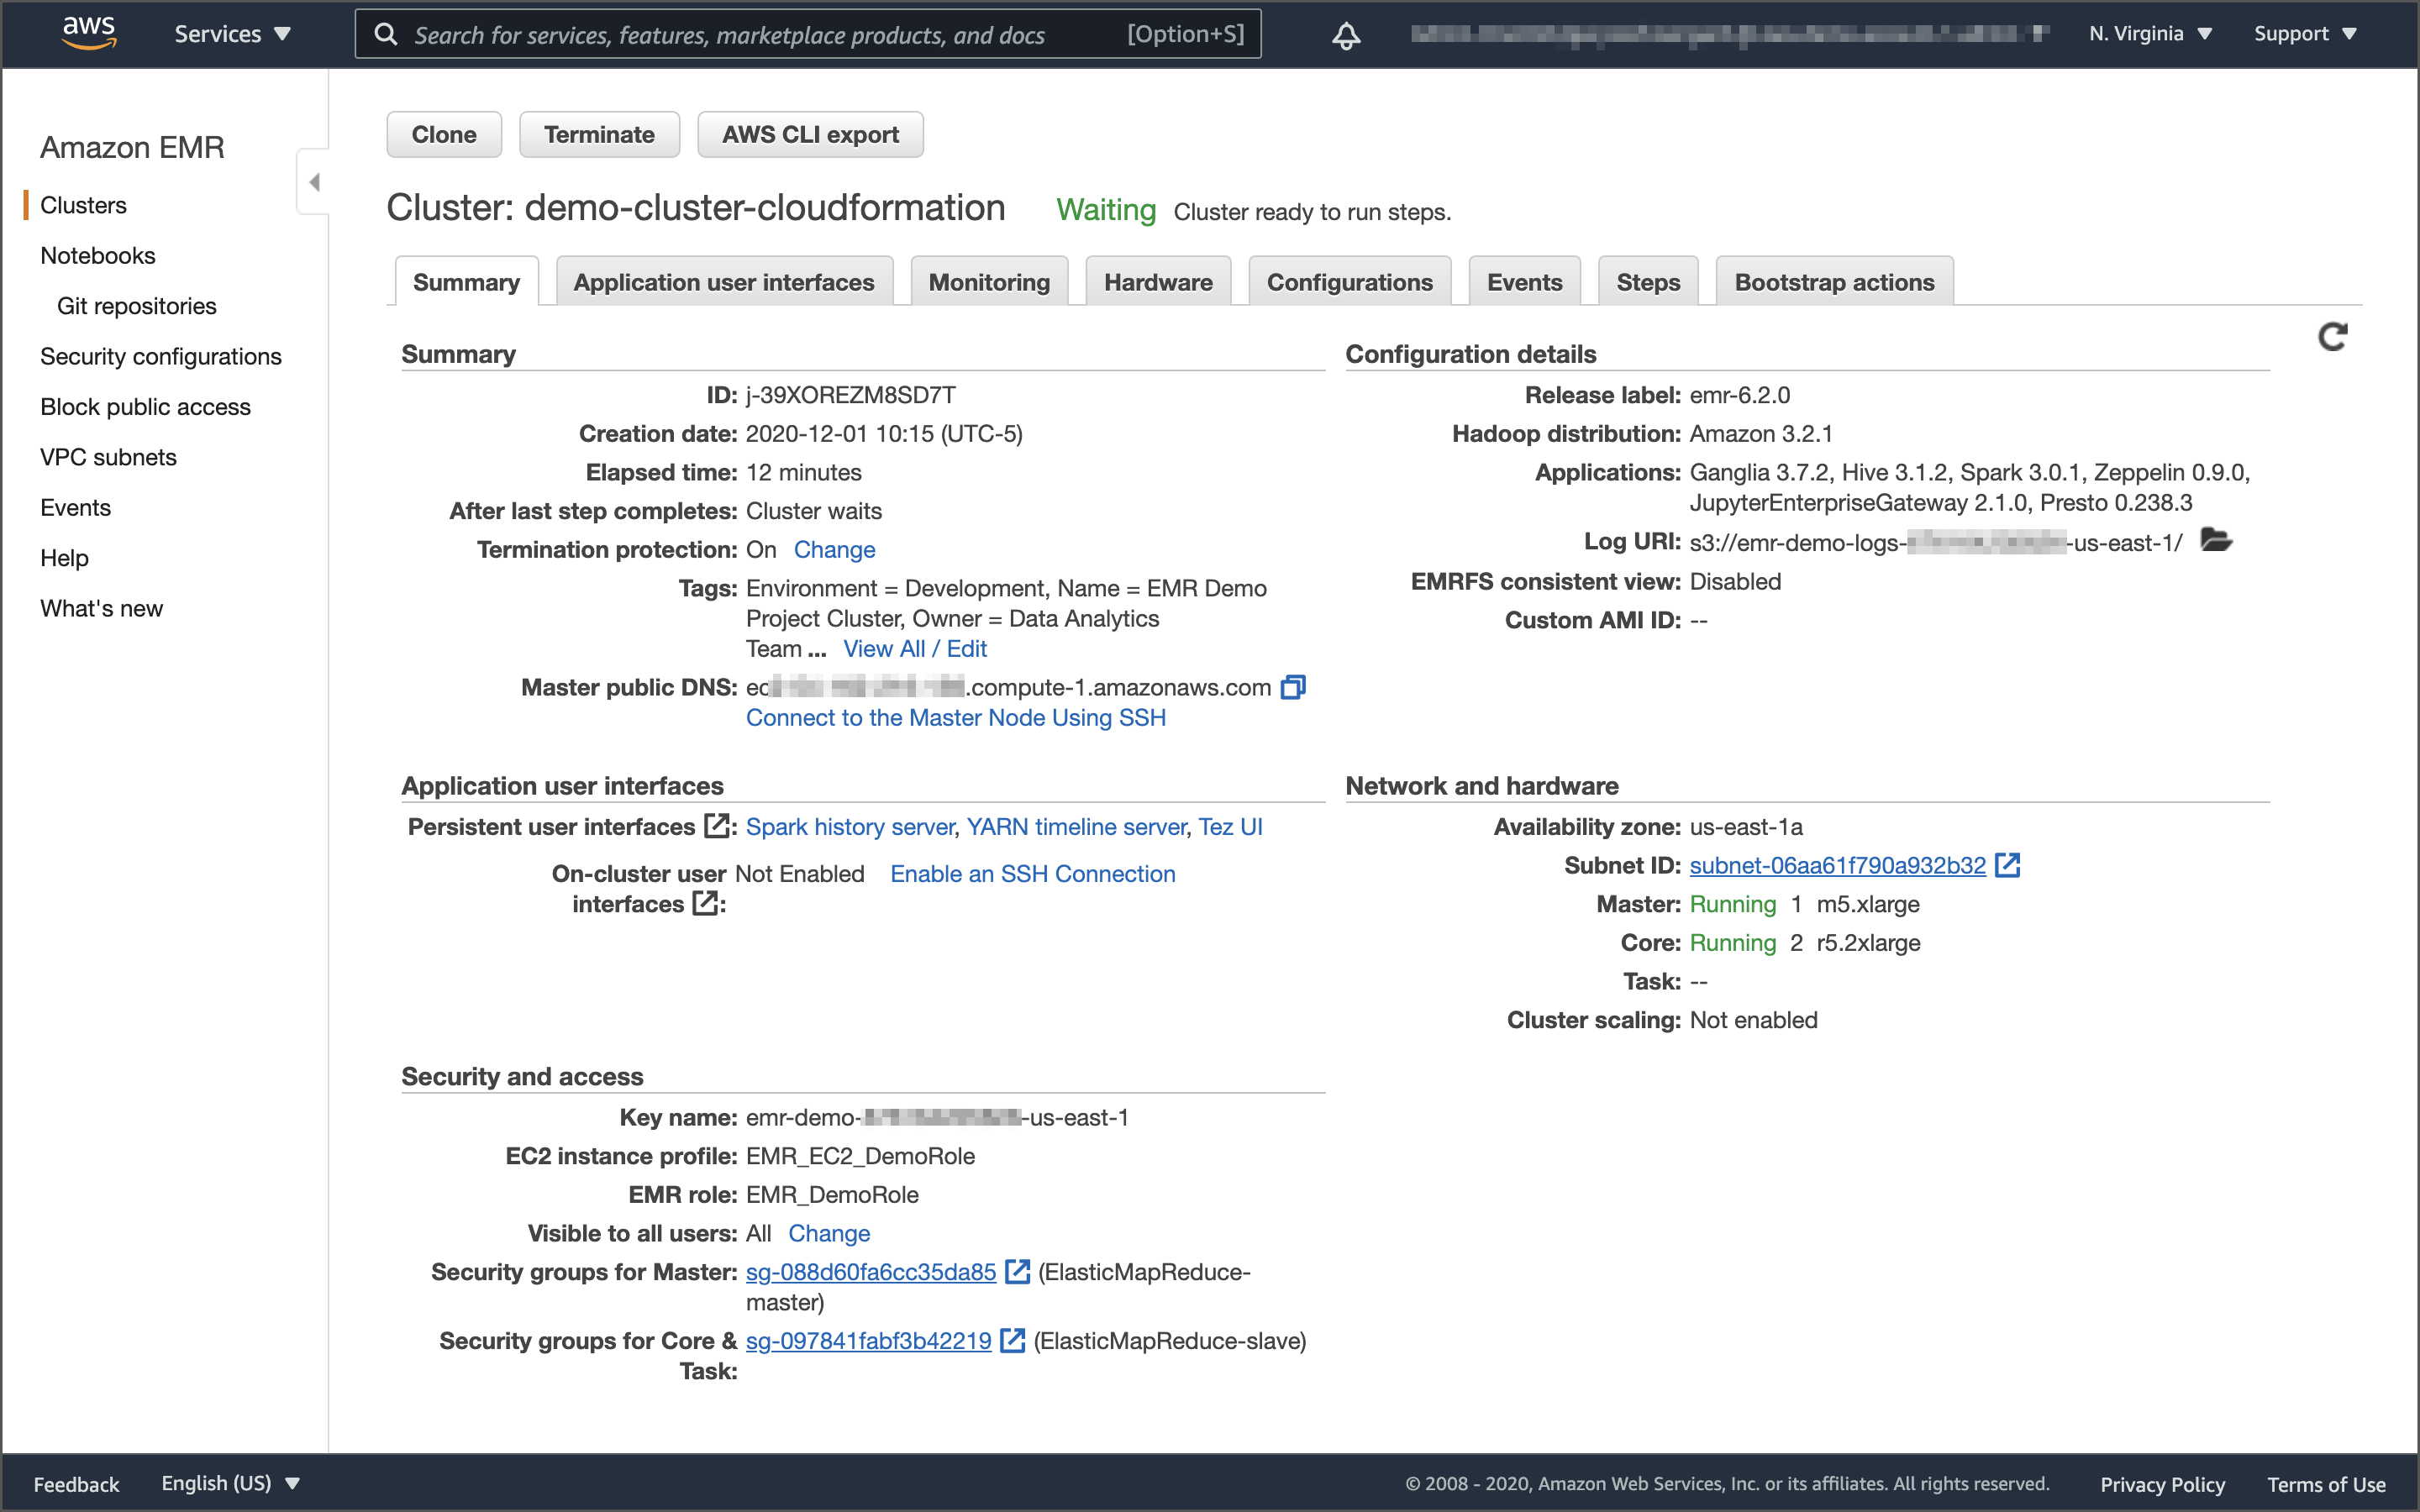
Earlier, we created an inbound rule to allow your IP address to access the Master node on port 22. From the EMR Console’s Cluster Summary tab, note the command necessary to SSH into the Master node of the EMR cluster.

The Python script, submit_spark_ssh.py, shown below, will submit the PySpark job to the EMR Master Node, using paramiko, a Python implementation of SSHv2. The script is replicating the same functionality as the shell-based SSH command above to execute a remote command on the EMR Master Node. The spark-submit command is on lines 36–38, below.
From the GitHub repository’s local copy, run the following command, which will execute a Python script to submit the job. The script requires one input parameter, which is the path to your EC2 key pair (e.g., ~/.ssh/my-key-pair.pem)
python3 ./scripts/submit_spark_ssh.py \
    --ec2-key-path </path/to/my-key-pair.pem>
The spark-submit command will be executed remotely on the EMR cluster’s Master node over SSH. All variables in the commands will be replaced by the environment variables, set in advance, which use AWS CLI emr and ssm commands.

Monitoring Spark Jobs
We set spark.yarn.submit.waitAppCompletion to true. According to Spark’s documentation, this property controls whether the client waits to exit in YARN cluster mode until the application is completed. If set to true, the client process will stay alive, reporting the application’s status. Otherwise, the client process will exit after submission. We can watch the job’s progress from the terminal.

We can also use the YARN Timeline Server and the Spark History Server in addition to the terminal. Links to both are shown on both the EMR Console’s Cluster ‘Summary’ and ‘Application user interfaces’ tabs. Unlike other EMR application web interfaces, using port forwarding, also known as creating an SSH tunnel, is not required for the YARN Timeline Server or the Spark History Server.

YARN Timeline Server
Below, we see that the job we submitted running on the YARN Timeline Server also includes useful tools like access to configuration, local logs, server stacks, and server metrics.

YARN Timeline Server allows us to drill down into individual jobs and view logs. Logs are ideal for troubleshooting failed jobs, especially the stdout logs.

Spark History Server
You can also view the PySpark application we submitted from the Master node using the Spark History Server. Below, we see completed Spark applications (aka Spark jobs) in the Spark History Server.

Below, we see more details about our Spark job using the Spark History Server.

We can even see visual representations of each Spark job’s Directed Acyclic Graph (DAG).

3. Run Job Flow on an Auto-Terminating EMR Cluster
The next option to run PySpark applications on EMR is to create a short-lived, auto-terminating EMR cluster using the run_job_flow method. We will create a new EMR cluster, run a series of Steps (PySpark applications), and then auto-terminate the cluster. This is a cost-effective method of running PySpark applications on-demand.
We will create a second 3-node EMR v6.2.0 cluster to demonstrate this method, using Amazon EC2 Spot instances for all the EMR cluster’s Master and Core nodes. Unlike the first, long-lived, more general-purpose EMR cluster, we will only deploy the Spark application to this cluster as that is the only application we will need to run the Steps.
Using the run_job_flow method, we will execute the four PySpark data analysis applications. The PySpark application’s spark-submit commands are defined in a separate JSON-format file, job_flow_steps_analyze.json. Similar to the previous add_job_flow_steps.py script, this pattern of decoupling the Spark job command and arguments from the execution code, we can define and submit any number of Steps without changing the Python execution script. Also similar, this script retrieves parameter values from the SSM Parameter Store.
From the GitHub repository’s local copy, run the following command, which will execute a Python script to create a new cluster, run the two PySpark applications, and then auto-terminate.
python3 ./scripts/run_job_flow.py --job-type analyze
As shown below, we see the short-lived EMR cluster in the process of terminating after successfully running the PySpark applications as EMR Steps.


4. Using AWS Step Functions
According to AWS, AWS Step Functions is a serverless function orchestrator that makes it easy to sequence AWS Lambda functions and multiple AWS services. Step Functions manages sequencing, error handling, retry logic, and state, removing a significant operational burden from your team. Step Functions is based on state machines and tasks. A state machine is a workflow. A task is a state in a workflow that represents a single unit of work that another AWS service performs. Each step in a workflow is a state. Using AWS Step Functions, we define our workflows as state machines, which transform complex code into easy to understand statements and diagrams.

You can use AWS Step Functions to run PySpark applications as EMR Steps on an existing EMR cluster. Using Step Functions, we can also create the cluster, run multiple EMR Steps sequentially or in parallel, and finally, auto-terminate the cluster.
We will create two state machines for this demo, one for the PySpark data processing applications and one for the PySpark data analysis applications. To create state machines, we first need to create JSON-based state machine definition files. The files are written in Amazon States Language. According to AWS, Amazon States Language is a JSON-based, structured language used to define a state machine, a collection of states that can do work (Task states), determine which states to transition to next (Choice states), stop execution with an error (Fail states), and so on.
The definition files contain specific references to AWS resources deployed to your AWS account originally created by CloudFormation. Below is a snippet of the state machine definition file, step_function_emr_analyze.json, showing part of the configuration of the EMR cluster. Note the parameterized key/value pairs (e.g., “Ec2KeyName.$”: “$.InstancesEc2KeyName” on line 5). The values will come from a JSON-formatted inputs file and are dynamically replaced upon the state machine’s execution.
Python Templating
To automate the process of adding dynamic resource references to the state machine’s inputs files, we will use Jinja, the modern and designer-friendly templating language for Python, modeled after Django’s templates. We will render the Jinja template to a JSON-based state machine inputs file, replacing the template’s resource tags (keys) with values from the SSM Parameter Store’s parameters. Below is a snippet from the inputs file Jinja template, step_function_inputs_analyze.j2.
First, install Jinja2, then create two JSON-based state machine inputs files from the Jinja templates using the included Python file.
# install Jinja2
python3 -m pip install Jinja2

python3 ./scripts/create_inputs_files.py
Below we see the same snippet of the final inputs file. Jinja tags have been replaced with values from the SSM Parameter Store.
Using the definition files, create two state machines using the included Python files.
python3 ./scripts/create_state_machine.py \
    --definition-file step_function_emr_process.json \
    --state-machine EMR-Demo-Process

python3 ./scripts/create_state_machine.py \
    --definition-file step_function_emr_analyze.json \
    --state-machine EMR-Demo-Analysis
Both state machines should appear in the AWS Step Functions Console’s State Machines tab. Below, we see the ‘EMR-Demo-Analysis’ state machine’s definition both as JSON and rendered visually to a layout.
To execute either of the state machines, use the included Python file, passing in the exact name of the state machine to execute, either ‘EMR-Demo-Process’ or ‘EMR-Demo-Analysis’, and the name of the inputs file. I suggest running the EMR-Demo-Analysis version so as not to re-process all the raw data.
python3 ./scripts/execute_state_machine.py \
    --state-machine EMR-Demo-Process \
    --inputs-file step_function_inputs_process.json

python3 ./scripts/execute_state_machine.py \
    --state-machine EMR-Demo-Analysis \
    --inputs-file step_function_inputs_analyze.json
When the PySpark analysis application’s Step Function state machine is executed, a new EMR cluster is created, the PySpark applications are run, and finally, the cluster is auto-terminated. Below, we see a successfully executed state machine, which successfully ran the four PySpark analysis applications in parallel, on a new auto-terminating EMR cluster.

Conclusion
This post explored four methods for running PySpark applications on Amazon Elastic MapReduce (Amazon EMR). The key to scaling data analytics with PySpark on EMR is the use of automation. Therefore, we looked at ways to automate the deployment of EMR resources, create and submit PySpark jobs, and terminate EMR resources when the jobs are complete. Furthermore, we were able to decouple references to dynamic AWS resources within our PySpark applications using parameterization. This allows us to deploy and run PySpark resources across multiple AWS Accounts and AWS Regions without code changes.
In part two of the series, we will explore the use of the recently announced service, Amazon Managed Workflows for Apache Airflow (MWAA), and in part three, the use of Juypter and Zeppelin notebooks for data science, scientific computing, and machine learning on EMR.
This blog represents my own viewpoints and not of my employer, Amazon Web Services. All product names, logos, and brands are the property of their respective owners.

#1 by James Adams on January 29, 2021 - 11:12 am
This is a very thorough, well written article which addresses much of my use case (I have experience running PySpark jobs in Databricks and now I need to use EMR instead). Thank you, Gary!